- Главная
- Разное
- Дизайн
- Бизнес и предпринимательство
- Аналитика
- Образование
- Развлечения
- Красота и здоровье
- Финансы
- Государство
- Путешествия
- Спорт
- Недвижимость
- Армия
- Графика
- Культурология
- Еда и кулинария
- Лингвистика
- Английский язык
- Астрономия
- Алгебра
- Биология
- География
- Детские презентации
- Информатика
- История
- Литература
- Маркетинг
- Математика
- Медицина
- Менеджмент
- Музыка
- МХК
- Немецкий язык
- ОБЖ
- Обществознание
- Окружающий мир
- Педагогика
- Русский язык
- Технология
- Физика
- Философия
- Химия
- Шаблоны, картинки для презентаций
- Экология
- Экономика
- Юриспруденция
Generative Drafting (ISO) презентация
Содержание
- 1. Generative Drafting (ISO)
- 2. Copyright DASSAULT SYSTEMES 2002 Table of Contents
- 3. Copyright DASSAULT SYSTEMES 2002 Table of Contents
- 4. Copyright DASSAULT SYSTEMES 2002 Generative Drafting
- 5. Understanding the general process Accessing the Workbench
- 6. Copyright DASSAULT SYSTEMES 2002 Part Design Assembly
- 7. Copyright DASSAULT SYSTEMES 2002 From 1- Start
- 8. Copyright DASSAULT SYSTEMES 2002 Dimension properties Text
- 9. Copyright DASSAULT SYSTEMES 2002 View Frame View
- 10. Copyright DASSAULT SYSTEMES 2002 Magnifier (on)
- 11. Copyright DASSAULT SYSTEMES 2002 You had a
- 12. Starting a Generative Drawing
- 13. Starting a Generative Drawing You will
- 14. Copyright DASSAULT SYSTEMES 2002 A CATDrawing file
- 15. Copyright DASSAULT SYSTEMES 2002 Ways to Generate
- 16. Copyright DASSAULT SYSTEMES 2002 File Options:
- 17. Copyright DASSAULT SYSTEMES 2002 Setting the Drawing
- 18. Copyright DASSAULT SYSTEMES 2002 Setting First Angle
- 19. Copyright DASSAULT SYSTEMES 2002 Starting a Drawing
- 20. Copyright DASSAULT SYSTEMES 2002 You will learn
- 21. Copyright DASSAULT SYSTEMES 2002 Views can be
- 22. Copyright DASSAULT SYSTEMES 2002 1- View Wizard
- 23. Copyright DASSAULT SYSTEMES 2002 Creating a Front
- 24. Copyright DASSAULT SYSTEMES 2002 Creating a Front
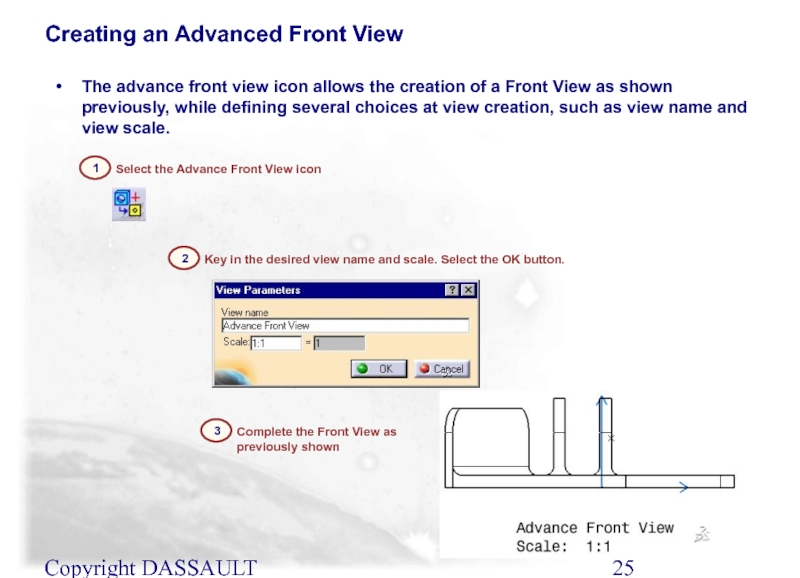
- 25. Copyright DASSAULT SYSTEMES 2002 Creating an Advanced
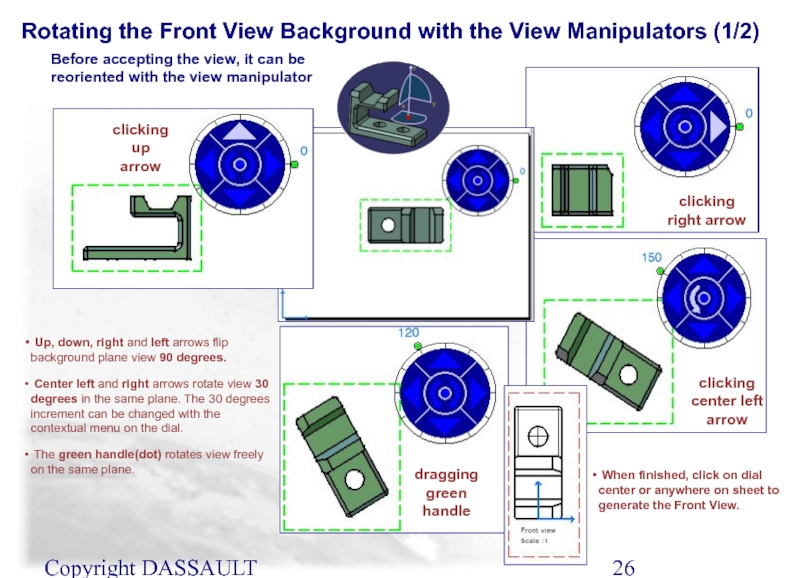
- 26. Copyright DASSAULT SYSTEMES 2002 Rotating the Front
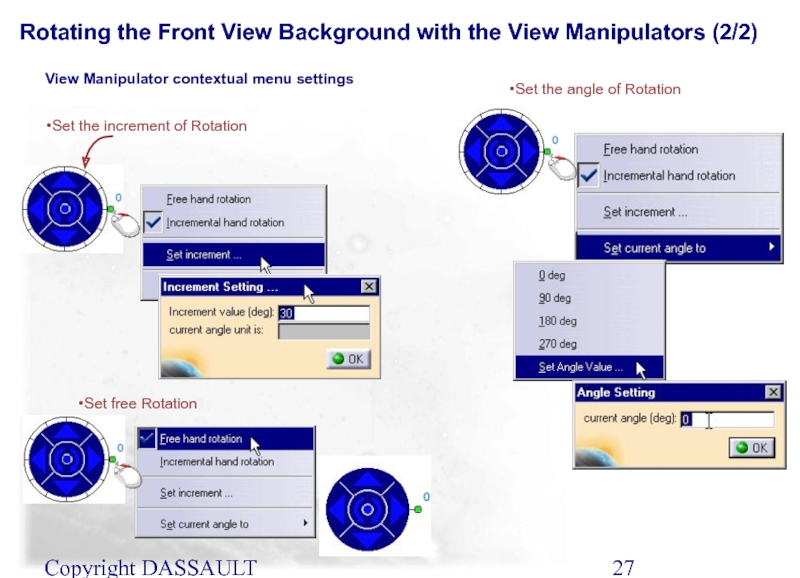
- 27. Copyright DASSAULT SYSTEMES 2002 Set the increment
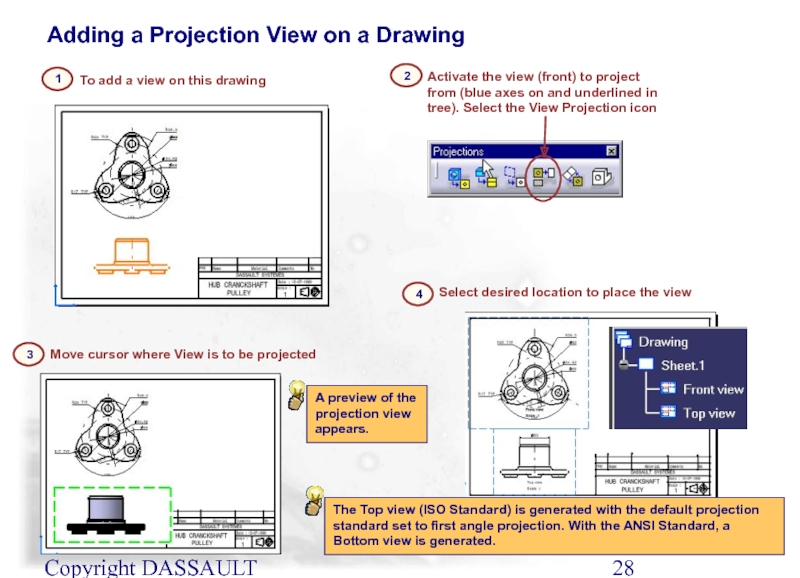
- 28. Copyright DASSAULT SYSTEMES 2002 To add a
- 29. Copyright DASSAULT SYSTEMES 2002 The View Wizard
- 30. Copyright DASSAULT SYSTEMES 2002 Generating Main Views
- 31. Copyright DASSAULT SYSTEMES 2002 Generating Main Views
- 32. Copyright DASSAULT SYSTEMES 2002 Generating Main Views
- 33. Copyright DASSAULT SYSTEMES 2002 How to generate
- 34. In this lesson you will generate section,
- 35. Adding Section Views and Cuts You will
- 36. Copyright DASSAULT SYSTEMES 2002 Simple offset section
- 37. Copyright DASSAULT SYSTEMES 2002 Section View: A
- 38. Copyright DASSAULT SYSTEMES 2002 Front view is
- 39. Copyright DASSAULT SYSTEMES 2002 To add an
- 40. Adding Secondary Views You will learn how
- 41. Copyright DASSAULT SYSTEMES 2002 Secondary Views:
- 42. Copyright DASSAULT SYSTEMES 2002 Secondary Views:
- 43. Copyright DASSAULT SYSTEMES 2002 Detail views can
- 44. Copyright DASSAULT SYSTEMES 2002 To create this
- 45. Copyright DASSAULT SYSTEMES 2002 To create this
- 46. Copyright DASSAULT SYSTEMES 2002 To create this
- 47. Copyright DASSAULT SYSTEMES 2002 To create the
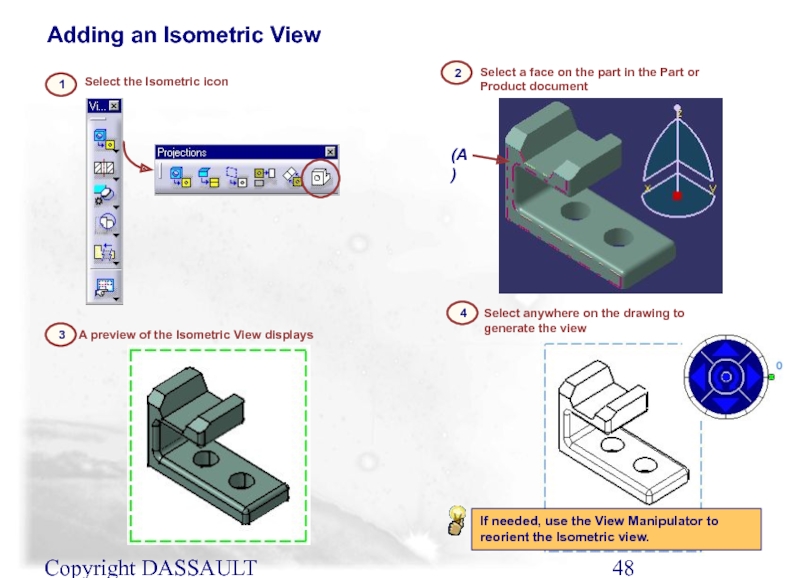
- 48. Copyright DASSAULT SYSTEMES 2002 Select the Isometric
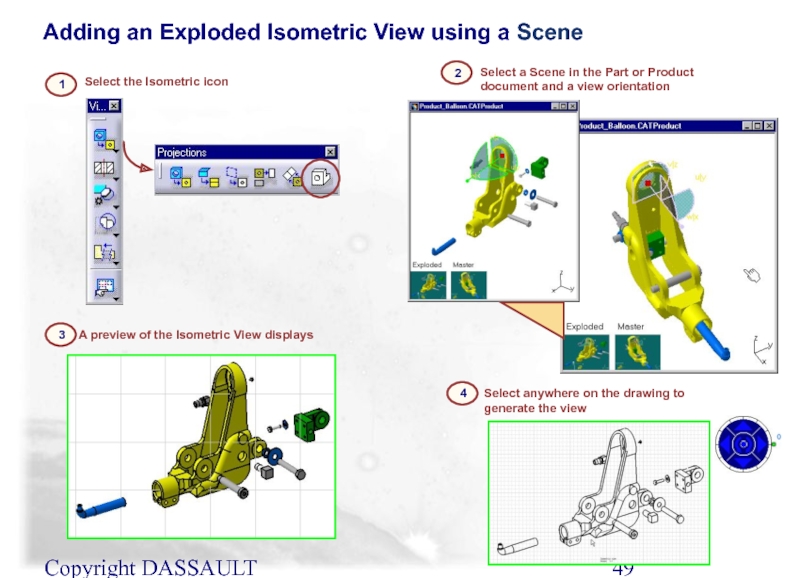
- 49. Copyright DASSAULT SYSTEMES 2002 Select the Isometric
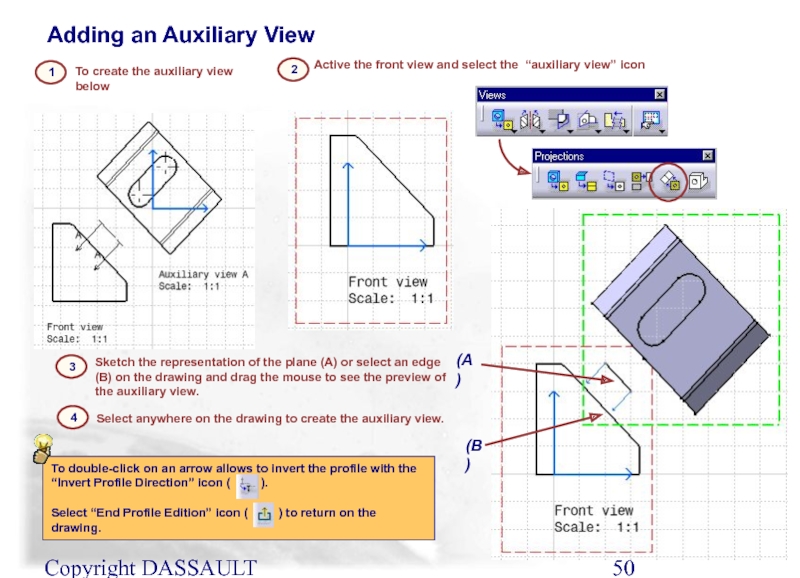
- 50. Copyright DASSAULT SYSTEMES 2002 To create the
- 51. Copyright DASSAULT SYSTEMES 2002 To not generate
- 52. Copyright DASSAULT SYSTEMES 2002 How to add
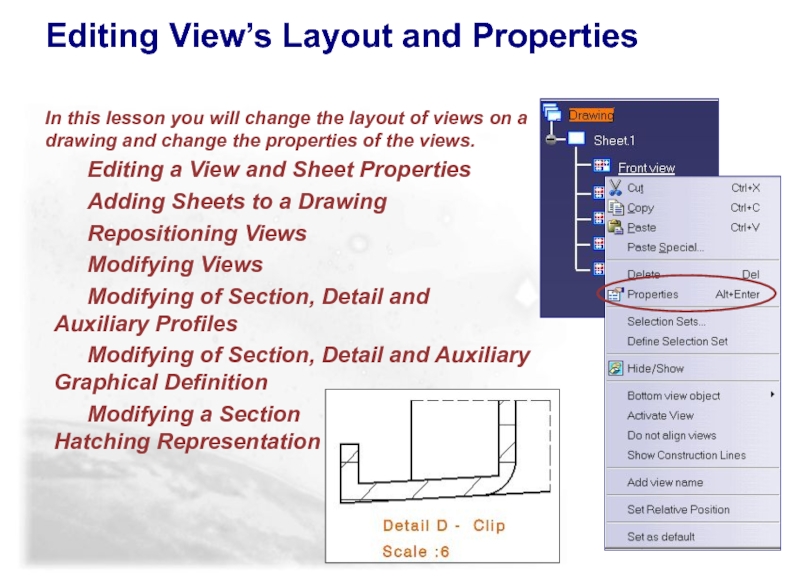
- 53. Editing View’s Layout and Properties In this
- 54. Editing view and sheet properties You will
- 55. Copyright DASSAULT SYSTEMES 2002 View and Sheet
- 56. Copyright DASSAULT SYSTEMES 2002 Select the view
- 57. Copyright DASSAULT SYSTEMES 2002 Select the Sheet
- 58. Adding sheets to a drawing You will
- 59. Copyright DASSAULT SYSTEMES 2002 Sheets are added
- 60. Copyright DASSAULT SYSTEMES 2002 Select the New
- 61. Repositioning Views You will learn how to
- 62. Copyright DASSAULT SYSTEMES 2002 Views can be
- 63. Copyright DASSAULT SYSTEMES 2002 Select the frame
- 64. Copyright DASSAULT SYSTEMES 2002 A view can
- 65. Copyright DASSAULT SYSTEMES 2002 Select « View Positioning »
- 66. Copyright DASSAULT SYSTEMES 2002 Repositioning a view
- 67. Copyright DASSAULT SYSTEMES 2002 Select the view
- 68. Copyright DASSAULT SYSTEMES 2002 1 Cut the
- 69. Modifying Views You will learn how to
- 70. Copyright DASSAULT SYSTEMES 2002 They can be
- 71. Copyright DASSAULT SYSTEMES 2002 Select OK to
- 72. Copyright DASSAULT SYSTEMES 2002 Duplicating elements in
- 73. Copyright DASSAULT SYSTEMES 2002 Product Part Filtering
- 74. Copyright DASSAULT SYSTEMES 2002 Product Part Filtering
- 75. Copyright DASSAULT SYSTEMES 2002 Product Part Filtering
- 76. Copyright DASSAULT SYSTEMES 2002 Product Filtering Management
- 77. Modifying of Section, Detail, Auxiliary Views You
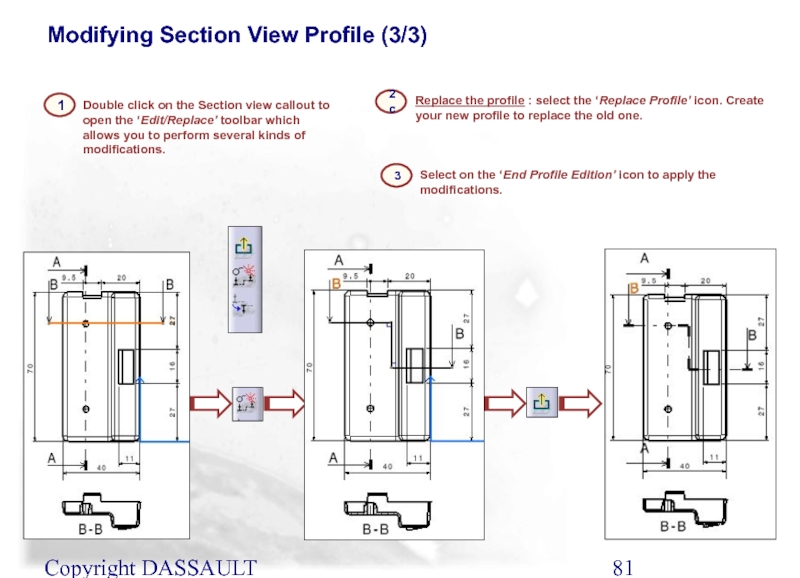
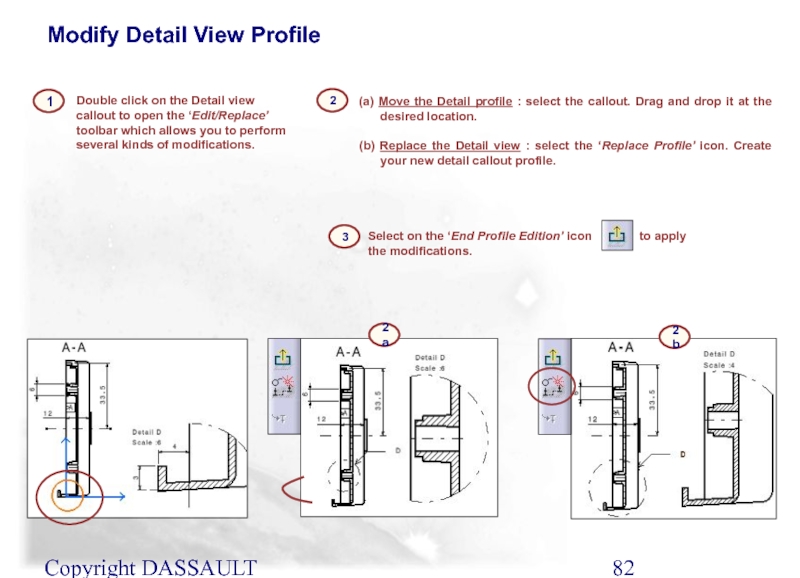
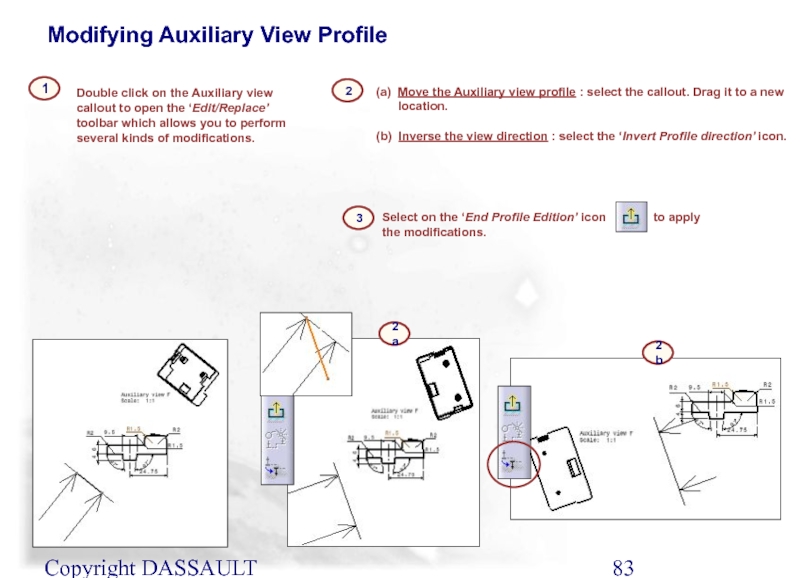
- 78. Copyright DASSAULT SYSTEMES 2002 The design of
- 79. Copyright DASSAULT SYSTEMES 2002 Double click on
- 80. Copyright DASSAULT SYSTEMES 2002 Double click on
- 81. Copyright DASSAULT SYSTEMES 2002 2c 1 Replace
- 82. Copyright DASSAULT SYSTEMES 2002 2 Double click
- 83. Copyright DASSAULT SYSTEMES 2002 2 Double click
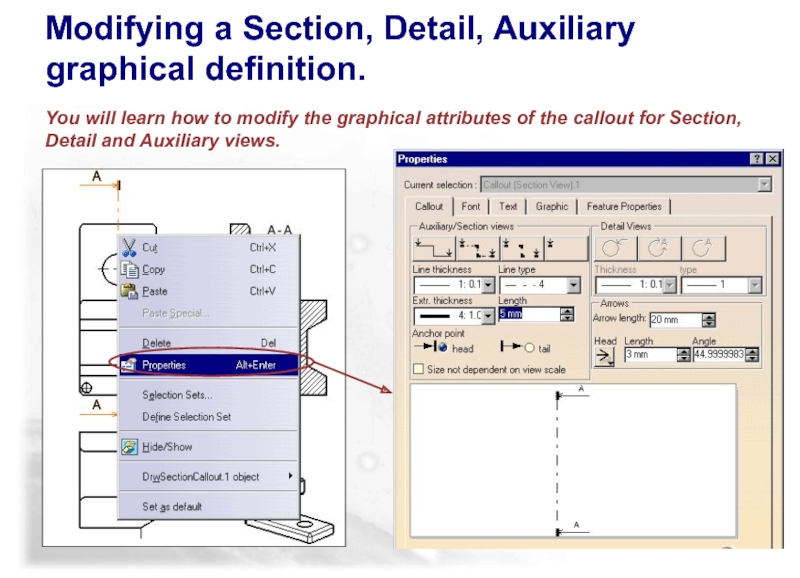
- 84. Modifying a Section, Detail, Auxiliary graphical
- 85. Copyright DASSAULT SYSTEMES 2002 According to your
- 86. Copyright DASSAULT SYSTEMES 2002 2 Select (or
- 87. Copyright DASSAULT SYSTEMES 2002 2 Select (or
- 88. Copyright DASSAULT SYSTEMES 2002 2 1 Select
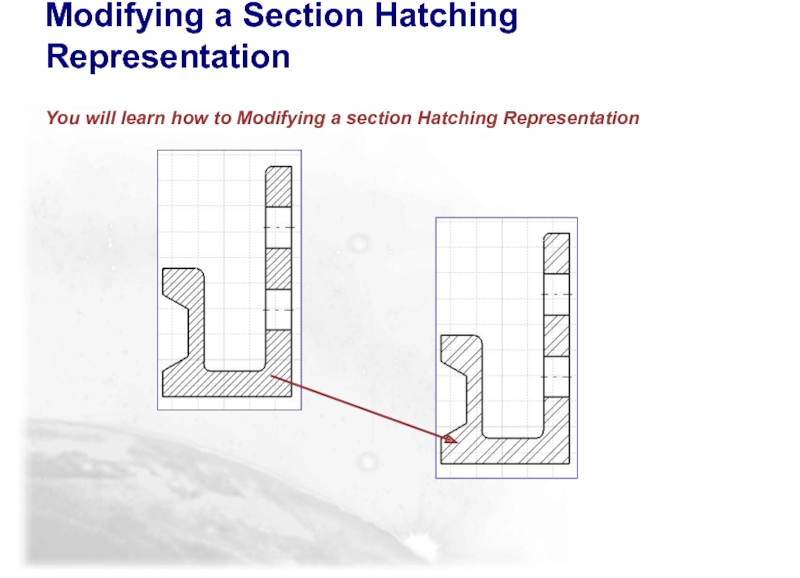
- 89. Modifying a Section Hatching Representation You
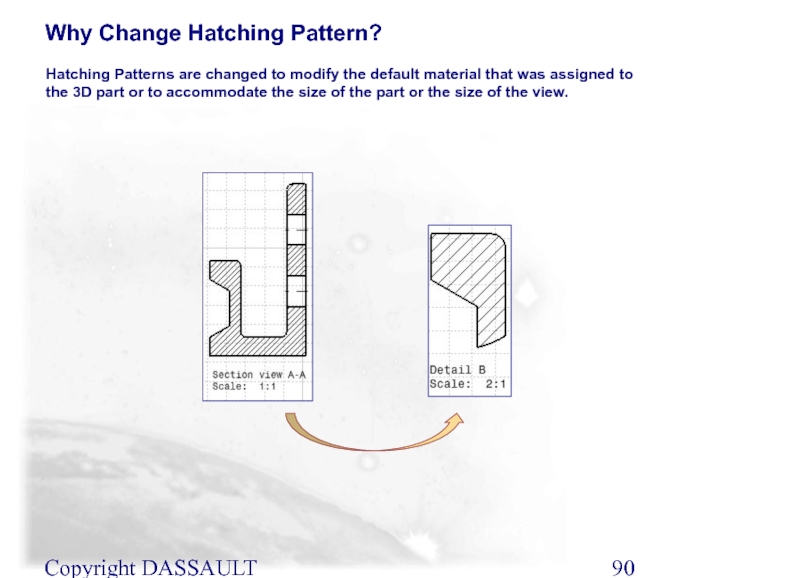
- 90. Copyright DASSAULT SYSTEMES 2002 Hatching Patterns are
- 91. Copyright DASSAULT SYSTEMES 2002 To change the
- 92. Copyright DASSAULT SYSTEMES 2002 Using the Next
- 93. Copyright DASSAULT SYSTEMES 2002 In this lesson
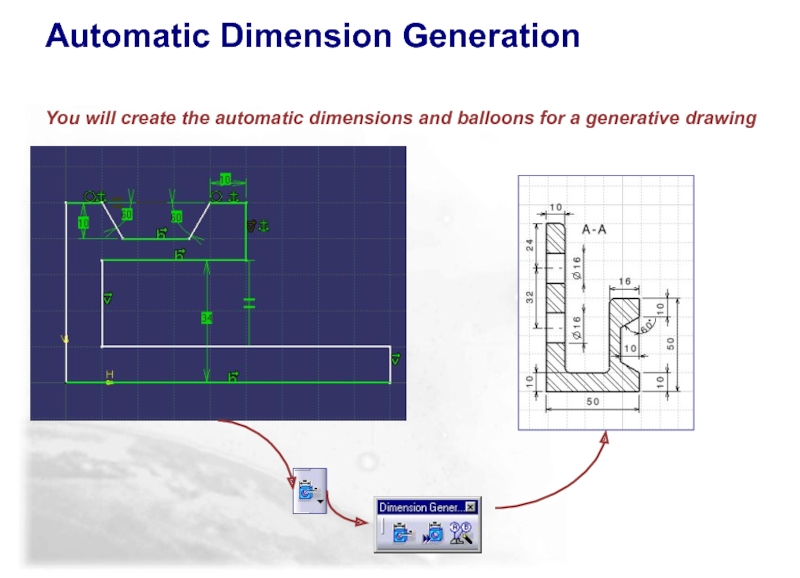
- 94. Automatic Dimension Generation You will create the automatic dimensions and balloons for a generative drawing
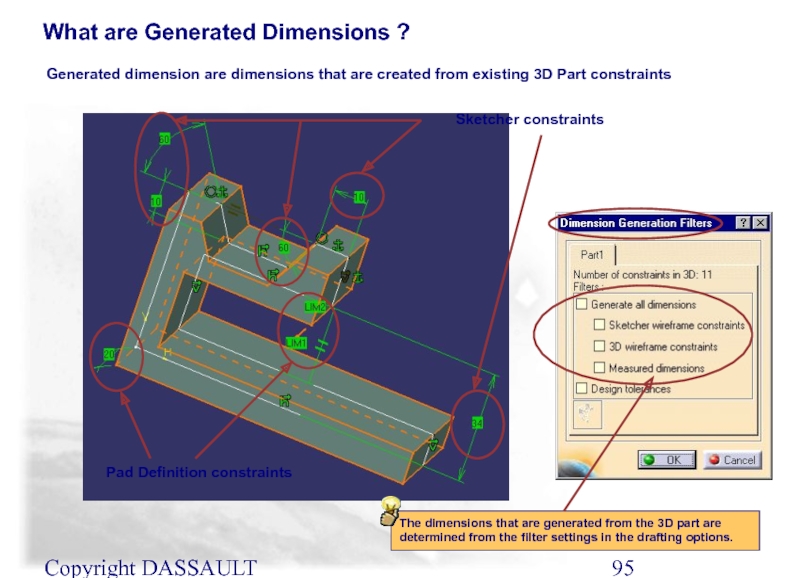
- 95. Copyright DASSAULT SYSTEMES 2002 What are Generated
- 96. Copyright DASSAULT SYSTEMES 2002 Generated Dimensions ...
- 97. Copyright DASSAULT SYSTEMES 2002 One Step Dimensioning
- 98. Copyright DASSAULT SYSTEMES 2002 Step by Step
- 99. Copyright DASSAULT SYSTEMES 2002 Dimensioning Generation in
- 100. Copyright DASSAULT SYSTEMES 2002 Automatic Positioning of
- 101. Copyright DASSAULT SYSTEMES 2002 Dimensioning Generation Step
- 102. Copyright DASSAULT SYSTEMES 2002 Dimension Interference Analysis…
- 103. Copyright DASSAULT SYSTEMES 2002 Analyzing the Interference
- 104. Copyright DASSAULT SYSTEMES 2002 Analyzing the Interference
- 105. Copyright DASSAULT SYSTEMES 2002 Balloons Creates balloon
- 106. Copyright DASSAULT SYSTEMES 2002 Dimension Associativity If
- 107. Copyright DASSAULT SYSTEMES 2002 To Sum Up…
- 108. Finalizing the Drawing and Printing In this
- 109. Checking for Changes You will learn how
- 110. Copyright DASSAULT SYSTEMES 2002 Select the update
- 111. Copyright DASSAULT SYSTEMES 2002 Checking Links to
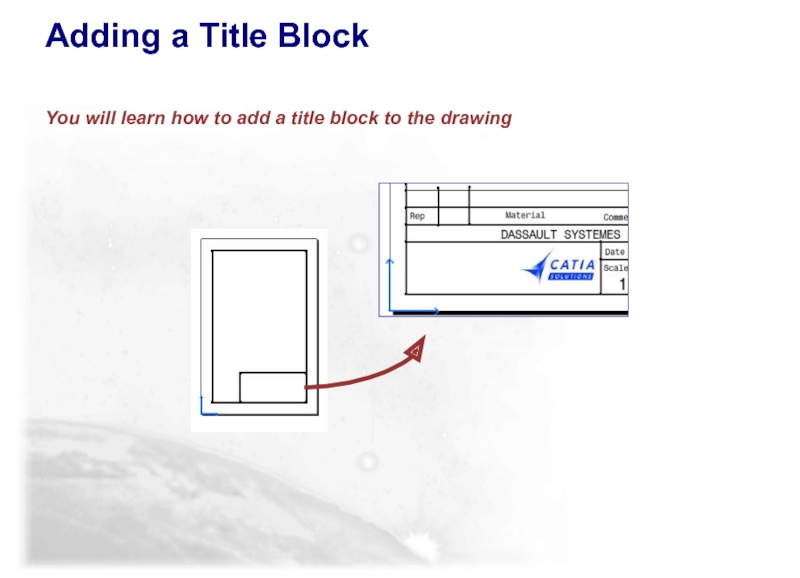
- 112. Adding a Title Block You will learn
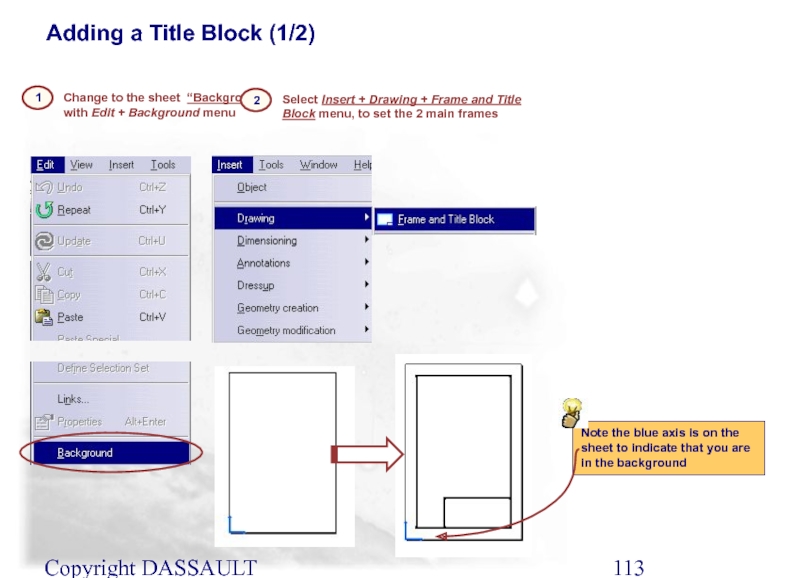
- 113. Copyright DASSAULT SYSTEMES 2002 Change to the
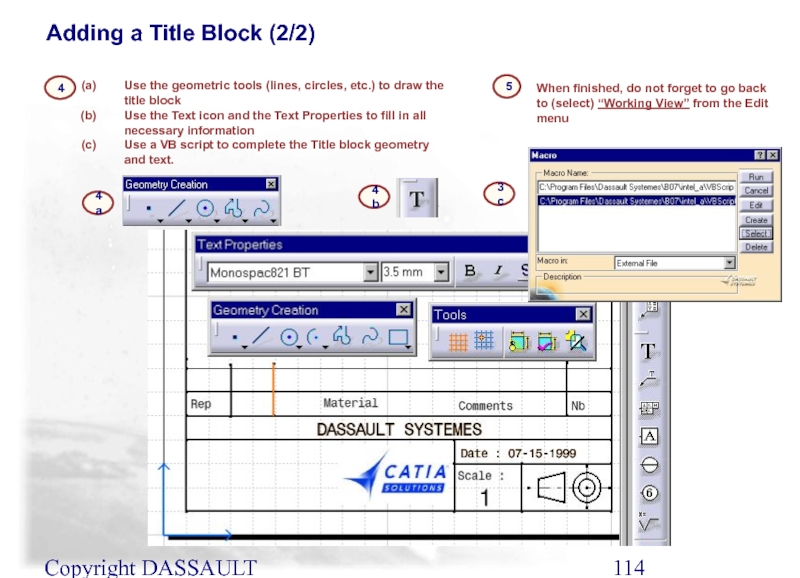
- 114. Copyright DASSAULT SYSTEMES 2002 Use the geometric
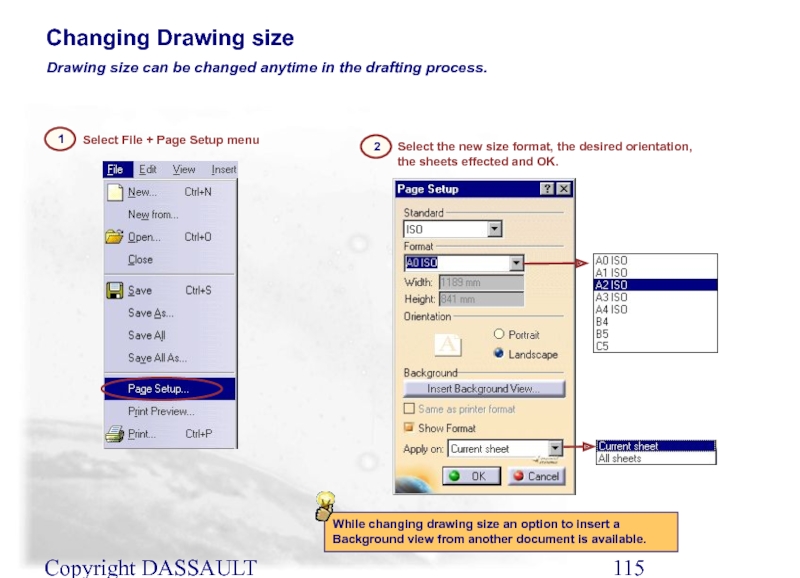
- 115. Copyright DASSAULT SYSTEMES 2002 Select File +
- 116. Adding a BOM (Bill of Material) You
- 117. Copyright DASSAULT SYSTEMES 2002 Adding a BOM
- 118. Copyright DASSAULT SYSTEMES 2002 Adding a BOM
- 119. Printing the Drawing You will learn how to Print the drawing
- 120. Copyright DASSAULT SYSTEMES 2002 From the
- 121. Copyright DASSAULT SYSTEMES 2002 Print User Interface
- 122. Copyright DASSAULT SYSTEMES 2002 Three options
- 123. Copyright DASSAULT SYSTEMES 2002 In this lesson
- 124. You will learn how to set the session’s default drafting options Setting Drafting Options
- 125. Copyright DASSAULT SYSTEMES 2002 There are primarily
- 126. Copyright DASSAULT SYSTEMES 2002 General Options (1/2)
- 127. Copyright DASSAULT SYSTEMES 2002 General Options (2/2)
- 128. Copyright DASSAULT SYSTEMES 2002 Layout Options Set
- 129. Copyright DASSAULT SYSTEMES 2002 Generation Options Set
- 130. Copyright DASSAULT SYSTEMES 2002 Geometry Options Set
- 131. Copyright DASSAULT SYSTEMES 2002 Dimension Options Manual
- 132. Copyright DASSAULT SYSTEMES 2002 Dimension Manipulators
- 133. Copyright DASSAULT SYSTEMES 2002 Annotation Options
- 134. Copyright DASSAULT SYSTEMES 2002 Drawing Standard Drawing
- 135. Copyright DASSAULT SYSTEMES 2002 How to set
- 136. You will learn how to take advantage
- 137. Copyright DASSAULT SYSTEMES 2002 3D Viewer
- 138. Copyright DASSAULT SYSTEMES 2002 The Standards File
- 139. Copyright DASSAULT SYSTEMES 2002 2 Set the
- 140. Copyright DASSAULT SYSTEMES 2002 3 Generate the
- 141. Copyright DASSAULT SYSTEMES 2002 3 Note the
- 142. Copyright DASSAULT SYSTEMES 2002 3 When the
- 143. Copyright DASSAULT SYSTEMES 2002 How to set
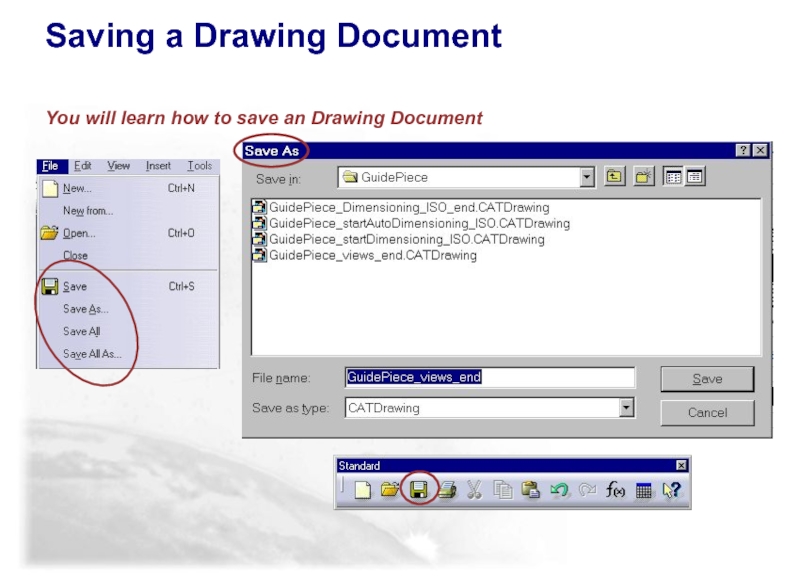
- 144. Saving a Drawing Document You will learn
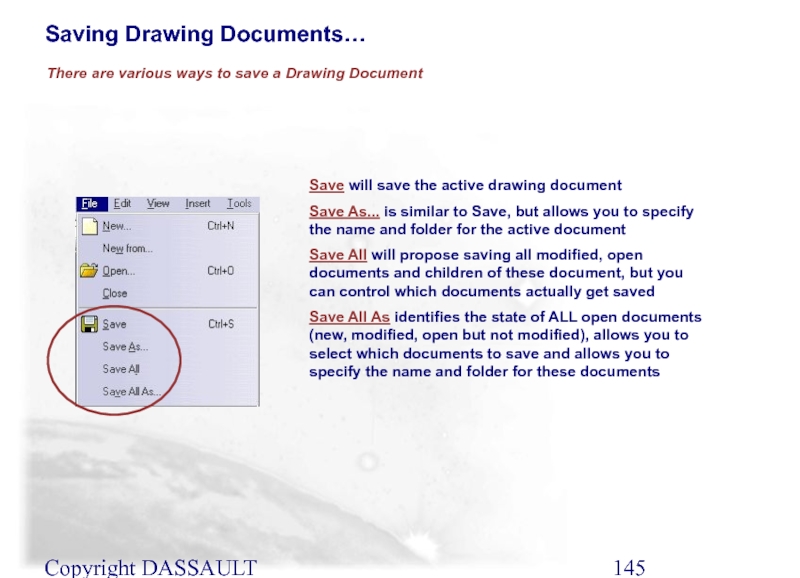
- 145. Copyright DASSAULT SYSTEMES 2002 There are various
- 146. Copyright DASSAULT SYSTEMES 2002 When a generated
- 147. Copyright DASSAULT SYSTEMES 2002 How to save
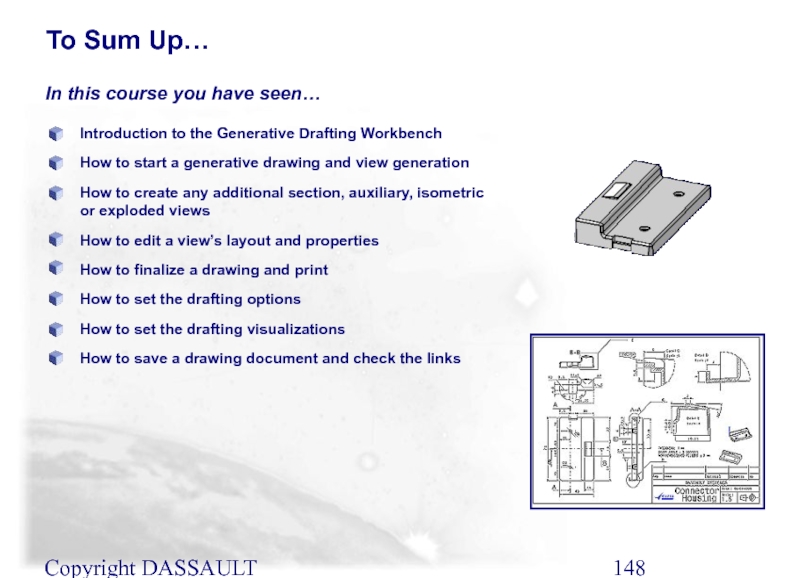
- 148. Copyright DASSAULT SYSTEMES 2002 Introduction to the
Слайд 1Copyright DASSAULT SYSTEMES 2002
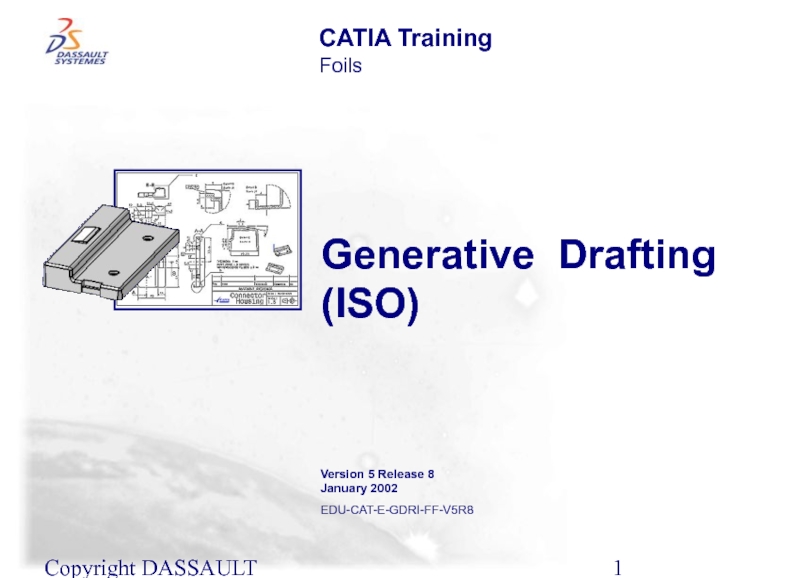
Generative Drafting (ISO)
CATIA Training
Foils
Version 5 Release 8
January
EDU-CAT-E-GDRI-FF-V5R8
Слайд 2Copyright DASSAULT SYSTEMES 2002
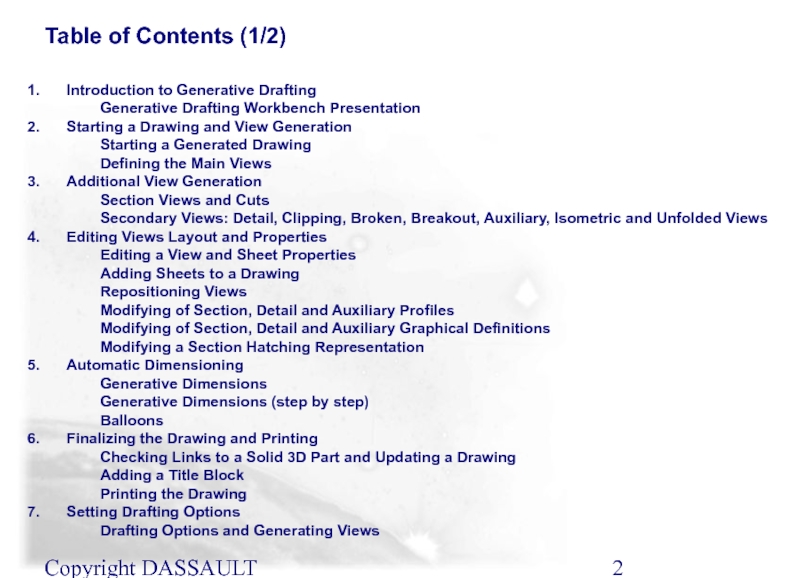
Table of Contents (1/2)
Introduction to Generative Drafting
Generative Drafting
Starting a Drawing and View Generation
Starting a Generated Drawing
Defining the Main Views
Additional View Generation
Section Views and Cuts
Secondary Views: Detail, Clipping, Broken, Breakout, Auxiliary, Isometric and Unfolded Views
Editing Views Layout and Properties
Editing a View and Sheet Properties
Adding Sheets to a Drawing
Repositioning Views
Modifying of Section, Detail and Auxiliary Profiles
Modifying of Section, Detail and Auxiliary Graphical Definitions
Modifying a Section Hatching Representation
Automatic Dimensioning
Generative Dimensions
Generative Dimensions (step by step)
Balloons
Finalizing the Drawing and Printing
Checking Links to a Solid 3D Part and Updating a Drawing
Adding a Title Block
Printing the Drawing
Setting Drafting Options
Drafting Options and Generating Views
Слайд 3Copyright DASSAULT SYSTEMES 2002
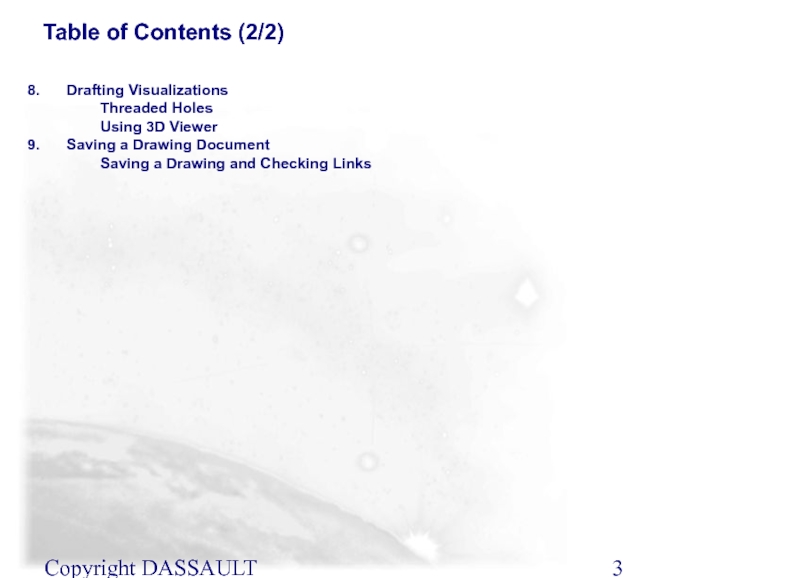
Table of Contents (2/2)
Drafting Visualizations
Threaded Holes
Using 3D Viewer
Saving
Saving a Drawing and Checking Links
Слайд 4Copyright DASSAULT SYSTEMES 2002
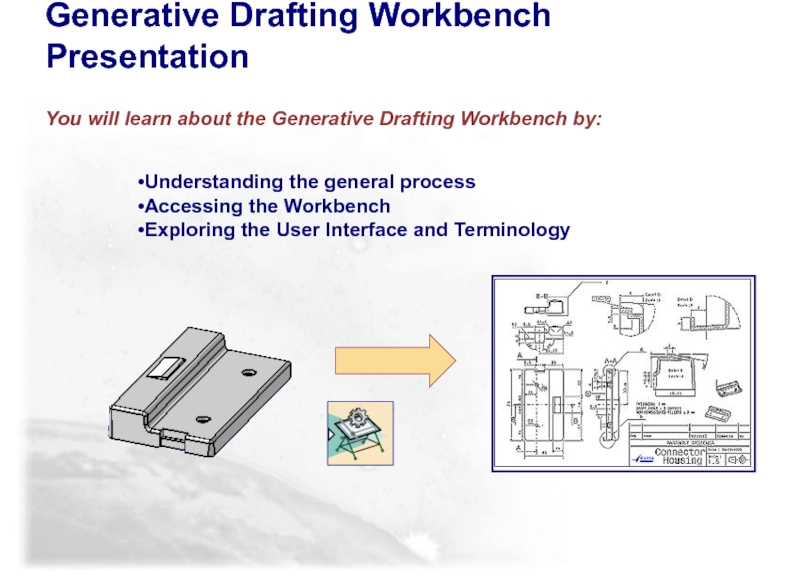
Generative Drafting Workbench Presentation
Introduction To Generative Drafting
You will
Слайд 5Understanding the general process
Accessing the Workbench
Exploring the User Interface and Terminology
Generative
You will learn about the Generative Drafting Workbench by:
Слайд 6Copyright DASSAULT SYSTEMES 2002
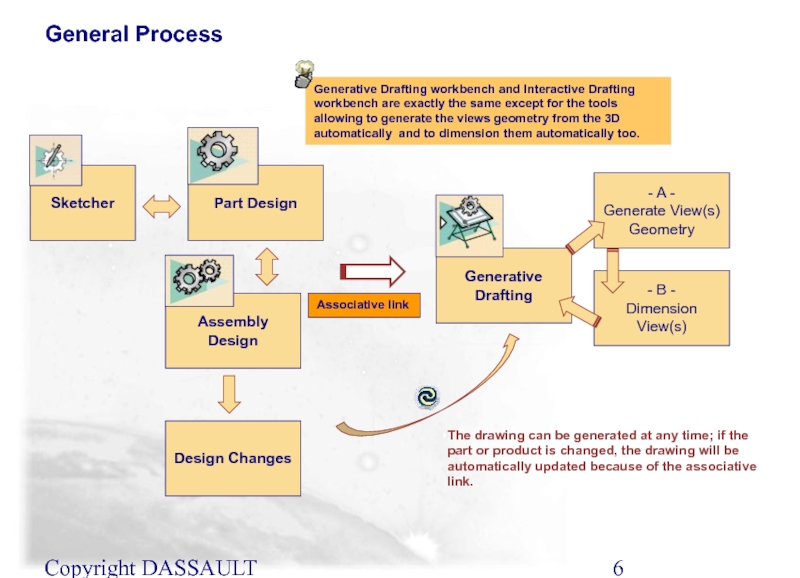
Part Design
Assembly Design
Generative Drafting
The drawing can be generated
Design Changes
- A -
Generate View(s) Geometry
- B -
Dimension View(s)
Generative Drafting workbench and Interactive Drafting workbench are exactly the same except for the tools allowing to generate the views geometry from the 3D automatically and to dimension them automatically too.
Sketcher
Associative link
General Process
Слайд 7Copyright DASSAULT SYSTEMES 2002
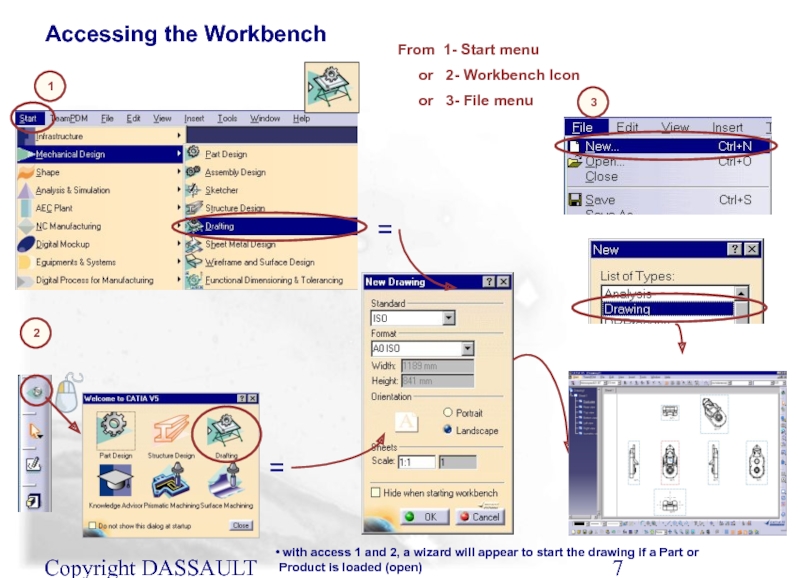
From 1- Start menu
or
or 3- File menu
with access 1 and 2, a wizard will appear to start the drawing if a Part or Product is loaded (open)
1
2
3
Accessing the Workbench
=
=
Слайд 8Copyright DASSAULT SYSTEMES 2002
Dimension properties
Text properties
Set Default Switch
Graphic Properties
Drafting Toolbars and
1
2
3
4
5
6
7
8
1 -
2 -
3 -
4 -
5 -
6 -
7 -
8 -
Each toolbar contains objects that are related to specific tasks.
Objects within these toolbars are compressed and can be expanded for additional capability by selecting the
Слайд 9Copyright DASSAULT SYSTEMES 2002
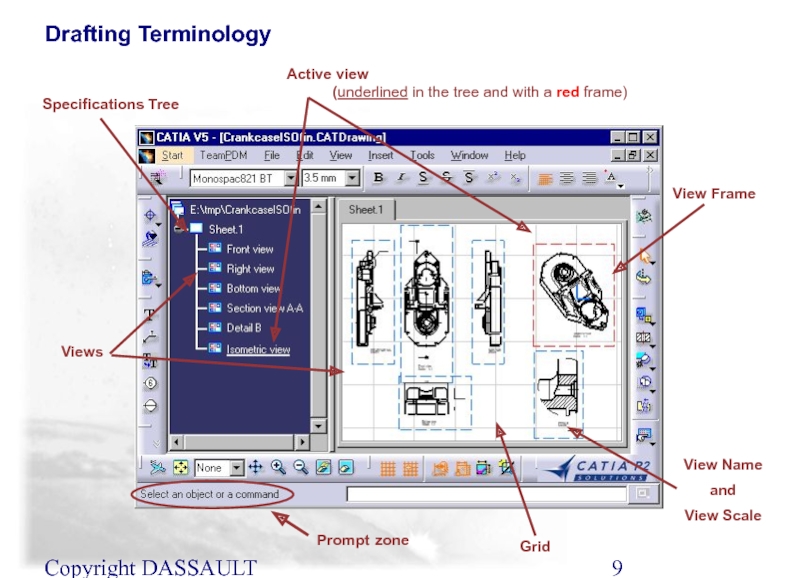
View Frame
View Name
and
View Scale
Grid
Active view
Specifications Tree
Views
Prompt zone
Drafting Terminology
Слайд 10Copyright DASSAULT SYSTEMES 2002
Magnifier (on)
(View Menu)
Drawing Overview (on)
View
Step by step Dimension Generation
Generative Drafting (P2 Power Tools)
Слайд 11Copyright DASSAULT SYSTEMES 2002
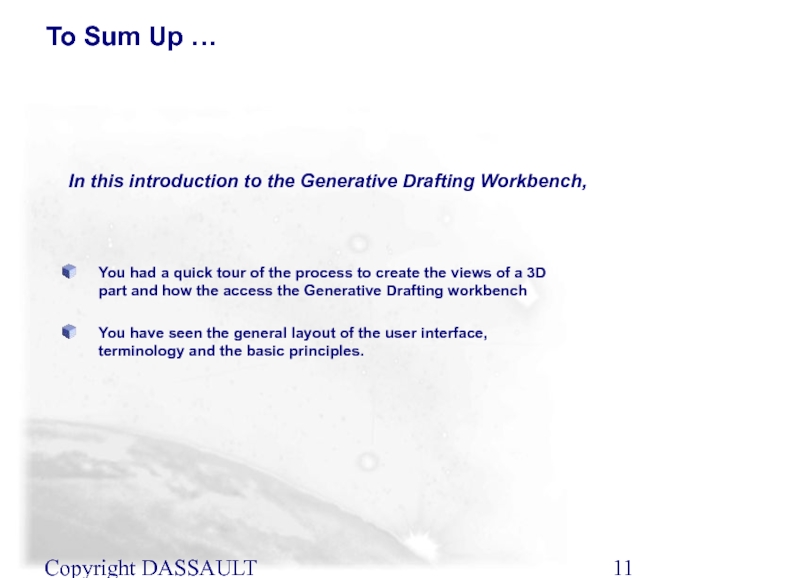
You had a quick tour of the process
You have seen the general layout of the user interface, terminology and the basic principles.
In this introduction to the Generative Drafting Workbench,
To Sum Up …
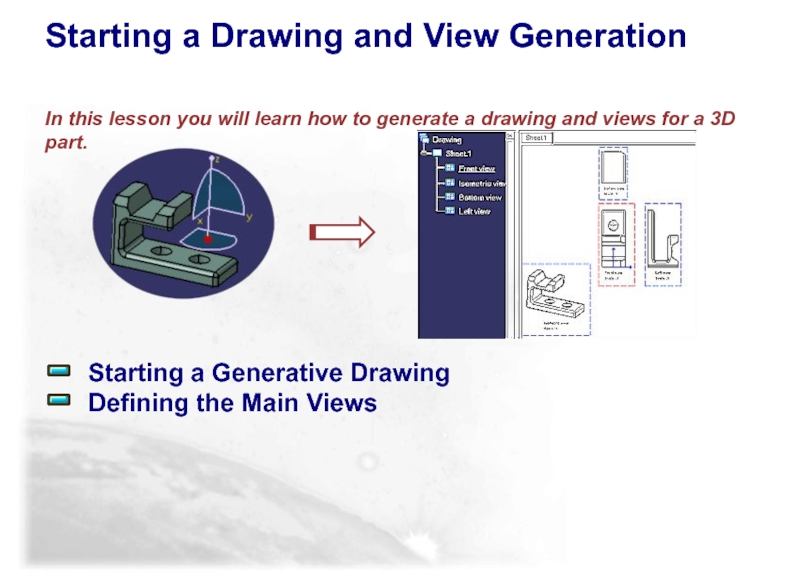
Слайд 12 Starting a Generative Drawing
Defining the Main Views
Starting
In this lesson you will learn how to generate a drawing and views for a 3D part.
Слайд 13Starting a Generative Drawing
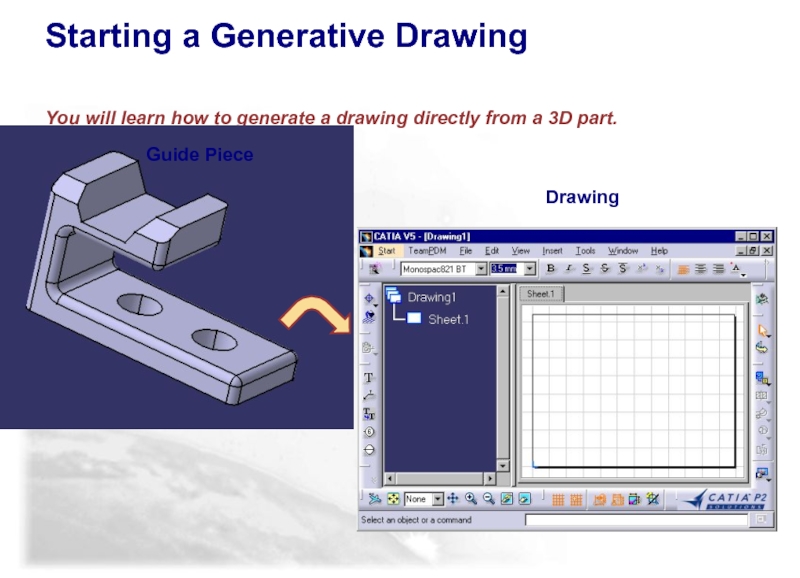
You will learn how to generate a
Guide Piece
Drawing
Слайд 14Copyright DASSAULT SYSTEMES 2002
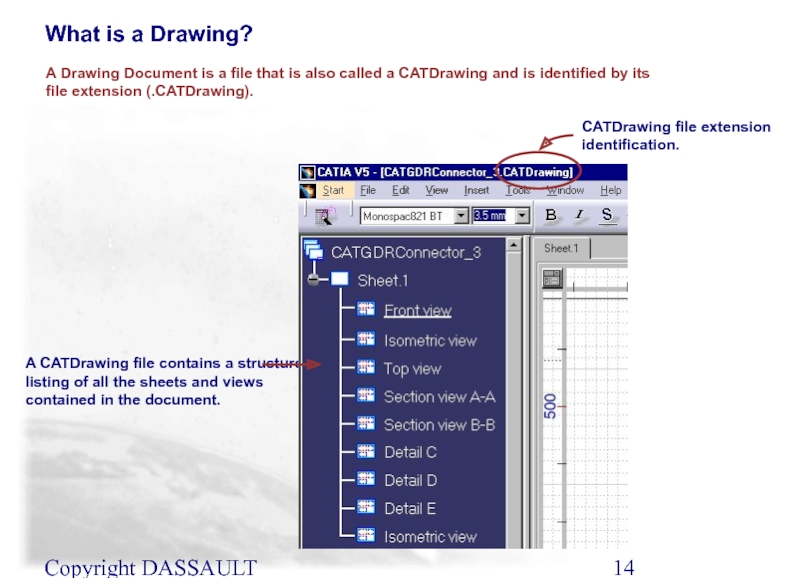
A CATDrawing file contains a structure listing of
A Drawing Document is a file that is also called a CATDrawing and is identified by its file extension (.CATDrawing).
CATDrawing file extension identification.
What is a Drawing?
Слайд 15Copyright DASSAULT SYSTEMES 2002
Ways to Generate a Drawing
1- File menu
2-
3- Workbench Icon
4- New Icon
Drawing Documents (CATDrawing) can be created in various ways.
2
1
4
3
How to Start a Generative Drawing from a CATPart?
Слайд 16Copyright DASSAULT SYSTEMES 2002
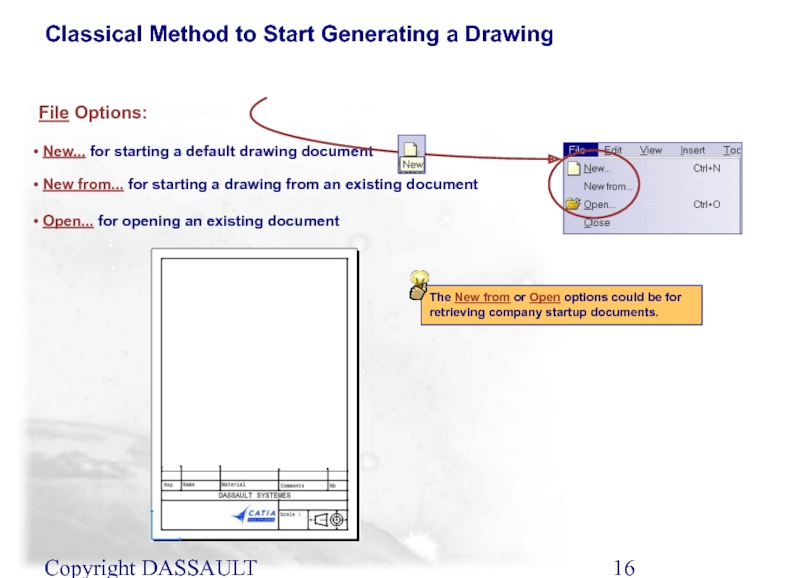
File Options:
New... for starting a default
New from... for starting a drawing from an existing document
Open... for opening an existing document
The New from or Open options could be for retrieving company startup documents.
Classical Method to Start Generating a Drawing
Слайд 17Copyright DASSAULT SYSTEMES 2002
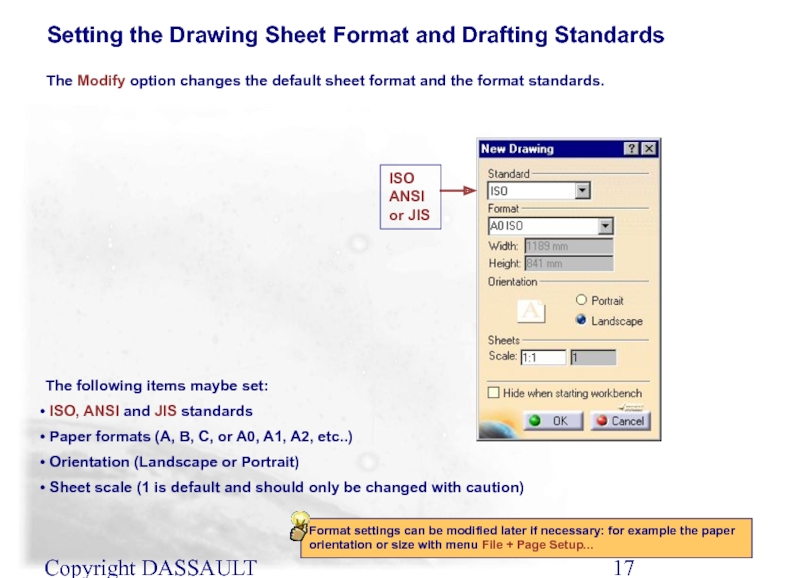
Setting the Drawing Sheet Format and Drafting Standards
The
The following items maybe set:
ISO, ANSI and JIS standards
Paper formats (A, B, C, or A0, A1, A2, etc..)
Orientation (Landscape or Portrait)
Sheet scale (1 is default and should only be changed with caution)
ISO
ANSI
or JIS
Format settings can be modified later if necessary: for example the paper orientation or size with menu File + Page Setup...
Слайд 18Copyright DASSAULT SYSTEMES 2002
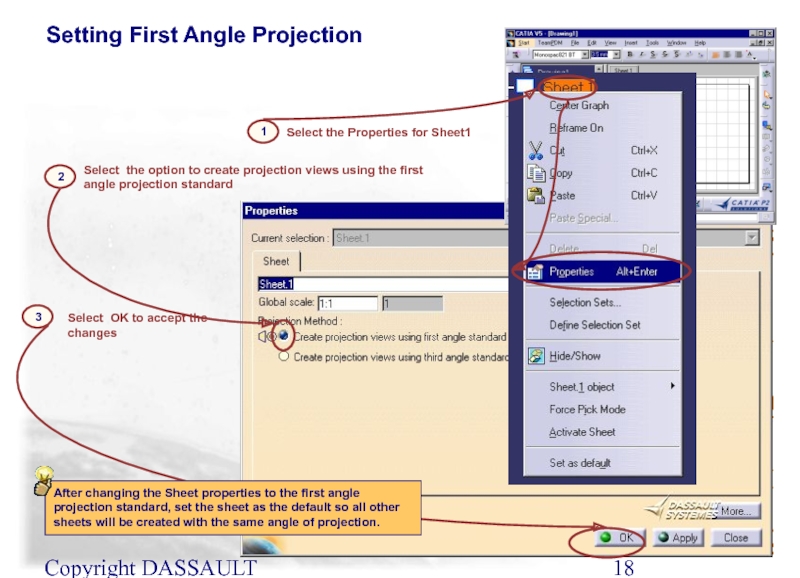
Setting First Angle Projection
2
1
Select the Properties for Sheet1
Select
3
Select OK to accept the changes
After changing the Sheet properties to the first angle projection standard, set the sheet as the default so all other sheets will be created with the same angle of projection.
Слайд 19Copyright DASSAULT SYSTEMES 2002
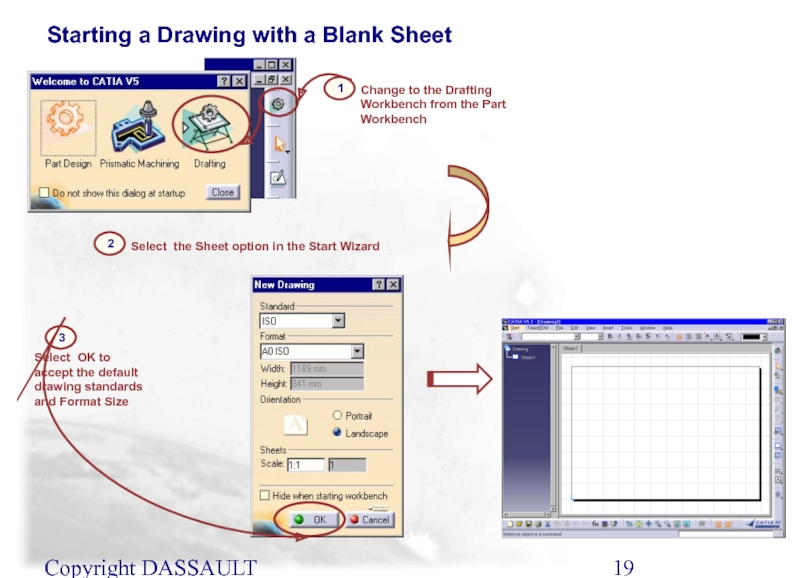
Starting a Drawing with a Blank Sheet
2
1
Change to
Select the Sheet option in the Start Wizard
3
Select OK to accept the default drawing standards and Format Size
Слайд 20Copyright DASSAULT SYSTEMES 2002
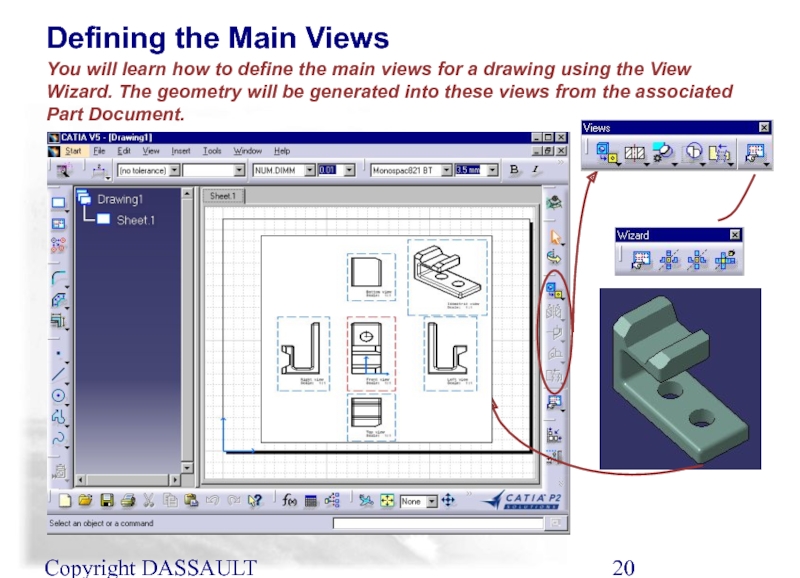
You will learn how to define the main
Defining the Main Views
Слайд 21Copyright DASSAULT SYSTEMES 2002
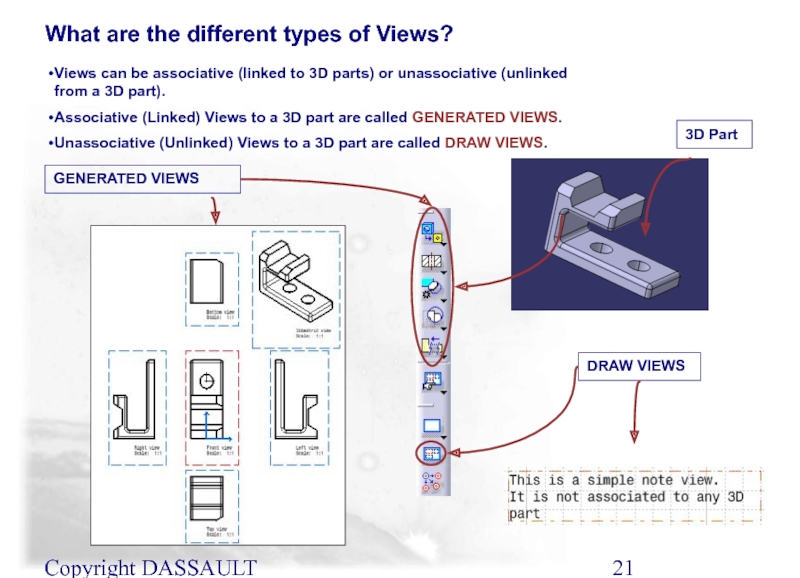
Views can be associative (linked to 3D parts)
Associative (Linked) Views to a 3D part are called GENERATED VIEWS.
Unassociative (Unlinked) Views to a 3D part are called DRAW VIEWS.
GENERATED VIEWS
DRAW VIEWS
3D Part
What are the different types of Views?
Слайд 22Copyright DASSAULT SYSTEMES 2002
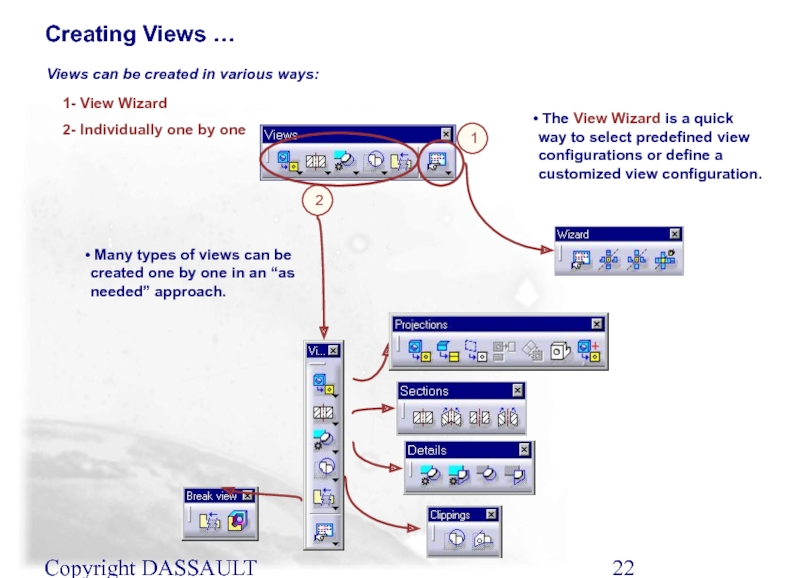
1- View Wizard
2- Individually one by one
Views can
2
1
The View Wizard is a quick way to select predefined view configurations or define a customized view configuration.
Many types of views can be created one by one in an “as needed” approach.
Creating Views …
Слайд 23Copyright DASSAULT SYSTEMES 2002
Creating a Front View (1/2)
Create a front view
1
2
Start the drawing with a blank sheet
Select the Front View icon
3
Switch or activate the CATPart or CATProduct document (window)
Note: the Front View is used as the defining view when creating projection views.
Слайд 24Copyright DASSAULT SYSTEMES 2002
Creating a Front View (2/2)
4
5
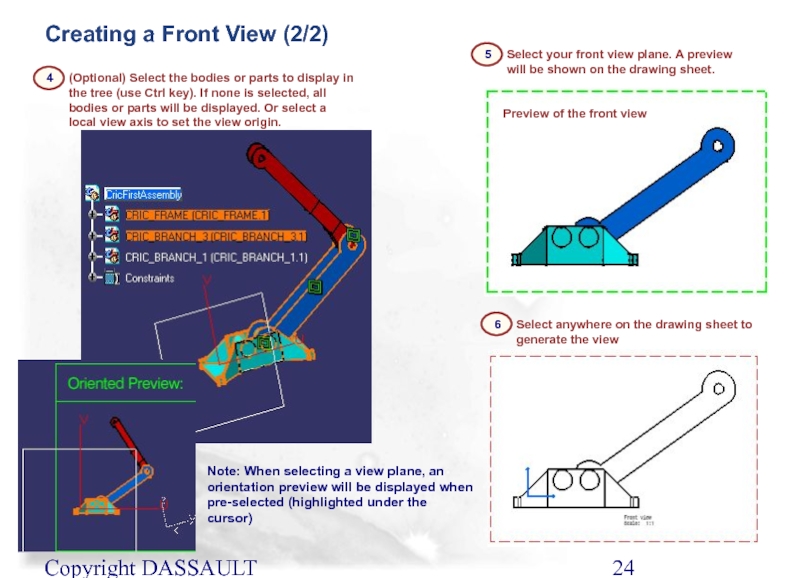
(Optional) Select the bodies
Select your front view plane. A preview will be shown on the drawing sheet.
6
Select anywhere on the drawing sheet to generate the view
Preview of the front view
Note: When selecting a view plane, an orientation preview will be displayed when pre-selected (highlighted under the cursor)
Слайд 25Copyright DASSAULT SYSTEMES 2002
Creating an Advanced Front View
The advance front view
1
Select the Advance Front View icon
3
Complete the Front View as previously shown
2
Key in the desired view name and scale. Select the OK button.
Слайд 26Copyright DASSAULT SYSTEMES 2002
Rotating the Front View Background with the View
clicking up arrow
dragging green handle
clicking center left arrow
clicking right arrow
Up, down, right and left arrows flip background plane view 90 degrees.
Center left and right arrows rotate view 30 degrees in the same plane. The 30 degrees increment can be changed with the contextual menu on the dial.
The green handle(dot) rotates view freely on the same plane.
Before accepting the view, it can be reoriented with the view manipulator
When finished, click on dial center or anywhere on sheet to generate the Front View.
Слайд 27Copyright DASSAULT SYSTEMES 2002
Set the increment of Rotation
View Manipulator contextual
Set the angle of Rotation
Set free Rotation
Rotating the Front View Background with the View Manipulators (2/2)
Слайд 28Copyright DASSAULT SYSTEMES 2002
To add a view on this drawing
Select desired
1
4
Adding a Projection View on a Drawing
A preview of the projection view appears.
The Top view (ISO Standard) is generated with the default projection standard set to first angle projection. With the ANSI Standard, a Bottom view is generated.
Activate the view (front) to project from (blue axes on and underlined in tree). Select the View Projection icon
2
Move cursor where View is to be projected
3
Слайд 29Copyright DASSAULT SYSTEMES 2002
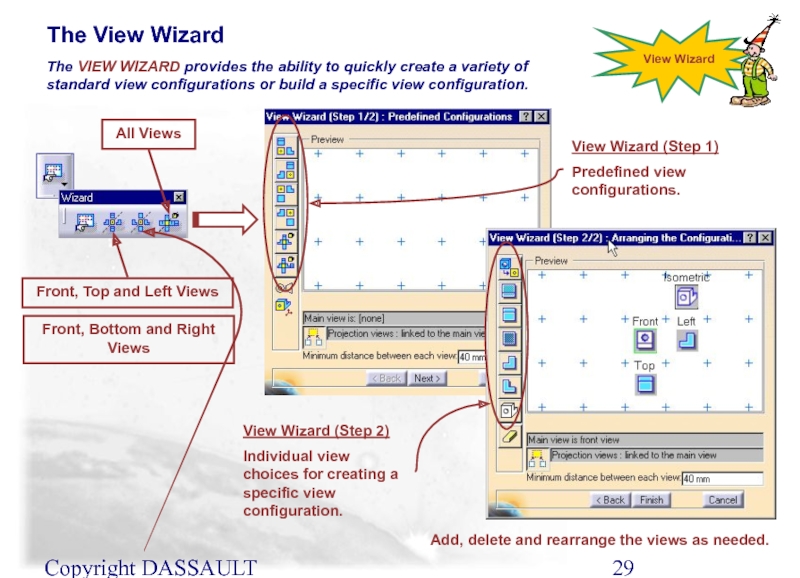
The View Wizard
The VIEW WIZARD provides the ability
View Wizard
Front, Top and Left Views
Front, Bottom and Right Views
View Wizard (Step 1)
Predefined view configurations.
View Wizard (Step 2)
Individual view choices for creating a specific view configuration.
All Views
Add, delete and rearrange the views as needed.
Слайд 30Copyright DASSAULT SYSTEMES 2002
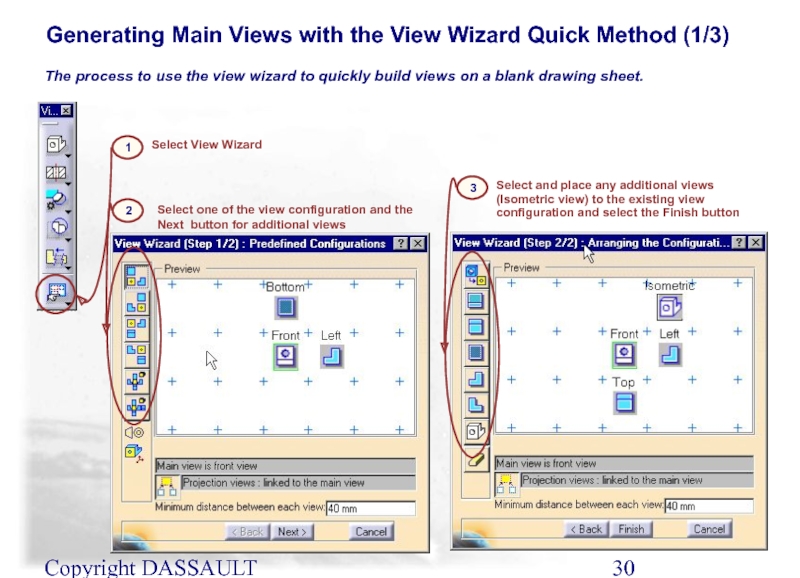
Generating Main Views with the View Wizard Quick
The process to use the view wizard to quickly build views on a blank drawing sheet.
Select one of the view configuration and the Next button for additional views
Select and place any additional views (Isometric view) to the existing view configuration and select the Finish button
2
3
Select View Wizard
1
Слайд 31Copyright DASSAULT SYSTEMES 2002
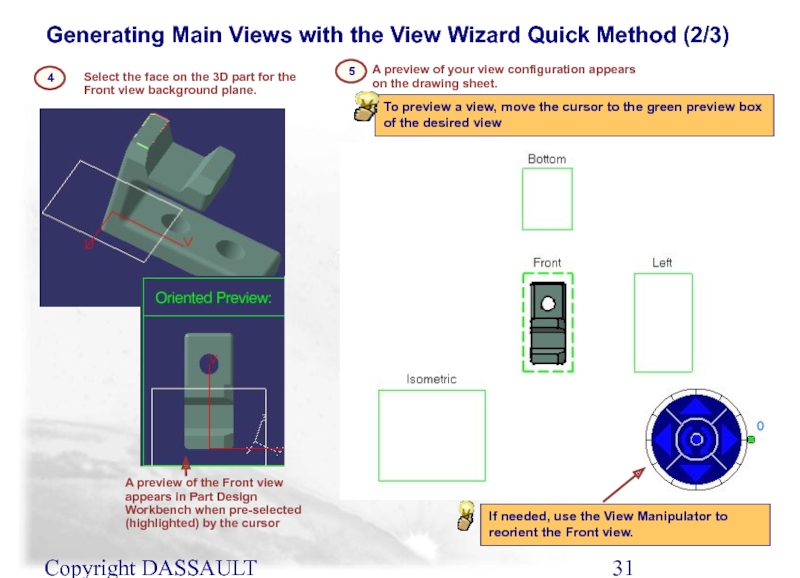
Generating Main Views with the View Wizard Quick
A preview of your view configuration appears on the drawing sheet.
5
4
Select the face on the 3D part for the Front view background plane.
A preview of the Front view appears in Part Design Workbench when pre-selected (highlighted) by the cursor
If needed, use the View Manipulator to reorient the Front view.
To preview a view, move the cursor to the green preview box of the desired view
Слайд 32Copyright DASSAULT SYSTEMES 2002
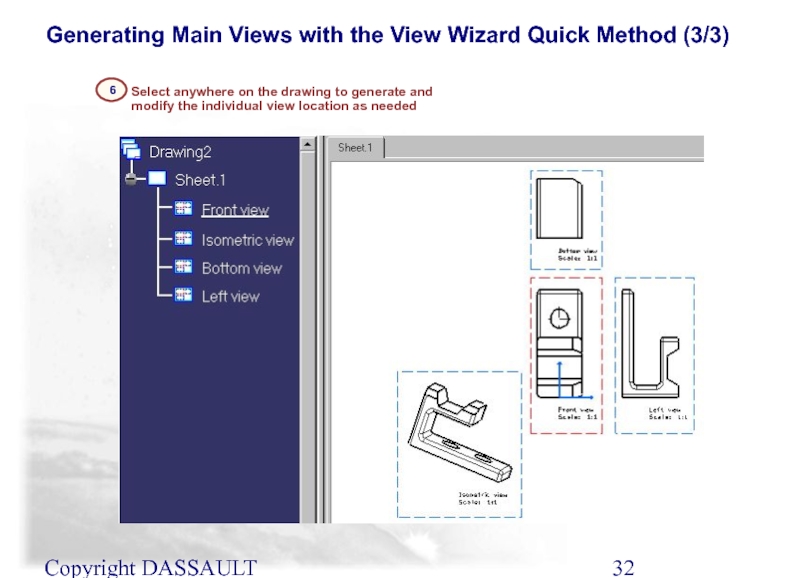
Generating Main Views with the View Wizard Quick
Select anywhere on the drawing to generate and modify the individual view location as needed
6
Слайд 33Copyright DASSAULT SYSTEMES 2002
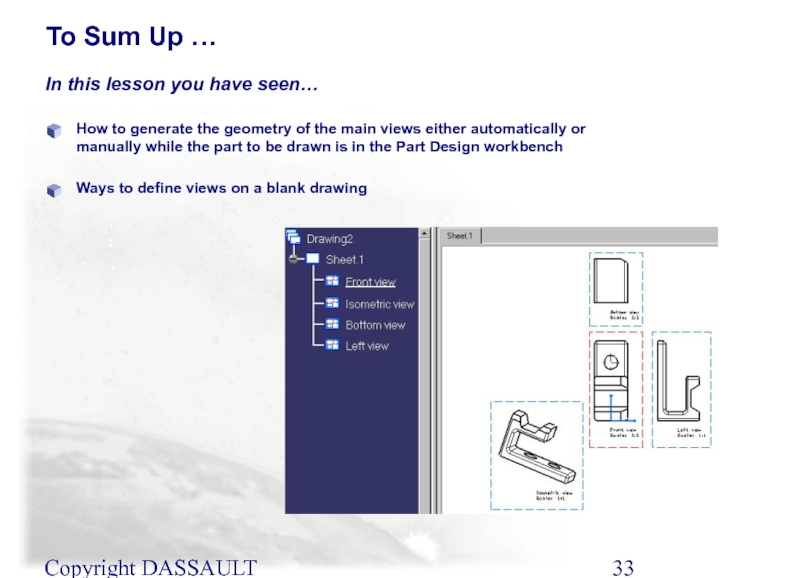
How to generate the geometry of the main
Ways to define views on a blank drawing
To Sum Up …
In this lesson you have seen…
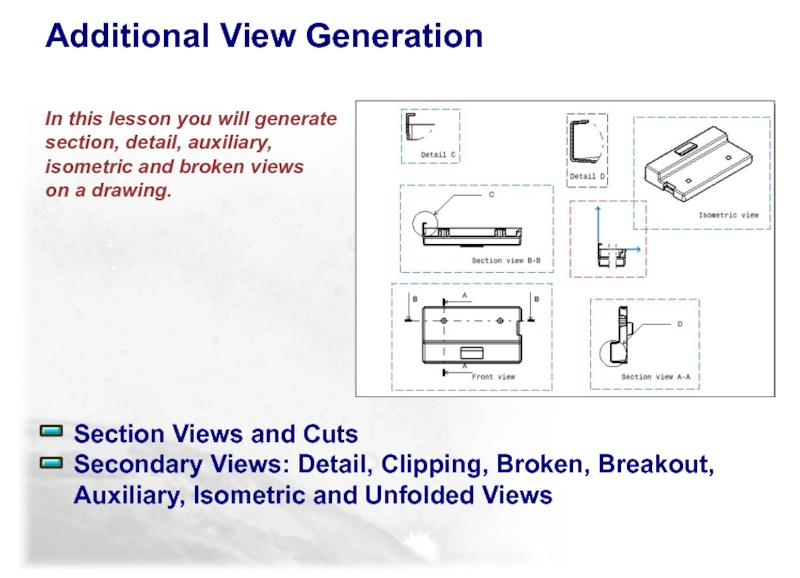
Слайд 34In this lesson you will generate section, detail, auxiliary, isometric and broken views on
Section Views and Cuts
Secondary Views: Detail, Clipping, Broken, Breakout, Auxiliary, Isometric and Unfolded Views
Additional View Generation
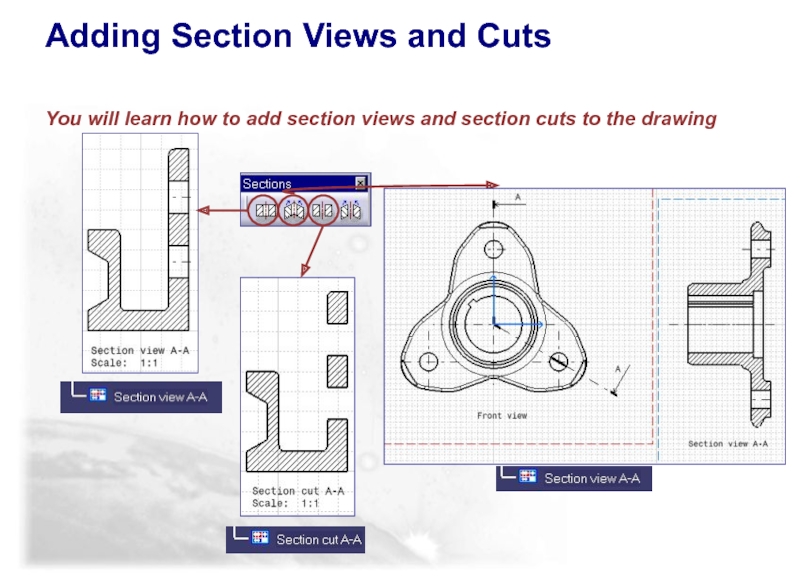
Слайд 35Adding Section Views and Cuts
You will learn how to add section
Слайд 36Copyright DASSAULT SYSTEMES 2002
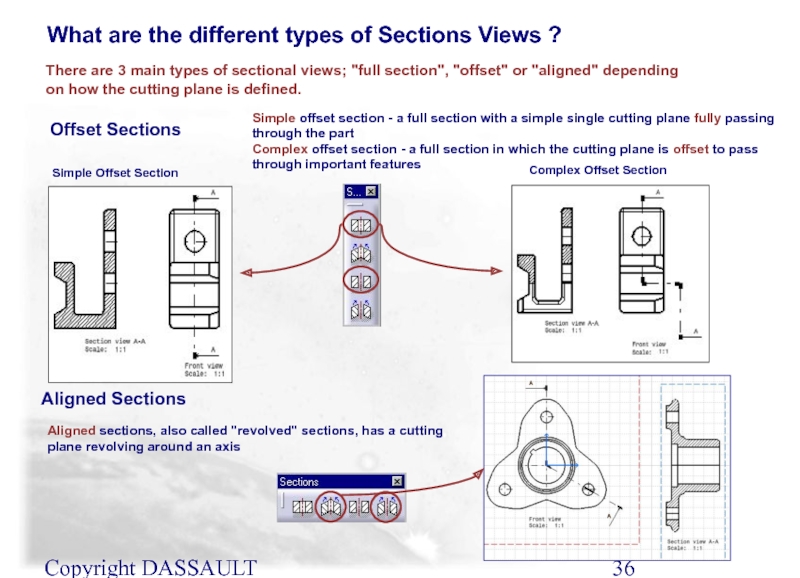
Simple offset section - a full section with
Complex offset section - a full section in which the cutting plane is offset to pass through important features
What are the different types of Sections Views ?
Complex Offset Section
Offset Sections
Simple Offset Section
Aligned Sections
Aligned sections, also called "revolved" sections, has a cutting plane revolving around an axis
There are 3 main types of sectional views; "full section", "offset" or "aligned" depending on how the cutting plane is defined.
Слайд 37Copyright DASSAULT SYSTEMES 2002
Section View: A view of the cutting plane
Section Views and Section Cuts …
Section Cut: A view of only the material that the cutting edge touches when passing through the part.
Reminder of the differences of a section view (Offset or Aligned) and section cut (Offset or Aligned)
Слайд 38Copyright DASSAULT SYSTEMES 2002
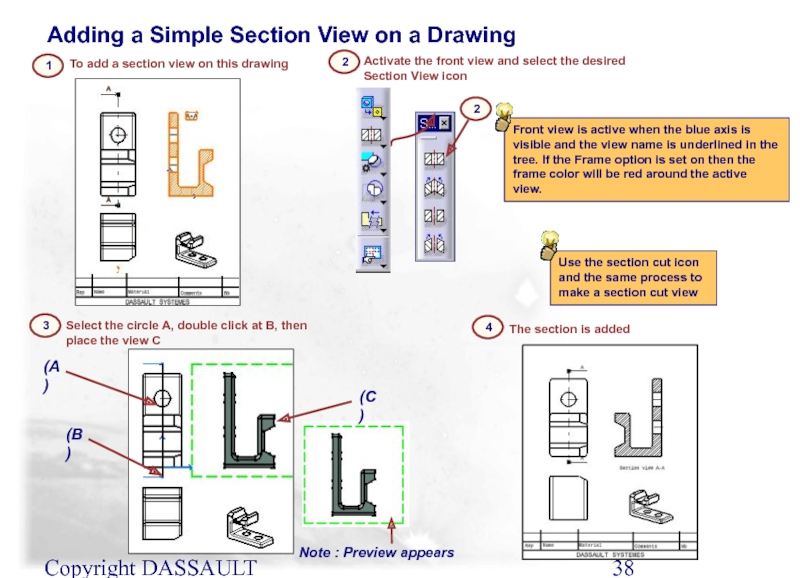
Front view is active when the blue axis
Select the circle A, double click at B, then place the view C
To add a section view on this drawing
The section is added
(A)
1
Activate the front view and select the desired Section View icon
2
3
4
(B)
(C)
Adding a Simple Section View on a Drawing
Use the section cut icon and the same process to make a section cut view
2
Note : Preview appears
Слайд 39Copyright DASSAULT SYSTEMES 2002
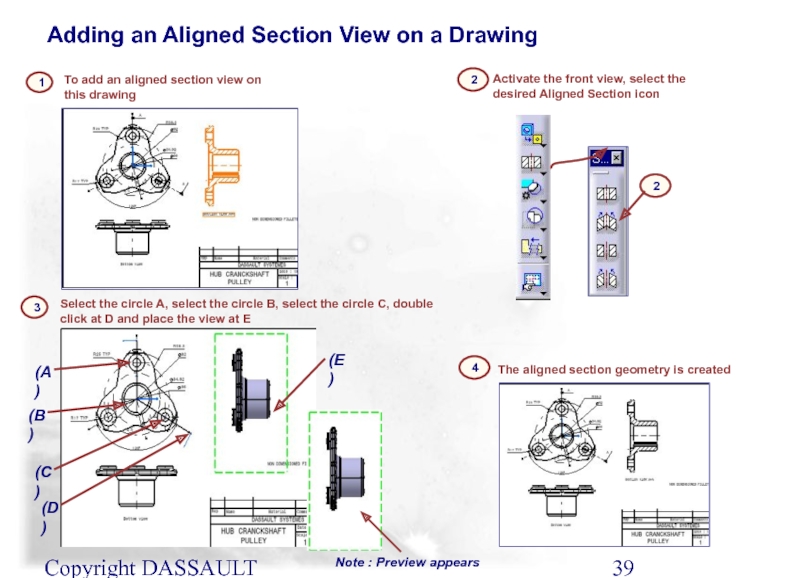
To add an aligned section view on this
The aligned section geometry is created
1
4
Adding an Aligned Section View on a Drawing
2
Activate the front view, select the desired Aligned Section icon
2
Select the circle A, select the circle B, select the circle C, double click at D and place the view at E
(A)
3
Note : Preview appears
(B)
(D)
(E)
(C)
Слайд 40Adding Secondary Views
You will learn how to add
secondary views
Detail Views
Clipped
Isometric Views
Breakout Views
Broken Views
Слайд 41Copyright DASSAULT SYSTEMES 2002
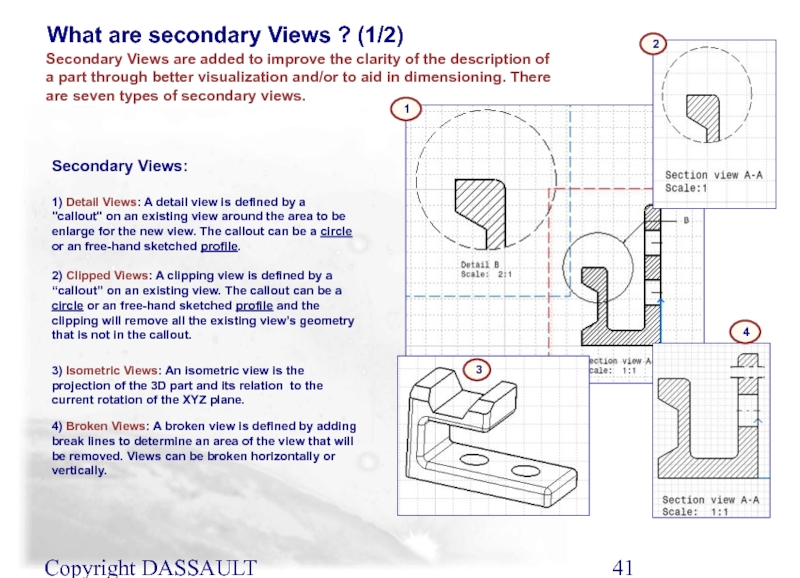
Secondary Views:
1) Detail Views: A detail view is
2) Clipped Views: A clipping view is defined by a “callout” on an existing view. The callout can be a circle or an free-hand sketched profile and the clipping will remove all the existing view’s geometry that is not in the callout.
3) Isometric Views: An isometric view is the projection of the 3D part and its relation to the current rotation of the XYZ plane.
4) Broken Views: A broken view is defined by adding break lines to determine an area of the view that will be removed. Views can be broken horizontally or vertically.
What are secondary Views ? (1/2)
Secondary Views are added to improve the clarity of the description of a part through better visualization and/or to aid in dimensioning. There are seven types of secondary views.
1
3
2
4
Слайд 42Copyright DASSAULT SYSTEMES 2002
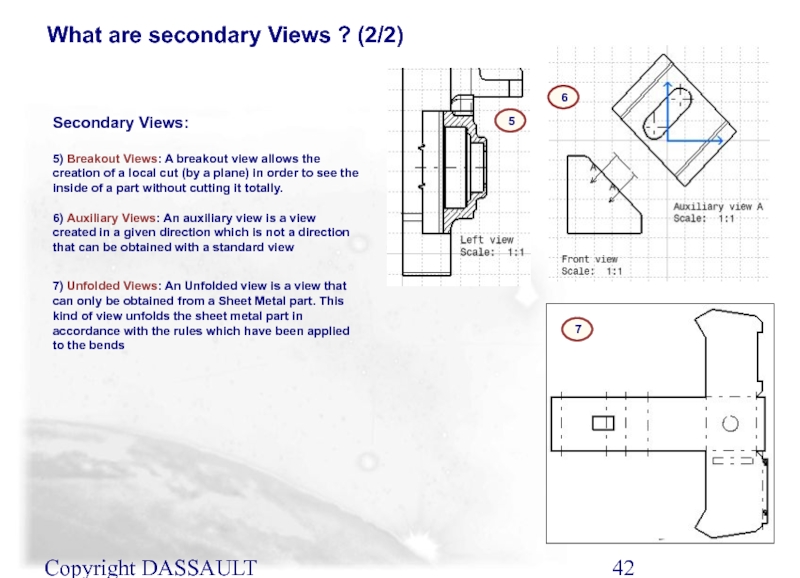
Secondary Views:
5) Breakout Views: A breakout view allows
6) Auxiliary Views: An auxiliary view is a view created in a given direction which is not a direction that can be obtained with a standard view
7) Unfolded Views: An Unfolded view is a view that can only be obtained from a Sheet Metal part. This kind of view unfolds the sheet metal part in accordance with the rules which have been applied to the bends
What are secondary Views ? (2/2)
5
6
Слайд 43Copyright DASSAULT SYSTEMES 2002
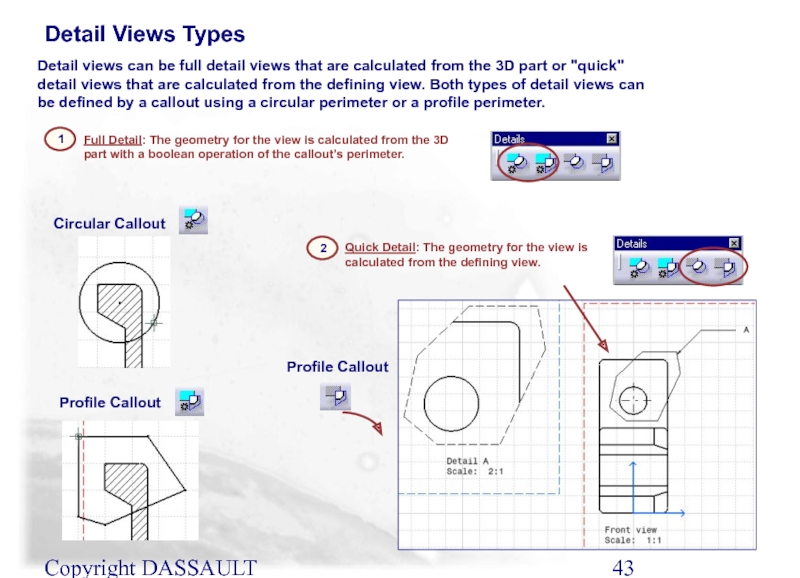
Detail views can be full detail views that
Detail Views Types
1
Full Detail: The geometry for the view is calculated from the 3D part with a boolean operation of the callout’s perimeter.
Circular Callout
Profile Callout
Quick Detail: The geometry for the view is calculated from the defining view.
2
Profile Callout
Слайд 44Copyright DASSAULT SYSTEMES 2002
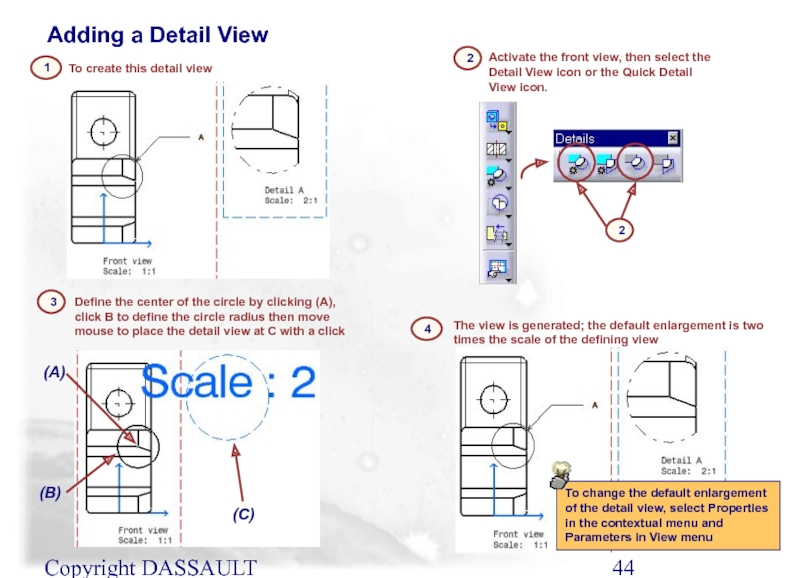
To create this detail view
1
Define the center of
3
The view is generated; the default enlargement is two times the scale of the defining view
4
Activate the front view, then select the Detail View icon or the Quick Detail View icon.
2
2
Adding a Detail View
To change the default enlargement of the detail view, select Properties in the contextual menu and Parameters in View menu
Слайд 45Copyright DASSAULT SYSTEMES 2002
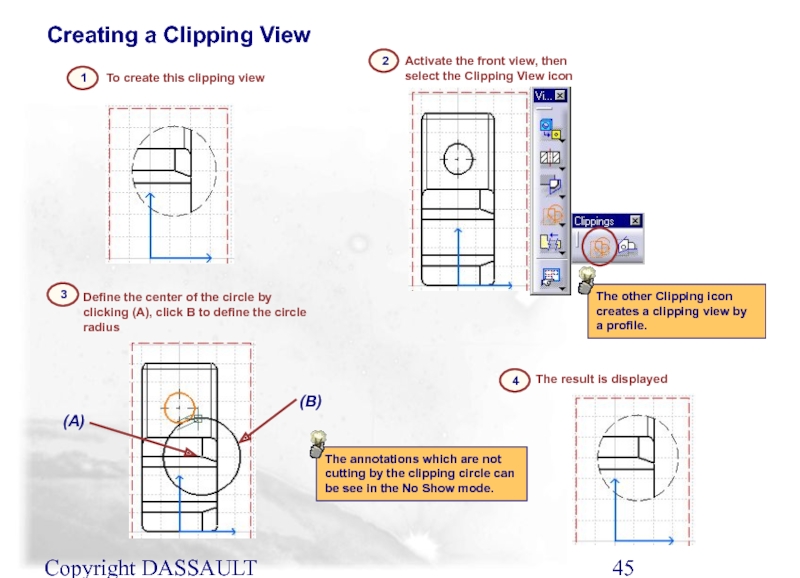
To create this clipping view
1
Creating a Clipping View
Activate
2
Define the center of the circle by clicking (A), click B to define the circle radius
3
4
The result is displayed
The annotations which are not cutting by the clipping circle can be see in the No Show mode.
The other Clipping icon creates a clipping view by a profile.
Слайд 46Copyright DASSAULT SYSTEMES 2002
To create this Broken view
1
Select anywhere on the
4
The second break limit can fall anywhere designated by the green dashed line. The solid red line represents the red zone for the areas that cannot be selected for creating the second break limit.
The broken view can be restored with contextual mouse button and select UNBREAK
Activate the Section A-A view and select the “breaking a view” icon
2
Breaking a View
Define the break out area by clicking (A) the location for the first break limit line, click (B) to delimit the height of the red area and click (C) to locate the second break limit line.
(C)
(B)
(A)
3
Area of break out
Area of break out
Note: A view can contain multiple break definitions given the definition is in the same direction and the two breaks do not overlap.
Слайд 47Copyright DASSAULT SYSTEMES 2002
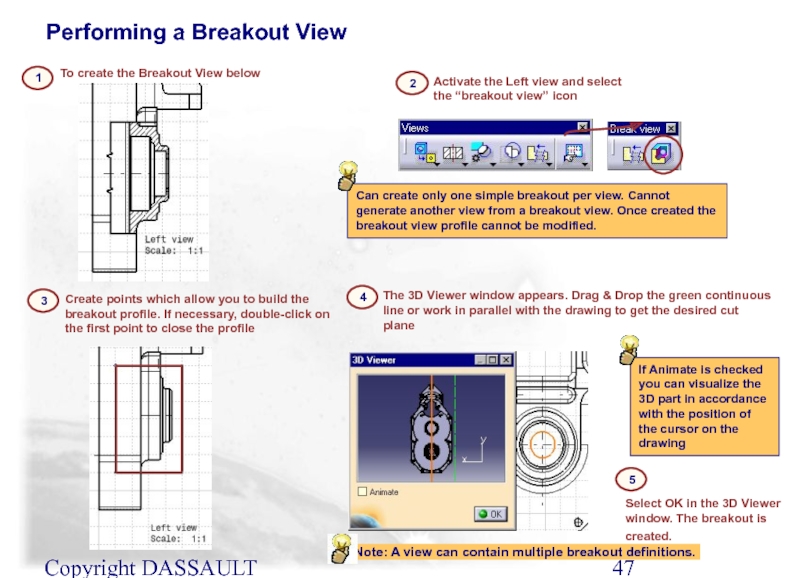
To create the Breakout View below
1
If Animate is
Activate the Left view and select the “breakout view” icon
2
The 3D Viewer window appears. Drag & Drop the green continuous line or work in parallel with the drawing to get the desired cut plane
4
Select OK in the 3D Viewer window. The breakout is created.
5
Create points which allow you to build the breakout profile. If necessary, double-click on the first point to close the profile
3
Can create only one simple breakout per view. Cannot generate another view from a breakout view. Once created the breakout view profile cannot be modified.
Performing a Breakout View
Note: A view can contain multiple breakout definitions.
Слайд 48Copyright DASSAULT SYSTEMES 2002
Select the Isometric icon
1
Adding an Isometric View
3
A preview
4
Select anywhere on the drawing to generate the view
(A)
2
Select a face on the part in the Part or Product document
If needed, use the View Manipulator to reorient the Isometric view.
Слайд 49Copyright DASSAULT SYSTEMES 2002
Select the Isometric icon
1
3
A preview of the Isometric
4
Select anywhere on the drawing to generate the view
2
Select a Scene in the Part or Product document and a view orientation
Adding an Exploded Isometric View using a Scene
Слайд 50Copyright DASSAULT SYSTEMES 2002
To create the auxiliary view below
(A)
1
2
Active the front
3
Sketch the representation of the plane (A) or select an edge (B) on the drawing and drag the mouse to see the preview of the auxiliary view.
(B)
Adding an Auxiliary View
Select anywhere on the drawing to create the auxiliary view.
4
To double-click on an arrow allows to invert the profile with the “Invert Profile Direction” icon ( ).
Select “End Profile Edition” icon ( ) to return on the drawing.
Слайд 51Copyright DASSAULT SYSTEMES 2002
To not generate the bend lines, uncheck the
3
Select anywhere to generate the unfolded view on the drawing
2
Select the first wall of the Sheet Metal part as a 3D reference and choose the reference axis system.
Select the Unfolded view icon
1
Dashed bend lines
Creating Unfolded Views with dashed Bend Lines
Слайд 52Copyright DASSAULT SYSTEMES 2002
How to add section views and section cuts
How to add secondary views
In this lesson you have seen…
To Sum Up…
Слайд 53Editing View’s Layout and Properties
In this lesson you will change the
Editing a View and Sheet Properties
Adding Sheets to a Drawing
Repositioning Views
Modifying Views
Modifying of Section, Detail and Auxiliary Profiles
Modifying of Section, Detail and Auxiliary Graphical Definition
Modifying a Section Hatching Representation
Слайд 55Copyright DASSAULT SYSTEMES 2002
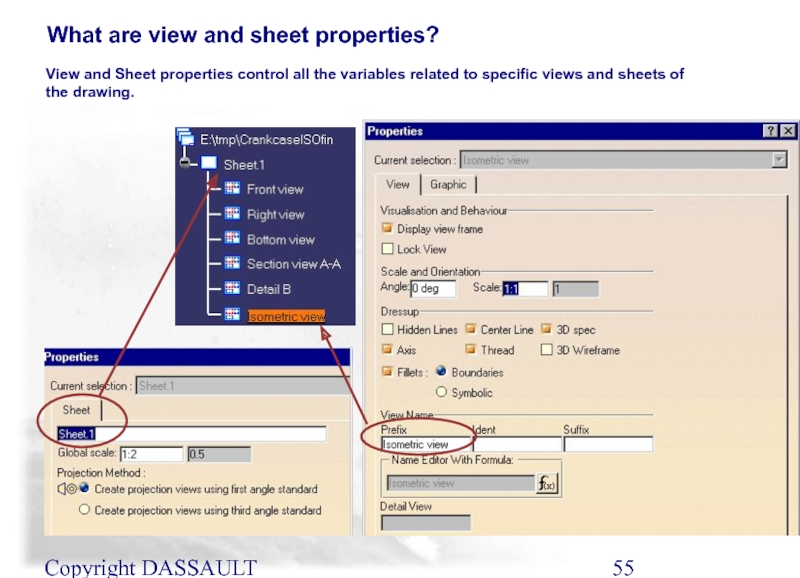
View and Sheet properties control all the variables
What are view and sheet properties?
Слайд 56Copyright DASSAULT SYSTEMES 2002
Select the view to modify in the tree
2
1
Select the View or Graphic tab and change the necessary options, here :
(A) View name
(B) Dressup to have fillets on
(C) Visualization to remove the frame
View Properties
Multi-selection of views is allowed on a single sheet or on different sheets
A
B
C
Слайд 57Copyright DASSAULT SYSTEMES 2002
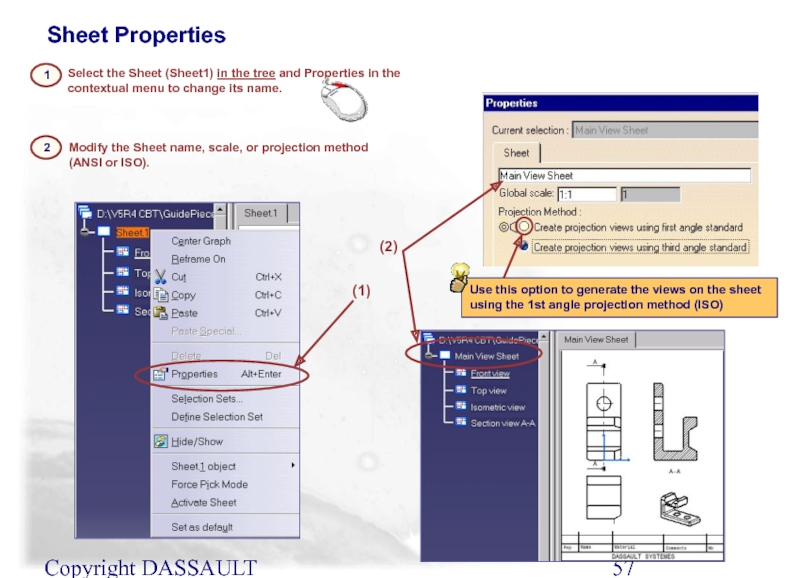
Select the Sheet (Sheet1) in the tree and
2
Use this option to generate the views on the sheet using the 1st angle projection method (ISO)
1
Modify the Sheet name, scale, or projection method (ANSI or ISO).
Sheet Properties
(1)
(2)
Слайд 59Copyright DASSAULT SYSTEMES 2002
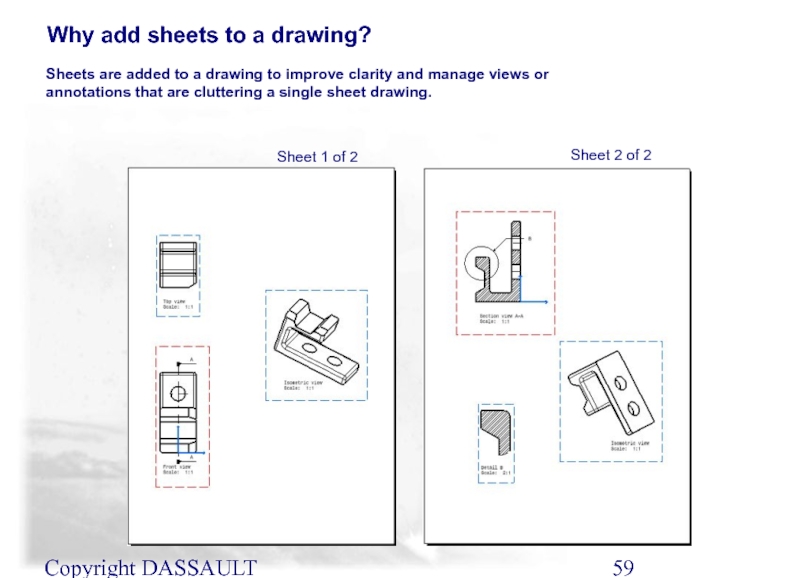
Sheets are added to a drawing to improve
Sheet 1 of 2
Sheet 2 of 2
Why add sheets to a drawing?
Слайд 60Copyright DASSAULT SYSTEMES 2002
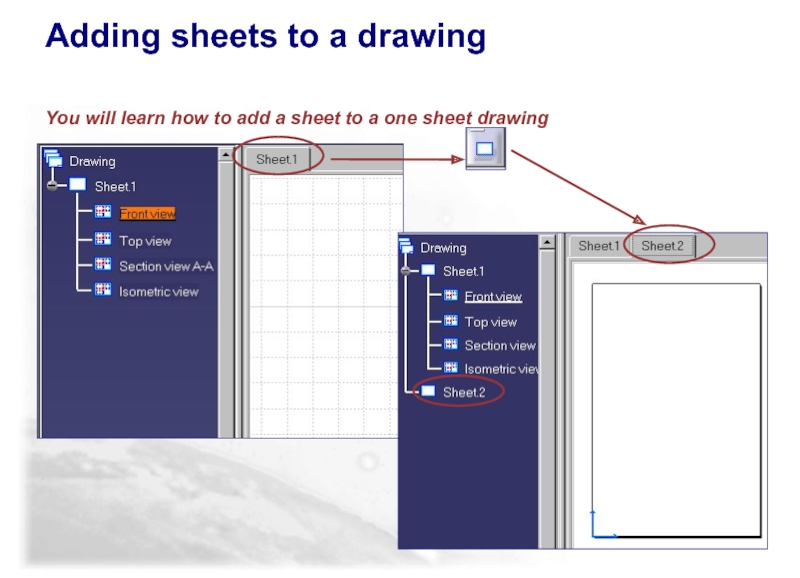
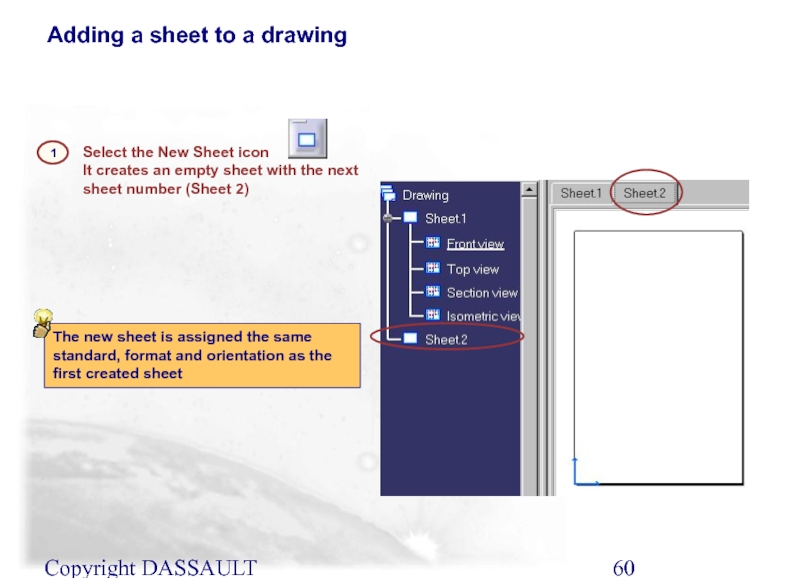
Select the New Sheet icon
It creates an empty
Adding a sheet to a drawing
1
The new sheet is assigned the same standard, format and orientation as the first created sheet
Слайд 61Repositioning Views
You will learn how to reposition views on a single
Слайд 62Copyright DASSAULT SYSTEMES 2002
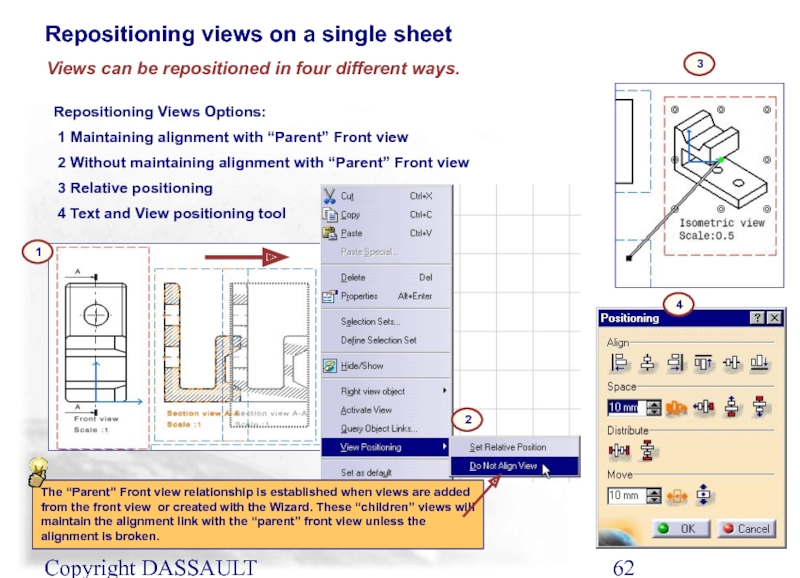
Views can be repositioned in four different ways.
Repositioning Views Options:
1 Maintaining alignment with “Parent” Front view
2 Without maintaining alignment with “Parent” Front view
3 Relative positioning
4 Text and View positioning tool
The “Parent” Front view relationship is established when views are added from the front view or created with the Wizard. These “children” views will maintain the alignment link with the “parent” front view unless the alignment is broken.
1
2
3
4
Repositioning views on a single sheet
Слайд 63Copyright DASSAULT SYSTEMES 2002
Select the frame of the view to move
2
Select the “Do not align views” in the contextual menu first if the desired position is to be not aligned with the Front view.
Repositioning views on sheet
1
View frame
A view can be repositioned (moved) to another location
Multi-selection of views is allowed
Слайд 64Copyright DASSAULT SYSTEMES 2002
A view can be positioned at an exact
Here view B is positioned relatively to view A
Relative Positioning
Positioning stick showing distance
Geometric center of view
Middle top anchor point
View A
View B
This is often used for isometric views, and particularly for exploded views of assemblies
Слайд 65Copyright DASSAULT SYSTEMES 2002
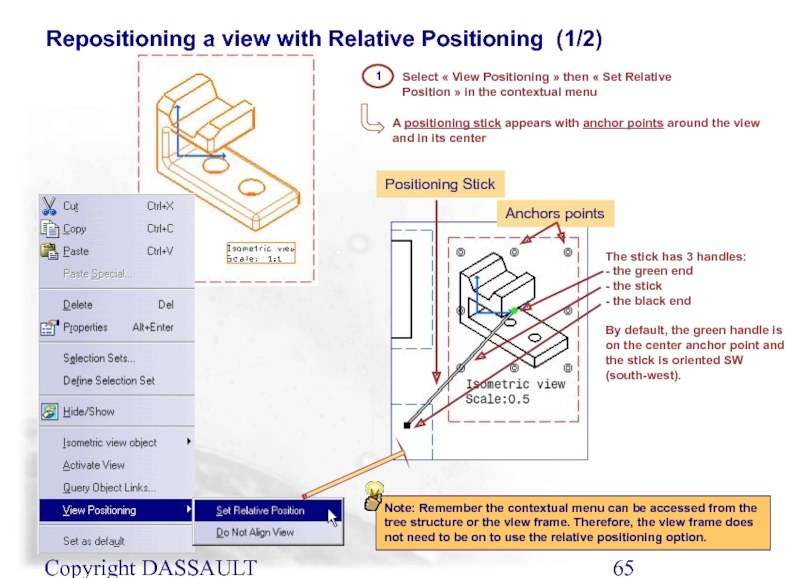
Select « View Positioning » then « Set Relative Position » in
Repositioning a view with Relative Positioning (1/2)
A positioning stick appears with anchor points around the view and in its center
Anchors points
Positioning Stick
The stick has 3 handles:
- the green end
- the stick
- the black end
By default, the green handle is on the center anchor point and the stick is oriented SW (south-west).
Note: Remember the contextual menu can be accessed from the tree structure or the view frame. Therefore, the view frame does not need to be on to use the relative positioning option.
1
Слайд 66Copyright DASSAULT SYSTEMES 2002
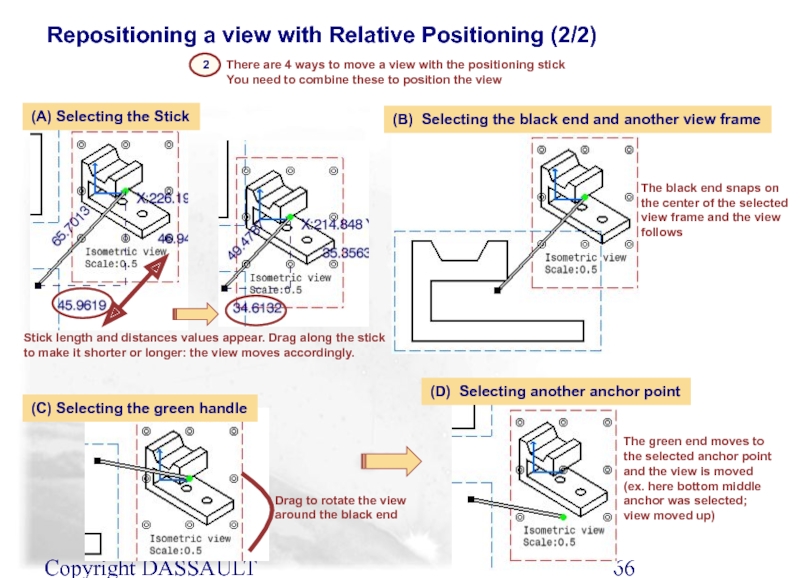
Repositioning a view with Relative Positioning (2/2)
Stick length
There are 4 ways to move a view with the positioning stick
You need to combine these to position the view
(C) Selecting the green handle
The green end moves to the selected anchor point and the view is moved
(ex. here bottom middle anchor was selected; view moved up)
(D) Selecting another anchor point
Drag to rotate the view around the black end
The black end snaps on the center of the selected view frame and the view follows
(A) Selecting the Stick
2
(B) Selecting the black end and another view frame
Слайд 67Copyright DASSAULT SYSTEMES 2002
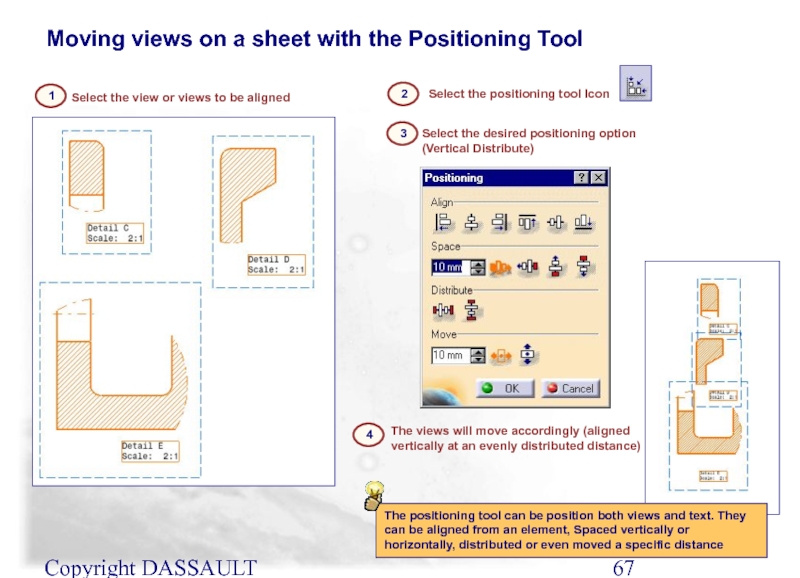
Select the view or views to be aligned
2
Select
Moving views on a sheet with the Positioning Tool
1
3
Select the desired positioning option (Vertical Distribute)
4
The views will move accordingly (aligned vertically at an evenly distributed distance)
The positioning tool can be position both views and text. They can be aligned from an element, Spaced vertically or horizontally, distributed or even moved a specific distance
Слайд 68Copyright DASSAULT SYSTEMES 2002
1
Cut the view on the sheet to be
Moving views from one sheet to another sheet
Paste the cut view on the desired sheet in the specification tree
2
1
2
Contextual Menu
Слайд 69Modifying Views
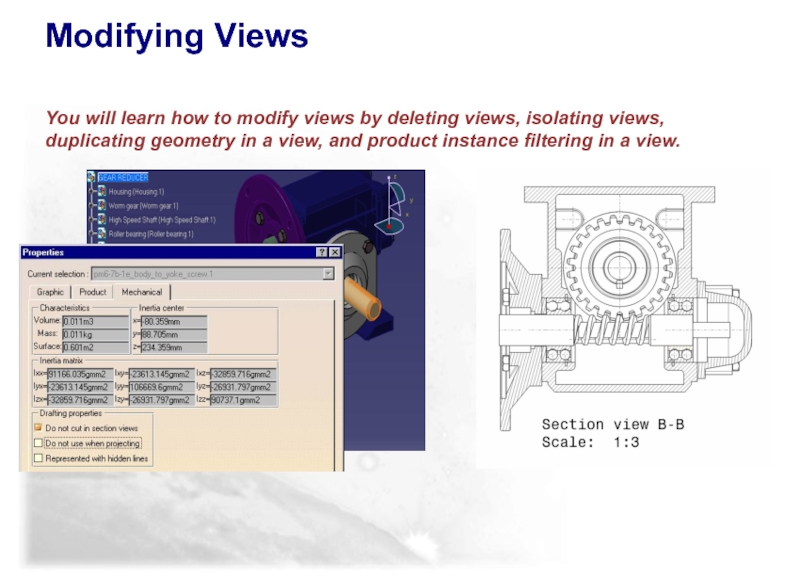
You will learn how to modify views by deleting views,
Слайд 70Copyright DASSAULT SYSTEMES 2002
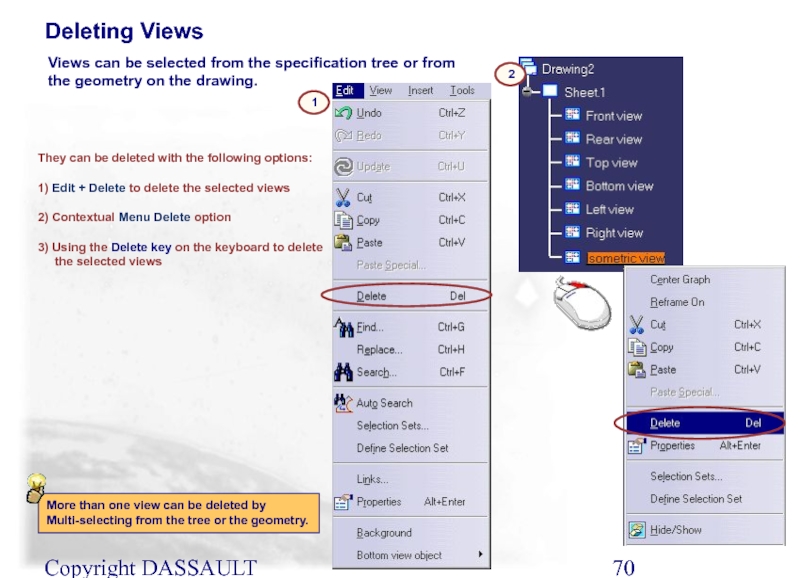
They can be deleted with the following options:
1)
2) Contextual Menu Delete option
3) Using the Delete key on the keyboard to delete the selected views
Deleting Views
1
More than one view can be deleted by Multi-selecting from the tree or the geometry.
2
Views can be selected from the specification tree or from the geometry on the drawing.
Слайд 71Copyright DASSAULT SYSTEMES 2002
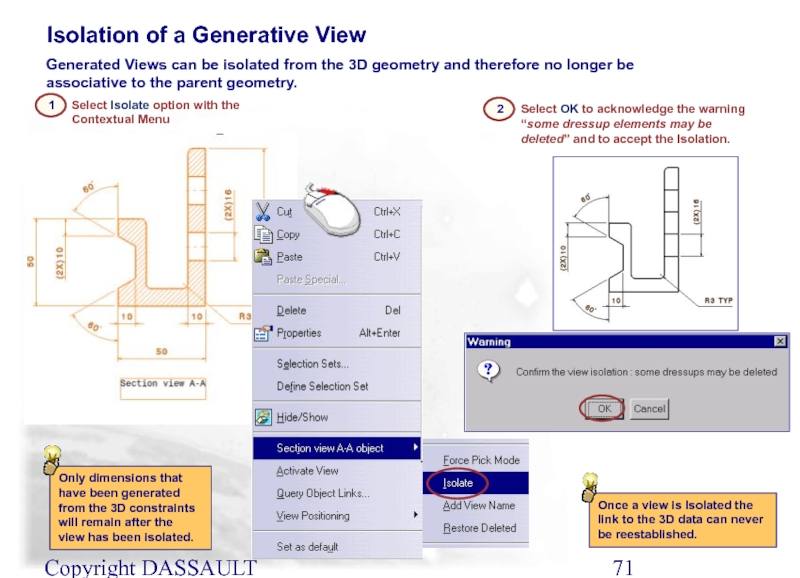
Select OK to acknowledge the warning “some dressup
2
Isolation of a Generative View
1
Only dimensions that have been generated from the 3D constraints will remain after the view has been isolated.
Once a view is Isolated the link to the 3D data can never be reestablished.
Generated Views can be isolated from the 3D geometry and therefore no longer be associative to the parent geometry.
Select Isolate option with the Contextual Menu
Слайд 72Copyright DASSAULT SYSTEMES 2002
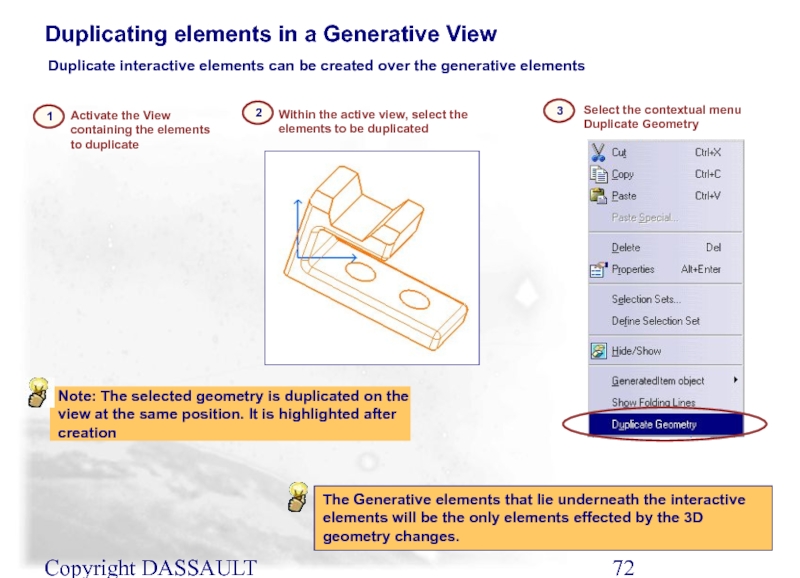
Duplicating elements in a Generative View
1
The Generative elements
3
Duplicate interactive elements can be created over the generative elements
Activate the View containing the elements to duplicate
2
Within the active view, select the elements to be duplicated
Select the contextual menu Duplicate Geometry
Note: The selected geometry is duplicated on the view at the same position. It is highlighted after creation
Слайд 73Copyright DASSAULT SYSTEMES 2002
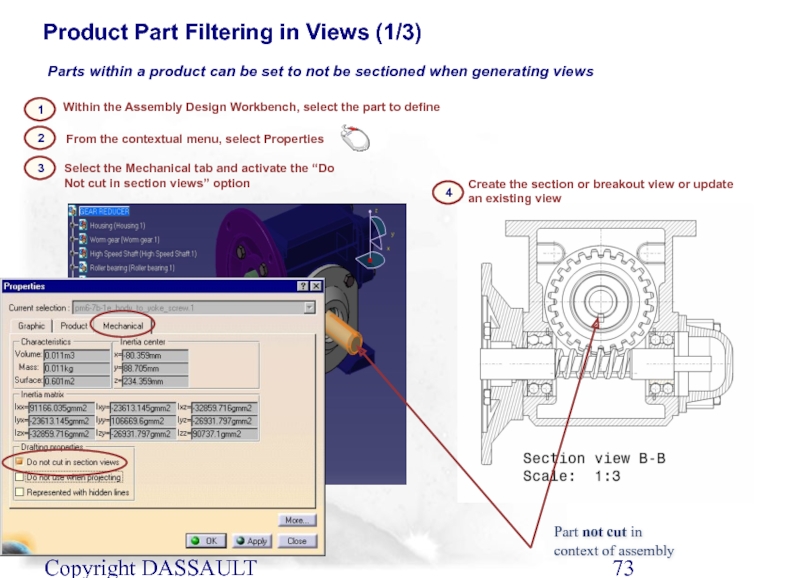
Product Part Filtering in Views (1/3)
Parts within a
Part not cut in context of assembly
Within the Assembly Design Workbench, select the part to define
2
1
Select the Mechanical tab and activate the “Do Not cut in section views” option
From the contextual menu, select Properties
3
4
Create the section or breakout view or update an existing view
Слайд 74Copyright DASSAULT SYSTEMES 2002
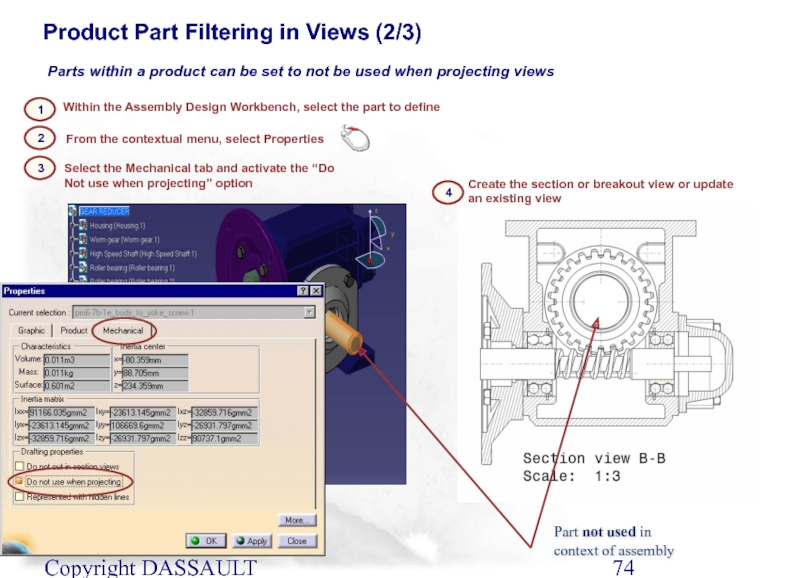
Product Part Filtering in Views (2/3)
Parts within a
Part not used in context of assembly
Within the Assembly Design Workbench, select the part to define
2
1
Select the Mechanical tab and activate the “Do Not use when projecting” option
From the contextual menu, select Properties
3
4
Create the section or breakout view or update an existing view
Слайд 75Copyright DASSAULT SYSTEMES 2002
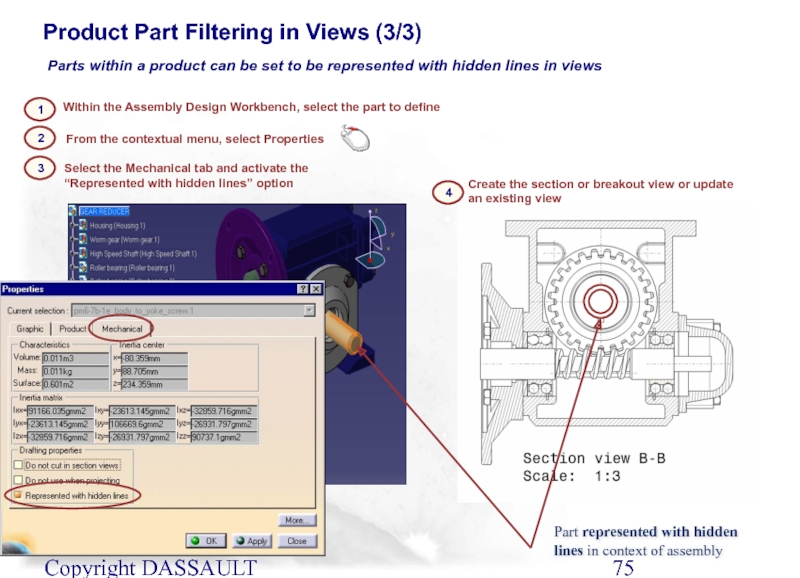
Product Part Filtering in Views (3/3)
Parts within a
Part represented with hidden lines in context of assembly
Within the Assembly Design Workbench, select the part to define
2
1
Select the Mechanical tab and activate the “Represented with hidden lines” option
From the contextual menu, select Properties
3
4
Create the section or breakout view or update an existing view
Слайд 76Copyright DASSAULT SYSTEMES 2002
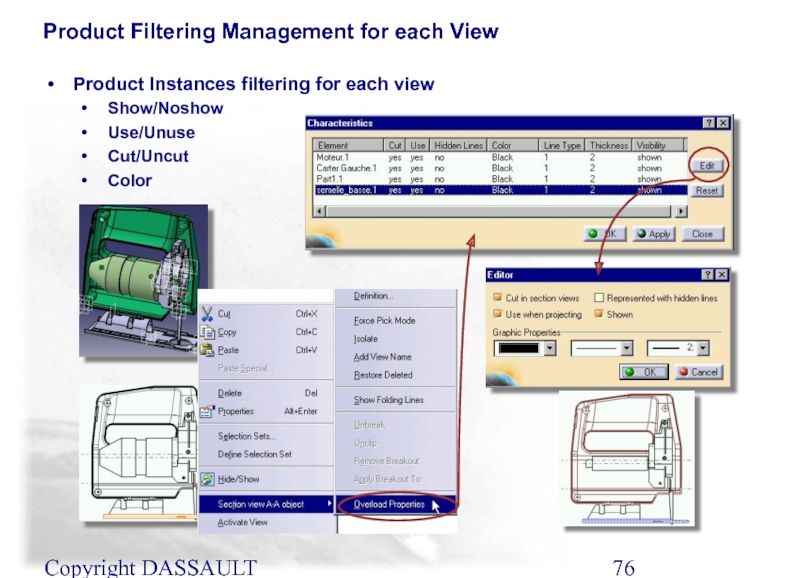
Product Filtering Management for each View
Product Instances filtering
Show/Noshow
Use/Unuse
Cut/Uncut
Color
Слайд 77Modifying of Section, Detail, Auxiliary Views
You will learn how to modify
Слайд 78Copyright DASSAULT SYSTEMES 2002
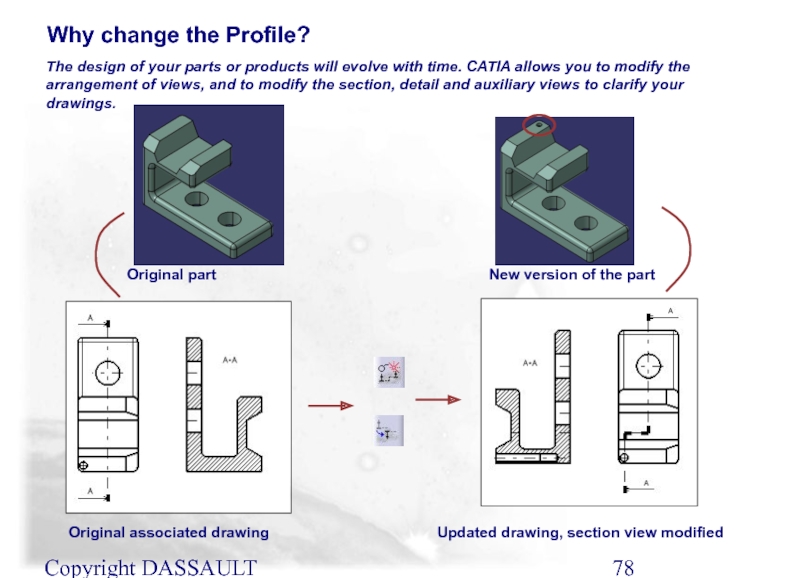
The design of your parts or products will
Original part
Original associated drawing
New version of the part
Updated drawing, section view modified
Why change the Profile?
Слайд 79Copyright DASSAULT SYSTEMES 2002
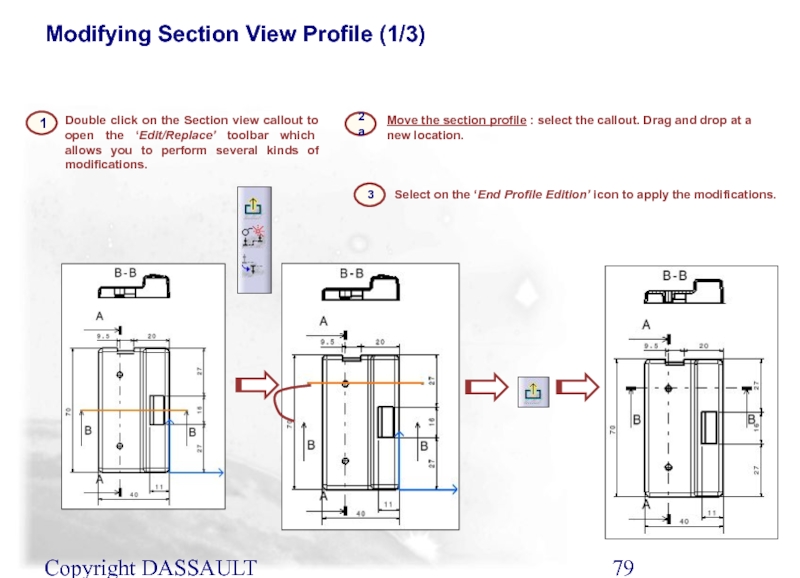
Double click on the Section view callout to
1
Move the section profile : select the callout. Drag and drop at a new location.
2a
Modifying Section View Profile (1/3)
Select on the ‘End Profile Edition’ icon to apply the modifications.
3
Слайд 80Copyright DASSAULT SYSTEMES 2002
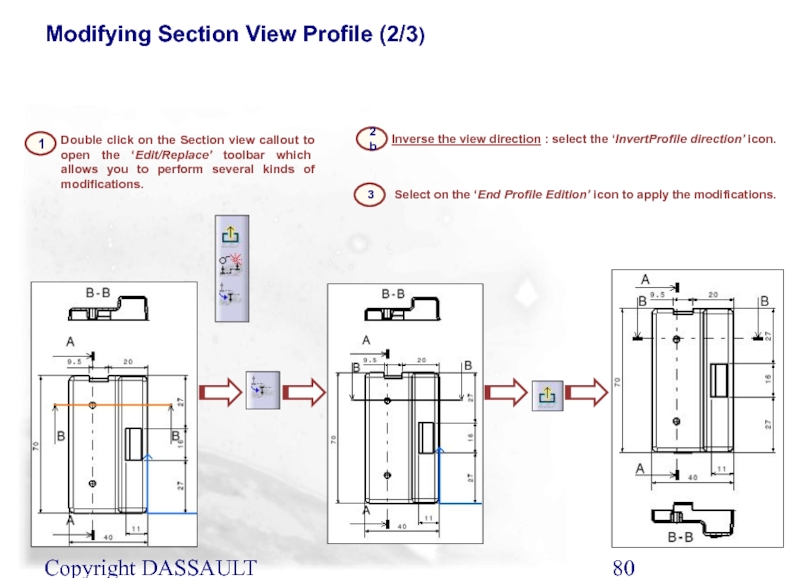
Double click on the Section view callout to
1
2b
Inverse the view direction : select the ‘InvertProfile direction’ icon.
Modifying Section View Profile (2/3)
Select on the ‘End Profile Edition’ icon to apply the modifications.
3
Слайд 81Copyright DASSAULT SYSTEMES 2002
2c
1
Replace the profile : select the ‘Replace Profile’
Double click on the Section view callout to open the ‘Edit/Replace’ toolbar which allows you to perform several kinds of modifications.
Modifying Section View Profile (3/3)
Select on the ‘End Profile Edition’ icon to apply the modifications.
3
Слайд 82Copyright DASSAULT SYSTEMES 2002
2
Double click on the Detail view callout to
1
(a) Move the Detail profile : select the callout. Drag and drop it at the desired location.
(b) Replace the Detail view : select the ‘Replace Profile’ icon. Create your new detail callout profile.
2a
2b
Modify Detail View Profile
Select on the ‘End Profile Edition’ icon to apply the modifications.
3
Слайд 83Copyright DASSAULT SYSTEMES 2002
2
Double click on the Auxiliary view callout to
1
(a) Move the Auxiliary view profile : select the callout. Drag it to a new location.
(b) Inverse the view direction : select the ‘Invert Profile direction’ icon.
2a
Modifying Auxiliary View Profile
2b
Select on the ‘End Profile Edition’ icon to apply the modifications.
3
Слайд 84Modifying a Section, Detail, Auxiliary
graphical definition.
You will learn how to
Слайд 85Copyright DASSAULT SYSTEMES 2002
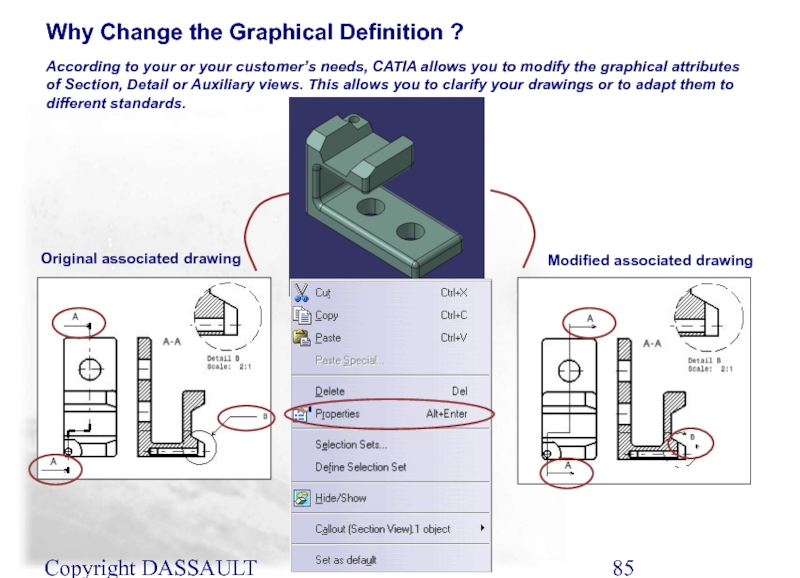
According to your or your customer’s needs, CATIA
Original associated drawing
Modified associated drawing
Why Change the Graphical Definition ?
Слайд 86Copyright DASSAULT SYSTEMES 2002
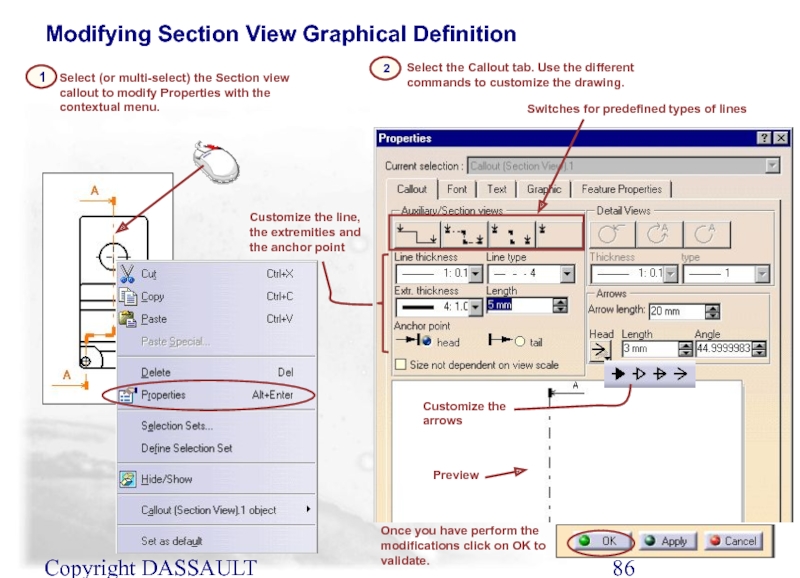
2
Select (or multi-select) the Section view callout to
1
Select the Callout tab. Use the different commands to customize the drawing.
Preview
Switches for predefined types of lines
Customize the line, the extremities and the anchor point
Customize the arrows
Once you have perform the modifications click on OK to validate.
Modifying Section View Graphical Definition
Слайд 87Copyright DASSAULT SYSTEMES 2002
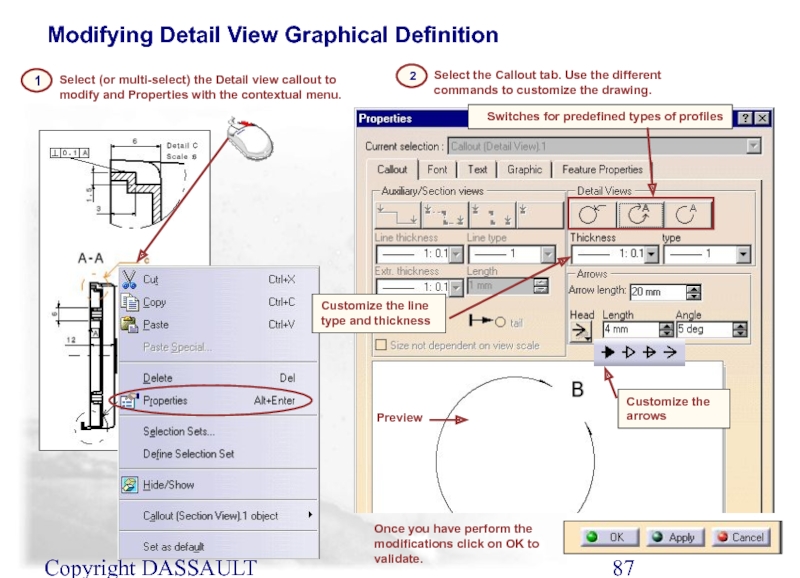
2
Select (or multi-select) the Detail view callout to
1
Preview
Switches for predefined types of profiles
Customize the arrows
Select the Callout tab. Use the different commands to customize the drawing.
Once you have perform the modifications click on OK to validate.
Modifying Detail View Graphical Definition
Customize the line type and thickness
Слайд 88Copyright DASSAULT SYSTEMES 2002
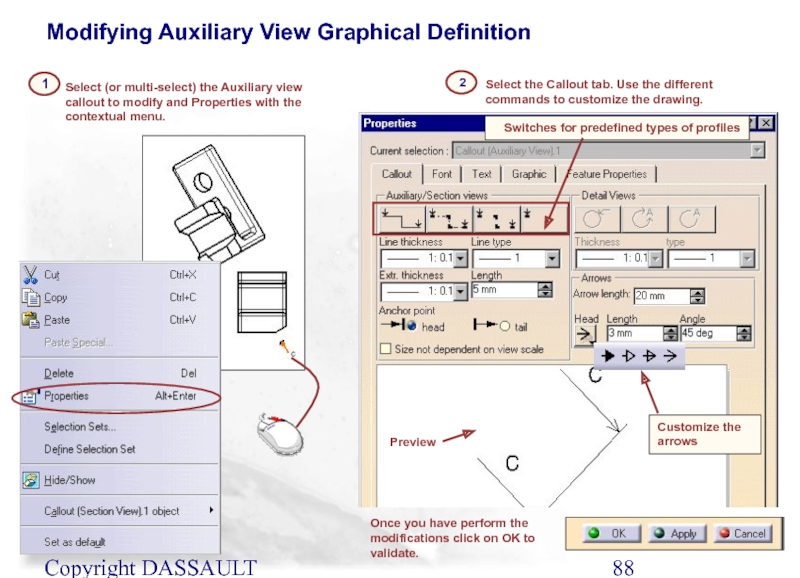
2
1
Select (or multi-select) the Auxiliary view callout to
Select the Callout tab. Use the different commands to customize the drawing.
Preview
Once you have perform the modifications click on OK to validate.
Switches for predefined types of profiles
Customize the arrows
Modifying Auxiliary View Graphical Definition
Слайд 89Modifying a Section Hatching Representation
You will learn how to Modifying
Слайд 90Copyright DASSAULT SYSTEMES 2002
Hatching Patterns are changed to modify the default
Why Change Hatching Pattern?
Слайд 91Copyright DASSAULT SYSTEMES 2002
To change the steel cross hatching to an
1
Select the hatching pattern to modify. Select the properties using the right mouse button.
2
Activate the Pattern table
(see next page)
3
Changing Hatching Pattern (1/2)
Слайд 92Copyright DASSAULT SYSTEMES 2002
Using the Next button, display the Aluminum pattern.
4
The pattern is changed on the section.
Select OK in the Properties window.
5
2
Changing Hatching Pattern (2/2)
Слайд 93Copyright DASSAULT SYSTEMES 2002
In this lesson you have seen…
How to Edit
How to add sheets to a drawing
How to manage views
How to modify Section, Detail and Auxiliary view profiles
How to duplicate generative geometry
How to modify Section, Detail and Auxiliary view’s graphical definition
How to modify section hatching
To Sum Up…
Слайд 94Automatic Dimension Generation
You will create the automatic dimensions and balloons for
Слайд 95Copyright DASSAULT SYSTEMES 2002
What are Generated Dimensions ?
Generated dimension are dimensions
Pad Definition constraints
Sketcher constraints
The dimensions that are generated from the 3D part are determined from the filter settings in the drafting options.
Слайд 96Copyright DASSAULT SYSTEMES 2002
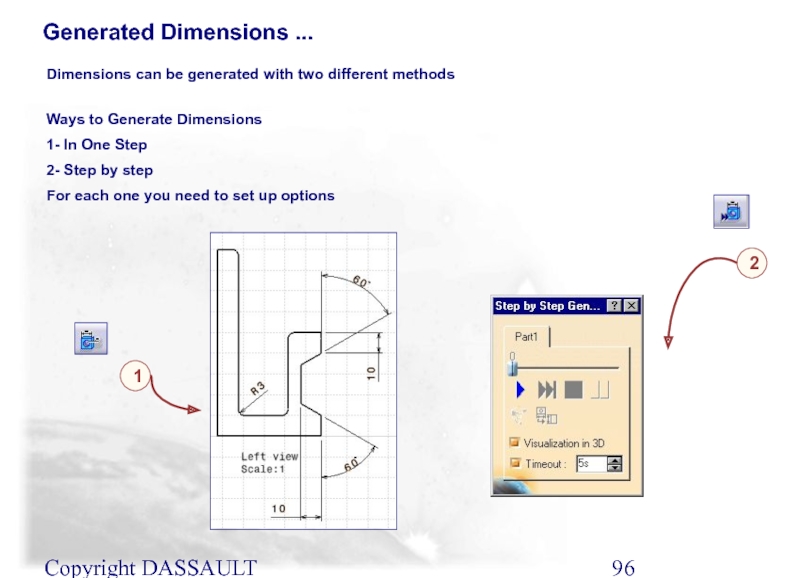
Generated Dimensions ...
Ways to Generate Dimensions
1- In One
2- Step by step
For each one you need to set up options
Dimensions can be generated with two different methods
1
2
Слайд 97Copyright DASSAULT SYSTEMES 2002
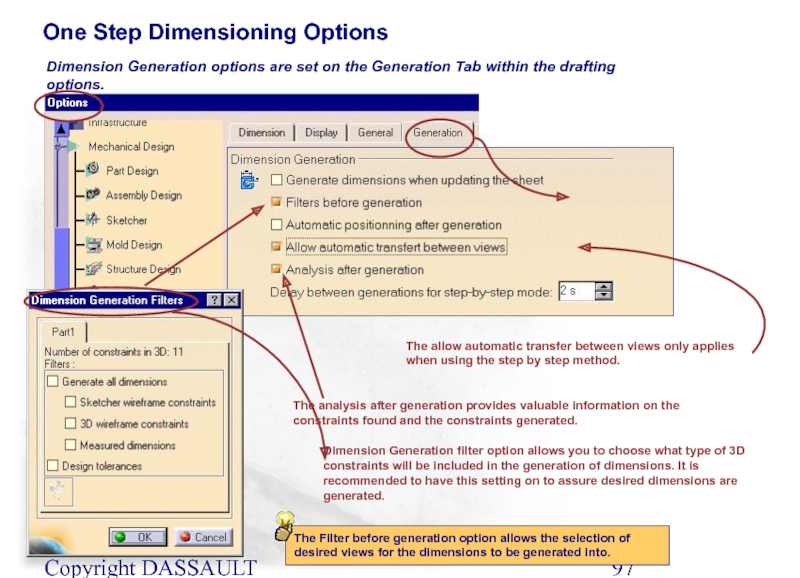
One Step Dimensioning Options
Dimension Generation filter option allows
Dimension Generation options are set on the Generation Tab within the drafting options.
The allow automatic transfer between views only applies when using the step by step method.
The analysis after generation provides valuable information on the constraints found and the constraints generated.
The Filter before generation option allows the selection of desired views for the dimensions to be generated into.
Слайд 98Copyright DASSAULT SYSTEMES 2002
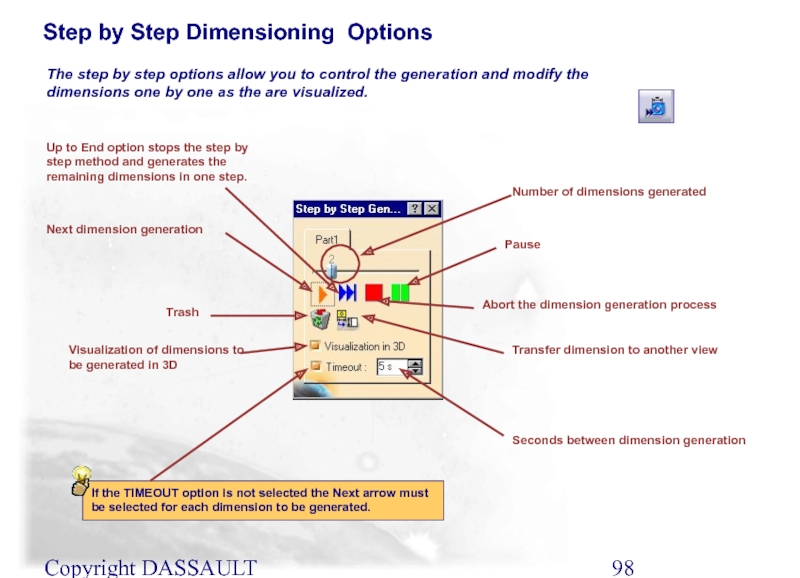
Step by Step Dimensioning Options
Pause
Transfer dimension to another
If the TIMEOUT option is not selected the Next arrow must be selected for each dimension to be generated.
The step by step options allow you to control the generation and modify the dimensions one by one as the are visualized.
Next dimension generation
Number of dimensions generated
Trash
Seconds between dimension generation
Abort the dimension generation process
Visualization of dimensions to be generated in 3D
Up to End option stops the step by step method and generates the remaining dimensions in one step.
Слайд 99Copyright DASSAULT SYSTEMES 2002
Dimensioning Generation in One Step
Select options from the
Select the views that are to receive the dimensions and set the filter option to generate all dimensions and OK
2
Select the one step dimension generation icon
1
3
Dimensions are generated in the selected views. If none of the views are selected the dimensions will generate is the most appropriate view such that they will not have to be dimensioned anywhere else.
4
Constraints can be recovered by selecting the Excluded constraints Icon and the constraint to be recover from 3D geometry.
Слайд 100Copyright DASSAULT SYSTEMES 2002
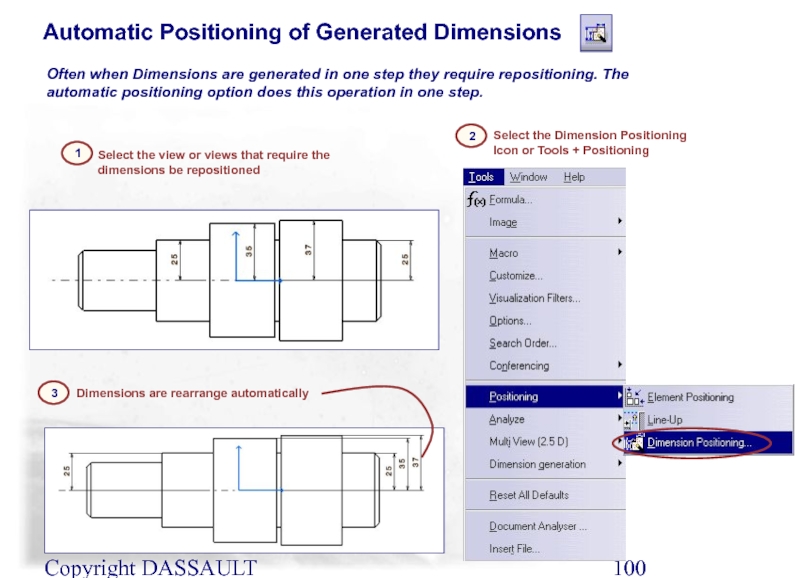
Automatic Positioning of Generated Dimensions
Dimensions are rearrange automatically
3
Select
1
Often when Dimensions are generated in one step they require repositioning. The automatic positioning option does this operation in one step.
Select the Dimension Positioning Icon or Tools + Positioning
2
Слайд 101Copyright DASSAULT SYSTEMES 2002
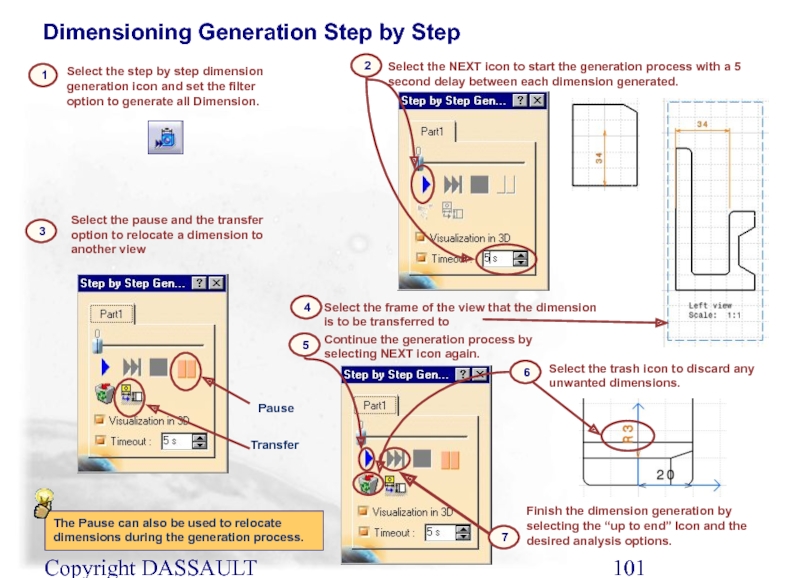
Dimensioning Generation Step by Step
Select the step by
Select the frame of the view that the dimension is to be transferred to
1
4
Select the NEXT icon to start the generation process with a 5 second delay between each dimension generated.
2
Select the pause and the transfer option to relocate a dimension to another view
3
Pause
Transfer
Continue the generation process by selecting NEXT icon again.
5
The Pause can also be used to relocate dimensions during the generation process.
Select the trash icon to discard any unwanted dimensions.
6
Finish the dimension generation by selecting the “up to end” Icon and the desired analysis options.
7
Слайд 102Copyright DASSAULT SYSTEMES 2002
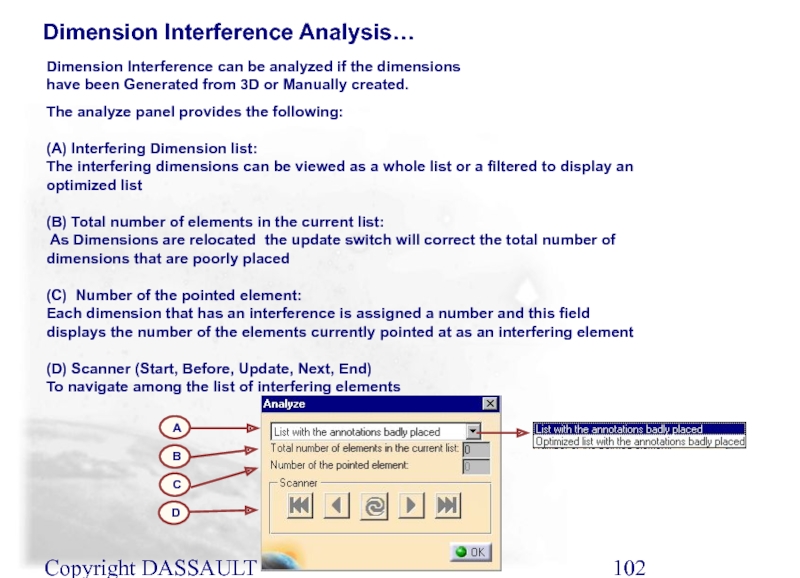
Dimension Interference Analysis…
Dimension Interference can be analyzed if
The analyze panel provides the following:
(A) Interfering Dimension list:
The interfering dimensions can be viewed as a whole list or a filtered to display an optimized list
(B) Total number of elements in the current list:
As Dimensions are relocated the update switch will correct the total number of dimensions that are poorly placed
(C) Number of the pointed element:
Each dimension that has an interference is assigned a number and this field displays the number of the elements currently pointed at as an interfering element
(D) Scanner (Start, Before, Update, Next, End)
To navigate among the list of interfering elements
B
C
D
A
Слайд 103Copyright DASSAULT SYSTEMES 2002
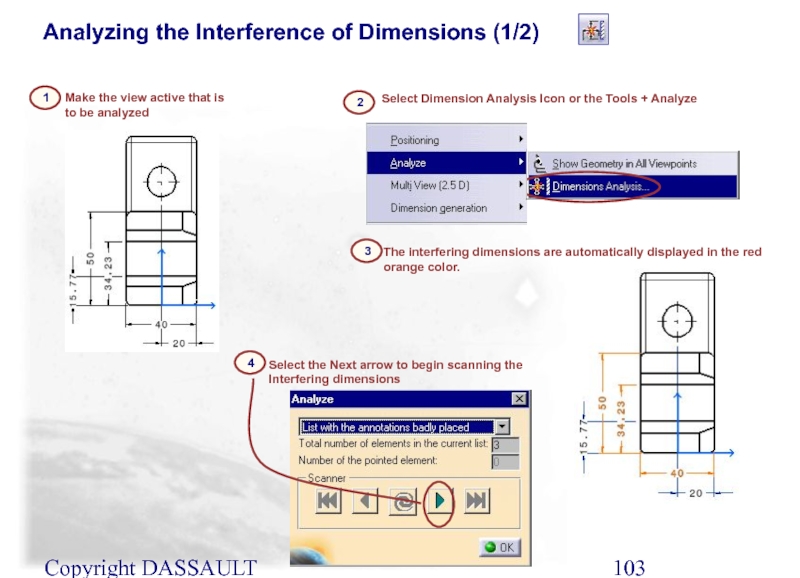
Analyzing the Interference of Dimensions (1/2)
Select Dimension Analysis
2
Make the view active that is to be analyzed
The interfering dimensions are automatically displayed in the red orange color.
Select the Next arrow to begin scanning the Interfering dimensions
3
4
1
Слайд 104Copyright DASSAULT SYSTEMES 2002
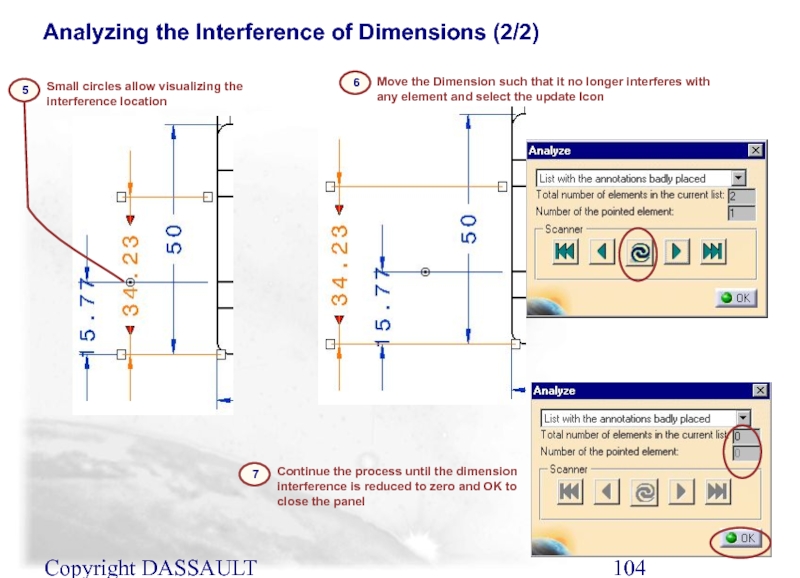
Analyzing the Interference of Dimensions (2/2)
Small circles allow
5
Move the Dimension such that it no longer interferes with any element and select the update Icon
6
Continue the process until the dimension interference is reduced to zero and OK to close the panel
7
Слайд 105Copyright DASSAULT SYSTEMES 2002
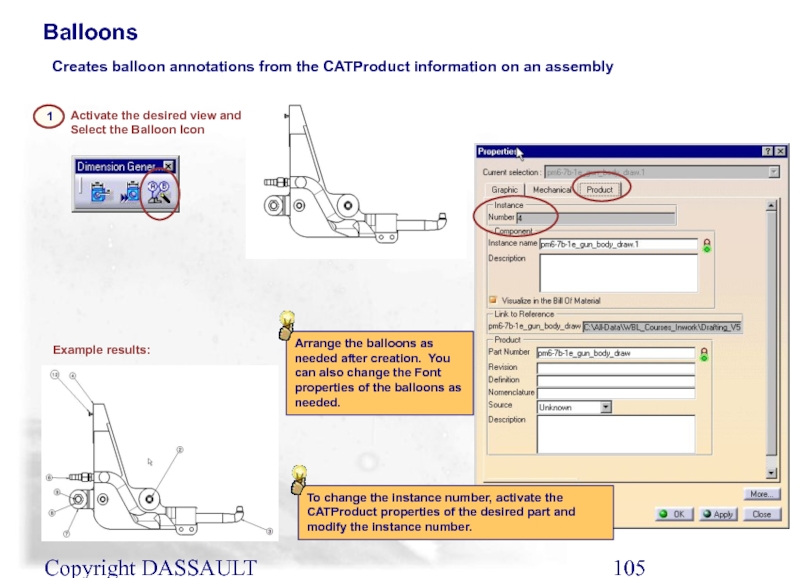
Balloons
Creates balloon annotations from the CATProduct information on
1
Activate the desired view and Select the Balloon Icon
Example results:
Arrange the balloons as needed after creation. You can also change the Font properties of the balloons as needed.
To change the instance number, activate the CATProduct properties of the desired part and modify the instance number.
Слайд 106Copyright DASSAULT SYSTEMES 2002
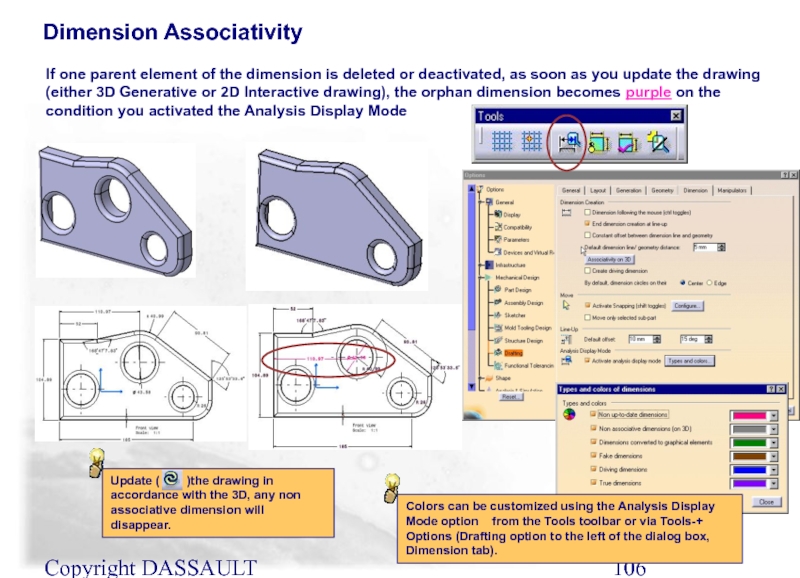
Dimension Associativity
If one parent element of the dimension
Update ( )the drawing in accordance with the 3D, any non associative dimension will disappear.
Colors can be customized using the Analysis Display Mode option from the Tools toolbar or via Tools-+ Options (Drafting option to the left of the dialog box, Dimension tab).
Слайд 107Copyright DASSAULT SYSTEMES 2002
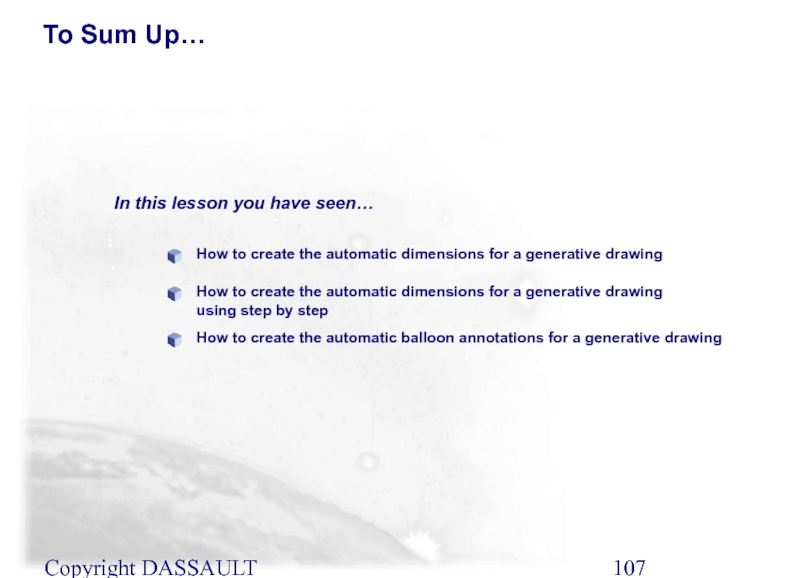
To Sum Up…
In this lesson you have seen…
How
How to create the automatic dimensions for a generative drawing using step by step
How to create the automatic balloon annotations for a generative drawing
Слайд 108Finalizing the Drawing and Printing
In this lesson you will see how
Checking Links to Solid 3D Part and Updating a Drawing
Adding a Title Block
Adding a BOM (Bill of Material)
Printing the drawing
Слайд 110Copyright DASSAULT SYSTEMES 2002
Select the update icon to re-generate the view
Watch out for the Update icon: if it is highlighted, it means that the drawing needs to be updated to reflect the changes that were made on the 3D part it represents
1
Matching Drawing with Modified 3D Part
If the part is not in the Part Design workbench, you can use Edit + Links to check if both representations match.
The red circle in the tree indicates that the 3D part is not loaded
Слайд 111Copyright DASSAULT SYSTEMES 2002
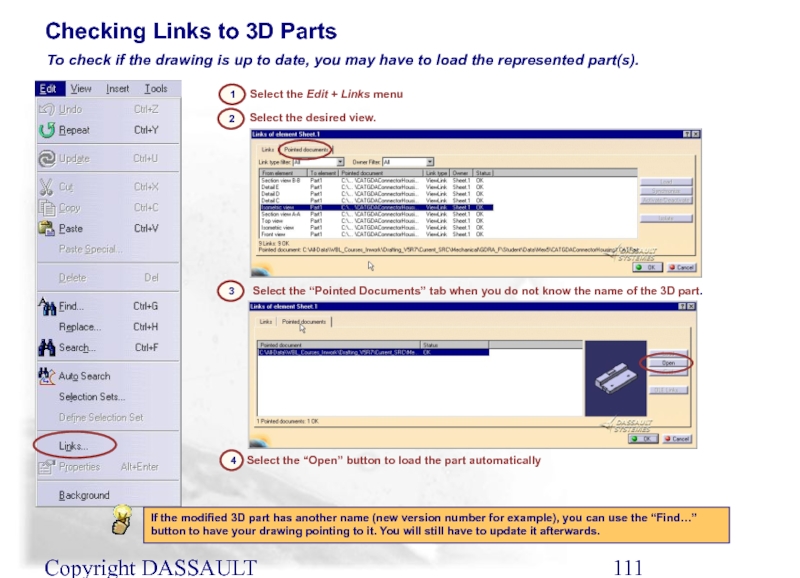
Checking Links to 3D Parts
To check if the
Select the Edit + Links menu
1
2
3
If the modified 3D part has another name (new version number for example), you can use the “Find…” button to have your drawing pointing to it. You will still have to update it afterwards.
4
Select the “Open” button to load the part automatically
Select the “Pointed Documents” tab when you do not know the name of the 3D part.
Select the desired view.
Слайд 113Copyright DASSAULT SYSTEMES 2002
Change to the sheet “Background” with Edit +
1
2
Select Insert + Drawing + Frame and Title Block menu, to set the 2 main frames
Note the blue axis is on the sheet to indicate that you are in the background
Adding a Title Block (1/2)
Слайд 114Copyright DASSAULT SYSTEMES 2002
Use the geometric tools (lines, circles, etc.) to
Use the Text icon and the Text Properties to fill in all necessary information
Use a VB script to complete the Title block geometry and text.
4
When finished, do not forget to go back to (select) “Working View” from the Edit menu
5
4a
4b
Adding a Title Block (2/2)
3c
Слайд 115Copyright DASSAULT SYSTEMES 2002
Select File + Page Setup menu
1
Drawing size
Select the new size format, the desired orientation, the sheets effected and OK.
2
While changing drawing size an option to insert a Background view from another document is available.
Changing Drawing size
Слайд 116Adding a BOM (Bill of Material)
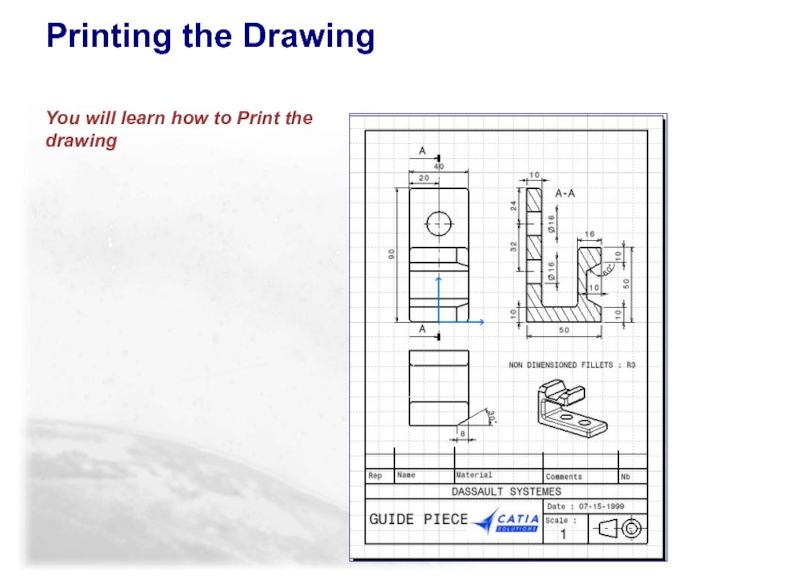
You will learn how to add
Слайд 117Copyright DASSAULT SYSTEMES 2002
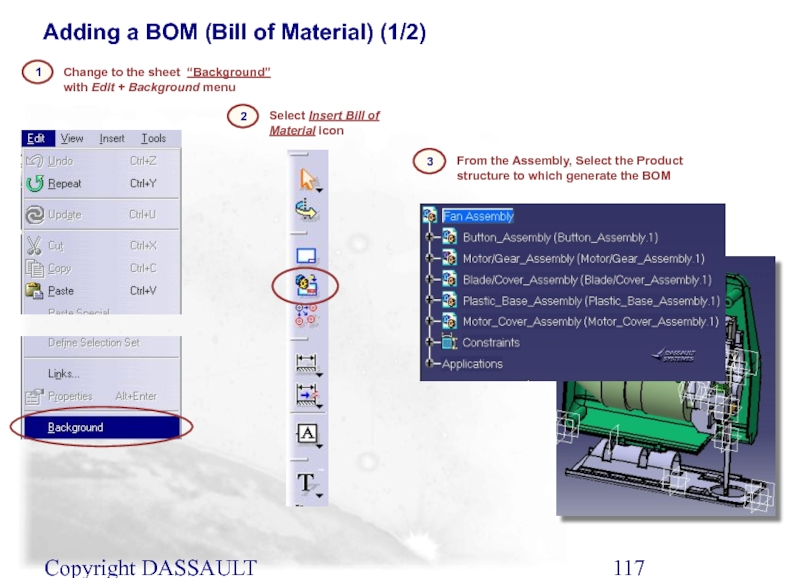
Adding a BOM (Bill of Material) (1/2)
Change to
1
2
From the Assembly, Select the Product structure to which generate the BOM
3
Select Insert Bill of Material icon
Слайд 118Copyright DASSAULT SYSTEMES 2002
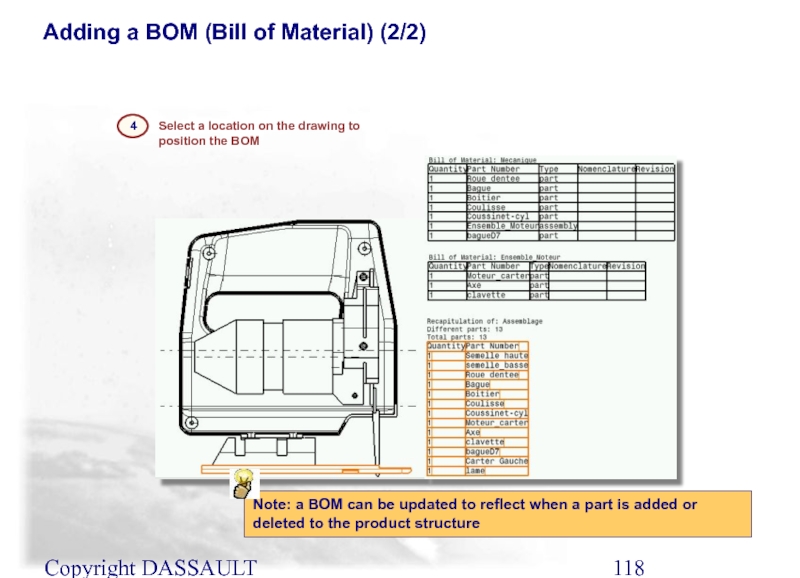
Adding a BOM (Bill of Material) (2/2)
Select a
4
Note: a BOM can be updated to reflect when a part is added or deleted to the product structure
Слайд 120Copyright DASSAULT SYSTEMES 2002
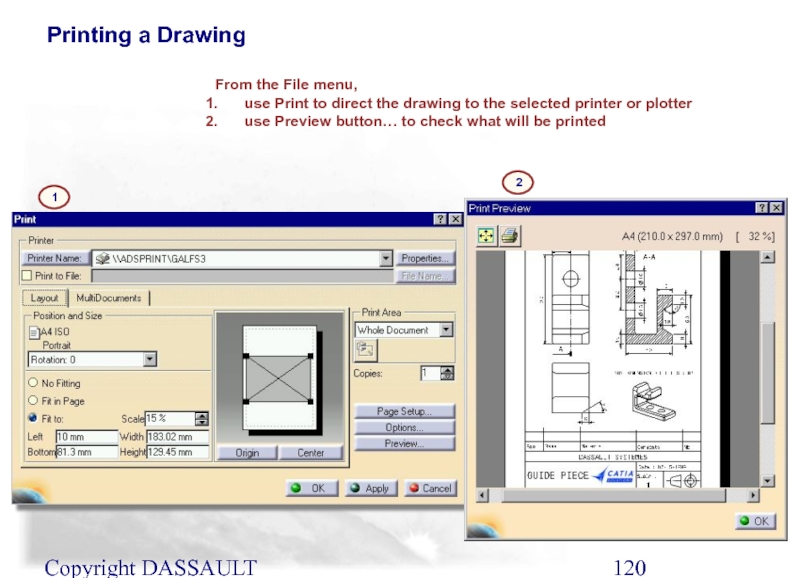
From the File menu,
use Print to
use Preview button… to check what will be printed
1
2
Printing a Drawing
Слайд 121Copyright DASSAULT SYSTEMES 2002
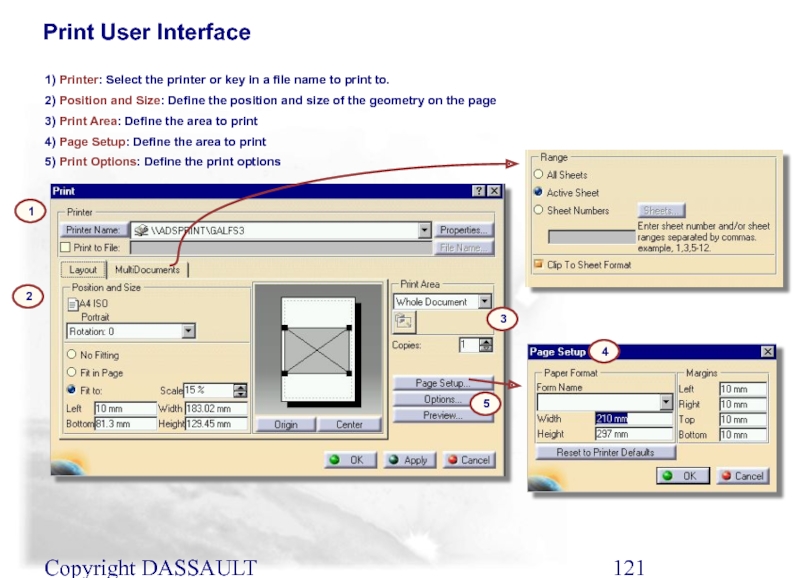
Print User Interface
1) Printer: Select the printer or
2) Position and Size: Define the position and size of the geometry on the page
3) Print Area: Define the area to print
4) Page Setup: Define the area to print
5) Print Options: Define the print options
1
2
3
4
5
Слайд 122Copyright DASSAULT SYSTEMES 2002
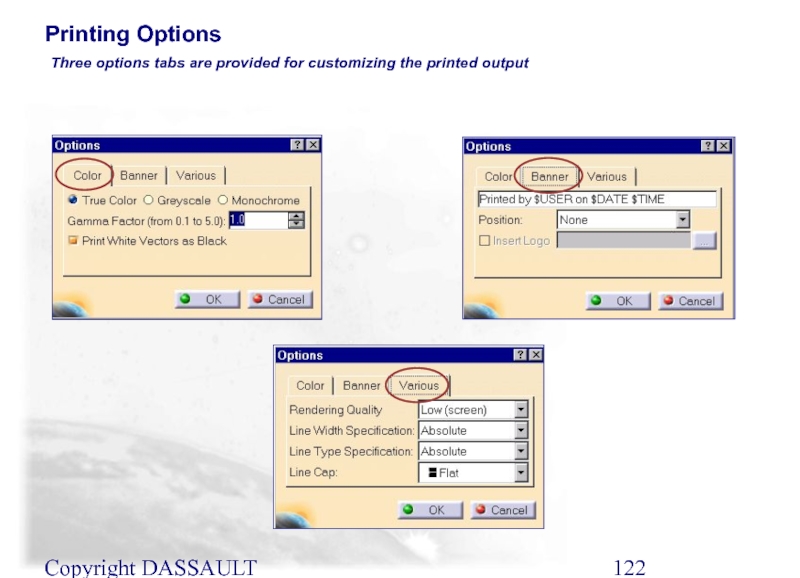
Three options tabs are provided for customizing
Printing Options
Слайд 123Copyright DASSAULT SYSTEMES 2002
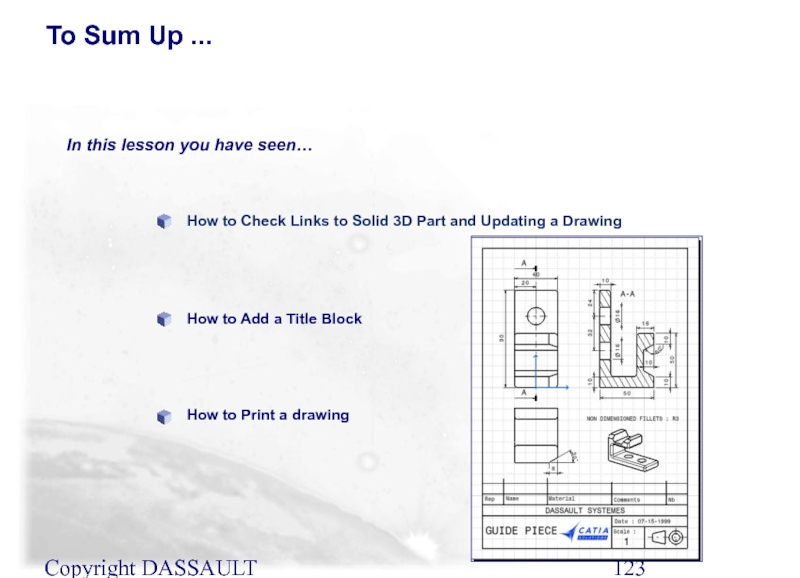
In this lesson you have seen…
How to Check
How to Add a Title Block
How to Print a drawing
To Sum Up ...
Слайд 125Copyright DASSAULT SYSTEMES 2002
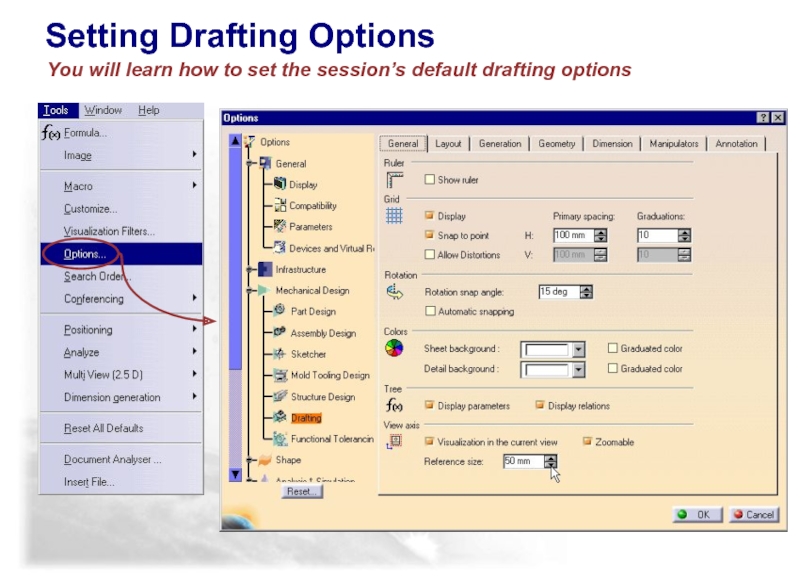
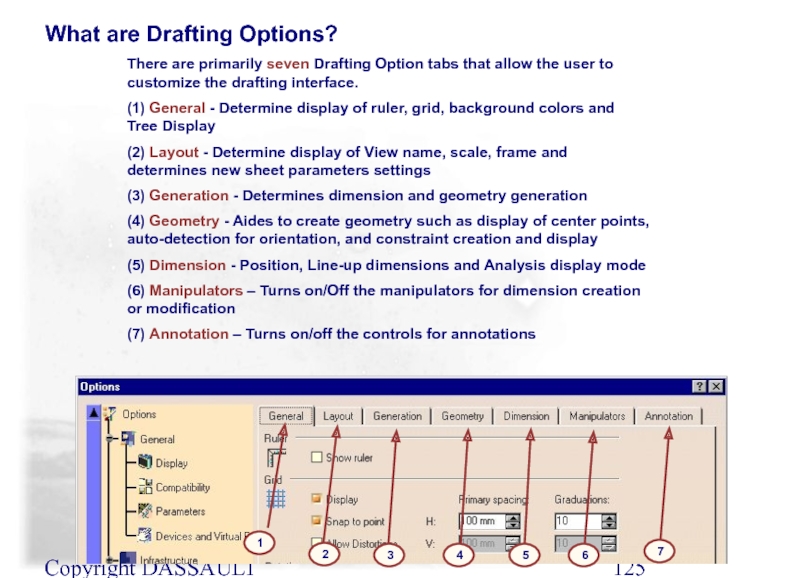
There are primarily seven Drafting Option tabs that
(1) General - Determine display of ruler, grid, background colors and Tree Display
(2) Layout - Determine display of View name, scale, frame and determines new sheet parameters settings
(3) Generation - Determines dimension and geometry generation
(4) Geometry - Aides to create geometry such as display of center points, auto-detection for orientation, and constraint creation and display
(5) Dimension - Position, Line-up dimensions and Analysis display mode
(6) Manipulators – Turns on/Off the manipulators for dimension creation or modification
(7) Annotation – Turns on/off the controls for annotations
What are Drafting Options?
1
2
3
4
5
6
7
Слайд 126Copyright DASSAULT SYSTEMES 2002
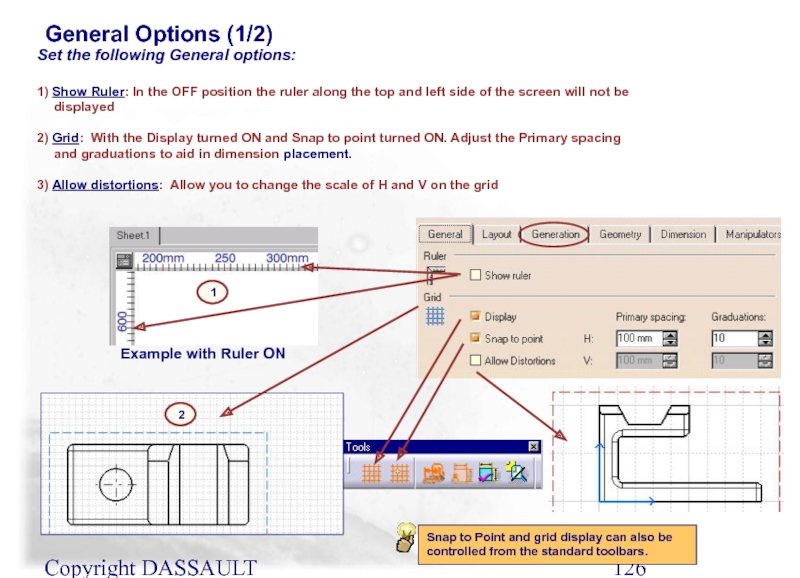
General Options (1/2)
Snap to Point and grid display
Set the following General options:
1) Show Ruler: In the OFF position the ruler along the top and left side of the screen will not be displayed
2) Grid: With the Display turned ON and Snap to point turned ON. Adjust the Primary spacing and graduations to aid in dimension placement.
3) Allow distortions: Allow you to change the scale of H and V on the grid
1
2
Example with Ruler ON
Слайд 127Copyright DASSAULT SYSTEMES 2002
General Options (2/2)
Set the following General options:
1
3
1) Rotation:
2) Colors: Allows easy identification of a Detail sheet by altering the background color
3) Tree: Allows parameters and relations to be displayed in the graph tree
4) View Axis: Provides a blue axis in the view that is current
2
4
Слайд 128Copyright DASSAULT SYSTEMES 2002
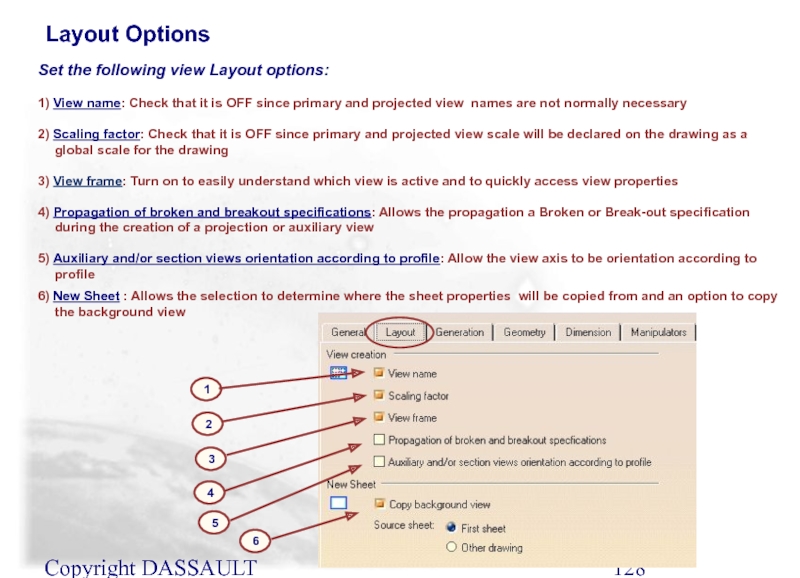
Layout Options
Set the following view Layout options:
1) View
2) Scaling factor: Check that it is OFF since primary and projected view scale will be declared on the drawing as a global scale for the drawing
3) View frame: Turn on to easily understand which view is active and to quickly access view properties
4) Propagation of broken and breakout specifications: Allows the propagation a Broken or Break-out specification during the creation of a projection or auxiliary view
5) Auxiliary and/or section views orientation according to profile: Allow the view axis to be orientation according to profile
6) New Sheet : Allows the selection to determine where the sheet properties will be copied from and an option to copy the background view
1
2
3
5
4
6
Слайд 129Copyright DASSAULT SYSTEMES 2002
Generation Options
Set the following view Generation options:
1
2
Threads are
2) Dimension Generation: Allows dimensions to be automatically positioned after generation, automatic transfer between views and analysis of dimensions that have been generated
Time delay between dimension when using the step by step method can also be set prior to starting the generation process.
1) Geometry Generation: Allows the automatic creation of axis, centerlines, thread representation, fillet boundaries, hidden lines, 3D colors inheritance, project 3D wireframe and set the view linetype
Слайд 130Copyright DASSAULT SYSTEMES 2002
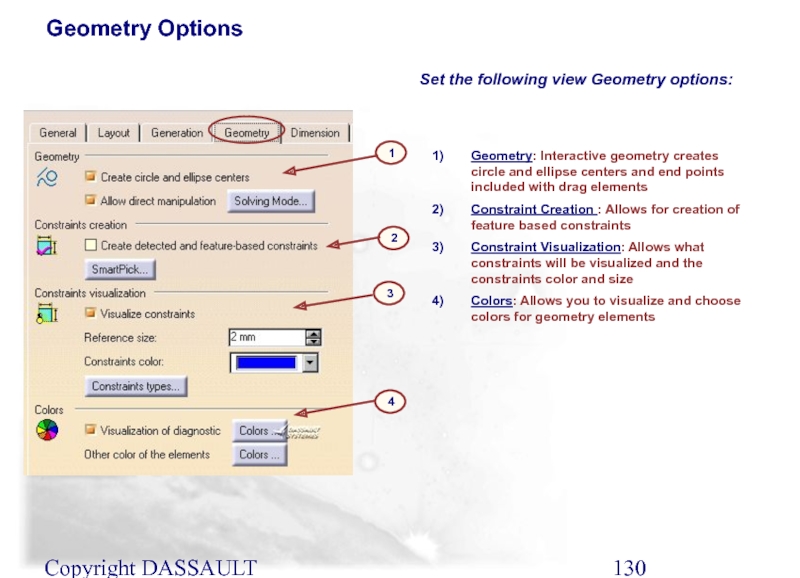
Geometry Options
Set the following view Geometry options:
1
2
Geometry: Interactive
Constraint Creation : Allows for creation of feature based constraints
Constraint Visualization: Allows what constraints will be visualized and the constraints color and size
Colors: Allows you to visualize and choose colors for geometry elements
3
4
Слайд 131Copyright DASSAULT SYSTEMES 2002
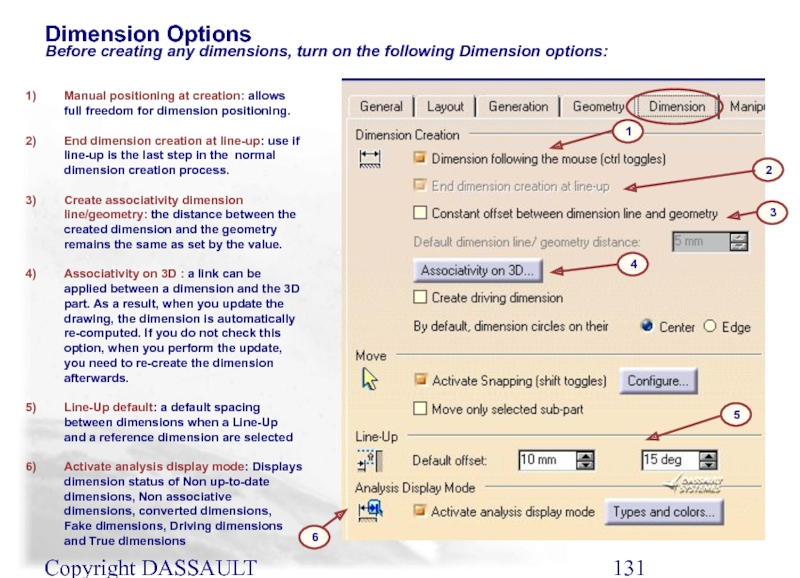
Dimension Options
Manual positioning at creation: allows full freedom
End dimension creation at line-up: use if line-up is the last step in the normal dimension creation process.
Create associativity dimension line/geometry: the distance between the created dimension and the geometry remains the same as set by the value.
Associativity on 3D : a link can be applied between a dimension and the 3D part. As a result, when you update the drawing, the dimension is automatically re-computed. If you do not check this option, when you perform the update, you need to re-create the dimension afterwards.
Line-Up default: a default spacing between dimensions when a Line-Up and a reference dimension are selected
Activate analysis display mode: Displays dimension status of Non up-to-date dimensions, Non associative dimensions, converted dimensions, Fake dimensions, Driving dimensions and True dimensions
Before creating any dimensions, turn on the following Dimension options:
1
2
4
6
5
3
Слайд 132Copyright DASSAULT SYSTEMES 2002
Dimension Manipulators
Option to enable dimension manipulators to
1
2
3
4
5
6
7
1
2
3
4
5
6
7
1a
3a
4a
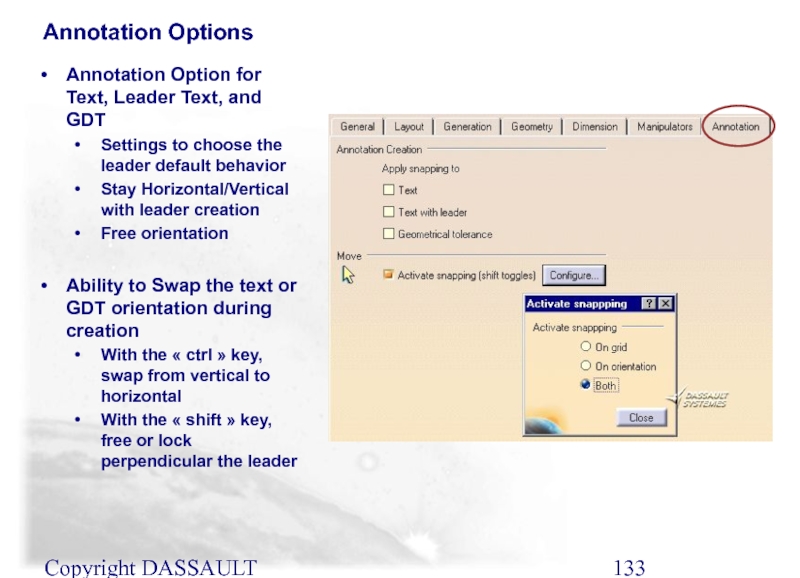
Слайд 133Copyright DASSAULT SYSTEMES 2002
Annotation Options
Annotation Option for Text, Leader Text, and
Settings to choose the leader default behavior
Stay Horizontal/Vertical with leader creation
Free orientation
Ability to Swap the text or GDT orientation during creation
With the « ctrl » key, swap from vertical to horizontal
With the « shift » key, free or lock perpendicular the leader
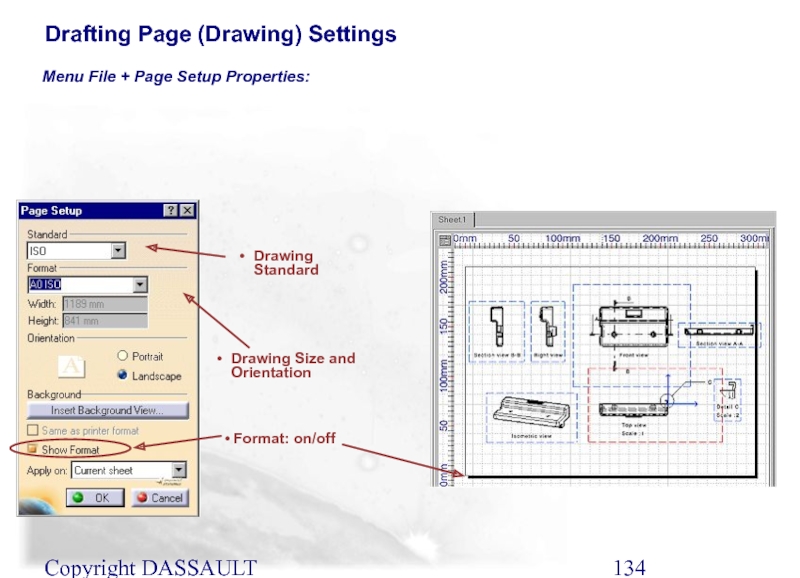
Слайд 134Copyright DASSAULT SYSTEMES 2002
Drawing Standard
Drawing Size and Orientation
Format: on/off
Drafting Page
Menu File + Page Setup Properties:
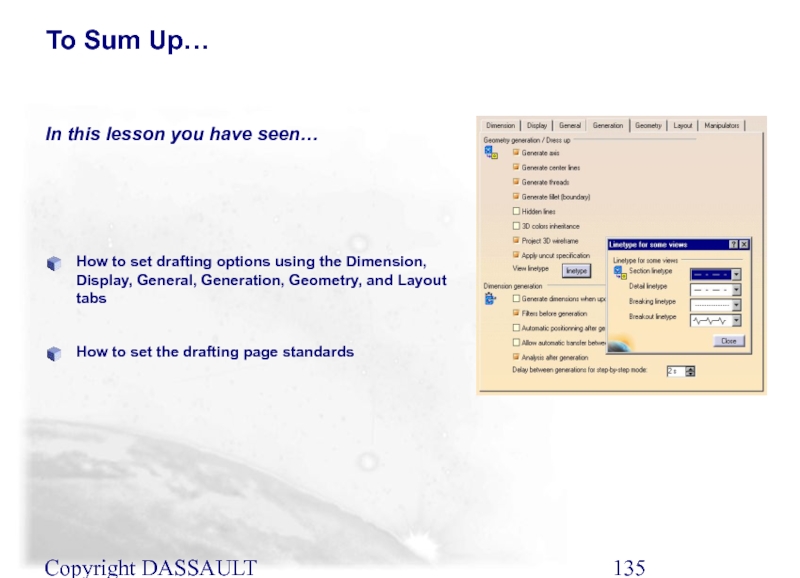
Слайд 135Copyright DASSAULT SYSTEMES 2002
How to set drafting options using the Dimension,
How to set the drafting page standards
In this lesson you have seen…
To Sum Up…
Слайд 136You will learn how to take advantage of visualization aids and
Drafting Visualizations
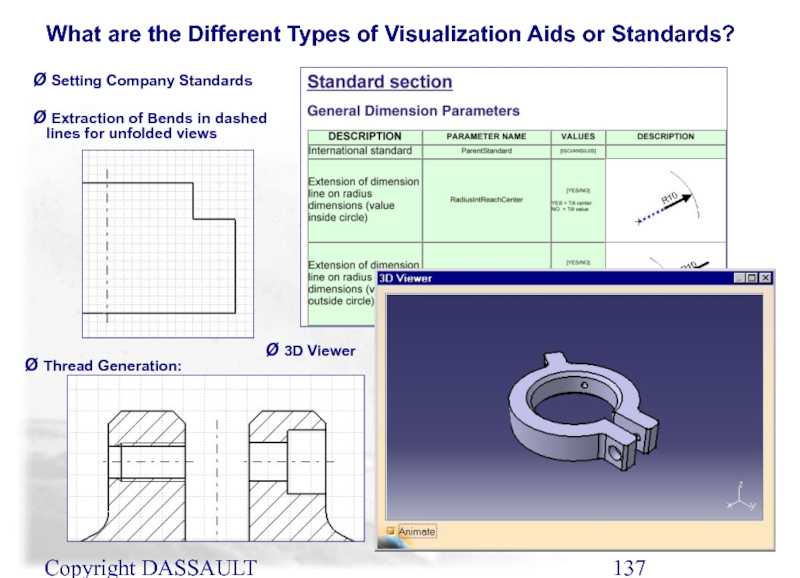
Слайд 137Copyright DASSAULT SYSTEMES 2002
3D Viewer
Extraction of Bends in dashed
Setting Company Standards
Thread Generation:
What are the Different Types of Visualization Aids or Standards?
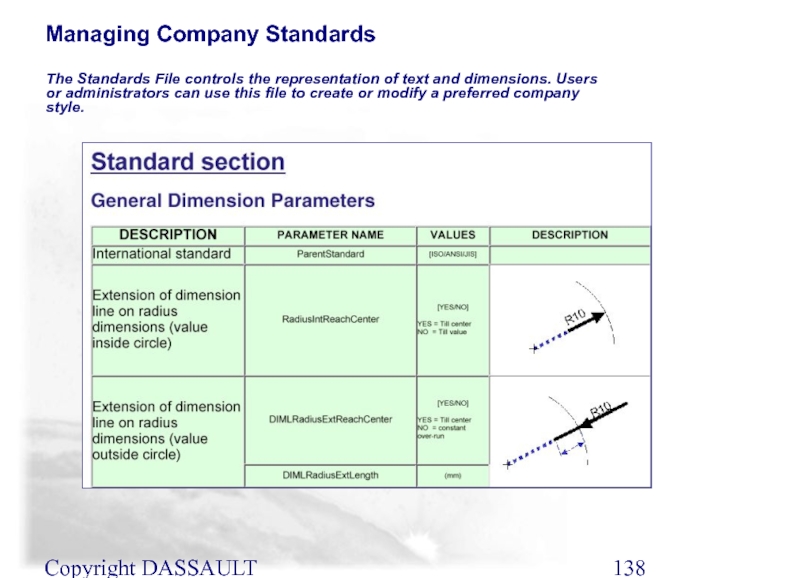
Слайд 138Copyright DASSAULT SYSTEMES 2002
The Standards File controls the representation of text
Managing Company Standards
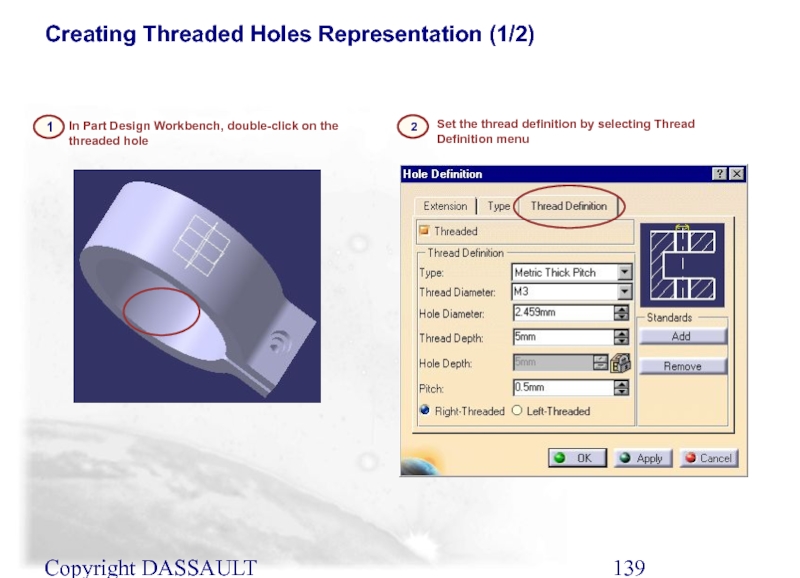
Слайд 139Copyright DASSAULT SYSTEMES 2002
2
Set the thread definition by selecting Thread Definition
In Part Design Workbench, double-click on the threaded hole
1
Creating Threaded Holes Representation (1/2)
Слайд 140Copyright DASSAULT SYSTEMES 2002
3
Generate the views or update the existing views
Creating Threaded Holes Representation (2/2)
Threaded Hole Representation
Слайд 141Copyright DASSAULT SYSTEMES 2002
3
Note the image in the 3D viewer orients
2
Move the cursor over a surface in one of the views
Select Tools + Analyze and select Show Geometry in all Viewpoints
1
The 3D viewer is only for previewing surfaces and is not available in select mode
The 3D Viewer enables visualization of the 3D element’s surface or edge in the views that the element corresponds with
Using the 3D Viewer
Слайд 142Copyright DASSAULT SYSTEMES 2002
3
When the views are updated the hide state
2
Modify the part in any way such that the views require an update
Hide unwanted edges
1
Update Persistency of Generated Geometry With Graphical Representation
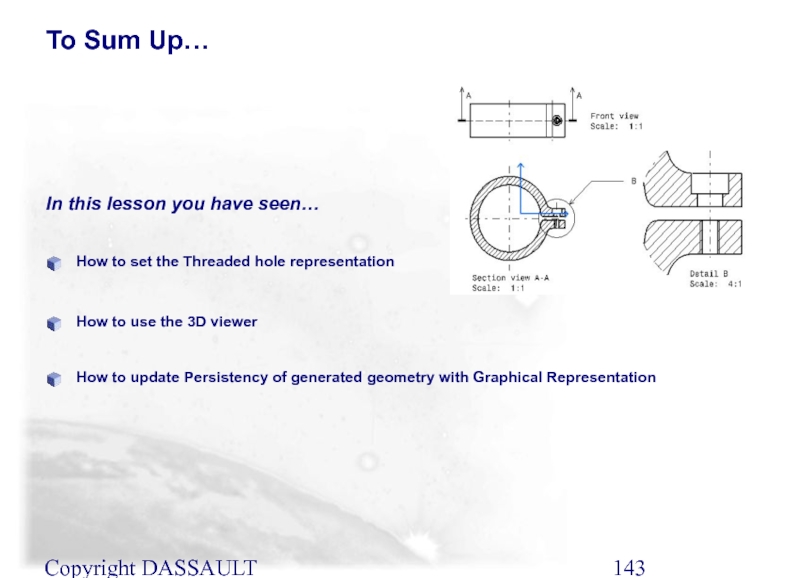
Слайд 143Copyright DASSAULT SYSTEMES 2002
How to set the Threaded hole representation
How to
In this lesson you have seen…
To Sum Up…
How to update Persistency of generated geometry with Graphical Representation
Слайд 145Copyright DASSAULT SYSTEMES 2002
There are various ways to save a Drawing
Save will save the active drawing document
Save As... is similar to Save, but allows you to specify the name and folder for the active document
Save All will propose saving all modified, open documents and children of these document, but you can control which documents actually get saved
Save All As identifies the state of ALL open documents (new, modified, open but not modified), allows you to select which documents to save and allows you to specify the name and folder for these documents
Saving Drawing Documents…
Слайд 146Copyright DASSAULT SYSTEMES 2002
When a generated drawing is saved, the link
To check the information stored , use the Edit + Links … menu right after saving - this might help prevent any surprises next time the document is opened:
Checking the Links to the 3D Part
Слайд 147Copyright DASSAULT SYSTEMES 2002
How to save a drawing
How to check the
In this lesson you have seen…
To Sum Up…
Слайд 148Copyright DASSAULT SYSTEMES 2002
Introduction to the Generative Drafting Workbench
How to start
In this course you have seen…
To Sum Up…
How to create any additional section, auxiliary, isometric or exploded views
How to edit a view’s layout and properties
How to finalize a drawing and print
How to set the drafting options
How to set the drafting visualizations
How to save a drawing document and check the links
