- Главная
- Разное
- Дизайн
- Бизнес и предпринимательство
- Аналитика
- Образование
- Развлечения
- Красота и здоровье
- Финансы
- Государство
- Путешествия
- Спорт
- Недвижимость
- Армия
- Графика
- Культурология
- Еда и кулинария
- Лингвистика
- Английский язык
- Астрономия
- Алгебра
- Биология
- География
- Детские презентации
- Информатика
- История
- Литература
- Маркетинг
- Математика
- Медицина
- Менеджмент
- Музыка
- МХК
- Немецкий язык
- ОБЖ
- Обществознание
- Окружающий мир
- Педагогика
- Русский язык
- Технология
- Физика
- Философия
- Химия
- Шаблоны, картинки для презентаций
- Экология
- Экономика
- Юриспруденция
PAP5300 service manual презентация
Содержание
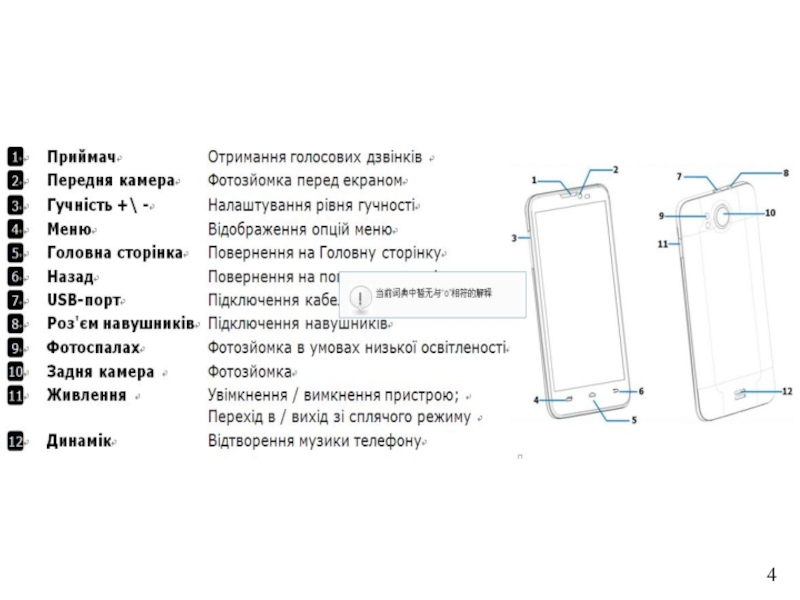
- 1. PAP5300 service manual
- 2. content 1、 Product introduce..………..p3-p5
- 3. Product introduce
- 5. Product introduce Model : Product size: 147*77.2*9.9
- 6. Hot gun 1. Tools list
- 7. 2. Battery caver disassembly open the
- 8. 3. Back caver disassembly 1) Unscrew 7
- 9. Fig. 3 2) Disassemble back cover with
- 10. 4.Main board and front cover disassembly
- 11. 2)remove two screws and open the
- 12. 3)remove the volume key FPC
- 13. 4)open the main board and
- 14. remove the light sensor and
- 15. Fig.9 6.Power key FPC & volume key
- 16. Fig.10 remove the receiver and
- 17. Fig.12 8. Sub PCBA disassembly remove
- 18. Fig.11 9. RF cable 、Main FPC disassembly
- 19. Fig.13 10.MIC disassembly Remove MIC,as the fig.13; Disassembly guide MIC CON. MIC
- 20. Structure parts diagram 3in1 module (LCD, TP
- 21. Repairing guide 1. LCD a. Check
- 22. 2. Camera a. Checking the camera is
- 23. 3. TP a. Checking the SW and
- 24. 4.Ring a. Checking the shrapnel of speaker
- 25. 5.receiver a. Checking the shrapnel of receiver
- 26. a. Checking the MIC and Vibrator is
- 27. a. Checking the shrapnel of earphone if
- 28. a. Checking the voltage of battery if
- 29. a. Checking the voltage of battery if
- 30. Checking the connector of T –card and
- 31. a. Checking RF line if that is
- 32. End

Слайд 2content
1、 Product introduce..………..p3-p5
2、 Disassembly guide ……….p6-p20
3、 Repairing guide …………...p21-p31


Слайд 5Product introduce
Model :
Product size: 147*77.2*9.9
Platform: Qualcomm MSM8225Q, Quad-Core 1.2GHz
Memory:
System: Android 4.1
Frequency band: WCDMA:900/2100MHz,GSM:900/1800/1900MHz
Battery: 2100mAh
charger: Travel charger
USB cable: MICRO 5PIN
earphone: 3.5jack
LCD&TP: 5.3 FWVGA TN, resolution:854*480,Capacitance TP(Glove
touch), multi-point touch
Camera:1.2M and 8.0M CMOS
Support:GPS, BT4.0,WIFI,FM。
Support:3D graphics accelerator,accelerator sensor, distance sensor, light feeling sensor。
System:")

Слайд 72. Battery caver disassembly
open the battery cover,as the Fig. 1
Fig. 1
Disassembly
Battery cover

Слайд 83. Back caver disassembly
1) Unscrew 7 screws in back cover ,as
Fig. 2
Disassembly guide
 Unscrew 7 screws in back cover ,as the Fig.2;Fig. 2Disassembly guide")
 Disassemble back cover with Tommy bar ,as the Fig.3;Disassembly guideBackcover")
Слайд 104.Main board and front cover disassembly
1)The main components of distribution,as
Fig.4
Disassembly guide
800M
CAM.
USB con.
Earphoe con.
Main
PCBA
TP con.
LCD con.
SIM con.
T card con.
Battery
con.
RF cable
Main FPC
Sub PCBA
vibrator
Light
Sensor
con.
Speaker
Support
for GSM
antenna
The main components of distribution,as the fig.4;Fig.4Disassembly guide800MCAM.USB con.Earphoe")
Слайд 11 2)remove two screws and open the LCD con.& TP con.
Fig.5
Disassembly guide
LCDcon.
TPcon.
remove two screws and open the LCD con.& TP con. ,as the fig.5;Fig.5Disassembly guideLCDcon.TPcon.")
Слайд 12 3)remove the volume key FPC & power key FPC,
Fig.6
Disassembly guide
Volume key FPC
Power key FPC
remove the volume key FPC & power key FPC, as the FIG. 6Fig.6Disassembly guideVolume")
Слайд 13 4)open the main board and remove the RF cable
Fig.7
Disassembly guide
RF cable con.
Main FPC con.
open the main board and remove the RF cable con. And main FPC con..as")
Слайд 14 remove the light sensor and 1.2M camera and 8M
5. 3M camera & light sensor disassembly
Fig.8
Disassembly guide
Light sensor con.
Support For
Light sensor
Light sensor FPC
1.2M cam.

Слайд 15Fig.9
6.Power key FPC & volume key FPC disassembly
remove the
Disassembly guide
Power
key FPC
Volume
key FPC

Слайд 16Fig.10
remove the receiver and speaker,as the FIG.10;
7. receiver and
Disassembly guide
Speaker
receiver

Слайд 17Fig.12
8. Sub PCBA disassembly
remove two screws and the sub PCBA
from the ,as the fig.12;
Disassembly guide
Sub PCBA
vibrator

Слайд 18Fig.11
9. RF cable 、Main FPC disassembly
Remove the RF cable and main
Disassembly guide
RF cable con.
main FPC con.
main FPC
RF cable


Слайд 20Structure parts diagram
3in1 module
(LCD, TP & front cover
Back cover
Battery cover
Main FPC
RF
Main PCBA
Sub
PCBA
1.2M camera
8M camera
SPK
Light sensor
receiver
Sensor holder
Support for GSM antenna
Volume
key FPC
Power Key FPC
Power Key
Volume Key

Слайд 21Repairing guide
1. LCD
a. Check if the SW is correct, otherwise to
b. Check the LCD if is ok, otherwise change a new LCD;
c. If that the LCD loose, re-assemble the LCD and test;
d. Checking the LCD connector if is ok, otherwise re-solder it or change a new one;
e. Checking the circuit around the LCD connector.
LCD
connector

Слайд 222. Camera
a. Checking the camera is assemble ok, re-assemble the camera
b. Using the good camera to do cross test, it can check if the camera is ok;
c. Checking the camera connector if is ok as below picture, otherwise to re-solder or change a new one;
d. Checking the circuit around the camera connector.
Repairing guide
Back Camera connector
Front Camera connector

Слайд 233. TP
a. Checking the SW and upgrade the SW;
b. Checking the
c. Using the good TP to do cross test;
d. Checking the TP connector, otherwise re-solder or change a new one;
e. Checking the circuit around the TP connector.
Repairing guide
TP Connector

Слайд 244.Ring
a. Checking the shrapnel of speaker if is ok;
b. Checking the
c. Checking the FPC if is ok;
d. Checking SPK-FPC if connector with sub-board is ok.
Repairing guide

Слайд 255.receiver
a. Checking the shrapnel of receiver if is ok;
b. Checking
c. Checking the connector point on the main board if is ok, as below picture;
c. Checking the receiver circuit if is ok.
Repairing guide

Слайд 26a. Checking the MIC and Vibrator is cold soldering, re-solder it;
b.
c. Checking the circuit of MIC and Vibrator;
d. Checking the FPC if connect ok.
6.MIC and Vibrator
Repairing guide
MIC CON.

Слайд 27a. Checking the shrapnel of earphone if is ok;
b. Checking the
c. Change earphone connector;
c. Checking the circuit of earphone.
7. Earphone
Repairing guide
earphone

Слайд 28a. Checking the voltage of battery if is 3.8-4.2V and connect
b. Upgrade the SW;
b. Checking the power on key and circuit around it.;
8.No Power On
Repairing guide
Power On

Слайд 29a. Checking the voltage of battery if is over 3.4V;
b. Checking
c. Checking the USB connector and circuit if is ok.
9.No charging
Repairing guide
USB Connector

Слайд 30Checking the connector of T –card and SIM card;
Change the
10.No SIM card and No memory card
Repairing guide
T-card
connector
SIM
Connector 2
SIM Connector 1

Слайд 31a. Checking RF line if that is broken;
b. Checking RF
11.Signal
Repairing guide
RF connector
Sub-board RF connector