- Главная
- Разное
- Дизайн
- Бизнес и предпринимательство
- Аналитика
- Образование
- Развлечения
- Красота и здоровье
- Финансы
- Государство
- Путешествия
- Спорт
- Недвижимость
- Армия
- Графика
- Культурология
- Еда и кулинария
- Лингвистика
- Английский язык
- Астрономия
- Алгебра
- Биология
- География
- Детские презентации
- Информатика
- История
- Литература
- Маркетинг
- Математика
- Медицина
- Менеджмент
- Музыка
- МХК
- Немецкий язык
- ОБЖ
- Обществознание
- Окружающий мир
- Педагогика
- Русский язык
- Технология
- Физика
- Философия
- Химия
- Шаблоны, картинки для презентаций
- Экология
- Экономика
- Юриспруденция
CATIAPart Design Advanced презентация
Содержание
- 1. CATIAPart Design Advanced
- 2. Course Presentation Objectives of the course In
- 3. Copyright DASSAULT SYSTEMES 2002 Table of Contents
- 4. Copyright DASSAULT SYSTEMES 2002 Table of Contents
- 5. Advanced Tools You will learn how to
- 6. Copyright DASSAULT SYSTEMES 2002 You will learn
- 7. Copyright DASSAULT SYSTEMES 2002 Some Key Points:
- 8. Copyright DASSAULT SYSTEMES 2002 Holes/Pockets/Pads not Normal
- 9. Copyright DASSAULT SYSTEMES 2002 You will learn
- 10. Copyright DASSAULT SYSTEMES 2002 Creating Grooves 4
- 11. Copyright DASSAULT SYSTEMES 2002 Groove : 3d
- 12. Copyright DASSAULT SYSTEMES 2002 Groove : Reverse
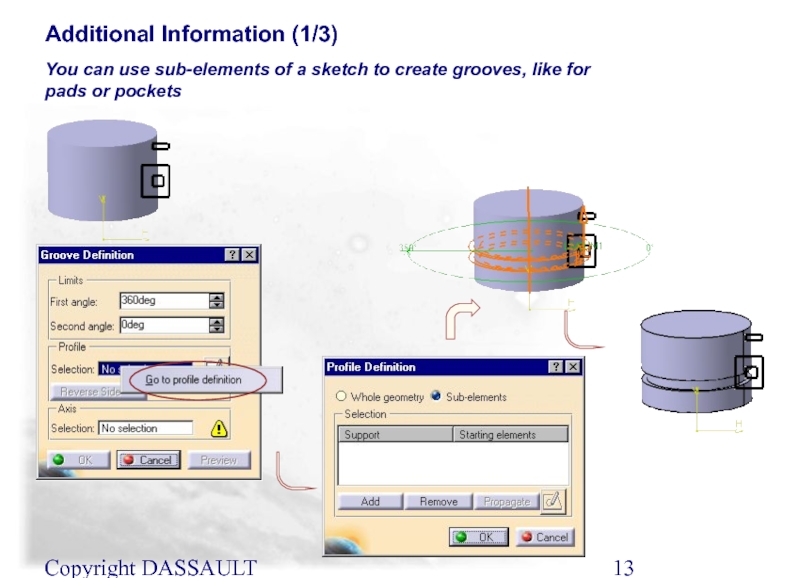
- 13. Copyright DASSAULT SYSTEMES 2002 Additional Information (1/3)
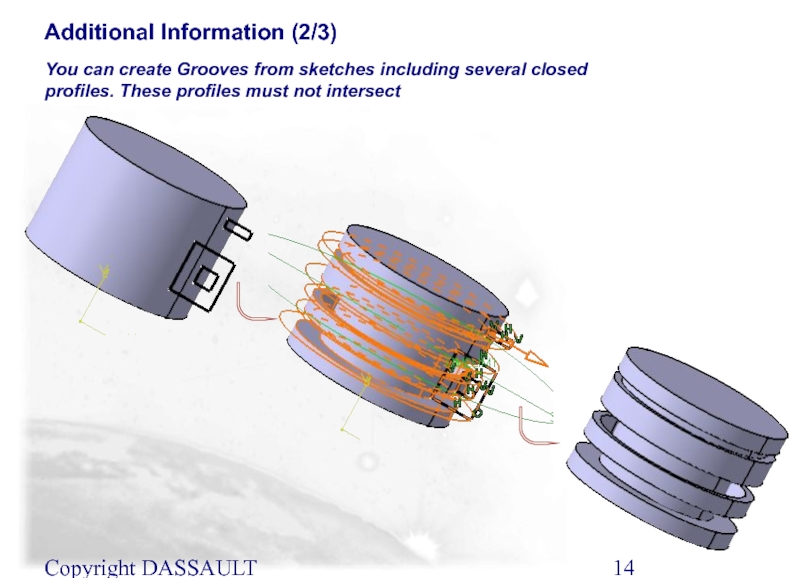
- 14. Copyright DASSAULT SYSTEMES 2002 Additional Information (2/3)
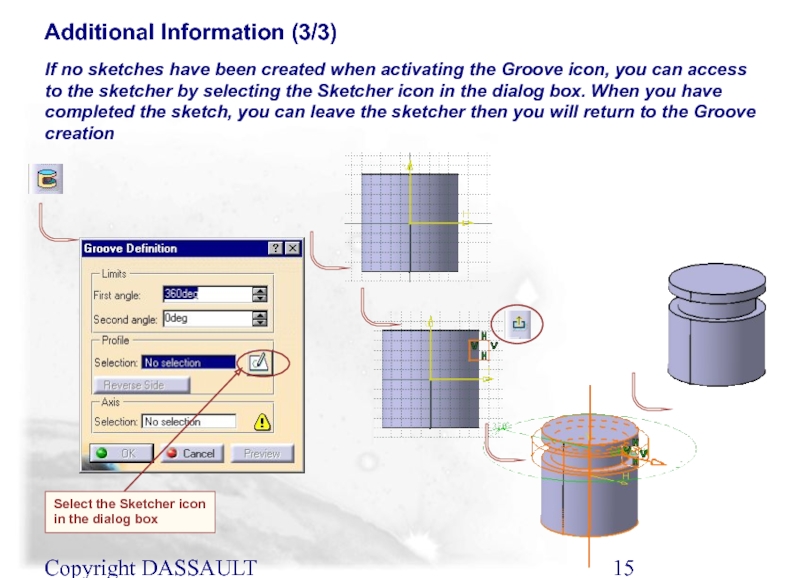
- 15. Copyright DASSAULT SYSTEMES 2002 Additional Information (3/3)
- 16. Copyright DASSAULT SYSTEMES 2002 In this lesson
- 17. Copyright DASSAULT SYSTEMES 2002 A Rib is
- 18. Copyright DASSAULT SYSTEMES 2002 A slot is
- 19. Copyright DASSAULT SYSTEMES 2002 You will find
- 20. Copyright DASSAULT SYSTEMES 2002 Creating a Simple
- 21. Copyright DASSAULT SYSTEMES 2002 Creating a Slot
- 22. Copyright DASSAULT SYSTEMES 2002 Additional Information (1/5)
- 23. Copyright DASSAULT SYSTEMES 2002 Additional Information (2/5)
- 24. Copyright DASSAULT SYSTEMES 2002 Additional Information (3/5)
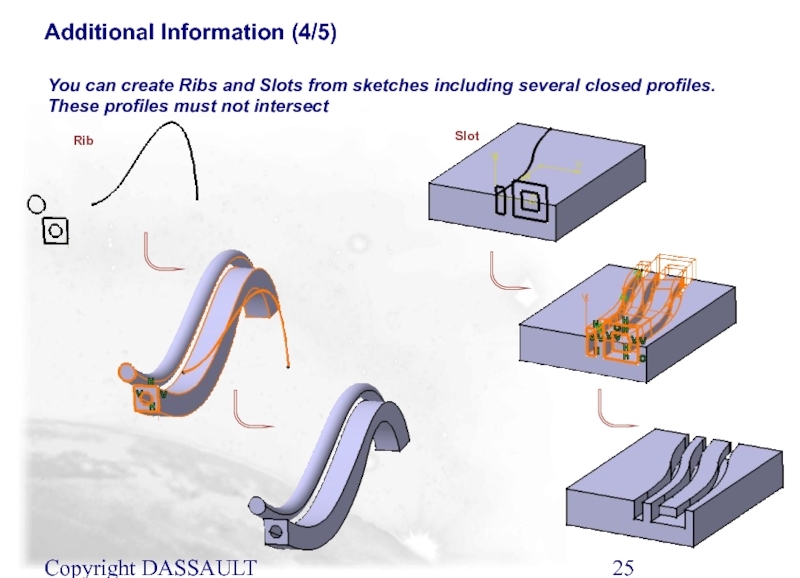
- 25. Copyright DASSAULT SYSTEMES 2002 Additional Information (4/5)
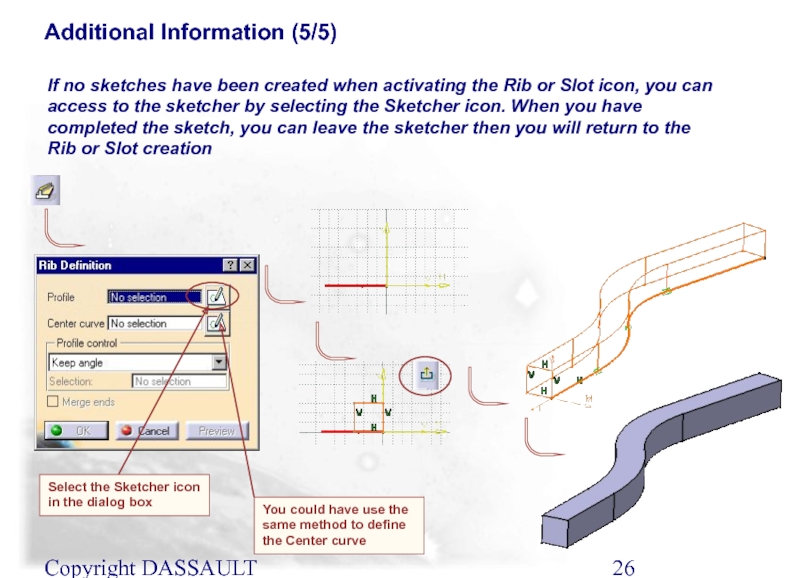
- 26. Copyright DASSAULT SYSTEMES 2002 Additional Information (5/5)
- 27. Copyright DASSAULT SYSTEMES 2002 In this lesson
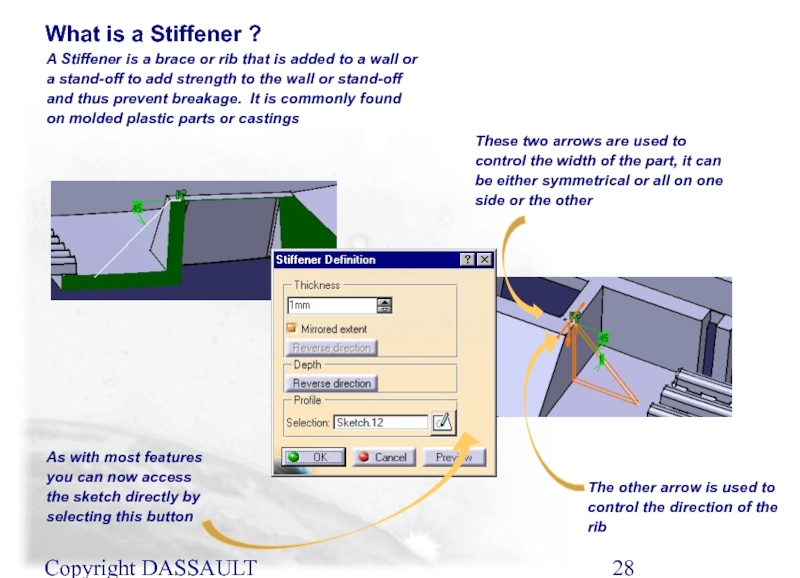
- 28. Copyright DASSAULT SYSTEMES 2002 A Stiffener is
- 29. Copyright DASSAULT SYSTEMES 2002 They can
- 30. Copyright DASSAULT SYSTEMES 2002 Creating Stiffeners
- 31. Copyright DASSAULT SYSTEMES 2002 Additional Information You
- 32. Creating Lofts You will learn how to
- 33. Copyright DASSAULT SYSTEMES 2002 In this lesson
- 34. Copyright DASSAULT SYSTEMES 2002 A Loft can
- 35. Copyright DASSAULT SYSTEMES 2002 Lofts can
- 36. Copyright DASSAULT SYSTEMES 2002 Loft Creation :
- 37. Copyright DASSAULT SYSTEMES 2002 Loft Creation :
- 38. Copyright DASSAULT SYSTEMES 2002 Loft Creation :
- 39. Copyright DASSAULT SYSTEMES 2002 Loft Creation :
- 40. Copyright DASSAULT SYSTEMES 2002 In this lesson
- 41. Copyright DASSAULT SYSTEMES 2002 The Remove Loft
- 42. Copyright DASSAULT SYSTEMES 2002 Remove Loft Material
- 43. Copyright DASSAULT SYSTEMES 2002 Remove Loft Material
- 44. Copyright DASSAULT SYSTEMES 2002 Remove Loft Material
- 45. Copyright DASSAULT SYSTEMES 2002 In this lesson
- 46. Copyright DASSAULT SYSTEMES 2002 A Coupling tab
- 47. Copyright DASSAULT SYSTEMES 2002 Coupling when Creating
- 48. Copyright DASSAULT SYSTEMES 2002 Coupling when Creating
- 49. Copyright DASSAULT SYSTEMES 2002 Coupling when Creating
- 50. Copyright DASSAULT SYSTEMES 2002 Coupling when Creating
- 51. Copyright DASSAULT SYSTEMES 2002 Coupling when Creating
- 52. Copyright DASSAULT SYSTEMES 2002 Coupling when Creating
- 53. Copyright DASSAULT SYSTEMES 2002 Loft: Manual Coupling
- 54. Copyright DASSAULT SYSTEMES 2002 Loft: Manual Coupling
- 55. Copyright DASSAULT SYSTEMES 2002 Manual Coupling: Displaying
- 56. Copyright DASSAULT SYSTEMES 2002 Loft: Relimitation (1/3)
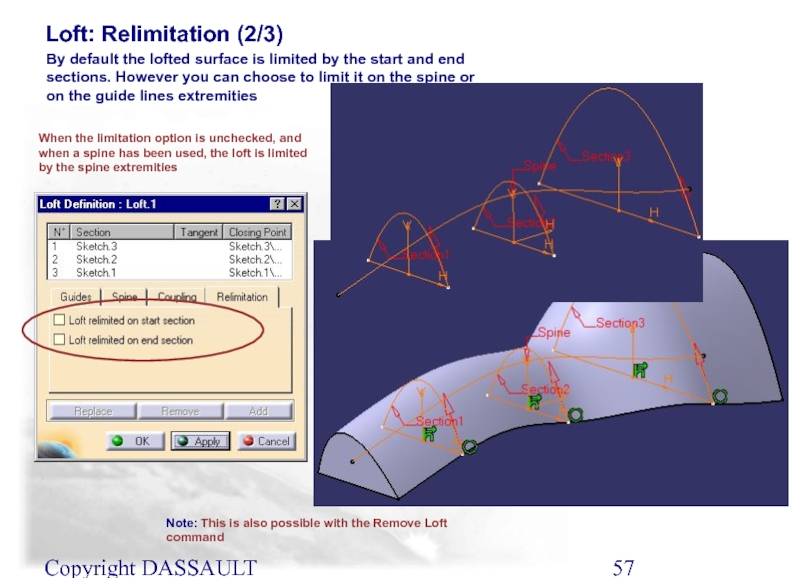
- 57. Copyright DASSAULT SYSTEMES 2002 Loft: Relimitation (2/3)
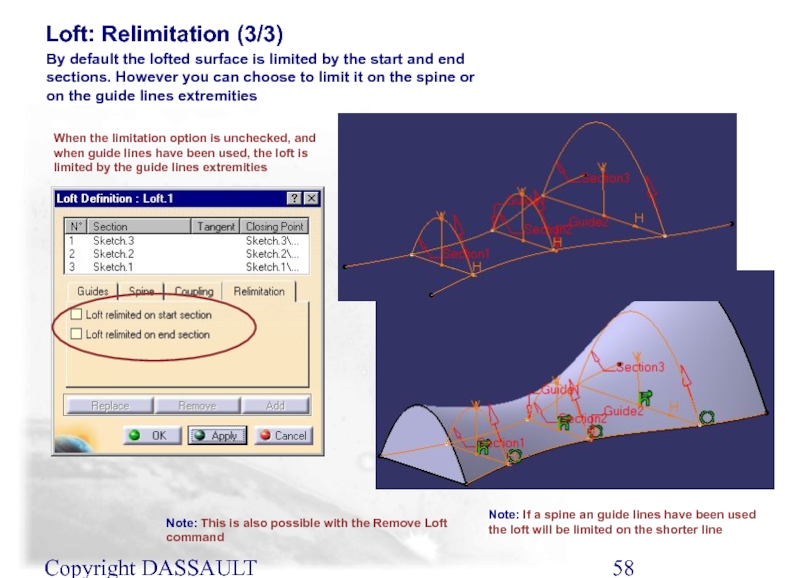
- 58. Copyright DASSAULT SYSTEMES 2002 Loft: Relimitation (3/3)
- 59. Copyright DASSAULT SYSTEMES 2002 In this lesson
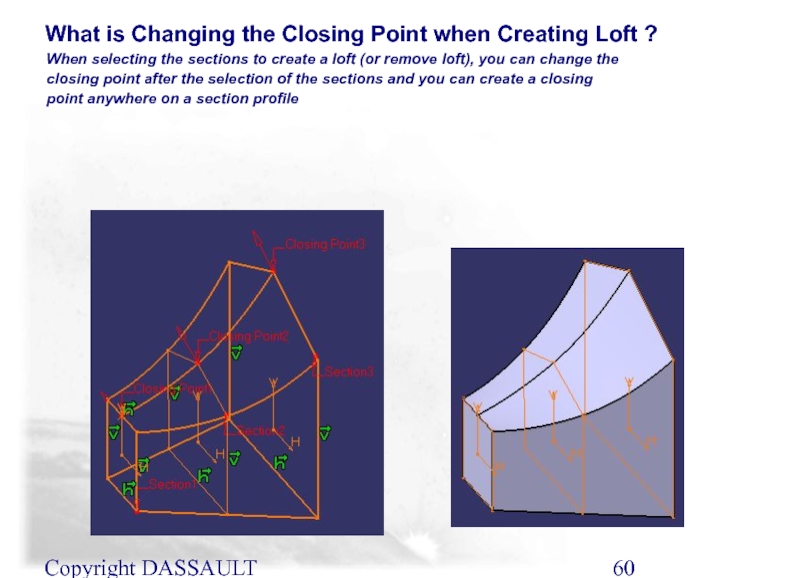
- 60. Copyright DASSAULT SYSTEMES 2002 When selecting the
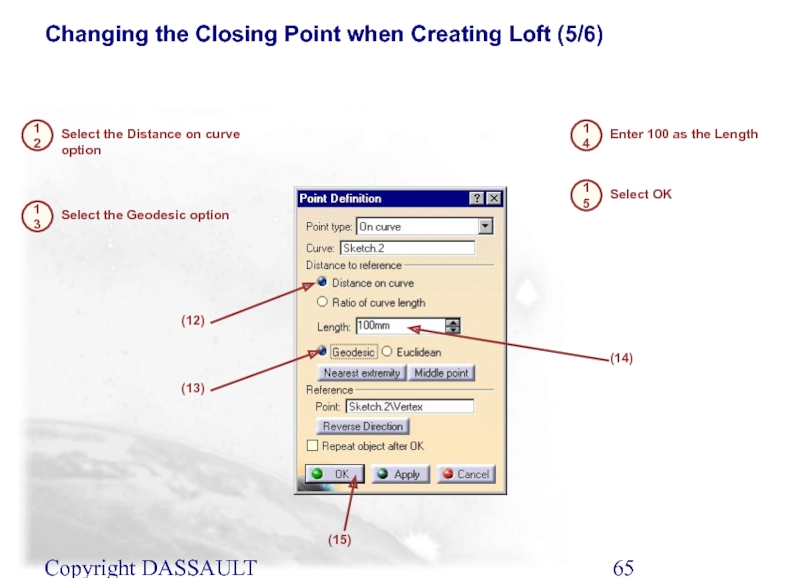
- 61. Copyright DASSAULT SYSTEMES 2002 Changing the Closing
- 62. Copyright DASSAULT SYSTEMES 2002 Changing the Closing
- 63. Copyright DASSAULT SYSTEMES 2002 Changing the Closing
- 64. Copyright DASSAULT SYSTEMES 2002 Changing the Closing
- 65. Copyright DASSAULT SYSTEMES 2002 Changing the Closing
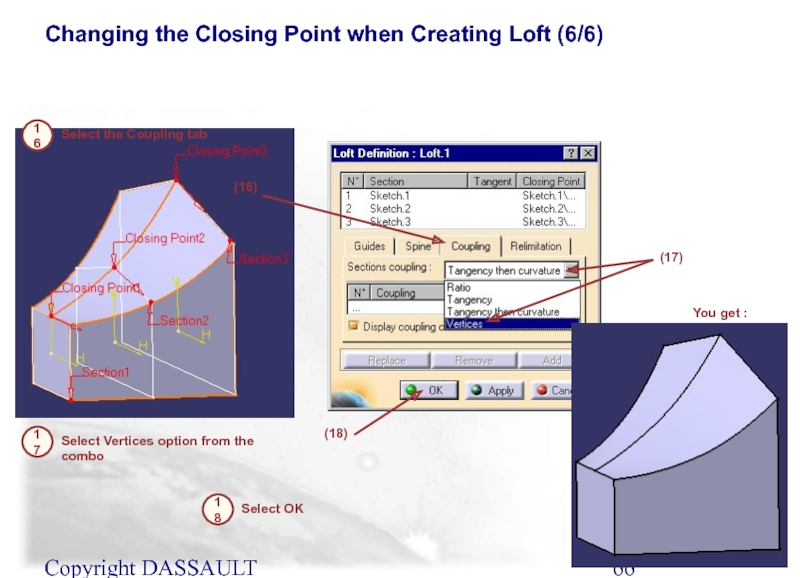
- 66. Copyright DASSAULT SYSTEMES 2002 Changing the Closing
- 67. Copyright DASSAULT SYSTEMES 2002 You will learn
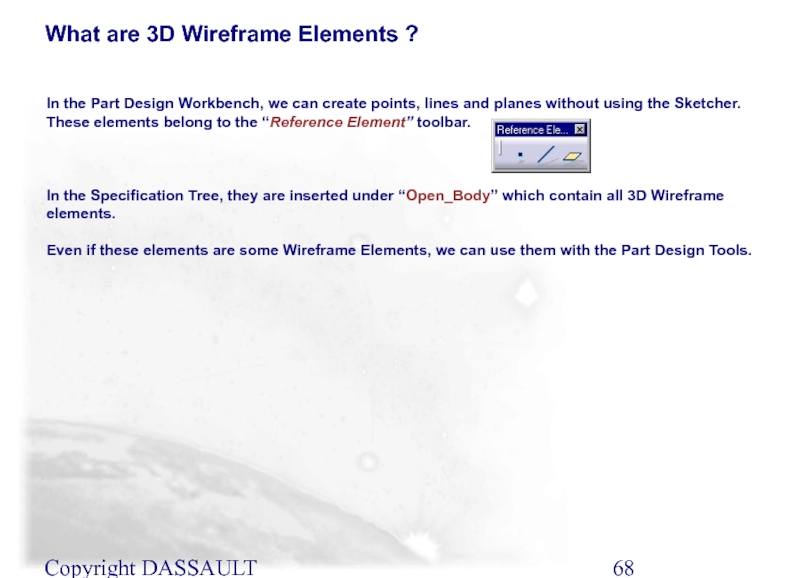
- 68. Copyright DASSAULT SYSTEMES 2002 What are 3D
- 69. Copyright DASSAULT SYSTEMES 2002 A dialog Box
- 70. Copyright DASSAULT SYSTEMES 2002 A dialog Box
- 71. Copyright DASSAULT SYSTEMES 2002 A dialog Box
- 72. Copyright DASSAULT SYSTEMES 2002 Using 3D Wireframe
- 73. Copyright DASSAULT SYSTEMES 2002 We will learn
- 74. Copyright DASSAULT SYSTEMES 2002 There are four
- 75. Copyright DASSAULT SYSTEMES 2002 There are four
- 76. Copyright DASSAULT SYSTEMES 2002 Split 1
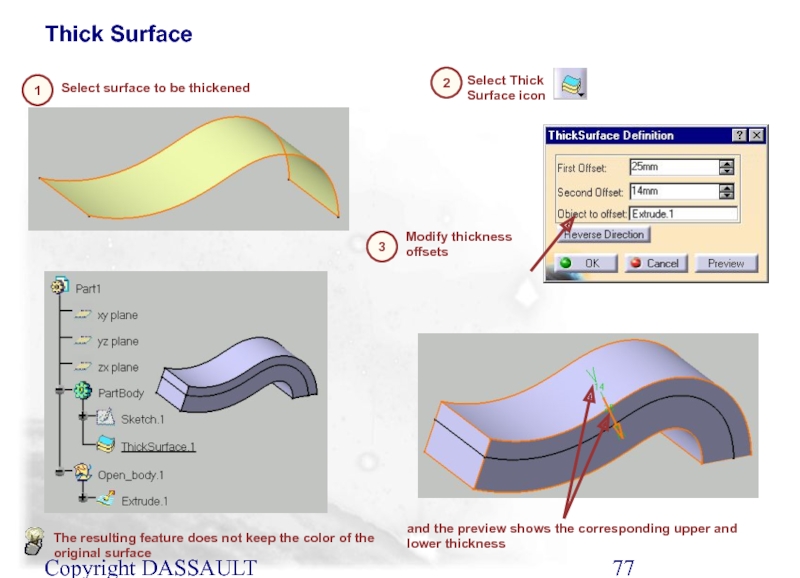
- 77. Copyright DASSAULT SYSTEMES 2002 Thick Surface
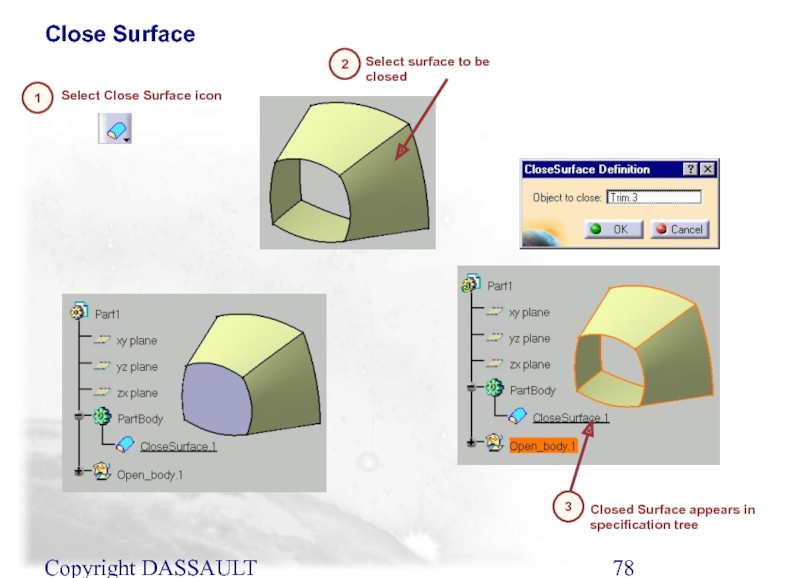
- 78. Copyright DASSAULT SYSTEMES 2002 Close Surface
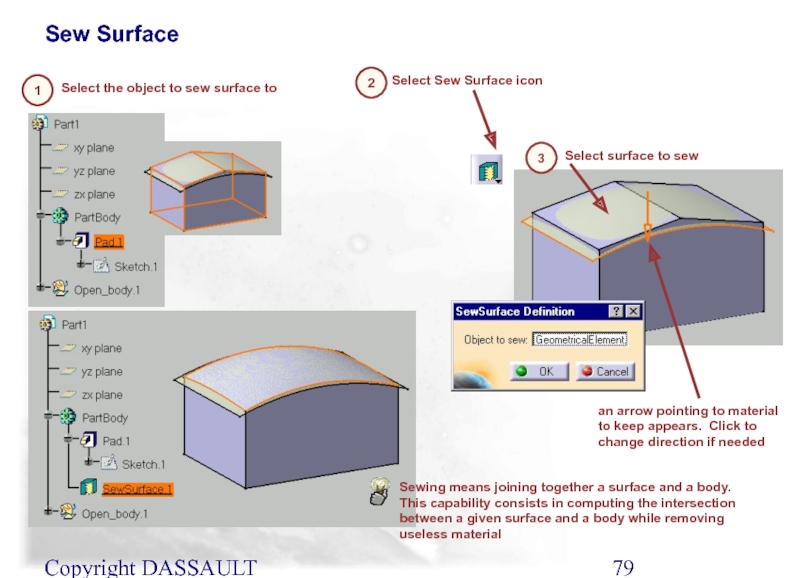
- 79. Copyright DASSAULT SYSTEMES 2002 Sew Surface
- 80. Copyright DASSAULT SYSTEMES 2002 Advance Draft In
- 81. Copyright DASSAULT SYSTEMES 2002 Select the
- 82. Copyright DASSAULT SYSTEMES 2002 With the Advanced
- 83. Copyright DASSAULT SYSTEMES 2002 The 1st side
- 84. Copyright DASSAULT SYSTEMES 2002 To define the
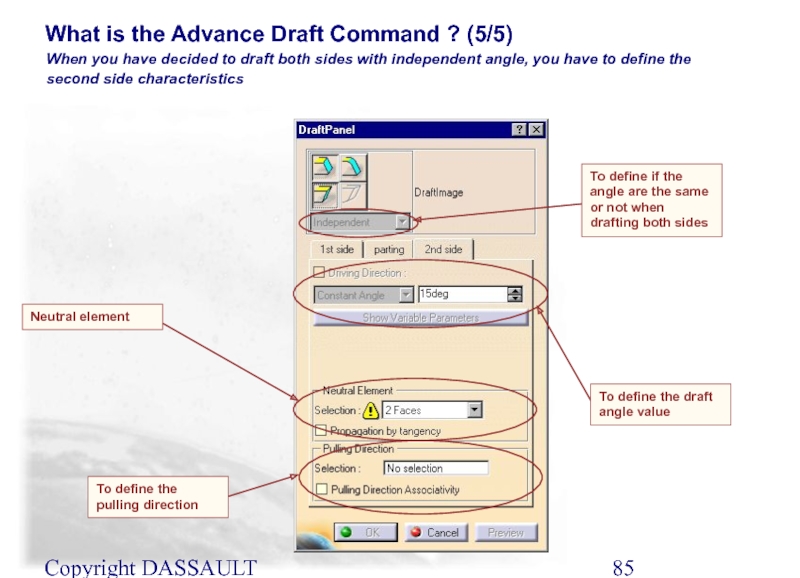
- 85. Copyright DASSAULT SYSTEMES 2002 When you have
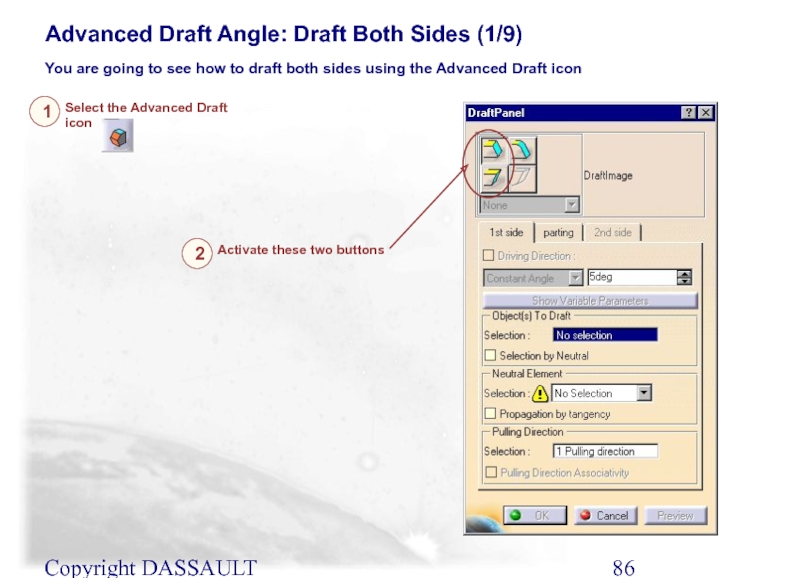
- 86. Copyright DASSAULT SYSTEMES 2002 Advanced Draft Angle:
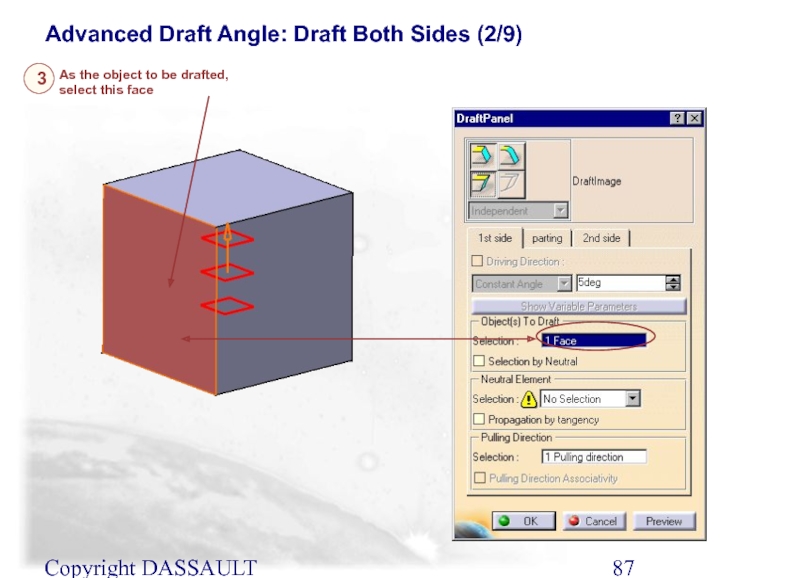
- 87. Copyright DASSAULT SYSTEMES 2002 Advanced Draft Angle:
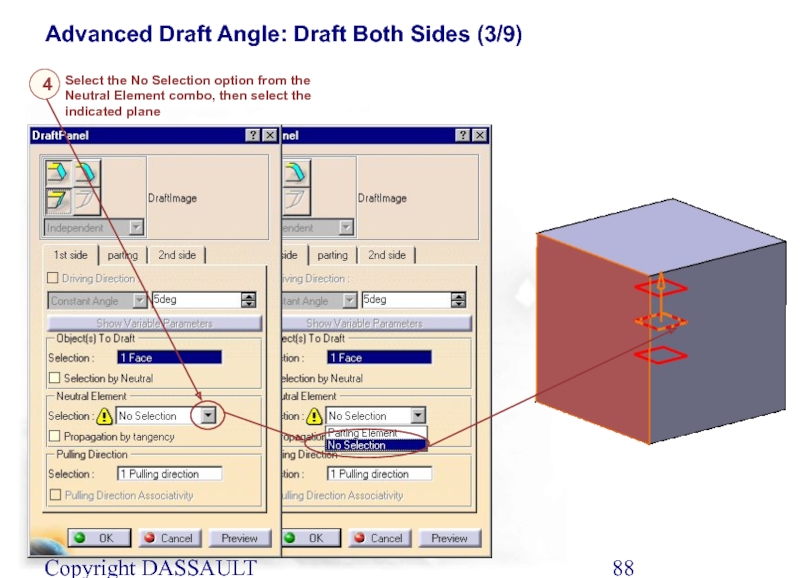
- 88. Copyright DASSAULT SYSTEMES 2002 Advanced Draft Angle:
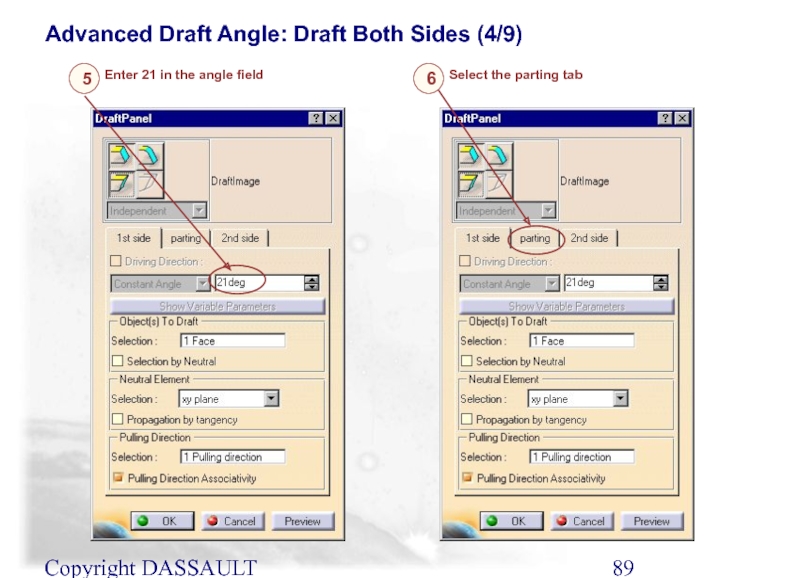
- 89. Copyright DASSAULT SYSTEMES 2002 Advanced Draft Angle:
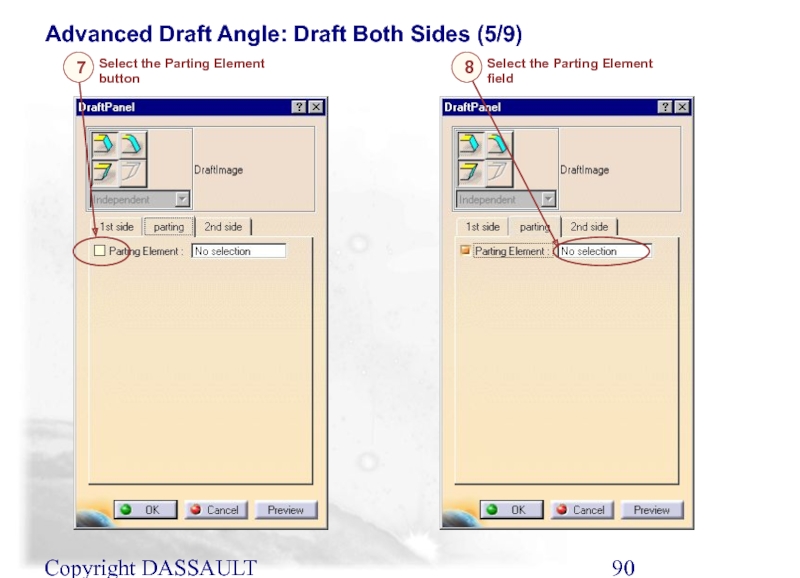
- 90. Copyright DASSAULT SYSTEMES 2002 Advanced Draft Angle:
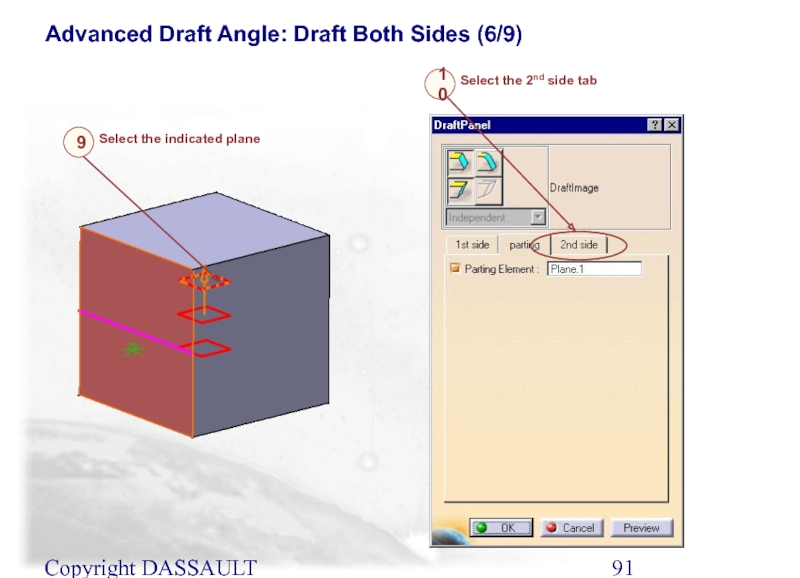
- 91. Copyright DASSAULT SYSTEMES 2002 Advanced Draft Angle:
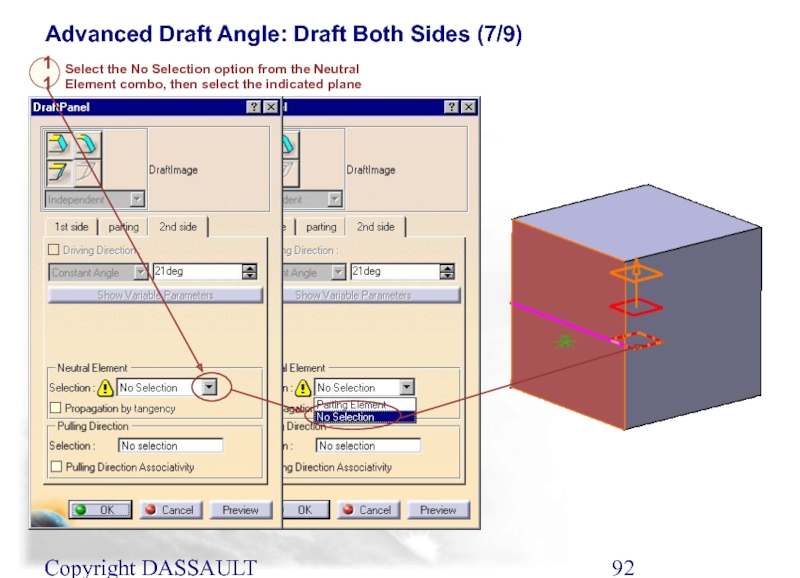
- 92. Copyright DASSAULT SYSTEMES 2002 Advanced Draft Angle:
- 93. Copyright DASSAULT SYSTEMES 2002 Advanced Draft Angle:
- 94. Copyright DASSAULT SYSTEMES 2002 Advanced Draft Angle:
- 95. Copyright DASSAULT SYSTEMES 2002 We will see
- 96. Copyright DASSAULT SYSTEMES 2002 Thickness 1
- 97. Copyright DASSAULT SYSTEMES 2002 In this lesson
- 98. Copyright DASSAULT SYSTEMES 2002 Transformation is the
- 99. Copyright DASSAULT SYSTEMES 2002 Transformations
- 100. Copyright DASSAULT SYSTEMES 2002 Translation 4 1
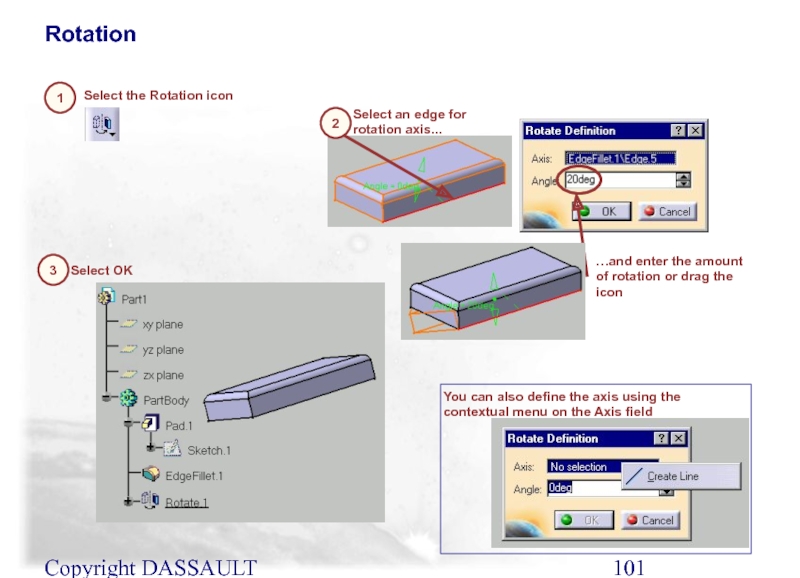
- 101. Copyright DASSAULT SYSTEMES 2002 Select the Rotation
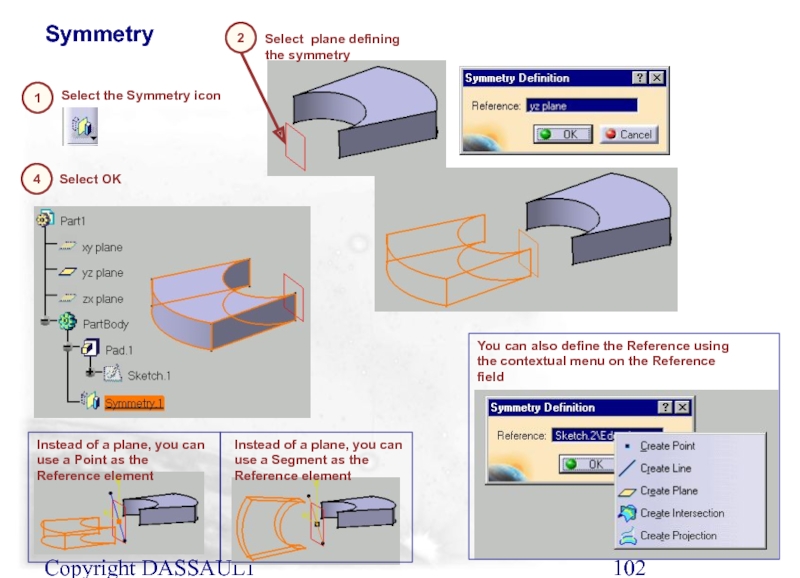
- 102. Copyright DASSAULT SYSTEMES 2002 Select OK Select
- 103. Copyright DASSAULT SYSTEMES 2002 In this lesson
- 104. Copyright DASSAULT SYSTEMES 2002
- 105. Copyright DASSAULT SYSTEMES 2002 They can be
- 106. Copyright DASSAULT SYSTEMES 2002 Creating 3D Constraints
- 107. Copyright DASSAULT SYSTEMES 2002 Using 3D Constraints
- 108. Copyright DASSAULT SYSTEMES 2002 You will learn
- 109. Copyright DASSAULT SYSTEMES 2002 It is possible
- 110. Copyright DASSAULT SYSTEMES 2002 Local Axis :
- 111. Copyright DASSAULT SYSTEMES 2002 Local Axis :
- 112. Copyright DASSAULT SYSTEMES 2002 Customizing Local Axis
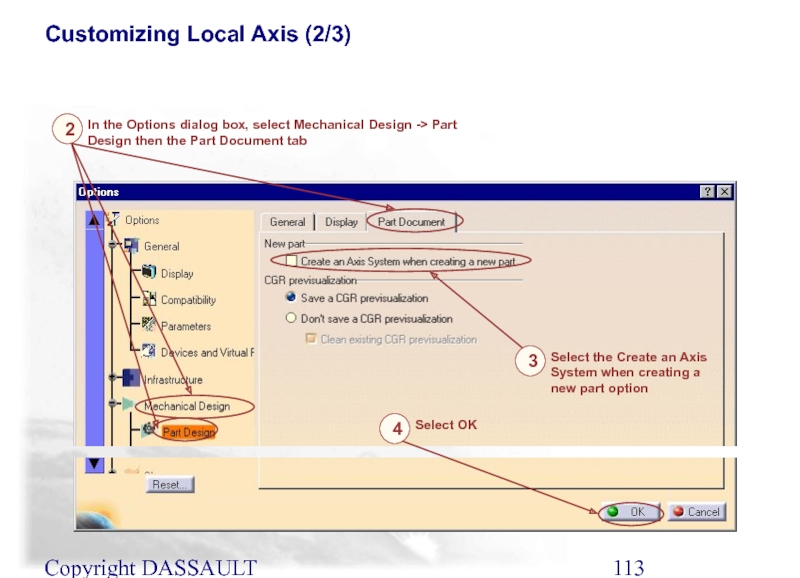
- 113. Copyright DASSAULT SYSTEMES 2002 Customizing Local Axis
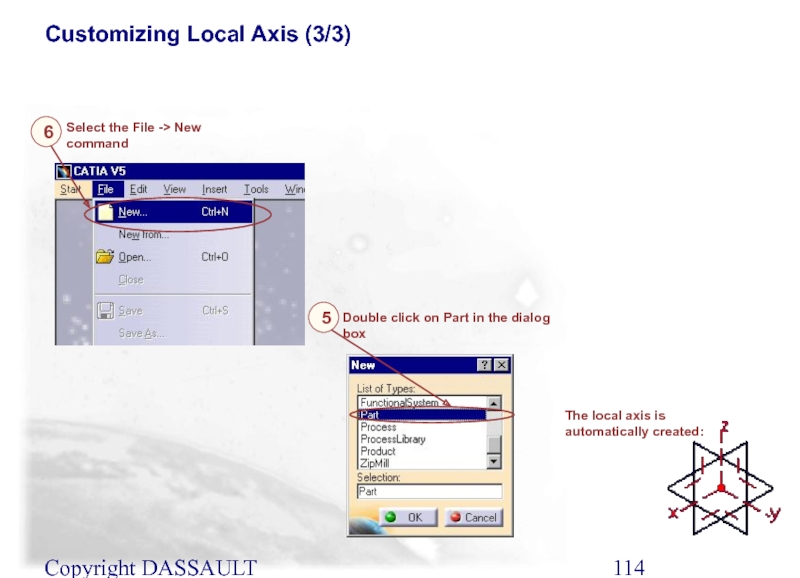
- 114. Copyright DASSAULT SYSTEMES 2002 Customizing Local Axis
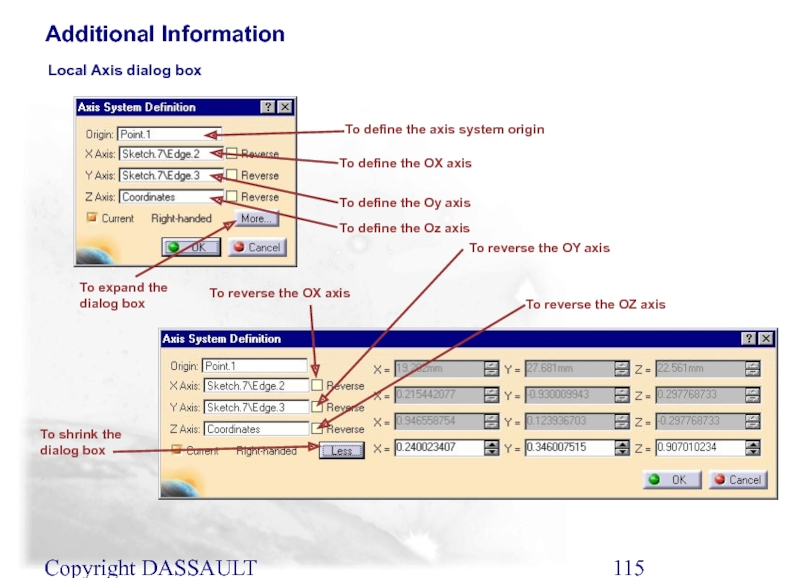
- 115. Copyright DASSAULT SYSTEMES 2002 Additional Information
- 116. Text with Leader Flag Note with Leader
- 117. Copyright DASSAULT SYSTEMES 2002 You will learn
- 118. Copyright DASSAULT SYSTEMES 2002 A text with
- 119. Copyright DASSAULT SYSTEMES 2002 Select the Text
- 120. Copyright DASSAULT SYSTEMES 2002 Double click Additional
- 121. Copyright DASSAULT SYSTEMES 2002 You will learn
- 122. Copyright DASSAULT SYSTEMES 2002 A flag note
- 123. Copyright DASSAULT SYSTEMES 2002 Enter Part Process
- 124. Copyright DASSAULT SYSTEMES 2002 Flag Notes with
- 125. Copyright DASSAULT SYSTEMES 2002 Select the Go
- 126. Copyright DASSAULT SYSTEMES 2002 Additional Information
- 127. Analysis You will learn how to analyze
- 128. Copyright DASSAULT SYSTEMES 2002 You will learn
- 129. Copyright DASSAULT SYSTEMES 2002 When a part
- 130. Copyright DASSAULT SYSTEMES 2002 Analysing Threads and
- 131. Copyright DASSAULT SYSTEMES 2002 Analysing Threads and
- 132. Copyright DASSAULT SYSTEMES 2002 You will learn
- 133. Copyright DASSAULT SYSTEMES 2002 The Draft Analysis
- 134. Copyright DASSAULT SYSTEMES 2002 The Draft Analysis
- 135. Copyright DASSAULT SYSTEMES 2002 Select the Invert
- 136. Copyright DASSAULT SYSTEMES 2002 Additional Information
- 137. Measure, Mean Dimensions, Scan, Parents-Children Cut, Paste,
- 138. Copyright DASSAULT SYSTEMES 2002 In this lesson,
- 139. Copyright DASSAULT SYSTEMES 2002 Measuring Elements means
- 140. Copyright DASSAULT SYSTEMES 2002 Measuring Elements 1
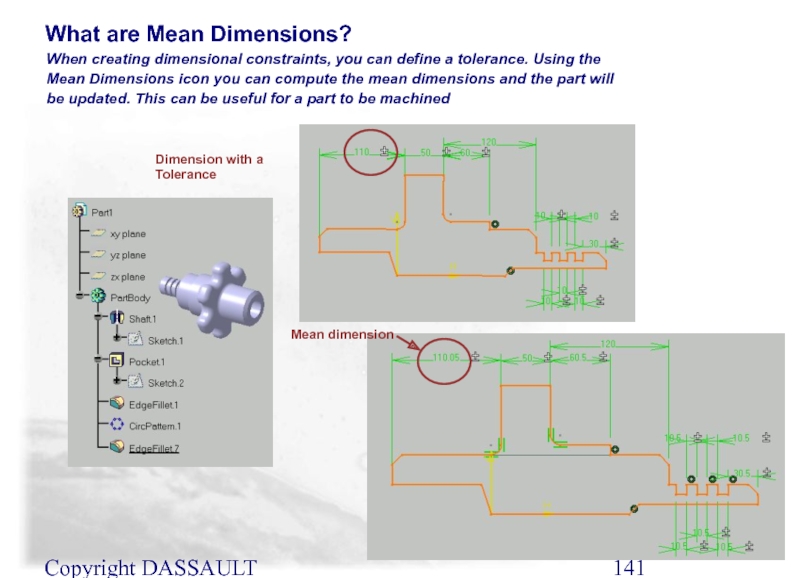
- 141. Copyright DASSAULT SYSTEMES 2002 When creating dimensional
- 142. Copyright DASSAULT SYSTEMES 2002 Mean Dimensions (1/4)
- 143. Copyright DASSAULT SYSTEMES 2002 Mean Dimensions (2/4)
- 144. Copyright DASSAULT SYSTEMES 2002 Mean Dimensions (3/4)
- 145. Copyright DASSAULT SYSTEMES 2002 Mean Dimensions (4/4)
- 146. Copyright DASSAULT SYSTEMES 2002 Scanning a
- 147. Copyright DASSAULT SYSTEMES 2002 Scanning a Part
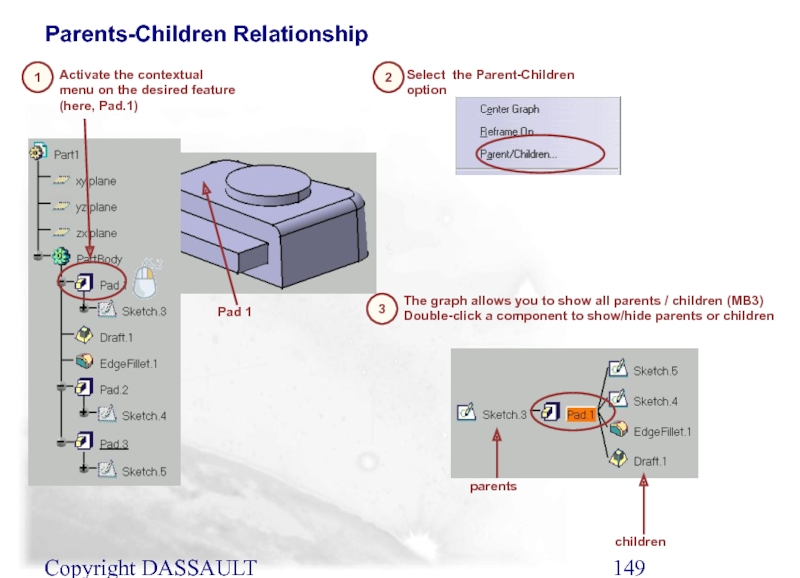
- 148. Copyright DASSAULT SYSTEMES 2002 The parents-children relationship
- 149. Copyright DASSAULT SYSTEMES 2002 Pad 1 Parents-Children
- 150. Copyright DASSAULT SYSTEMES 2002 Parents-Children (Edition) (1/2)
- 151. Copyright DASSAULT SYSTEMES 2002 Parents-Children (Edition) (2/2)
- 152. Copyright DASSAULT SYSTEMES 2002 In this lesson,
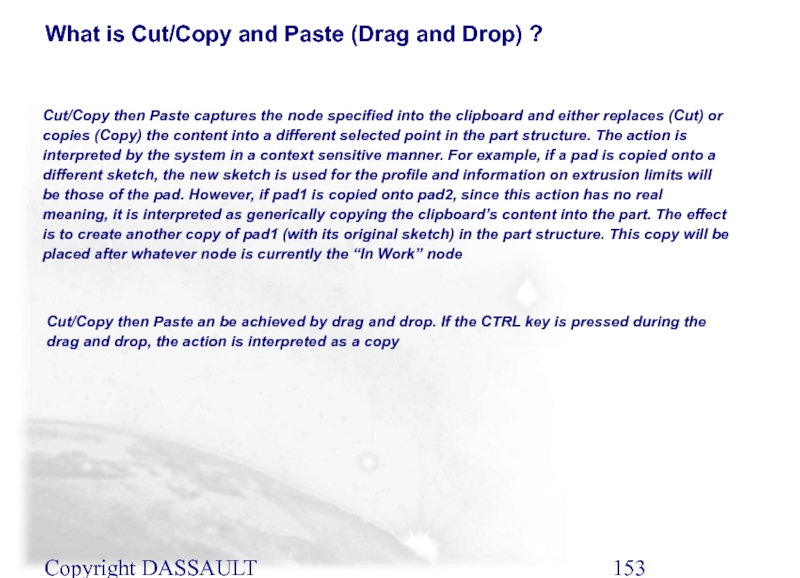
- 153. Copyright DASSAULT SYSTEMES 2002 Cut/Copy then Paste
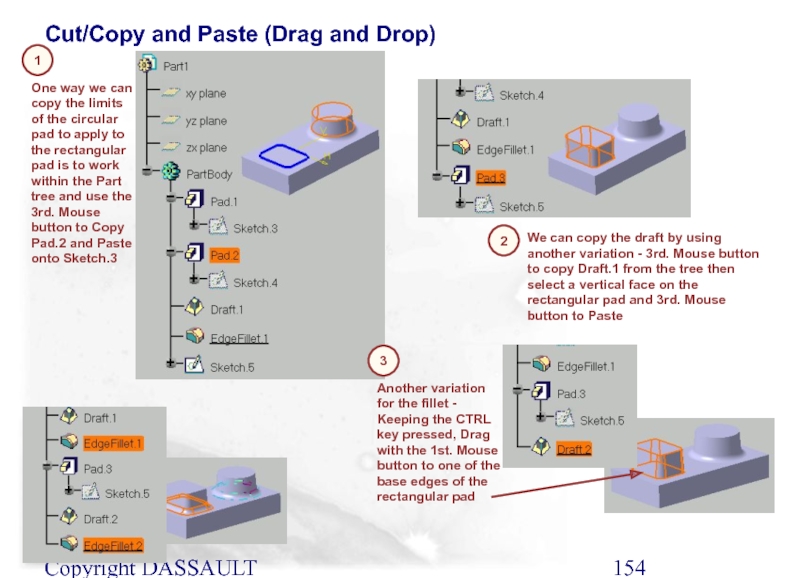
- 154. Copyright DASSAULT SYSTEMES 2002 One way we
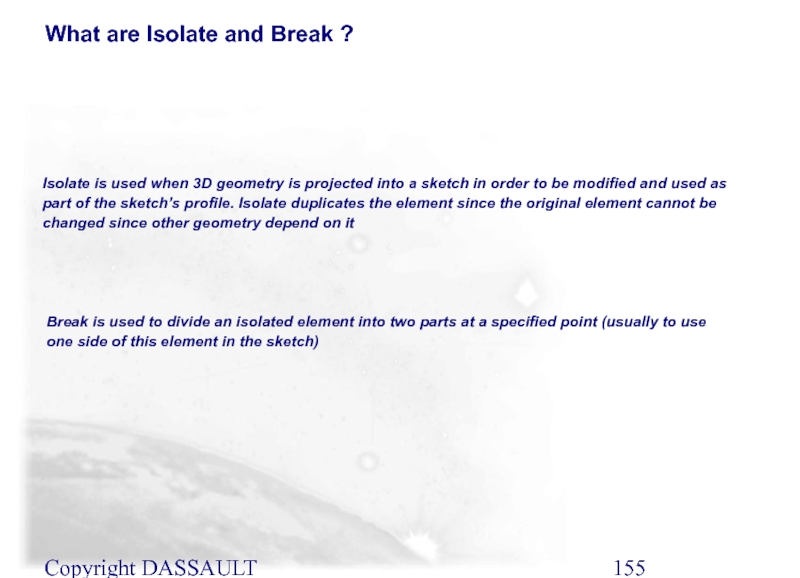
- 155. Copyright DASSAULT SYSTEMES 2002 Isolate is used
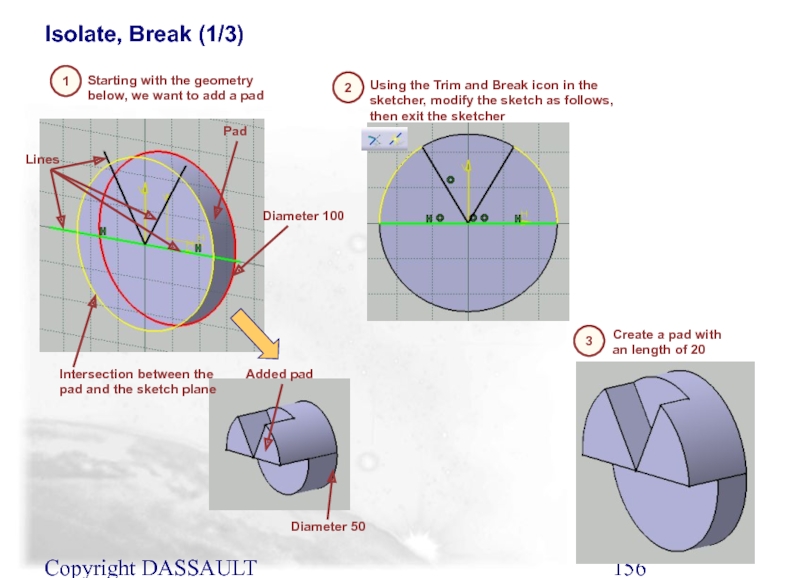
- 156. Copyright DASSAULT SYSTEMES 2002 Using the Trim
- 157. Copyright DASSAULT SYSTEMES 2002 Edit the Sketch
- 158. Copyright DASSAULT SYSTEMES 2002 Create two Coincidence
- 159. Copyright DASSAULT SYSTEMES 2002 You will learn
- 160. Copyright DASSAULT SYSTEMES 2002 Using several bodies
- 161. Copyright DASSAULT SYSTEMES 2002 A body is
- 162. Copyright DASSAULT SYSTEMES 2002 Assembling/Adding : If
- 163. Copyright DASSAULT SYSTEMES 2002 With the cursor
- 164. Copyright DASSAULT SYSTEMES 2002 With the cursor
- 165. Copyright DASSAULT SYSTEMES 2002 With the cursor
- 166. Copyright DASSAULT SYSTEMES 2002 Intersect We want
- 167. Copyright DASSAULT SYSTEMES 2002 Union Trimming Bodies
- 168. Copyright DASSAULT SYSTEMES 2002 Removing Lumps (1/3)
- 169. Copyright DASSAULT SYSTEMES 2002 Removing Lumps (2/3)
- 170. Copyright DASSAULT SYSTEMES 2002 Removing Lumps (3/3)
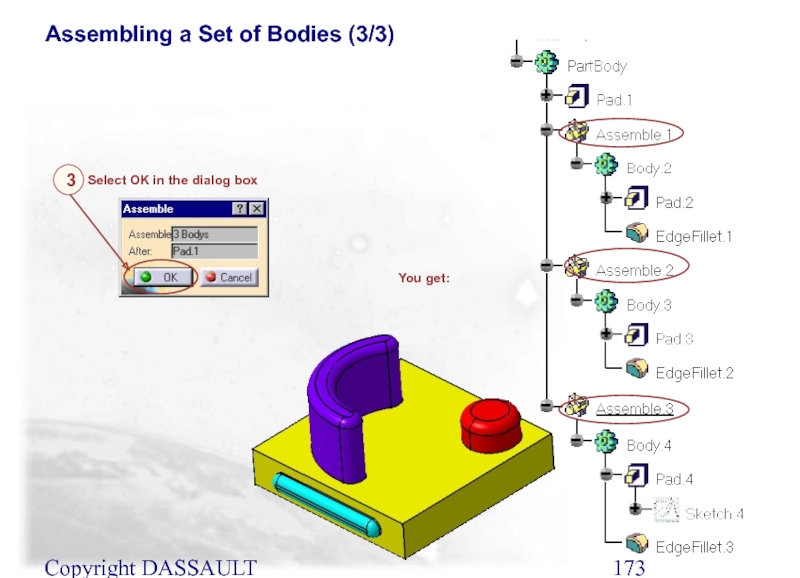
- 171. Copyright DASSAULT SYSTEMES 2002 Assembling a Set
- 172. Copyright DASSAULT SYSTEMES 2002 Assembling a Set
- 173. Copyright DASSAULT SYSTEMES 2002 Assembling a Set
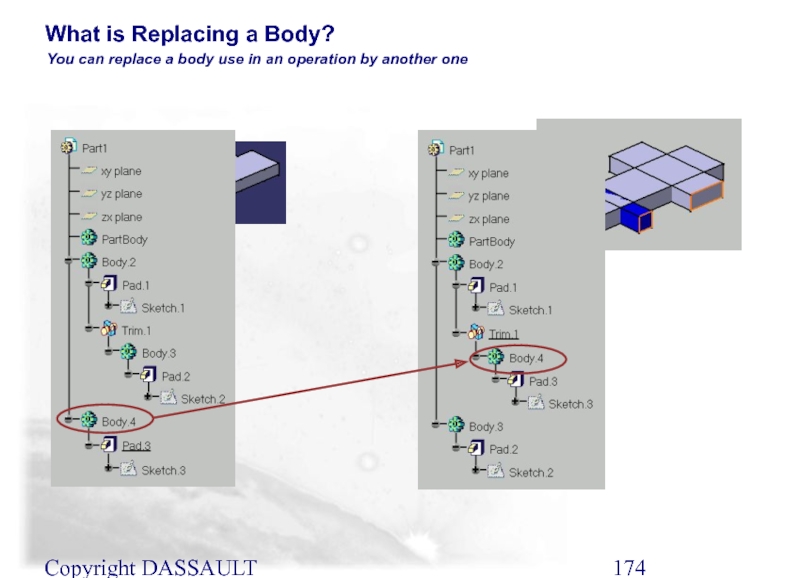
- 174. Copyright DASSAULT SYSTEMES 2002 You can replace
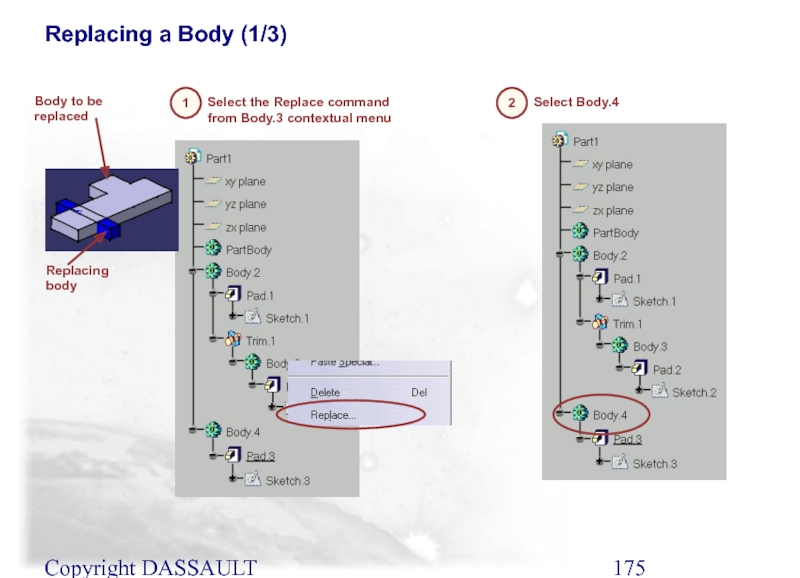
- 175. Copyright DASSAULT SYSTEMES 2002 Select the Replace
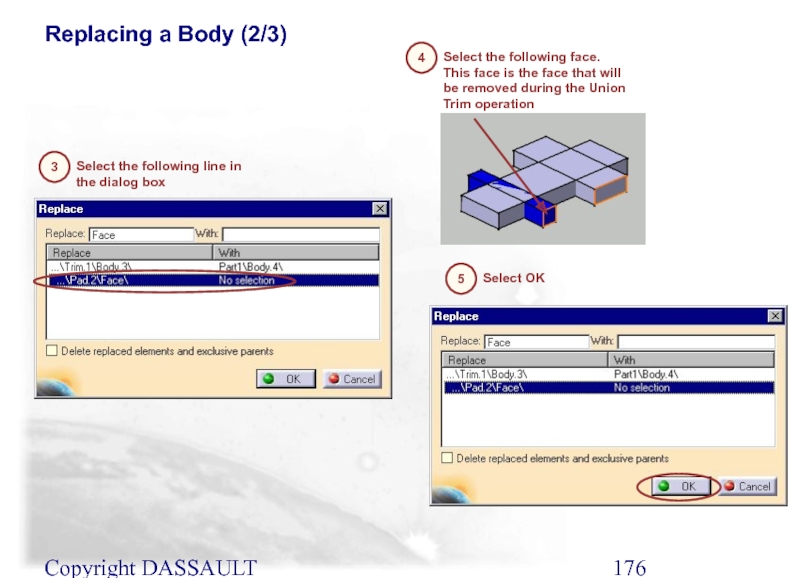
- 176. Copyright DASSAULT SYSTEMES 2002 Select the following
- 177. Copyright DASSAULT SYSTEMES 2002 If necessary, update
- 178. Copyright DASSAULT SYSTEMES 2002 Change Boolean Type
- 179. Copyright DASSAULT SYSTEMES 2002 Change Boolean Type
- 180. Copyright DASSAULT SYSTEMES 2002 Change Boolean Type
- 181. Copyright DASSAULT SYSTEMES 2002 Change Boolean Type
- 182. Copyright DASSAULT SYSTEMES 2002 You will learn
- 183. Copyright DASSAULT SYSTEMES 2002 The concept of
- 184. Copyright DASSAULT SYSTEMES 2002 In a CATIA
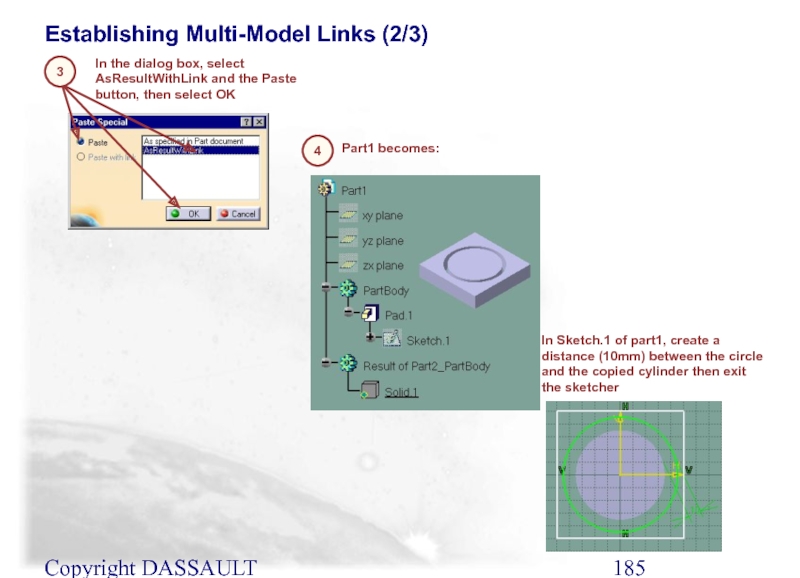
- 185. Copyright DASSAULT SYSTEMES 2002 In the dialog
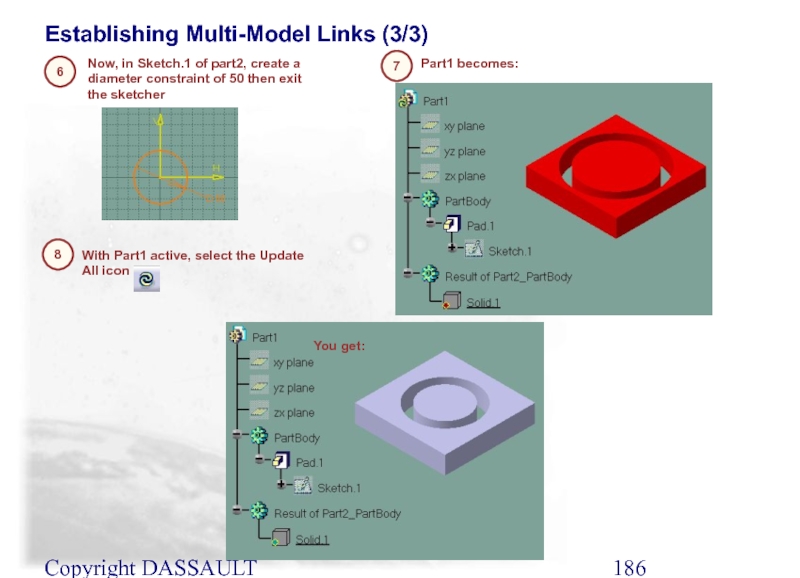
- 186. Copyright DASSAULT SYSTEMES 2002 Now, in Sketch.1
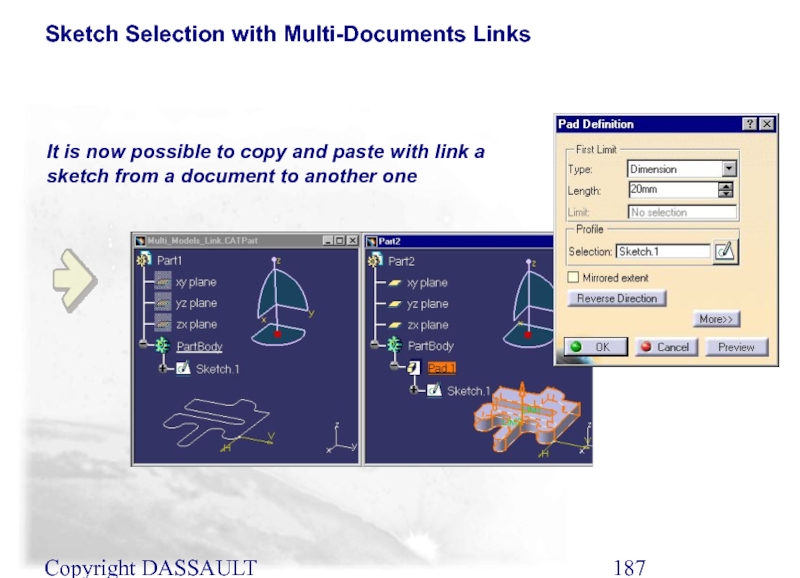
- 187. Copyright DASSAULT SYSTEMES 2002 Sketch Selection with
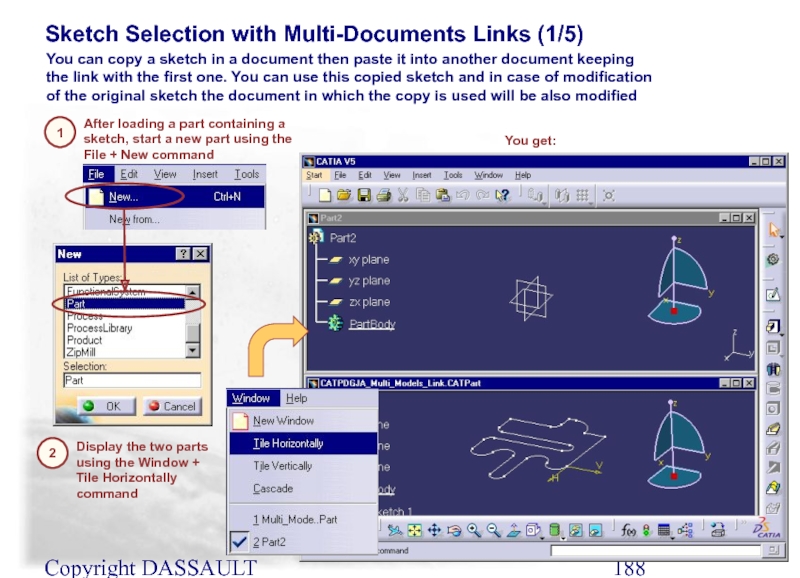
- 188. Copyright DASSAULT SYSTEMES 2002 Sketch Selection with
- 189. Copyright DASSAULT SYSTEMES 2002 Sketch Selection with
- 190. Copyright DASSAULT SYSTEMES 2002 Sketch Selection with
- 191. Copyright DASSAULT SYSTEMES 2002 Sketch Selection with
- 192. Copyright DASSAULT SYSTEMES 2002 Sketch Selection with
- 193. Copyright DASSAULT SYSTEMES 2002 As specified in
- 194. Copyright DASSAULT SYSTEMES 2002 You will
- 195. Copyright DASSAULT SYSTEMES 2002 A scaling is
- 196. Copyright DASSAULT SYSTEMES 2002 You can also
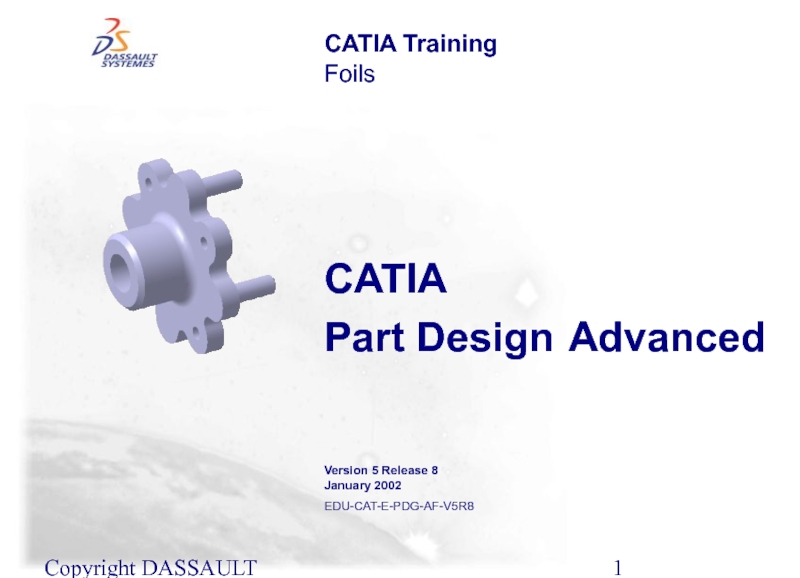
Слайд 1Copyright DASSAULT SYSTEMES 2002
CATIA
Part Design Advanced
CATIA Training
Foils
Version 5 Release 8
January
EDU-CAT-E-PDG-AF-V5R8
Слайд 2Course Presentation
Objectives of the course
In this course you will complete the
Targeted audience
New CATIA V5 users
Prerequisites
CATIA Part Design
Fundamentals course
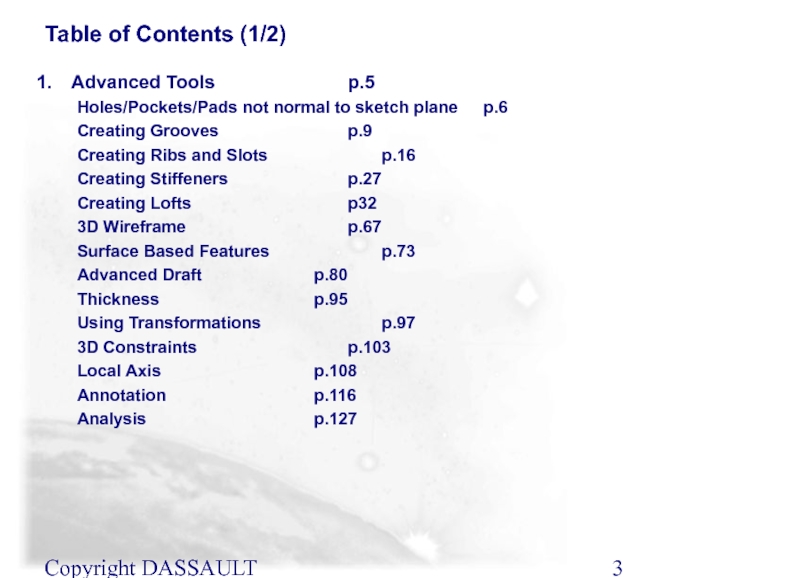
Слайд 3Copyright DASSAULT SYSTEMES 2002
Table of Contents (1/2)
Advanced Tools p.5
Holes/Pockets/Pads not normal to
Creating Grooves p.9
Creating Ribs and Slots p.16
Creating Stiffeners p.27
Creating Lofts p32
3D Wireframe p.67
Surface Based Features p.73
Advanced Draft p.80
Thickness p.95
Using Transformations p.97
3D Constraints p.103
Local Axis p.108
Annotation p.116
Analysis p.127
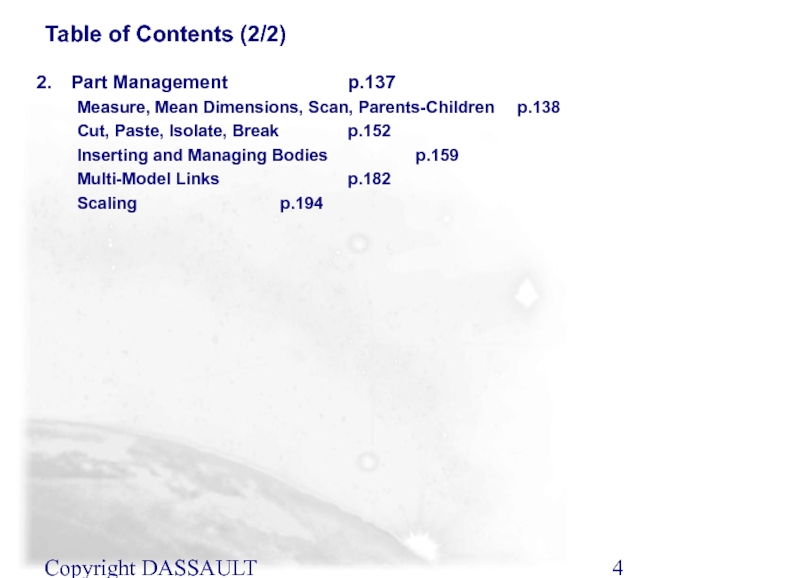
Слайд 4Copyright DASSAULT SYSTEMES 2002
Table of Contents (2/2)
Part Management p.137
Measure, Mean Dimensions, Scan,
Cut, Paste, Isolate, Break p.152
Inserting and Managing Bodies p.159
Multi-Model Links p.182
Scaling p.194
Слайд 5Advanced Tools
You will learn how to create and use other tools
Holes/Pockets/Pads not Normal to Sketch Plane
Creating Grooves
Creating Ribs and Slots
Creating Stiffeners
Creating Lofts
3D Wireframe Elements
Surface-Based Features
Thickness
Using Transformation
3D Constraints
Local Axis
Annotation
Слайд 6Copyright DASSAULT SYSTEMES 2002
You will learn how to create Holes, Pockets
Holes/Pockets/Pads not Normal to Sketch Plane
Defining a direction
Слайд 7Copyright DASSAULT SYSTEMES 2002
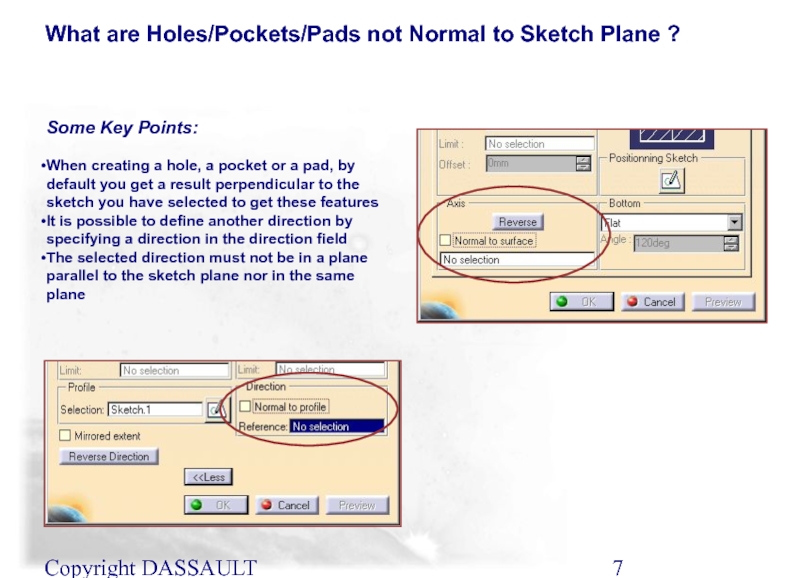
Some Key Points:
When creating a hole, a pocket
It is possible to define another direction by specifying a direction in the direction field
The selected direction must not be in a plane parallel to the sketch plane nor in the same plane
What are Holes/Pockets/Pads not Normal to Sketch Plane ?
Слайд 8Copyright DASSAULT SYSTEMES 2002
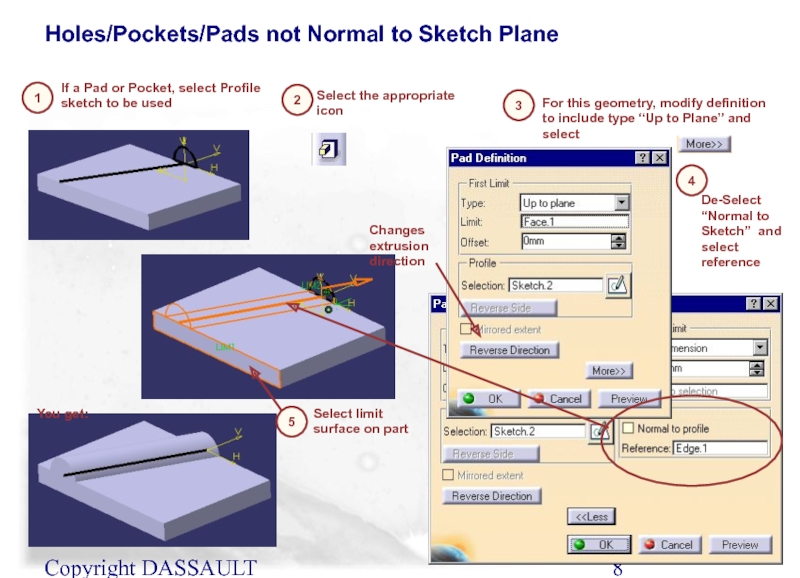
Holes/Pockets/Pads not Normal to Sketch Plane
1
If a Pad
2
De-Select “Normal to Sketch” and select reference
3
For this geometry, modify definition to include type “Up to Plane” and select
Changes extrusion direction
4
Select the appropriate icon
5
Select limit surface on part
You get:
Слайд 9Copyright DASSAULT SYSTEMES 2002
You will learn how to create grooves
Creating
Material removing according to a revolution body
Слайд 10Copyright DASSAULT SYSTEMES 2002
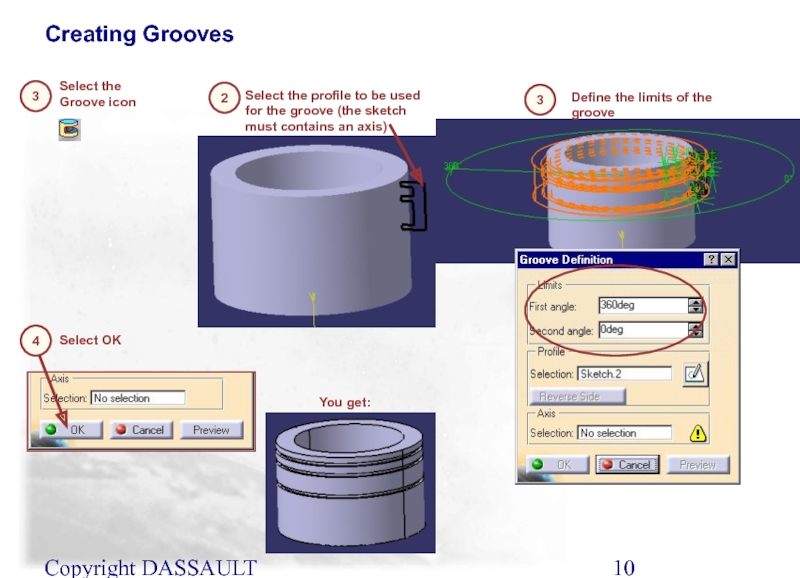
Creating Grooves
4
Select OK
2
Select the Groove icon
3
Define the limits
Select the profile to be used for the groove (the sketch must contains an axis)
3
You get:
Слайд 11Copyright DASSAULT SYSTEMES 2002
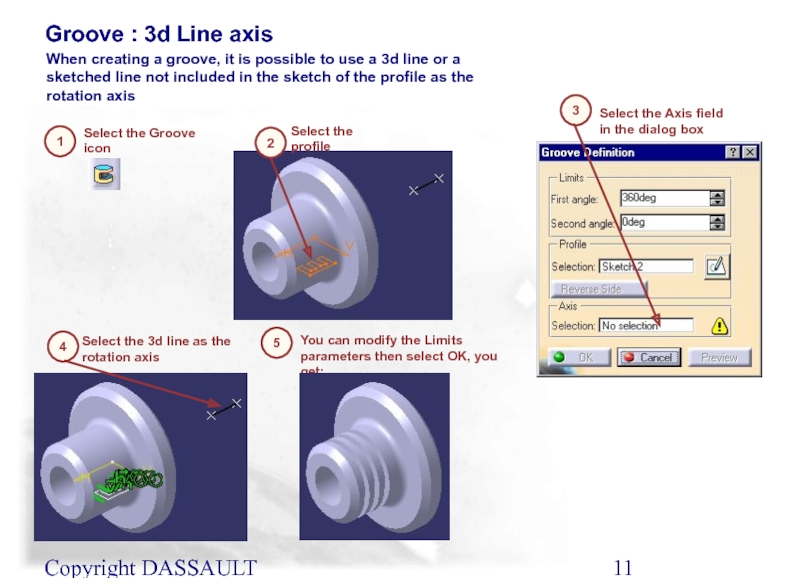
Groove : 3d Line axis
Select the Groove icon
1
2
Select
When creating a groove, it is possible to use a 3d line or a sketched line not included in the sketch of the profile as the rotation axis
3
Select the Axis field in the dialog box
4
Select the 3d line as the rotation axis
You can modify the Limits parameters then select OK, you get:
5
Слайд 12Copyright DASSAULT SYSTEMES 2002
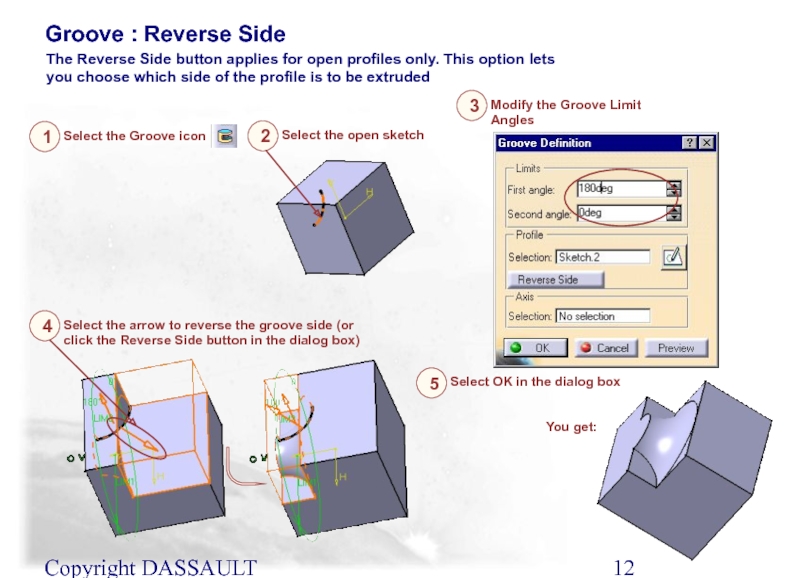
Groove : Reverse Side
The Reverse Side button applies
Select the Groove icon
1
Select the open sketch
2
Modify the Groove Limit Angles
3
Select the arrow to reverse the groove side (or click the Reverse Side button in the dialog box)
4
Select OK in the dialog box
5
You get:
Слайд 13Copyright DASSAULT SYSTEMES 2002
Additional Information (1/3)
You can use sub-elements of a
Слайд 14Copyright DASSAULT SYSTEMES 2002
Additional Information (2/3)
You can create Grooves from sketches
Слайд 15Copyright DASSAULT SYSTEMES 2002
Additional Information (3/3)
If no sketches have been created
Select the Sketcher icon in the dialog box
Слайд 16Copyright DASSAULT SYSTEMES 2002
In this lesson we will learn how to
Creating Ribs and Slots
Creating Ribs
Creating Slots
Слайд 17Copyright DASSAULT SYSTEMES 2002
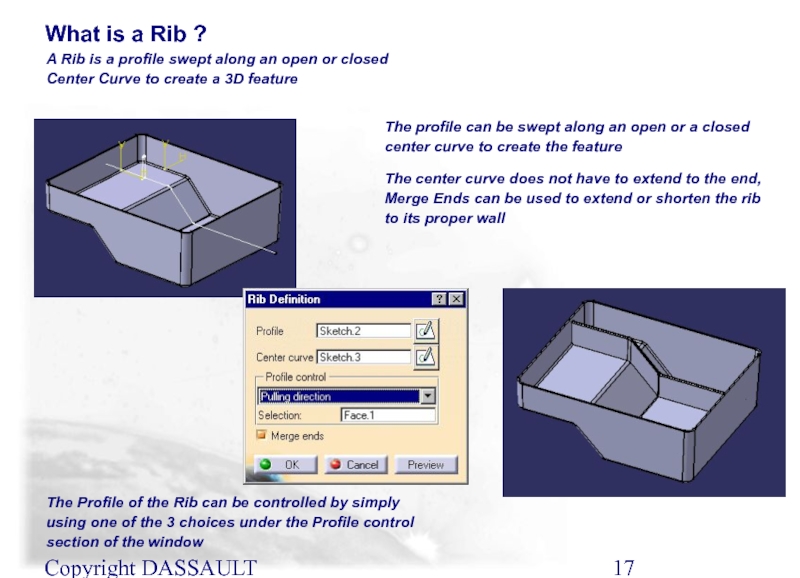
A Rib is a profile swept along an
What is a Rib ?
The profile can be swept along an open or a closed center curve to create the feature
The center curve does not have to extend to the end, Merge Ends can be used to extend or shorten the rib to its proper wall
The Profile of the Rib can be controlled by simply using one of the 3 choices under the Profile control section of the window
Слайд 18Copyright DASSAULT SYSTEMES 2002
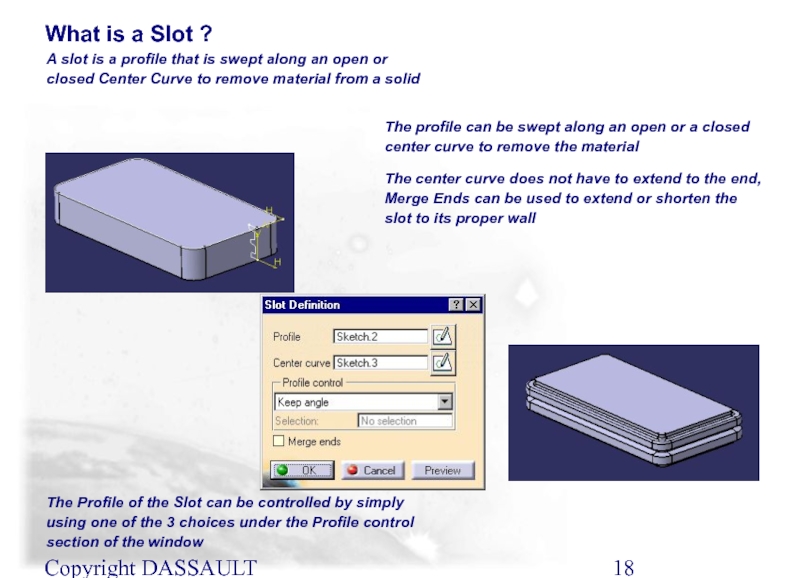
A slot is a profile that is swept
What is a Slot ?
The profile can be swept along an open or a closed center curve to remove the material
The center curve does not have to extend to the end, Merge Ends can be used to extend or shorten the slot to its proper wall
The Profile of the Slot can be controlled by simply using one of the 3 choices under the Profile control section of the window
Слайд 19Copyright DASSAULT SYSTEMES 2002
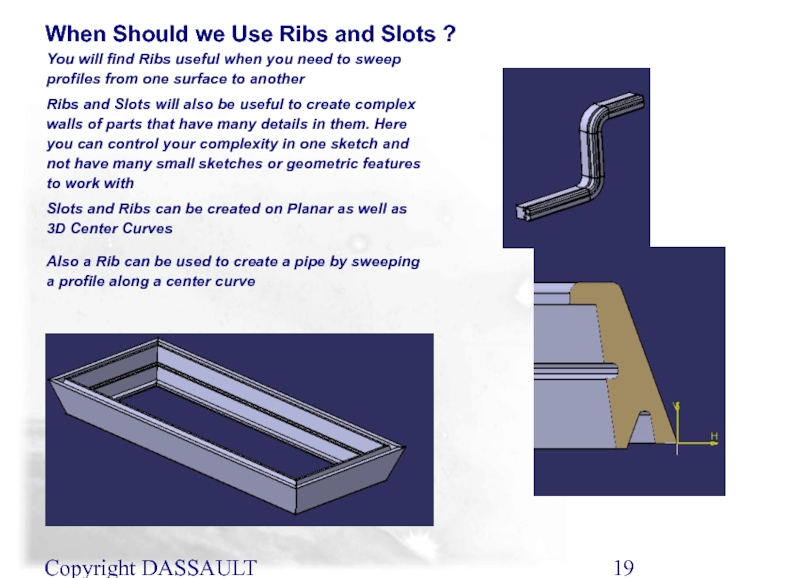
You will find Ribs useful when you need
When Should we Use Ribs and Slots ?
Ribs and Slots will also be useful to create complex walls of parts that have many details in them. Here you can control your complexity in one sketch and not have many small sketches or geometric features to work with
Slots and Ribs can be created on Planar as well as 3D Center Curves
Also a Rib can be used to create a pipe by sweeping a profile along a center curve
Слайд 20Copyright DASSAULT SYSTEMES 2002
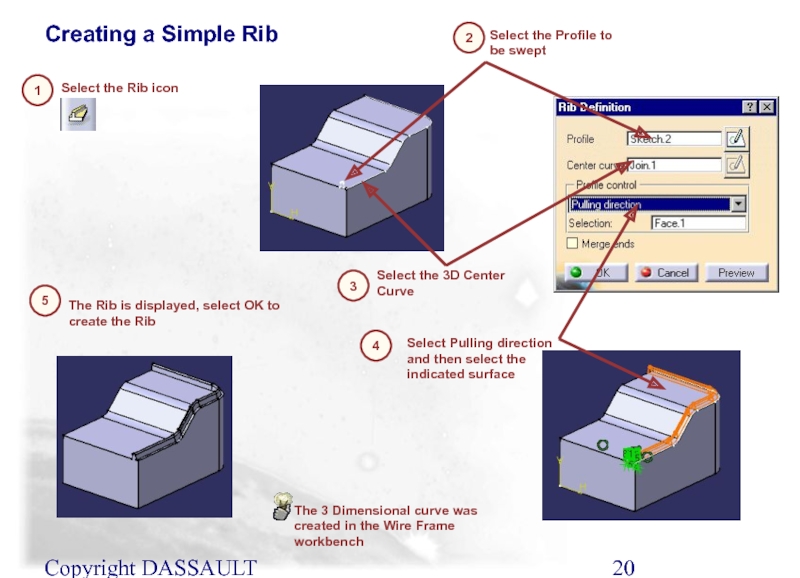
Creating a Simple Rib
1
Select the Rib icon
2
Select the
3
Select Pulling direction and then select the indicated surface
Select the Profile to be swept
4
The Rib is displayed, select OK to create the Rib
5
The 3 Dimensional curve was created in the Wire Frame workbench
Слайд 21Copyright DASSAULT SYSTEMES 2002
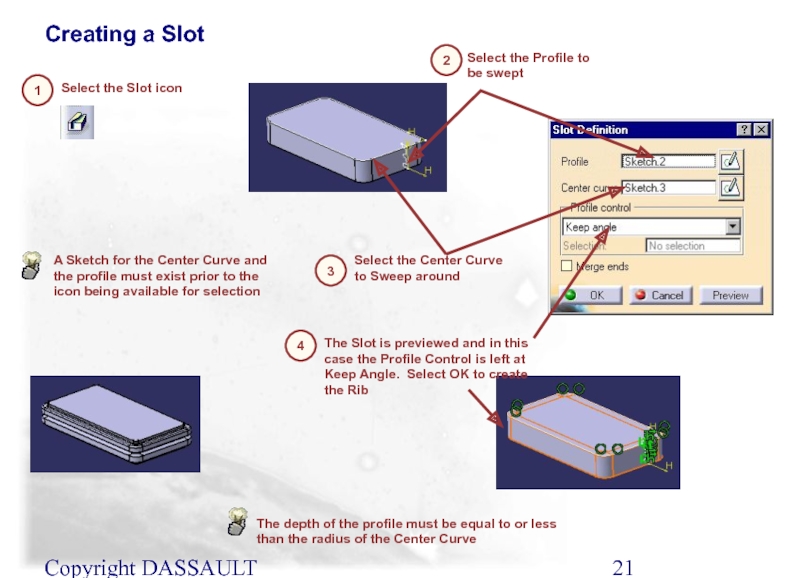
Creating a Slot
1
Select the Slot icon
2
Select the Center
3
The Slot is previewed and in this case the Profile Control is left at Keep Angle. Select OK to create the Rib
Select the Profile to be swept
4
A Sketch for the Center Curve and the profile must exist prior to the icon being available for selection
The depth of the profile must be equal to or less than the radius of the Center Curve
Слайд 22Copyright DASSAULT SYSTEMES 2002
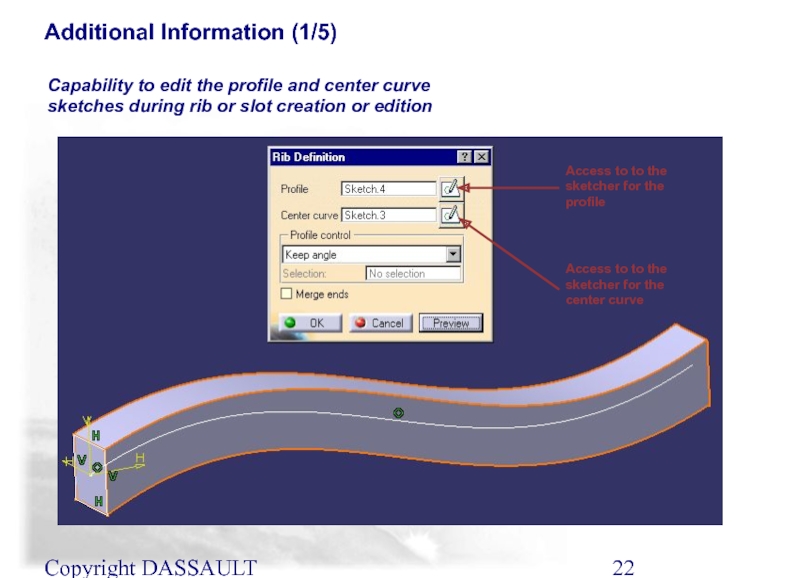
Additional Information (1/5)
Capability to edit the profile and
Access to to the sketcher for the profile
Access to to the sketcher for the center curve
Слайд 23Copyright DASSAULT SYSTEMES 2002
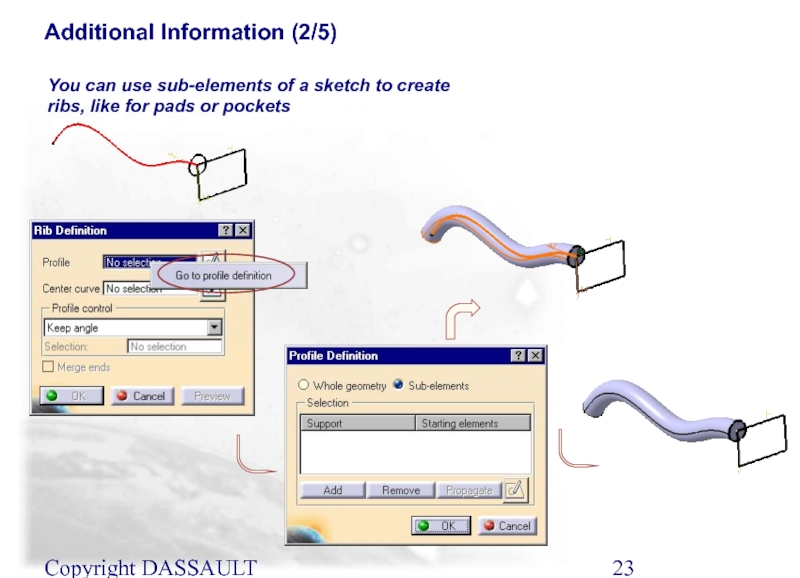
Additional Information (2/5)
You can use sub-elements of a
Слайд 24Copyright DASSAULT SYSTEMES 2002
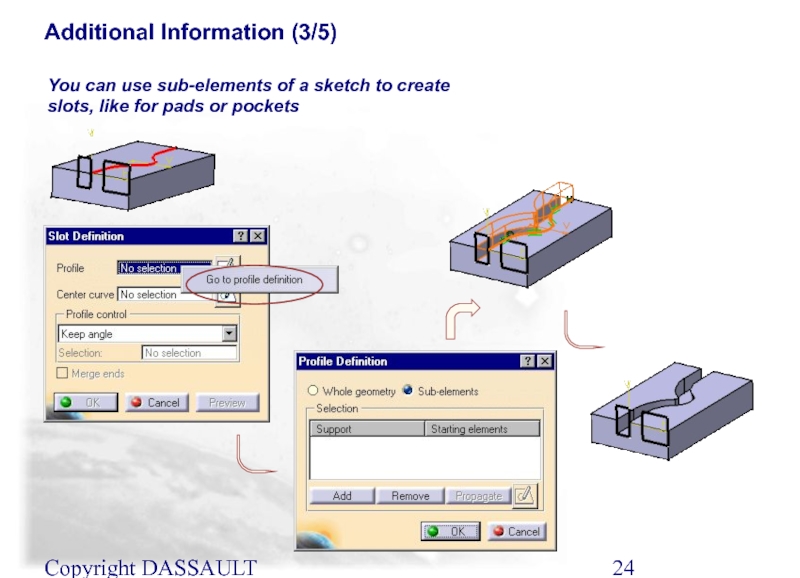
Additional Information (3/5)
You can use sub-elements of a
Слайд 25Copyright DASSAULT SYSTEMES 2002
Additional Information (4/5)
You can create Ribs and Slots
Rib
Slot
Слайд 26Copyright DASSAULT SYSTEMES 2002
Additional Information (5/5)
If no sketches have been created
Select the Sketcher icon in the dialog box
You could have use the same method to define the Center curve
Слайд 27Copyright DASSAULT SYSTEMES 2002
In this lesson we will learn how to
Creating Stiffeners
Creating a Stiffener
Слайд 28Copyright DASSAULT SYSTEMES 2002
A Stiffener is a brace or rib that
What is a Stiffener ?
These two arrows are used to control the width of the part, it can be either symmetrical or all on one side or the other
The other arrow is used to control the direction of the rib
As with most features you can now access the sketch directly by selecting this button
Слайд 29Copyright DASSAULT SYSTEMES 2002
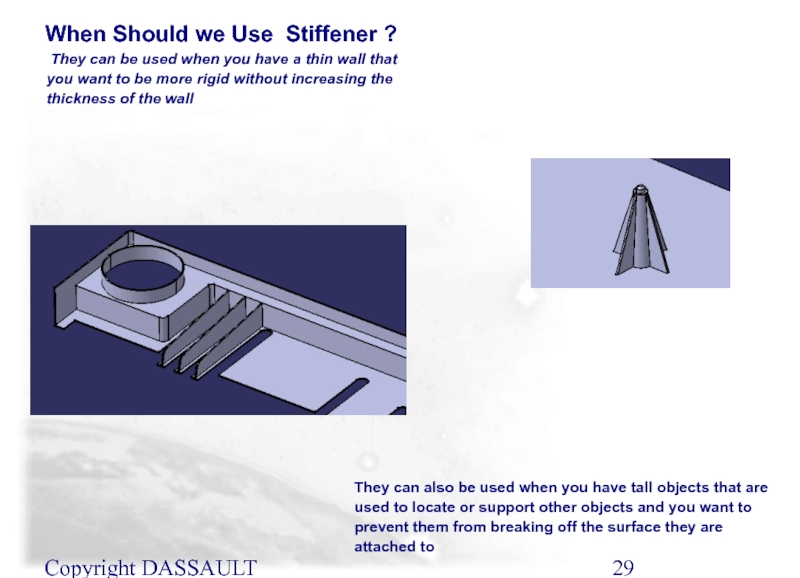
They can be used when you have
When Should we Use Stiffener ?
They can also be used when you have tall objects that are used to locate or support other objects and you want to prevent them from breaking off the surface they are attached to
Слайд 30Copyright DASSAULT SYSTEMES 2002
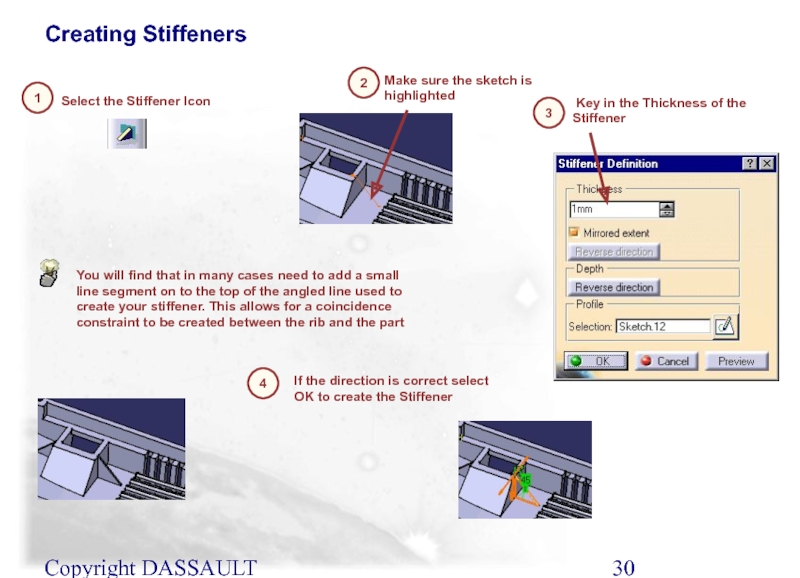
Creating Stiffeners
1
Select the Stiffener Icon
2
Key
3
If the direction is correct select OK to create the Stiffener
Make sure the sketch is highlighted
4
You will find that in many cases need to add a small line segment on to the top of the angled line used to create your stiffener. This allows for a coincidence constraint to be created between the rib and the part
Слайд 31Copyright DASSAULT SYSTEMES 2002
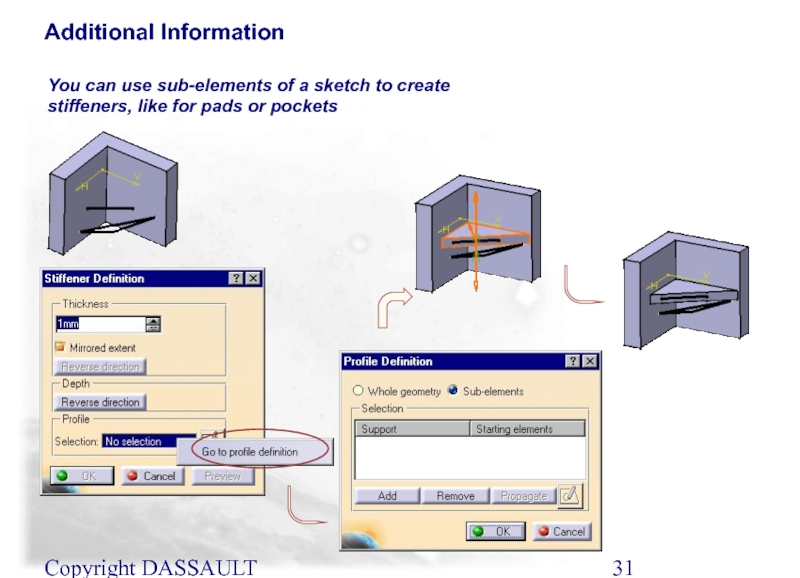
Additional Information
You can use sub-elements of a sketch
Слайд 32Creating Lofts
You will learn how to create Lofts and Removed Lofts
Creating
Remove Lofts
Coupling
Closing Points
Слайд 33Copyright DASSAULT SYSTEMES 2002
In this lesson we will learn how to
Creating Simple Lofts
Creating Simple Lofts
Слайд 34Copyright DASSAULT SYSTEMES 2002
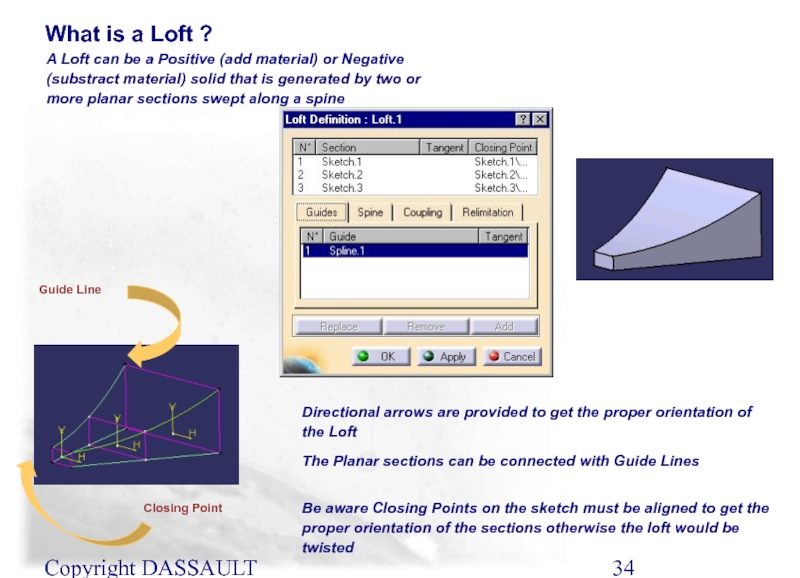
A Loft can be a Positive (add material)
What is a Loft ?
The Planar sections can be connected with Guide Lines
Be aware Closing Points on the sketch must be aligned to get the proper orientation of the sections otherwise the loft would be twisted
Directional arrows are provided to get the proper orientation of the Loft
Guide Line
Closing Point
Слайд 35Copyright DASSAULT SYSTEMES 2002
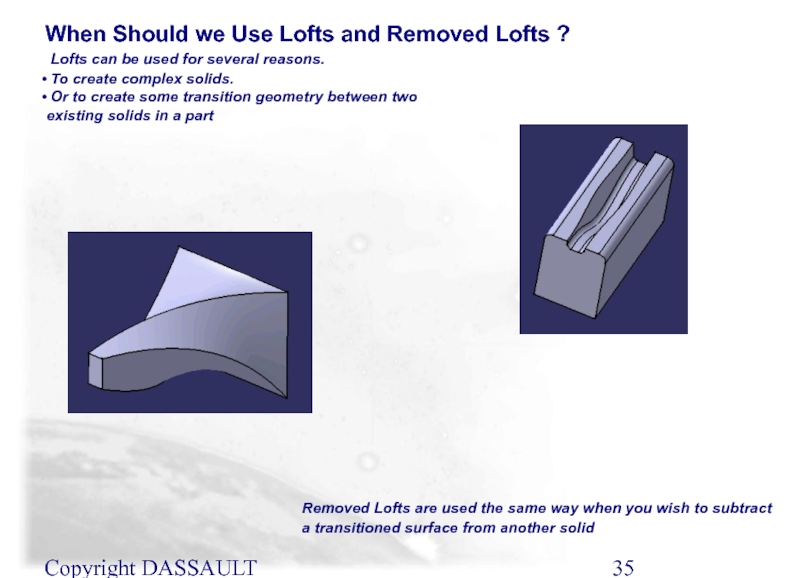
Lofts can be used for several reasons.
Or to create some transition geometry between two existing solids in a part
When Should we Use Lofts and Removed Lofts ?
Removed Lofts are used the same way when you wish to subtract a transitioned surface from another solid
Слайд 36Copyright DASSAULT SYSTEMES 2002
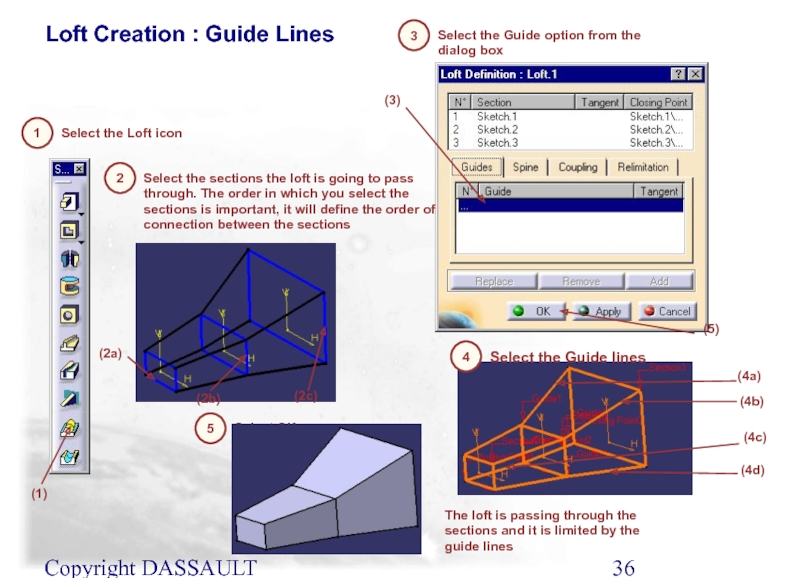
Loft Creation : Guide Lines
(1)
1
Select the Loft icon
2
Select
(4a)
The loft is passing through the sections and it is limited by the guide lines
(2a)
(2b)
(2c)
3
Select the Guide option from the dialog box
(3)
4
Select the Guide lines
(4b)
(4c)
(4d)
5
Select OK
(5)
Слайд 37Copyright DASSAULT SYSTEMES 2002
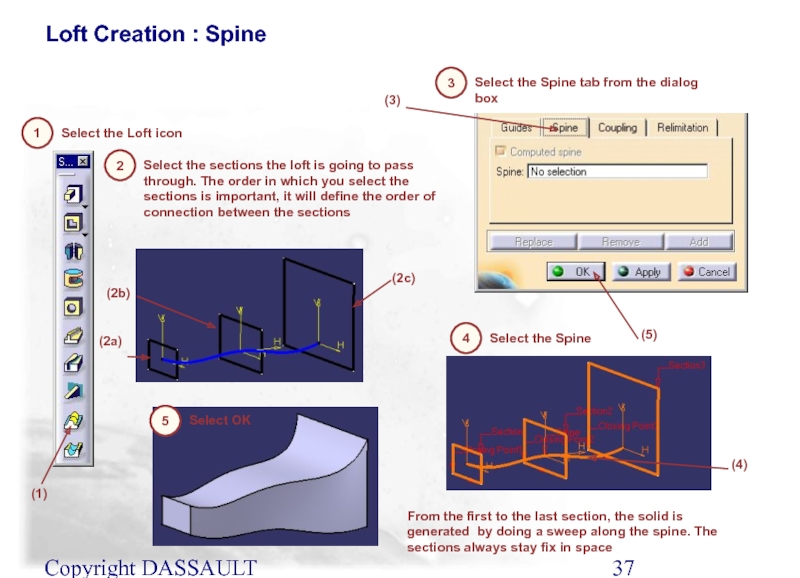
Loft Creation : Spine
(1)
1
Select the Loft icon
2
Select
(4)
From the first to the last section, the solid is generated by doing a sweep along the spine. The sections always stay fix in space
(2a)
(2b)
(2c)
3
Select the Spine tab from the dialog box
(3)
4
Select the Spine
5
Select OK
(5)
Слайд 38Copyright DASSAULT SYSTEMES 2002
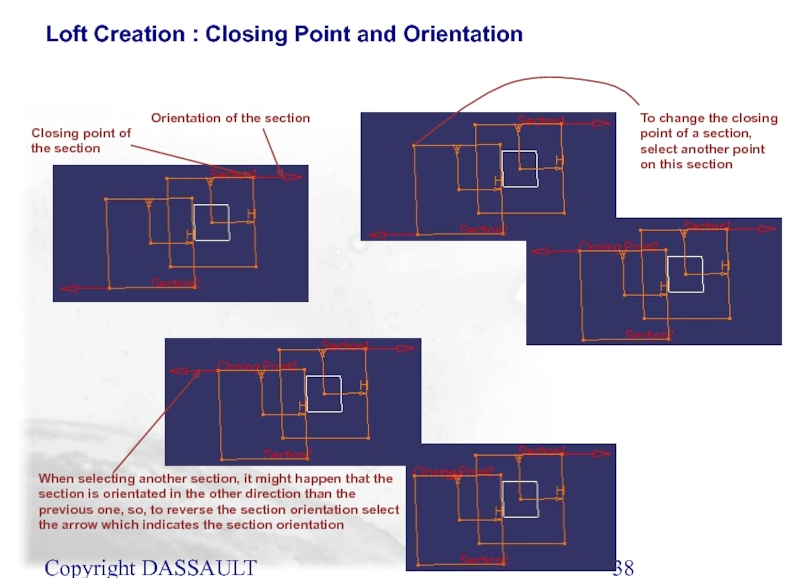
Loft Creation : Closing Point and Orientation
Orientation
When selecting another section, it might happen that the section is orientated in the other direction than the previous one, so, to reverse the section orientation select the arrow which indicates the section orientation
Closing point of the section
To change the closing point of a section, select another point on this section
Слайд 39Copyright DASSAULT SYSTEMES 2002
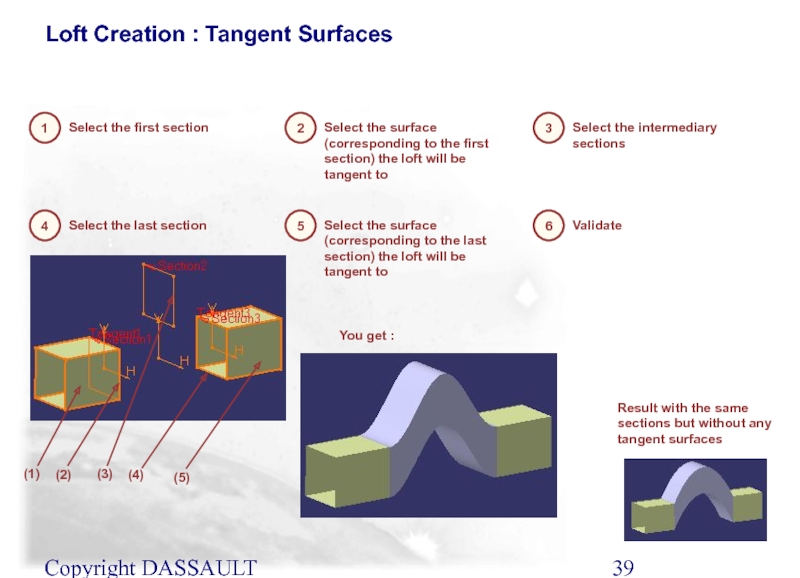
Loft Creation : Tangent Surfaces
1
Select the first
2
Select the surface (corresponding to the first section) the loft will be tangent to
3
Select the intermediary sections
4
Select the last section
5
Select the surface (corresponding to the last section) the loft will be tangent to
6
Validate
You get :
Result with the same sections but without any tangent surfaces
(1)
(2)
(3)
(4)
(5)
Слайд 40Copyright DASSAULT SYSTEMES 2002
In this lesson we will learn how to
Remove Lofts
Creating Simple Remove Lofts
Слайд 41Copyright DASSAULT SYSTEMES 2002
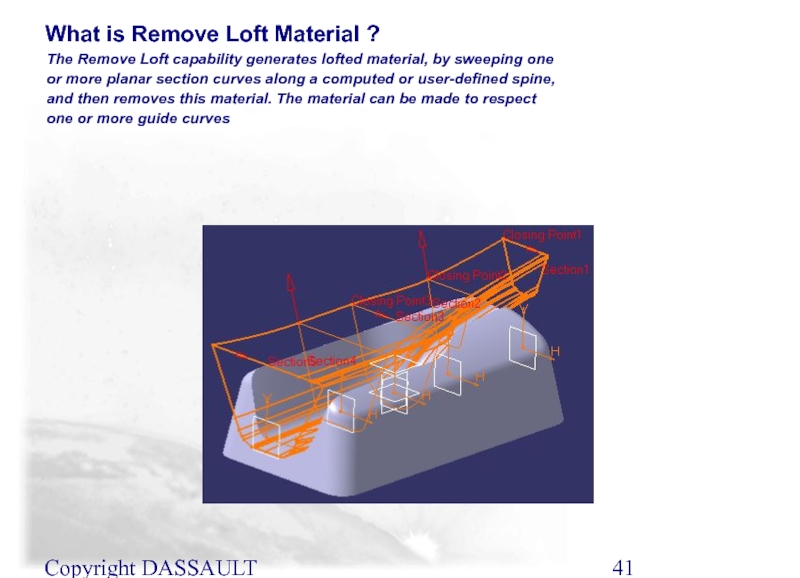
The Remove Loft capability generates lofted material, by
What is Remove Loft Material ?
Слайд 42Copyright DASSAULT SYSTEMES 2002
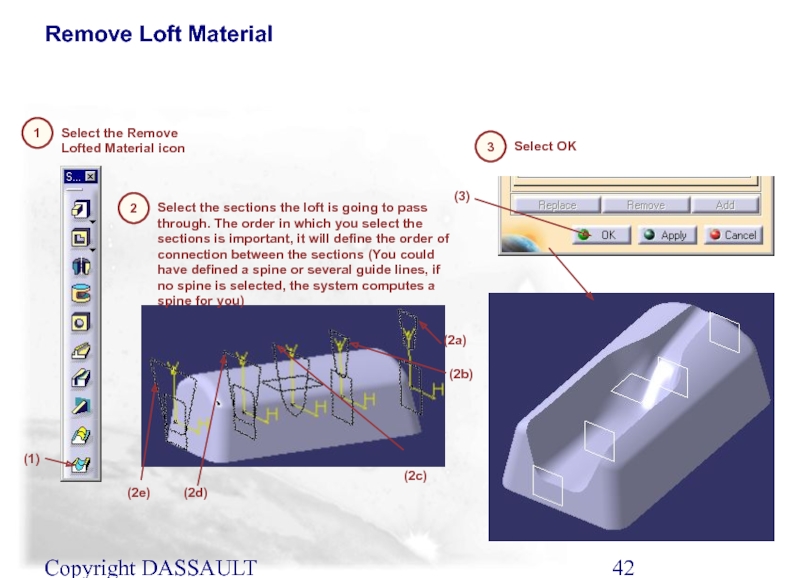
Remove Loft Material
(1)
1
Select the Remove Lofted Material
2
Select the sections the loft is going to pass through. The order in which you select the sections is important, it will define the order of connection between the sections (You could have defined a spine or several guide lines, if no spine is selected, the system computes a spine for you)
(2a)
(2b)
(2c)
3
Select OK
(3)
(2d)
(2e)
Слайд 43Copyright DASSAULT SYSTEMES 2002
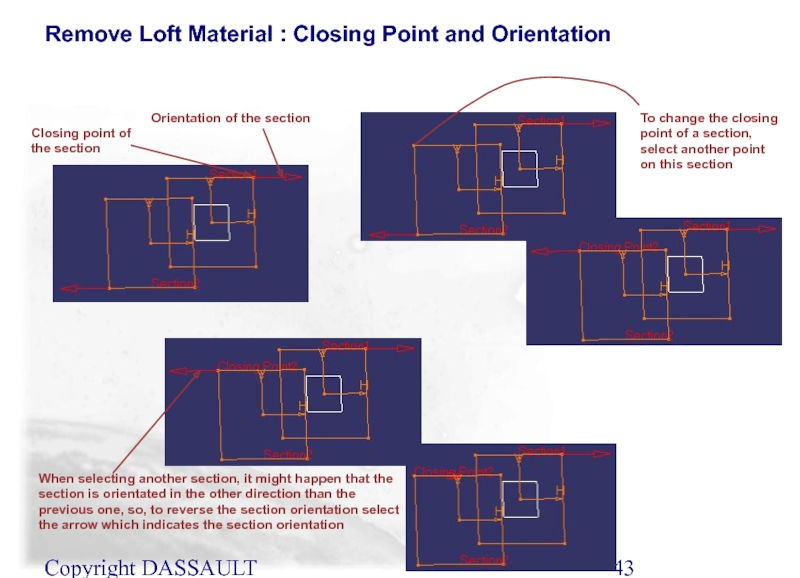
Remove Loft Material : Closing Point and Orientation
Orientation of the section
When selecting another section, it might happen that the section is orientated in the other direction than the previous one, so, to reverse the section orientation select the arrow which indicates the section orientation
Closing point of the section
To change the closing point of a section, select another point on this section
Слайд 44Copyright DASSAULT SYSTEMES 2002
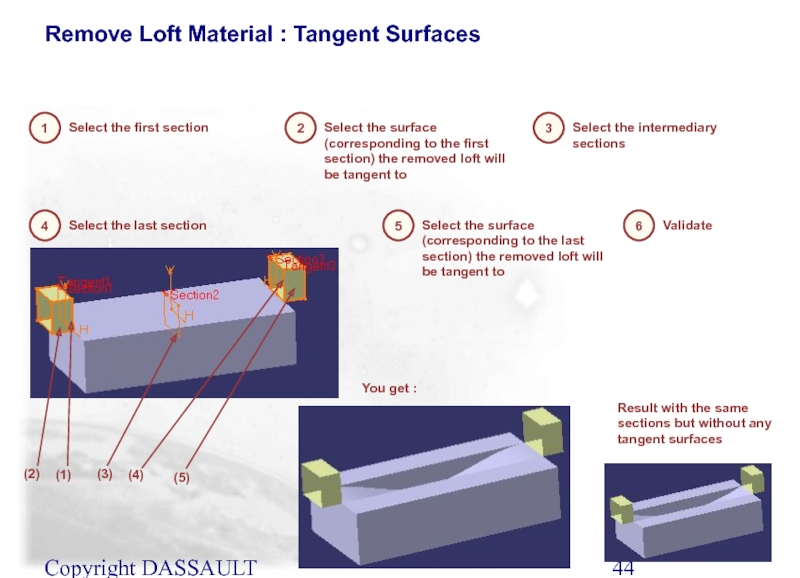
Remove Loft Material : Tangent Surfaces
1
Select the
2
Select the surface (corresponding to the first section) the removed loft will be tangent to
3
Select the intermediary sections
4
Select the last section
5
Select the surface (corresponding to the last section) the removed loft will be tangent to
6
Validate
You get :
Result with the same sections but without any tangent surfaces
(2)
(1)
(3)
(4)
(5)
Слайд 45Copyright DASSAULT SYSTEMES 2002
In this lesson we will learn how to
Coupling
Coupling when Creating Loft
Слайд 46Copyright DASSAULT SYSTEMES 2002
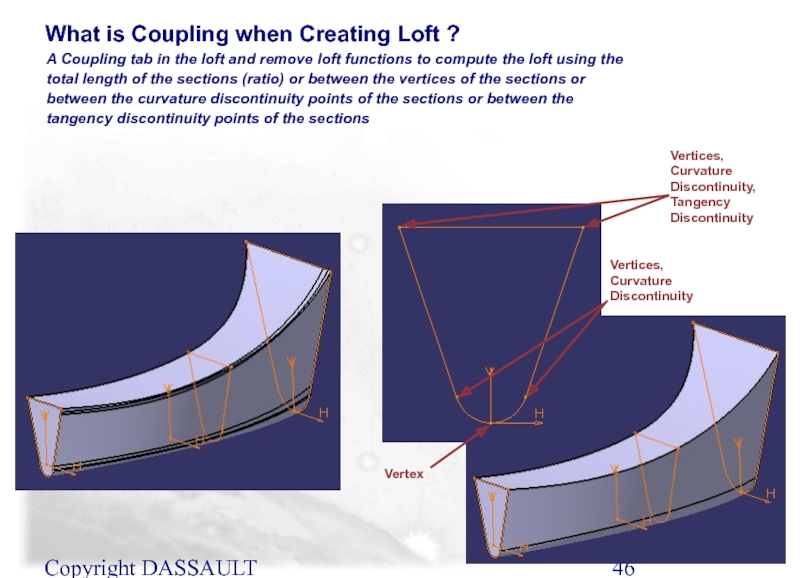
A Coupling tab in the loft and remove
What is Coupling when Creating Loft ?
Vertices, Curvature Discontinuity, Tangency Discontinuity
Vertices, Curvature Discontinuity
Vertex
Слайд 47Copyright DASSAULT SYSTEMES 2002
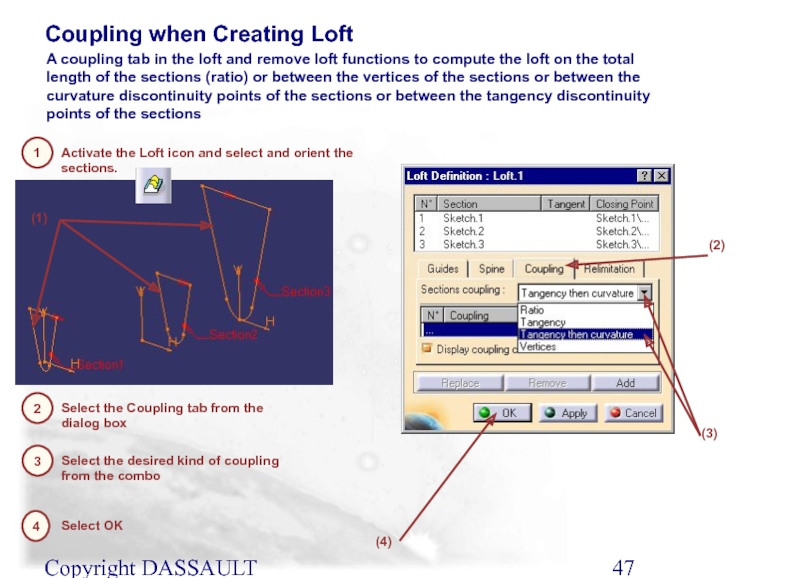
Coupling when Creating Loft
1
Activate the Loft icon
2
Select the Coupling tab from the dialog box
A coupling tab in the loft and remove loft functions to compute the loft on the total length of the sections (ratio) or between the vertices of the sections or between the curvature discontinuity points of the sections or between the tangency discontinuity points of the sections
(2)
3
Select the desired kind of coupling from the combo
(1)
4
Select OK
(3)
(4)
Слайд 48Copyright DASSAULT SYSTEMES 2002
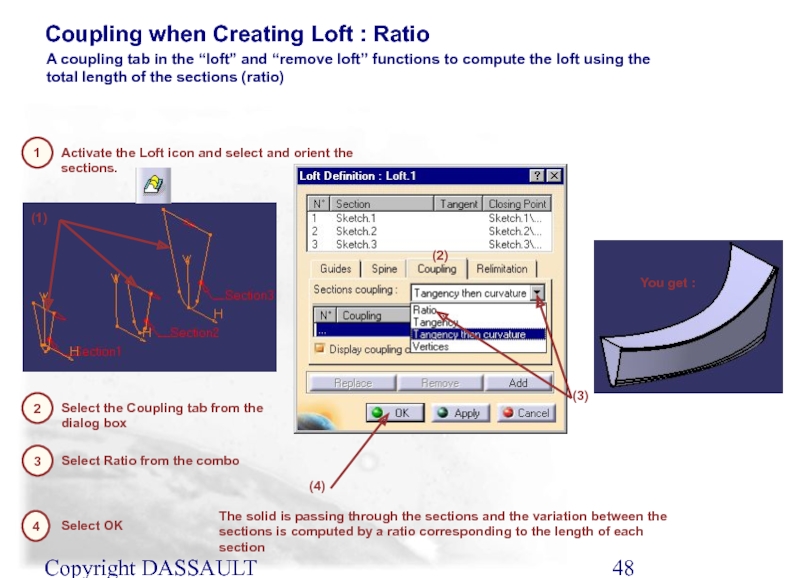
Coupling when Creating Loft : Ratio
1
Activate the Loft
2
Select the Coupling tab from the dialog box
A coupling tab in the “loft” and “remove loft” functions to compute the loft using the total length of the sections (ratio)
(2)
3
Select Ratio from the combo
(1)
4
Select OK
(3)
(4)
The solid is passing through the sections and the variation between the sections is computed by a ratio corresponding to the length of each section
You get :
Слайд 49Copyright DASSAULT SYSTEMES 2002
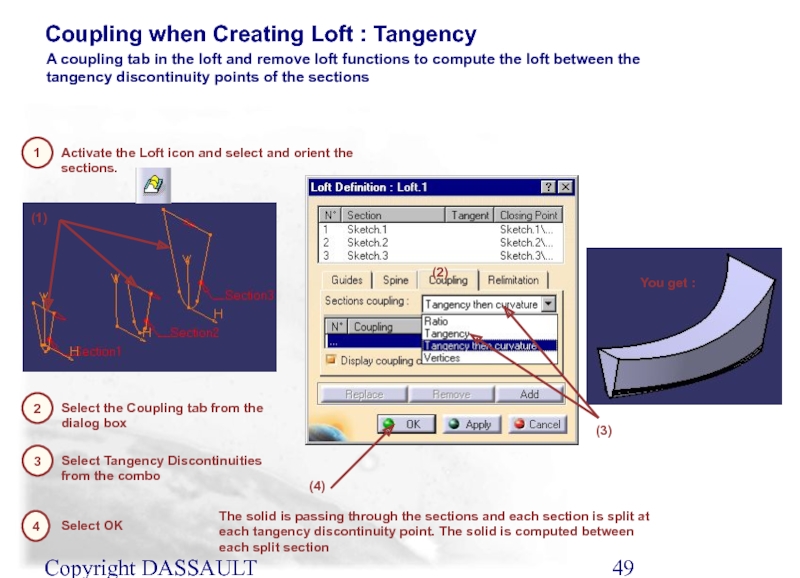
Coupling when Creating Loft : Tangency
1
Activate the Loft
2
Select the Coupling tab from the dialog box
(2)
3
Select Tangency Discontinuities from the combo
(1)
4
Select OK
(3)
(4)
The solid is passing through the sections and each section is split at each tangency discontinuity point. The solid is computed between each split section
You get :
A coupling tab in the loft and remove loft functions to compute the loft between the tangency discontinuity points of the sections
Слайд 50Copyright DASSAULT SYSTEMES 2002
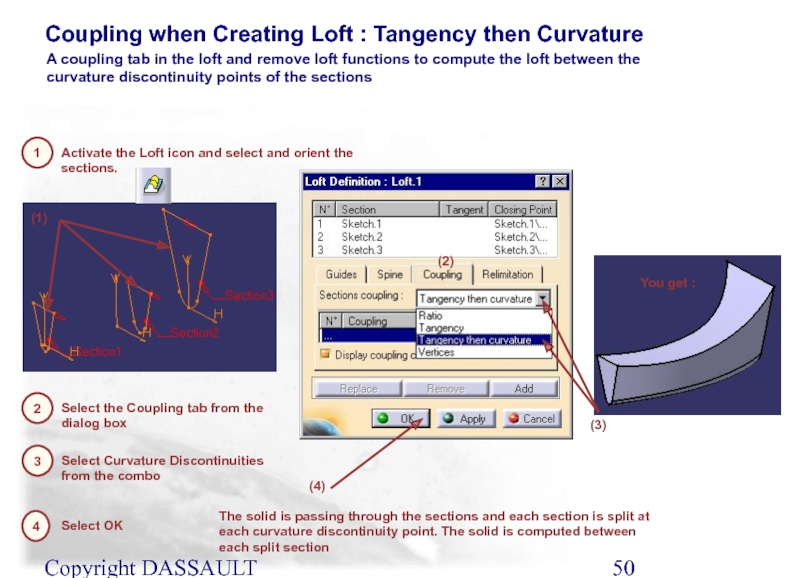
Coupling when Creating Loft : Tangency then Curvature
1
Activate
2
Select the Coupling tab from the dialog box
(2)
3
Select Curvature Discontinuities from the combo
(1)
4
Select OK
(3)
(4)
The solid is passing through the sections and each section is split at each curvature discontinuity point. The solid is computed between each split section
You get :
A coupling tab in the loft and remove loft functions to compute the loft between the curvature discontinuity points of the sections
Слайд 51Copyright DASSAULT SYSTEMES 2002
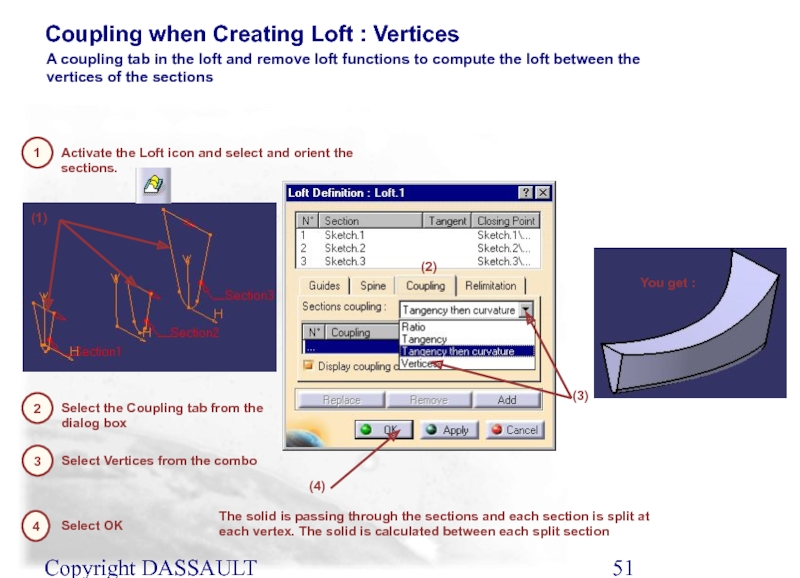
Coupling when Creating Loft : Vertices
1
Activate the
2
Select the Coupling tab from the dialog box
(2)
3
Select Vertices from the combo
(1)
4
Select OK
(3)
(4)
The solid is passing through the sections and each section is split at each vertex. The solid is calculated between each split section
You get :
A coupling tab in the loft and remove loft functions to compute the loft between the vertices of the sections
Слайд 52Copyright DASSAULT SYSTEMES 2002
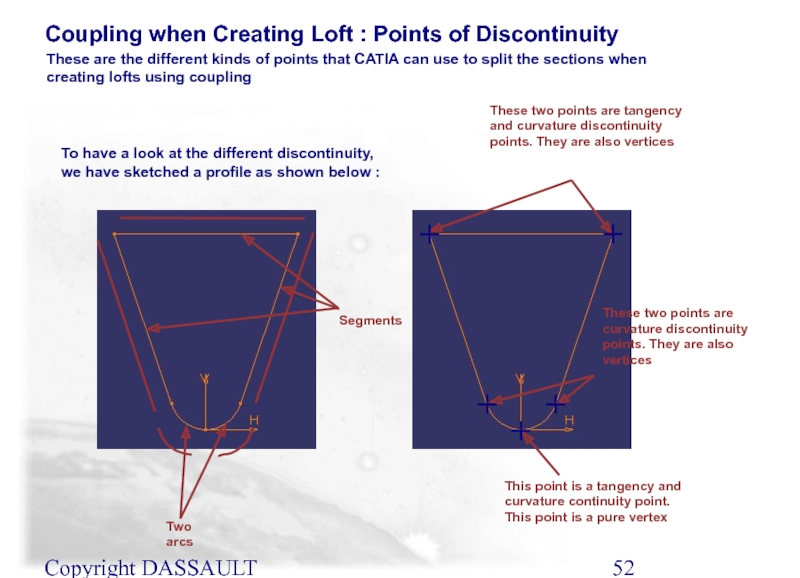
Coupling when Creating Loft : Points of Discontinuity
These two points are tangency and curvature discontinuity points. They are also vertices
This point is a tangency and curvature continuity point. This point is a pure vertex
To have a look at the different discontinuity, we have sketched a profile as shown below :
These are the different kinds of points that CATIA can use to split the sections when creating lofts using coupling
Segments
Two arcs
These two points are curvature discontinuity points. They are also vertices
Слайд 53Copyright DASSAULT SYSTEMES 2002
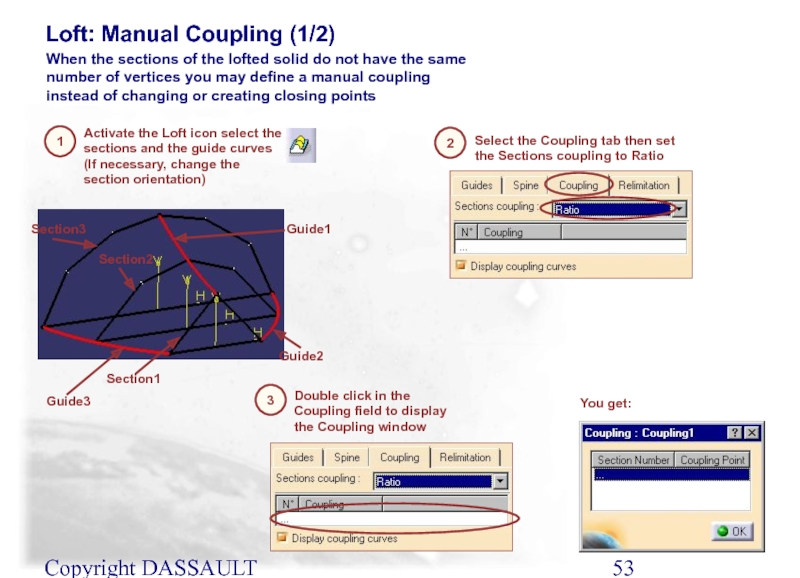
Loft: Manual Coupling (1/2)
Activate the Loft icon select
Double click in the Coupling field to display the Coupling window
1
2
3
Select the Coupling tab then set the Sections coupling to Ratio
When the sections of the lofted solid do not have the same number of vertices you may define a manual coupling instead of changing or creating closing points
You get:
Section1
Section2
Section3
Guide1
Guide2
Guide3
Слайд 54Copyright DASSAULT SYSTEMES 2002
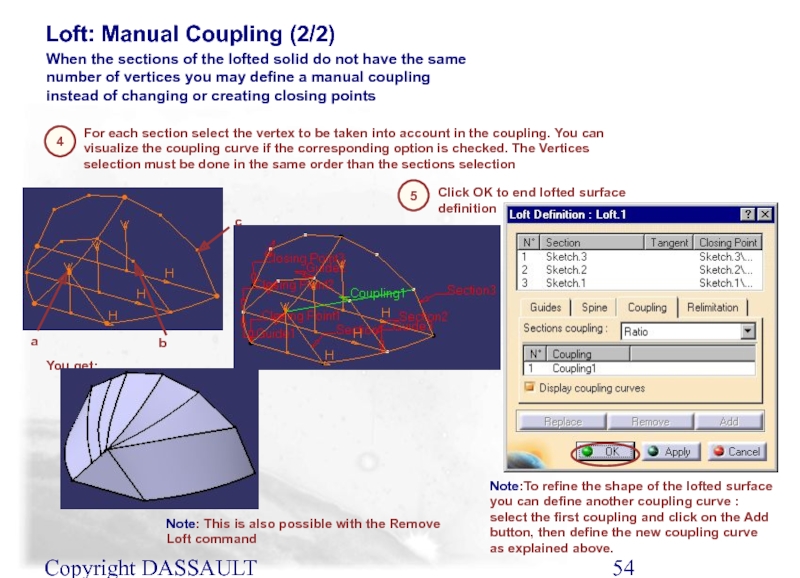
Loft: Manual Coupling (2/2)
For each section select the
4
5
Click OK to end lofted surface definition
When the sections of the lofted solid do not have the same number of vertices you may define a manual coupling instead of changing or creating closing points
You get:
Note:To refine the shape of the lofted surface you can define another coupling curve : select the first coupling and click on the Add button, then define the new coupling curve as explained above.
a
b
c
Note: This is also possible with the Remove Loft command
Слайд 55Copyright DASSAULT SYSTEMES 2002
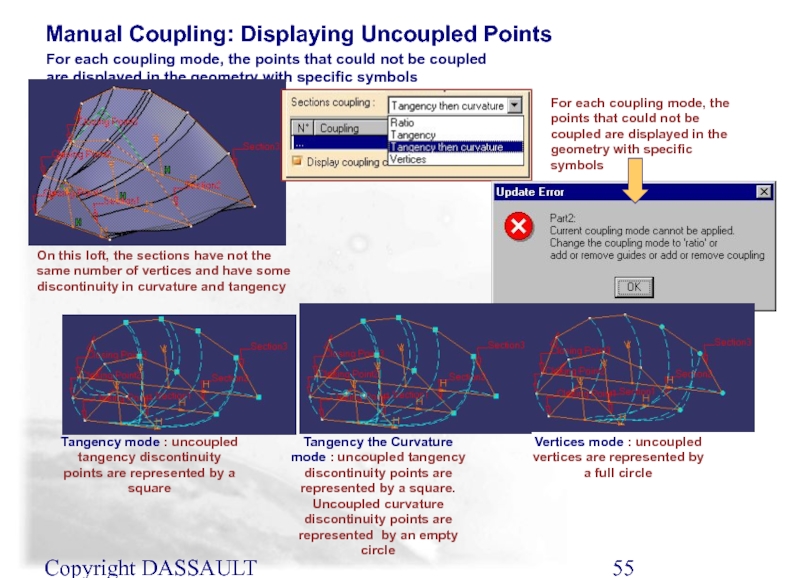
Manual Coupling: Displaying Uncoupled Points
On this loft, the
For each coupling mode, the points that could not be coupled are displayed in the geometry with specific symbols
For each coupling mode, the points that could not be coupled are displayed in the geometry with specific symbols
Tangency mode : uncoupled tangency discontinuity points are represented by a square
Tangency the Curvature mode : uncoupled tangency discontinuity points are represented by a square. Uncoupled curvature discontinuity points are represented by an empty circle
Vertices mode : uncoupled vertices are represented by a full circle
Слайд 56Copyright DASSAULT SYSTEMES 2002
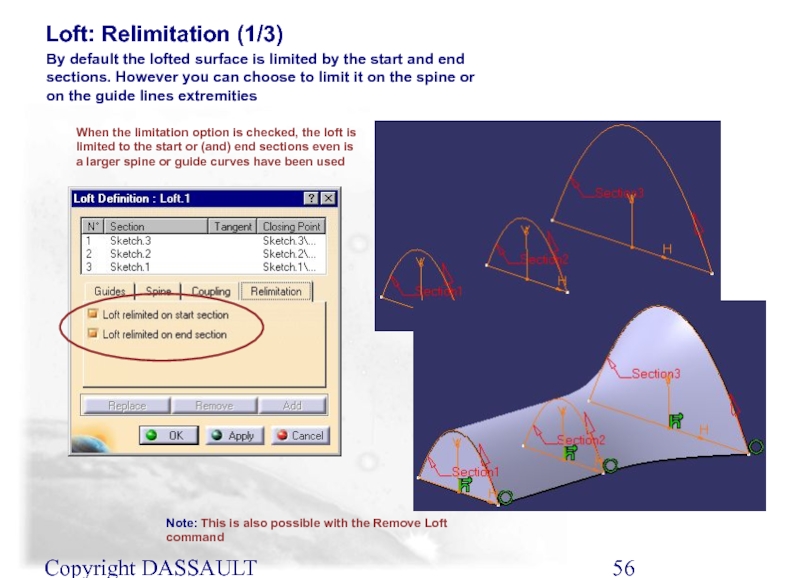
Loft: Relimitation (1/3)
When the limitation option is checked,
By default the lofted surface is limited by the start and end sections. However you can choose to limit it on the spine or on the guide lines extremities
Note: This is also possible with the Remove Loft command
Слайд 57Copyright DASSAULT SYSTEMES 2002
Loft: Relimitation (2/3)
When the limitation option is unchecked,
By default the lofted surface is limited by the start and end sections. However you can choose to limit it on the spine or on the guide lines extremities
Note: This is also possible with the Remove Loft command
Слайд 58Copyright DASSAULT SYSTEMES 2002
Loft: Relimitation (3/3)
When the limitation option is unchecked,
By default the lofted surface is limited by the start and end sections. However you can choose to limit it on the spine or on the guide lines extremities
Note: This is also possible with the Remove Loft command
Note: If a spine an guide lines have been used the loft will be limited on the shorter line
Слайд 59Copyright DASSAULT SYSTEMES 2002
In this lesson we will learn how to
Changing the Closing Point
Changing the Closing Point
Слайд 60Copyright DASSAULT SYSTEMES 2002
When selecting the sections to create a loft
What is Changing the Closing Point when Creating Loft ?
Слайд 61Copyright DASSAULT SYSTEMES 2002
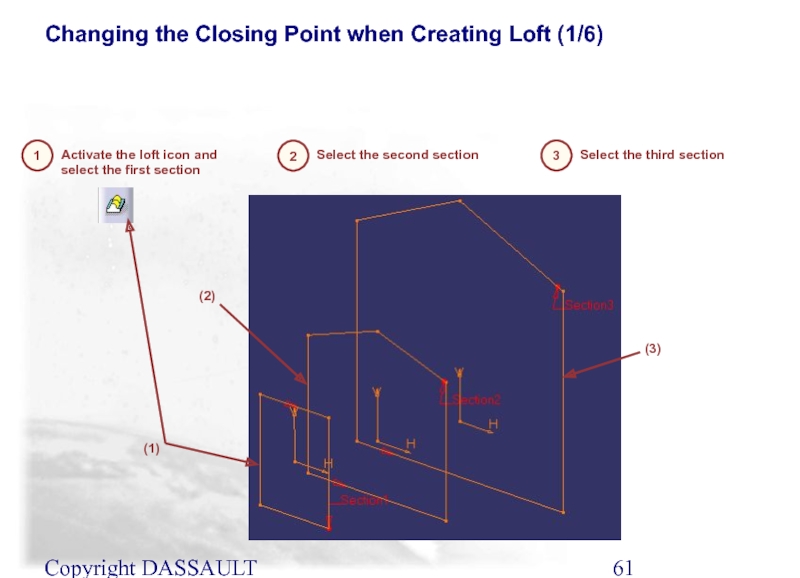
Changing the Closing Point when Creating Loft (1/6)
1
Activate the loft icon and select the first section
2
Select the second section
(2)
3
Select the third section
(1)
(3)
Слайд 62Copyright DASSAULT SYSTEMES 2002
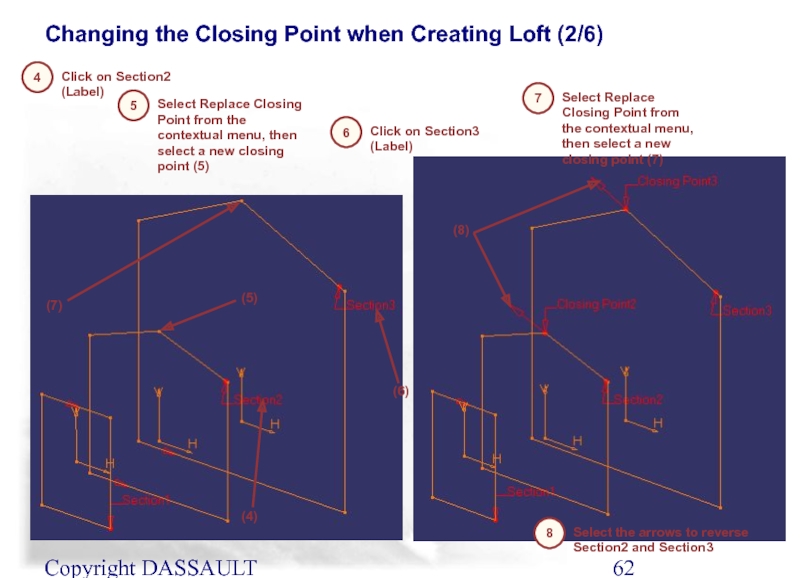
Changing the Closing Point when Creating Loft (2/6)
4
Click on Section2 (Label)
5
Select Replace Closing Point from the contextual menu, then select a new closing point (5)
(4)
(7)
(5)
7
Select Replace Closing Point from the contextual menu, then select a new closing point (7)
(6)
8
Select the arrows to reverse Section2 and Section3
(8)
6
Click on Section3 (Label)
Слайд 63Copyright DASSAULT SYSTEMES 2002
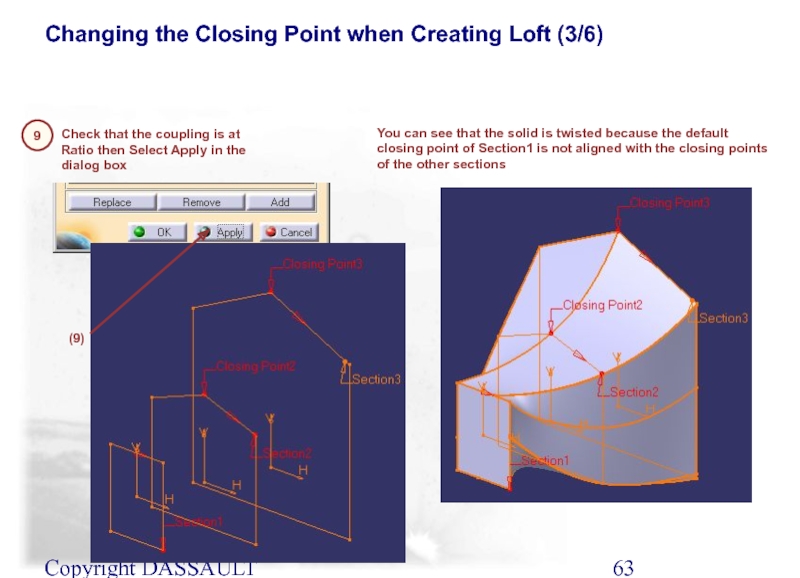
Changing the Closing Point when Creating Loft (3/6)
9
Check that the coupling is at Ratio then Select Apply in the dialog box
You can see that the solid is twisted because the default closing point of Section1 is not aligned with the closing points of the other sections
(9)
Слайд 64Copyright DASSAULT SYSTEMES 2002
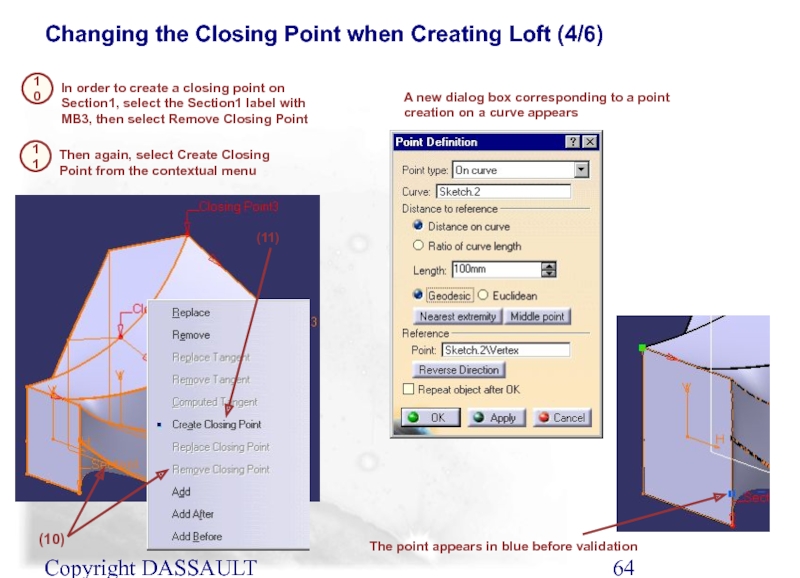
Changing the Closing Point when Creating Loft (4/6)
10
In order to create a closing point on Section1, select the Section1 label with MB3, then select Remove Closing Point
(10)
A new dialog box corresponding to a point creation on a curve appears
(11)
The point appears in blue before validation
11
Then again, select Create Closing Point from the contextual menu
Слайд 65Copyright DASSAULT SYSTEMES 2002
Changing the Closing Point when Creating Loft (5/6)
12
Select the Distance on curve option
(12)
(14)
13
Select the Geodesic option
14
Enter 100 as the Length
(13)
15
Select OK
(15)
Слайд 66Copyright DASSAULT SYSTEMES 2002
Changing the Closing Point when Creating Loft (6/6)
16
Select the Coupling tab
(16)
(18)
17
Select Vertices option from the combo
18
Select OK
(17)
You get :
Слайд 67Copyright DASSAULT SYSTEMES 2002
You will learn more about 3D Wireframe Elements
3D Wireframe Elements
3D Wireframe Elements
Use of Wireframe Elements in Part Design
Слайд 68Copyright DASSAULT SYSTEMES 2002
What are 3D Wireframe Elements ?
In the
In the Specification Tree, they are inserted under “Open_Body” which contain all 3D Wireframe elements.
Even if these elements are some Wireframe Elements, we can use them with the Part Design Tools.
Слайд 69Copyright DASSAULT SYSTEMES 2002
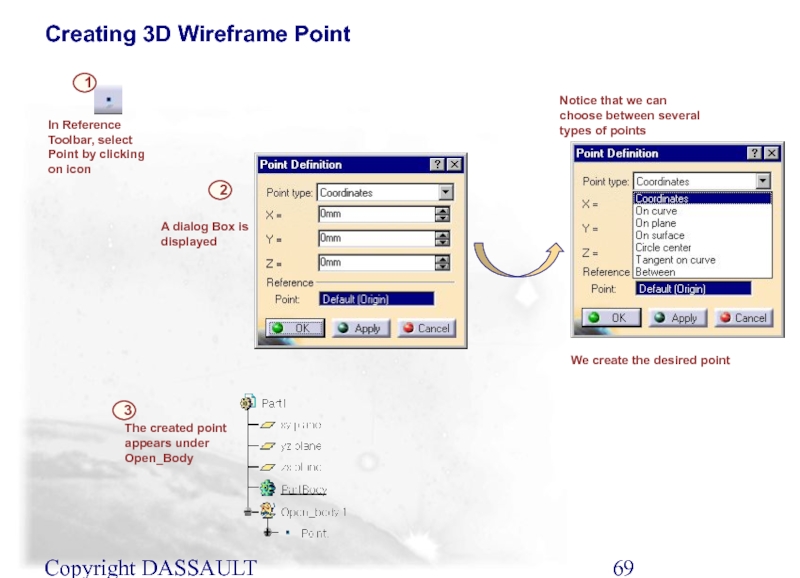
A dialog Box is displayed
2
In Reference Toolbar, select
1
Notice that we can choose between several types of points
3
The created point appears under Open_Body
We create the desired point
Creating 3D Wireframe Point
Слайд 70Copyright DASSAULT SYSTEMES 2002
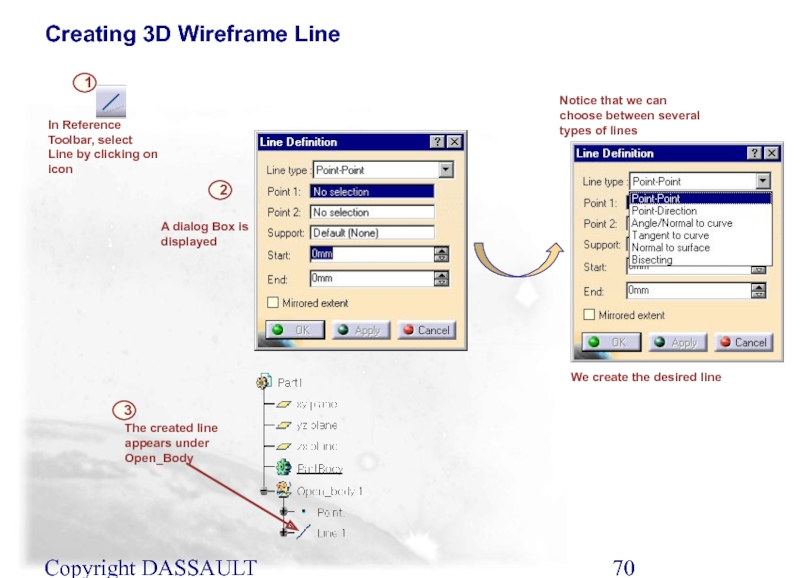
A dialog Box is displayed
2
In Reference Toolbar, select
1
Notice that we can choose between several types of lines
3
The created line appears under Open_Body
We create the desired line
Creating 3D Wireframe Line
Слайд 71Copyright DASSAULT SYSTEMES 2002
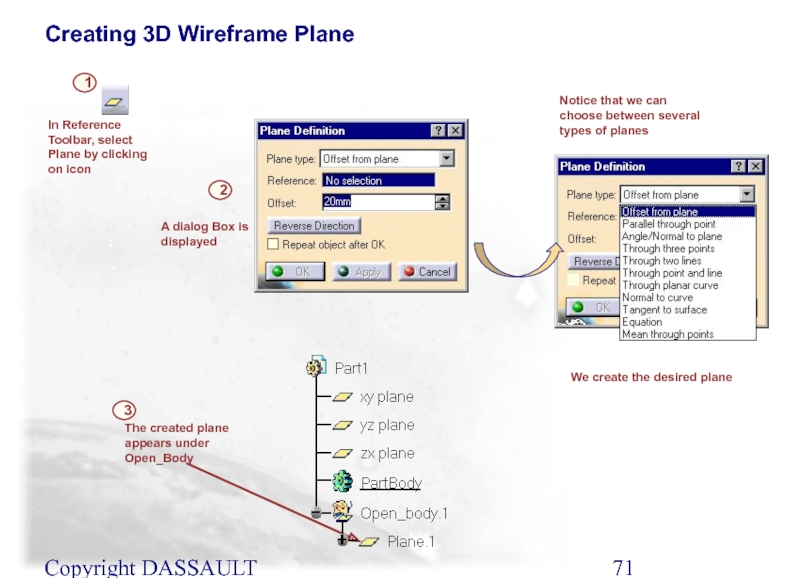
A dialog Box is displayed
2
In Reference Toolbar, select
1
Notice that we can choose between several types of planes
3
The created plane appears under Open_Body
We create the desired plane
Creating 3D Wireframe Plane
Слайд 72Copyright DASSAULT SYSTEMES 2002
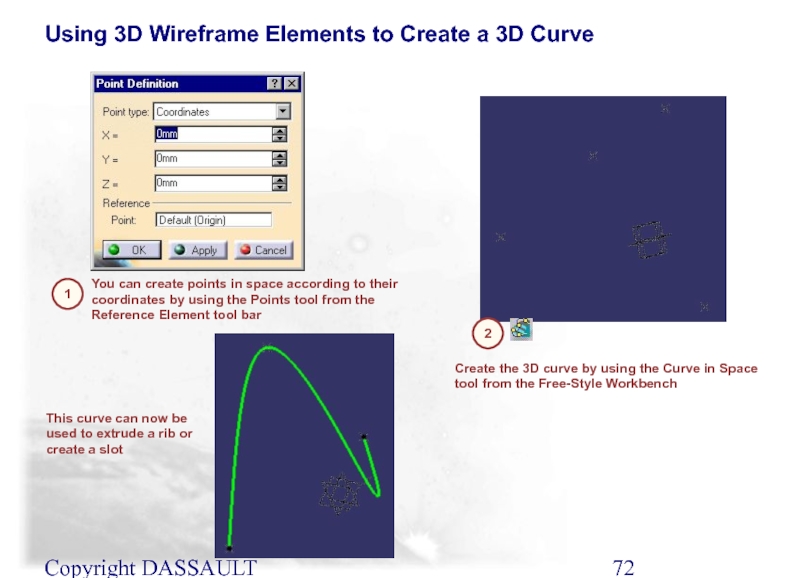
Using 3D Wireframe Elements to Create a 3D
1
You can create points in space according to their coordinates by using the Points tool from the Reference Element tool bar
2
Create the 3D curve by using the Curve in Space tool from the Free-Style Workbench
This curve can now be used to extrude a rib or create a slot
Слайд 73Copyright DASSAULT SYSTEMES 2002
We will learn how to use all of
Surface Based Features
Split
Thick Surface
Close Surface
Sew Surface
Слайд 74Copyright DASSAULT SYSTEMES 2002
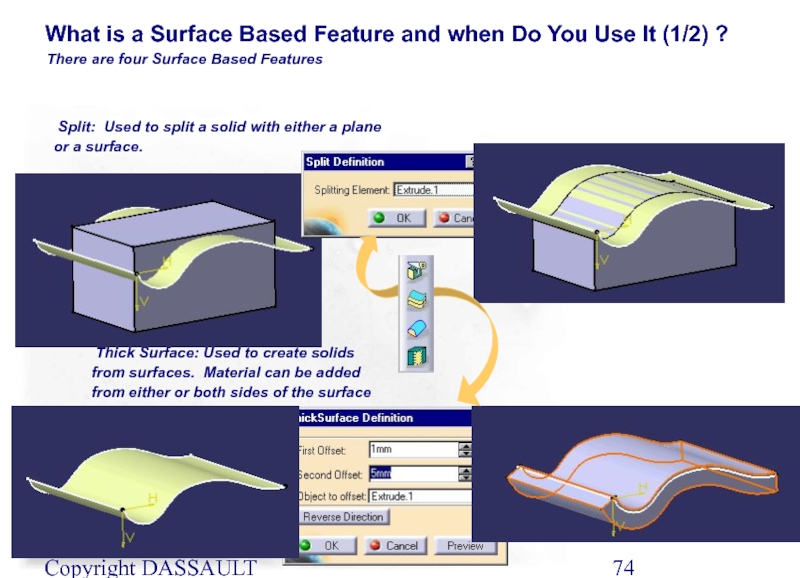
There are four Surface Based Features
What is a
Thick Surface: Used to create solids from surfaces. Material can be added from either or both sides of the surface
Split: Used to split a solid with either a plane or a surface.
Слайд 75Copyright DASSAULT SYSTEMES 2002
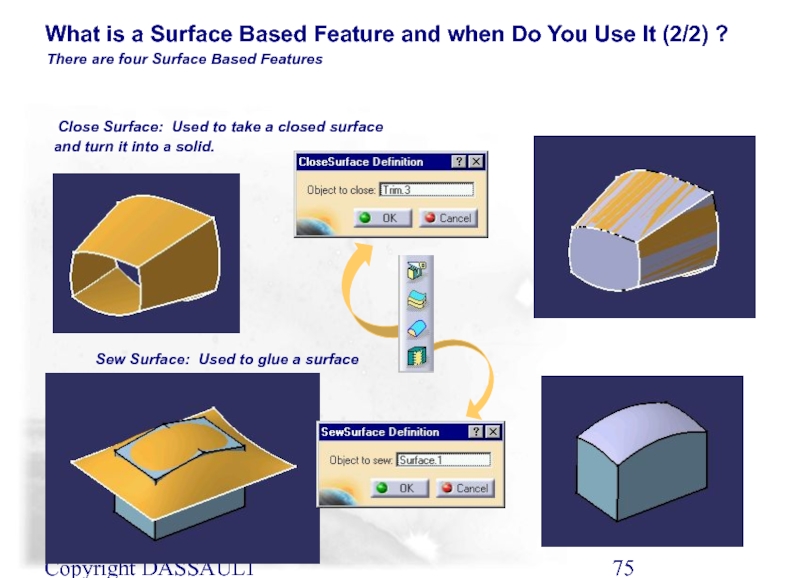
There are four Surface Based Features
What is a
Sew Surface: Used to glue a surface feature to an existing 3D solid.
Close Surface: Used to take a closed surface and turn it into a solid.
Слайд 76Copyright DASSAULT SYSTEMES 2002
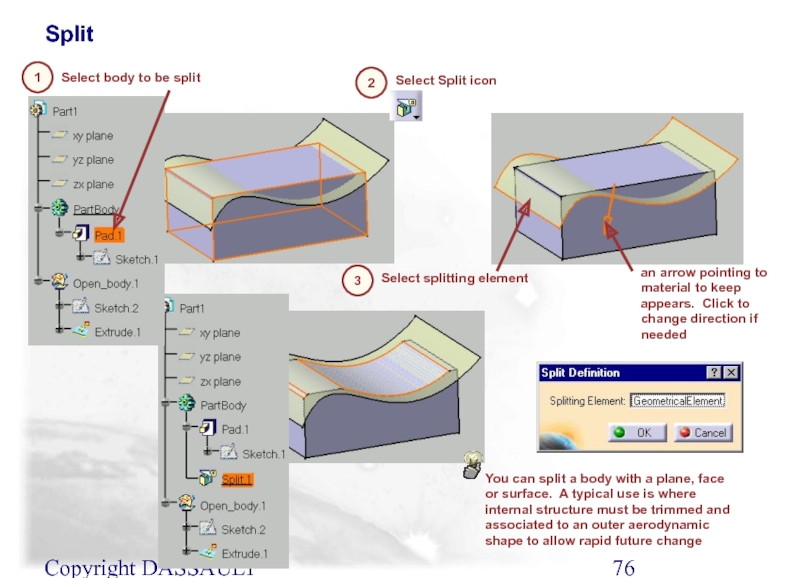
Split
1
Select body to be split
2
Select splitting element
3
You
Select Split icon
an arrow pointing to material to keep appears. Click to change direction if needed
Слайд 77Copyright DASSAULT SYSTEMES 2002
Thick Surface
1
Select surface to be thickened
2
Modify thickness
3
The resulting feature does not keep the color of the original surface
Select Thick Surface icon
and the preview shows the corresponding upper and lower thickness
Слайд 78Copyright DASSAULT SYSTEMES 2002
Close Surface
1
Select Close Surface icon
2
Closed Surface appears
3
Select surface to be closed
Слайд 79Copyright DASSAULT SYSTEMES 2002
Sew Surface
1
Select the object to sew surface
2
Select surface to sew
3
Sewing means joining together a surface and a body. This capability consists in computing the intersection between a given surface and a body while removing useless material
Select Sew Surface icon
an arrow pointing to material to keep appears. Click to change direction if needed
Слайд 80Copyright DASSAULT SYSTEMES 2002
Advance Draft
In this lesson we will see the
Advanced Draft
Слайд 81Copyright DASSAULT SYSTEMES 2002
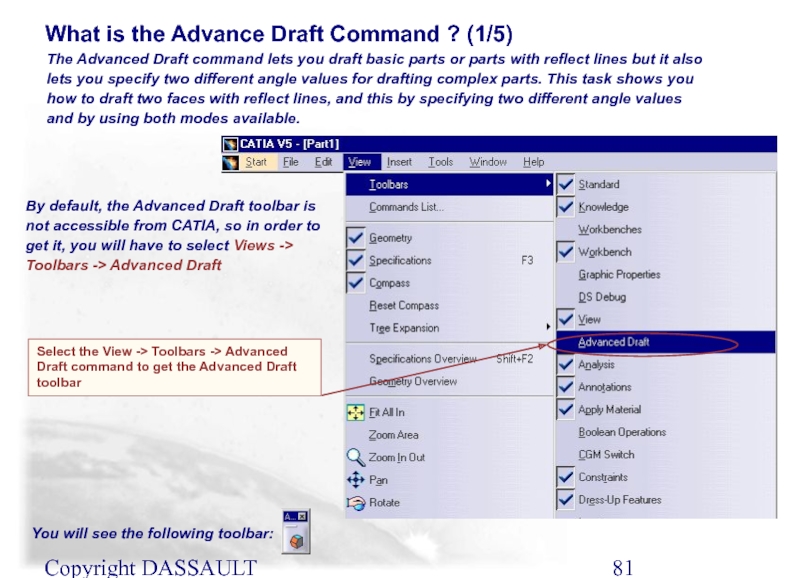
Select the View -> Toolbars -> Advanced Draft
The Advanced Draft command lets you draft basic parts or parts with reflect lines but it also lets you specify two different angle values for drafting complex parts. This task shows you how to draft two faces with reflect lines, and this by specifying two different angle values and by using both modes available.
What is the Advance Draft Command ? (1/5)
By default, the Advanced Draft toolbar is not accessible from CATIA, so in order to get it, you will have to select Views -> Toolbars -> Advanced Draft
You will see the following toolbar:
Слайд 82Copyright DASSAULT SYSTEMES 2002
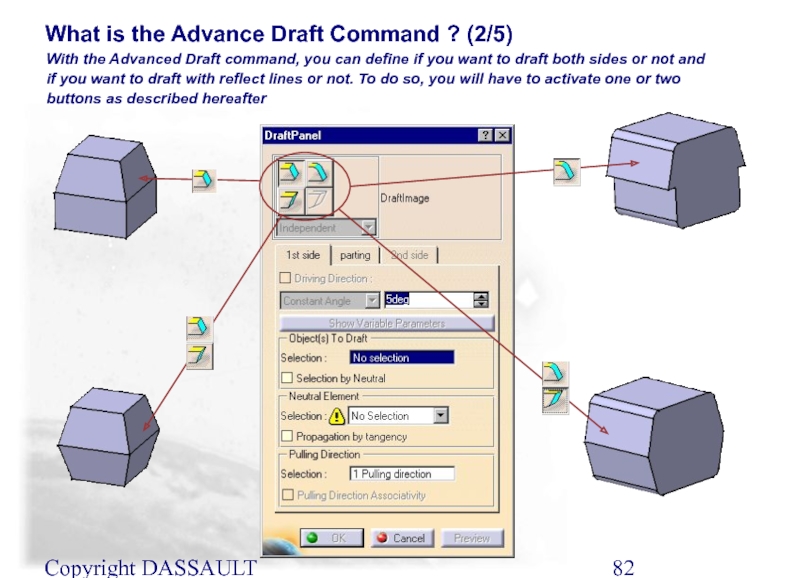
With the Advanced Draft command, you can define
What is the Advance Draft Command ? (2/5)
Слайд 83Copyright DASSAULT SYSTEMES 2002
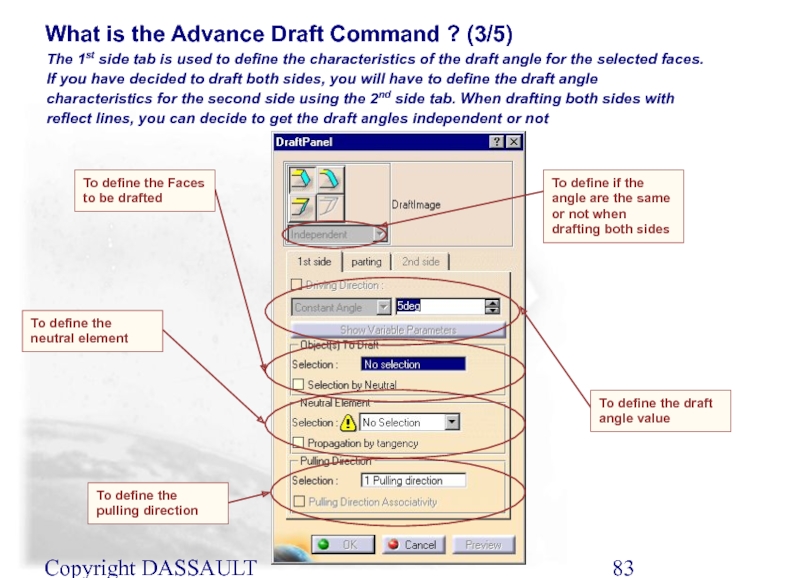
The 1st side tab is used to define
What is the Advance Draft Command ? (3/5)
To define the Faces to be drafted
To define the neutral element
To define the pulling direction
To define the draft angle value
To define if the angle are the same or not when drafting both sides
Слайд 84Copyright DASSAULT SYSTEMES 2002
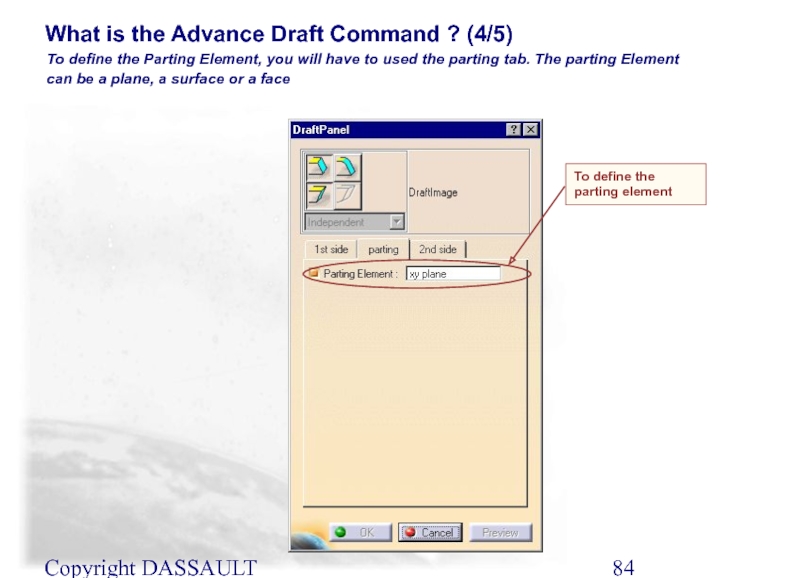
To define the Parting Element, you will have
What is the Advance Draft Command ? (4/5)
To define the parting element
Слайд 85Copyright DASSAULT SYSTEMES 2002
When you have decided to draft both sides
What is the Advance Draft Command ? (5/5)
Neutral element
To define the pulling direction
To define the draft angle value
To define if the angle are the same or not when drafting both sides
Слайд 86Copyright DASSAULT SYSTEMES 2002
Advanced Draft Angle: Draft Both Sides (1/9)
Select
1
You are going to see how to draft both sides using the Advanced Draft icon
Activate these two buttons
2
Слайд 87Copyright DASSAULT SYSTEMES 2002
Advanced Draft Angle: Draft Both Sides (2/9)
As
3
Слайд 88Copyright DASSAULT SYSTEMES 2002
Advanced Draft Angle: Draft Both Sides (3/9)
Select
4
Слайд 89Copyright DASSAULT SYSTEMES 2002
Advanced Draft Angle: Draft Both Sides (4/9)
Enter
5
Select the parting tab
6
Слайд 90Copyright DASSAULT SYSTEMES 2002
Advanced Draft Angle: Draft Both Sides (5/9)
Select
7
Select the Parting Element field
8
Слайд 91Copyright DASSAULT SYSTEMES 2002
Advanced Draft Angle: Draft Both Sides (6/9)
Select
9
Select the 2nd side tab
10
Слайд 92Copyright DASSAULT SYSTEMES 2002
Advanced Draft Angle: Draft Both Sides (7/9)
Select
11
Слайд 93Copyright DASSAULT SYSTEMES 2002
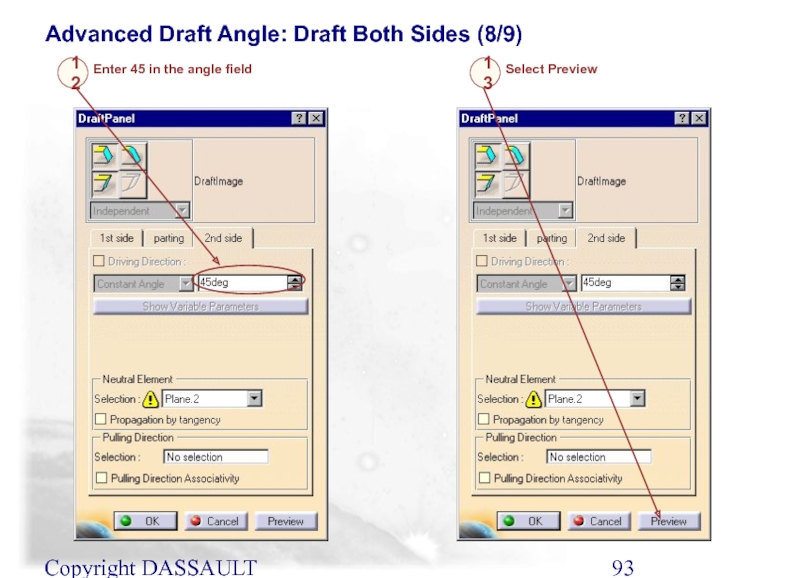
Advanced Draft Angle: Draft Both Sides (8/9)
Enter
12
Select Preview
13
Слайд 94Copyright DASSAULT SYSTEMES 2002
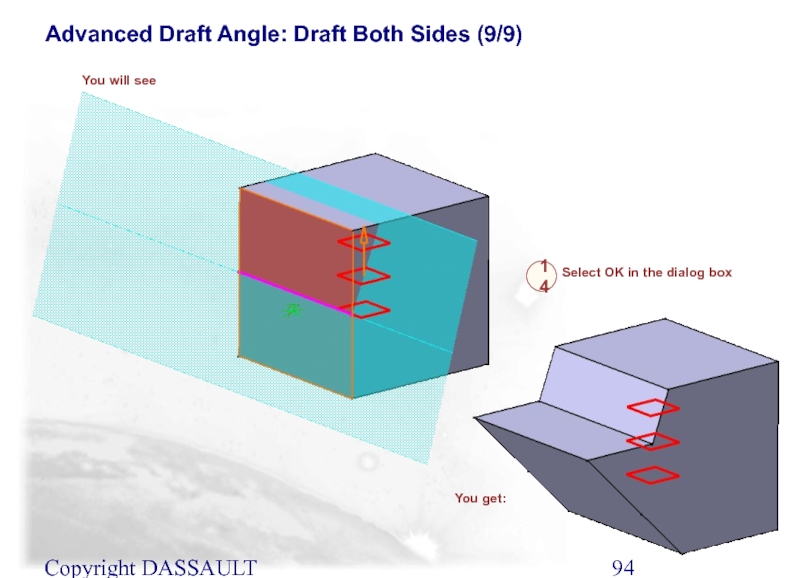
Advanced Draft Angle: Draft Both Sides (9/9)
Select
14
You will see
You get:
Слайд 95Copyright DASSAULT SYSTEMES 2002
We will see how to add material on
Thickness
Thickness Creation
Слайд 96Copyright DASSAULT SYSTEMES 2002
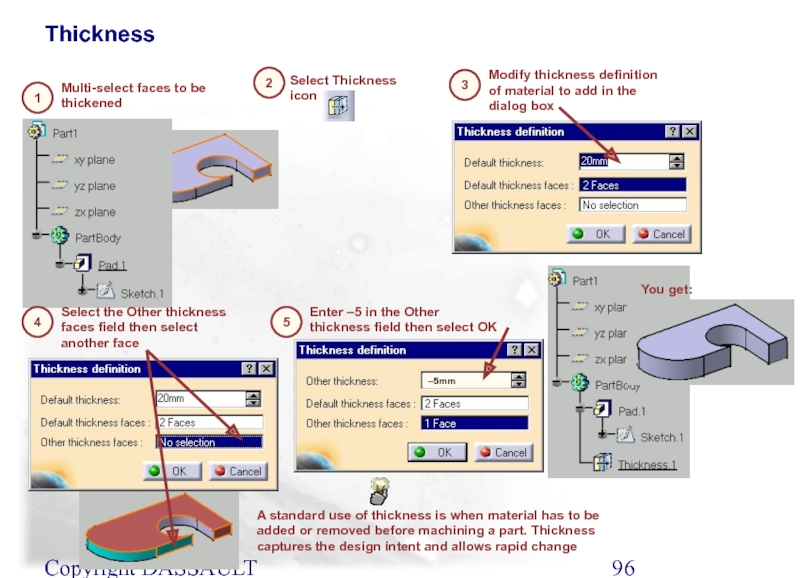
Thickness
1
Multi-select faces to be thickened
2
Modify thickness definition
3
A standard use of thickness is when material has to be added or removed before machining a part. Thickness captures the design intent and allows rapid change
Select Thickness icon
Select the Other thickness faces field then select another face
4
Enter –5 in the Other thickness field then select OK
5
You get:
Слайд 97Copyright DASSAULT SYSTEMES 2002
In this lesson we will learn how to
Using Transformations
Using Transformations
Слайд 98Copyright DASSAULT SYSTEMES 2002
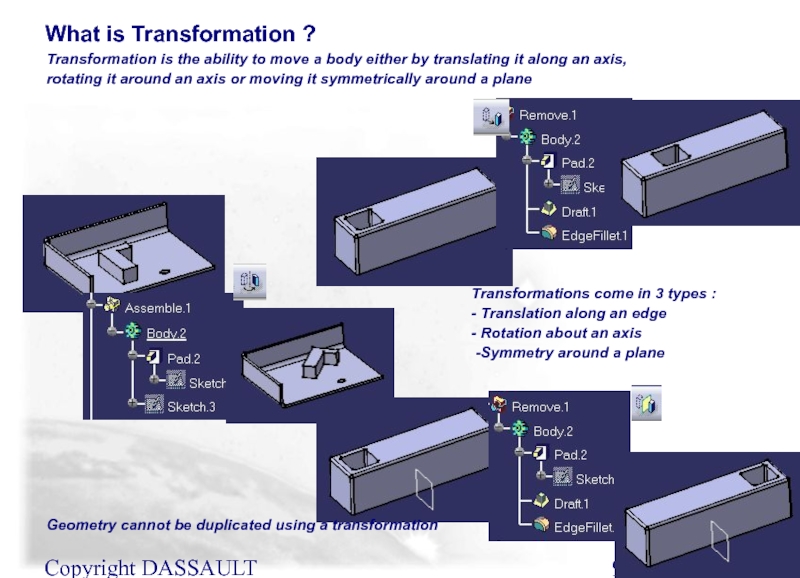
Transformation is the ability to move a body
What is Transformation ?
Geometry cannot be duplicated using a transformation
Transformations come in 3 types :
- Translation along an edge
- Rotation about an axis
-Symmetry around a plane
Слайд 99Copyright DASSAULT SYSTEMES 2002
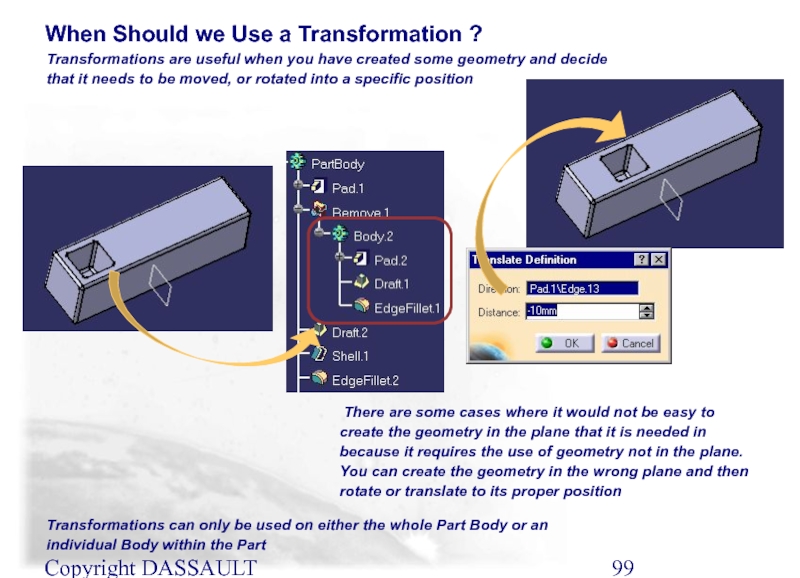
Transformations are useful when you have created some
When Should we Use a Transformation ?
Transformations can only be used on either the whole Part Body or an individual Body within the Part
There are some cases where it would not be easy to create the geometry in the plane that it is needed in because it requires the use of geometry not in the plane. You can create the geometry in the wrong plane and then rotate or translate to its proper position
Слайд 100Copyright DASSAULT SYSTEMES 2002
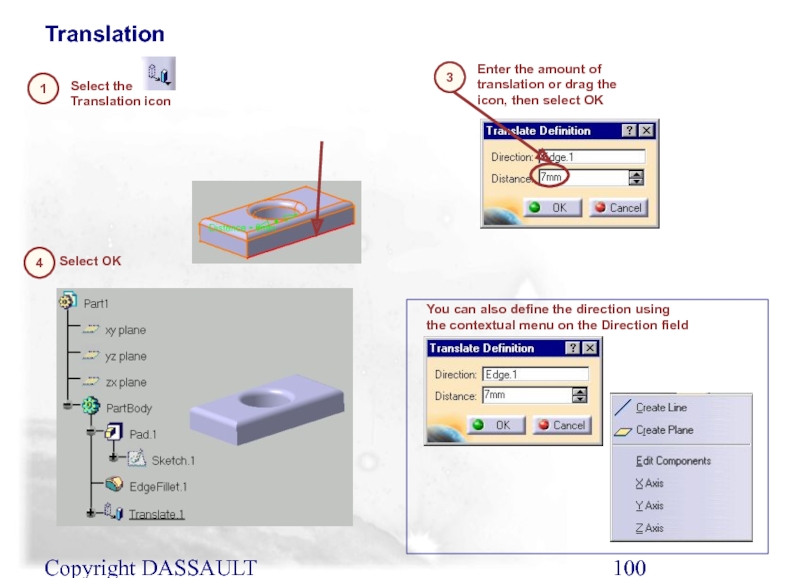
Translation
4
1
Select OK
Select the Translation icon
Enter the amount of
You can also define the direction using the contextual menu on the Direction field
3
Слайд 101Copyright DASSAULT SYSTEMES 2002
Select the Rotation icon
Select an edge for rotation
…and enter the amount of rotation or drag the icon
Rotation
1
2
You can also define the axis using the contextual menu on the Axis field
Select OK
3
Слайд 102Copyright DASSAULT SYSTEMES 2002
Select OK
Select plane defining the symmetry
Select the Symmetry
Symmetry
1
2
4
Instead of a plane, you can use a Point as the Reference element
Instead of a plane, you can use a Segment as the Reference element
You can also define the Reference using the contextual menu on the Reference field
Слайд 103Copyright DASSAULT SYSTEMES 2002
In this lesson we will learn how to
3D Constraints
Creating and Using 3D Constraints
Слайд 104Copyright DASSAULT SYSTEMES 2002
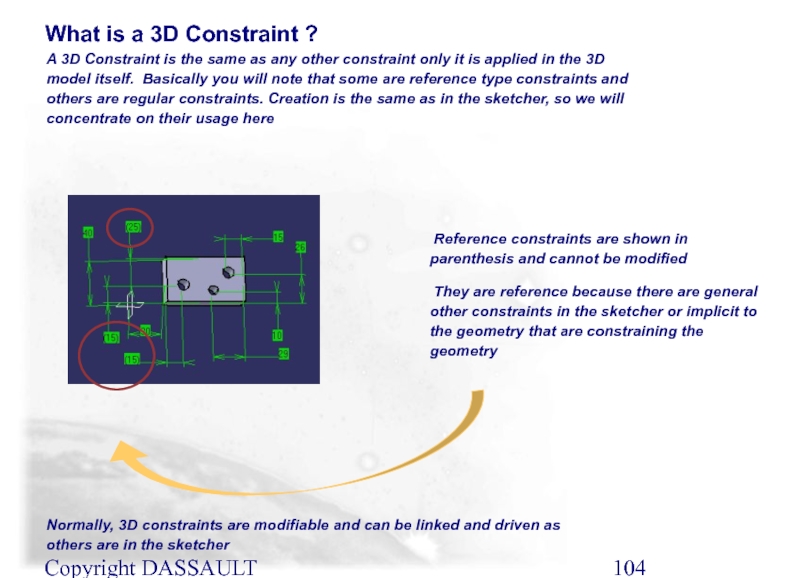
A 3D Constraint is the same as any
What is a 3D Constraint ?
Normally, 3D constraints are modifiable and can be linked and driven as others are in the sketcher
They are reference because there are general other constraints in the sketcher or implicit to the geometry that are constraining the geometry
Reference constraints are shown in parenthesis and cannot be modified
Слайд 105Copyright DASSAULT SYSTEMES 2002
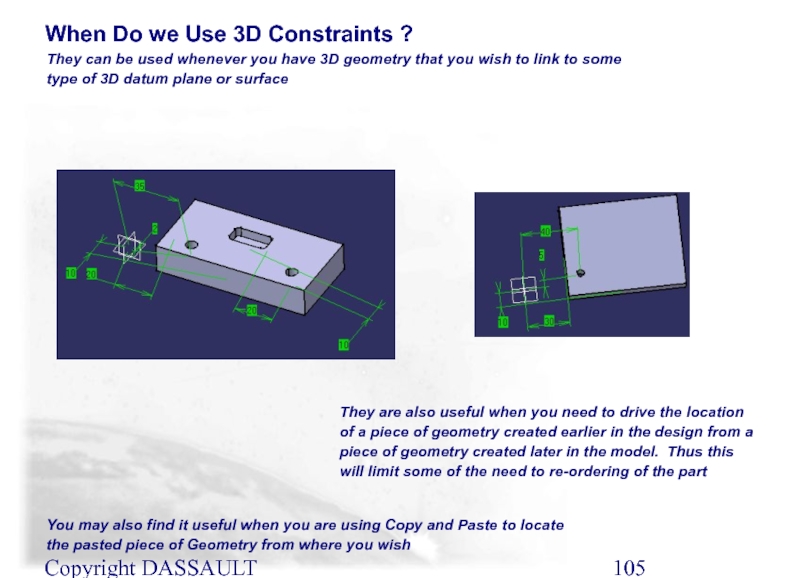
They can be used whenever you have 3D
When Do we Use 3D Constraints ?
You may also find it useful when you are using Copy and Paste to locate the pasted piece of Geometry from where you wish
They are also useful when you need to drive the location of a piece of geometry created earlier in the design from a piece of geometry created later in the model. Thus this will limit some of the need to re-ordering of the part
Слайд 106Copyright DASSAULT SYSTEMES 2002
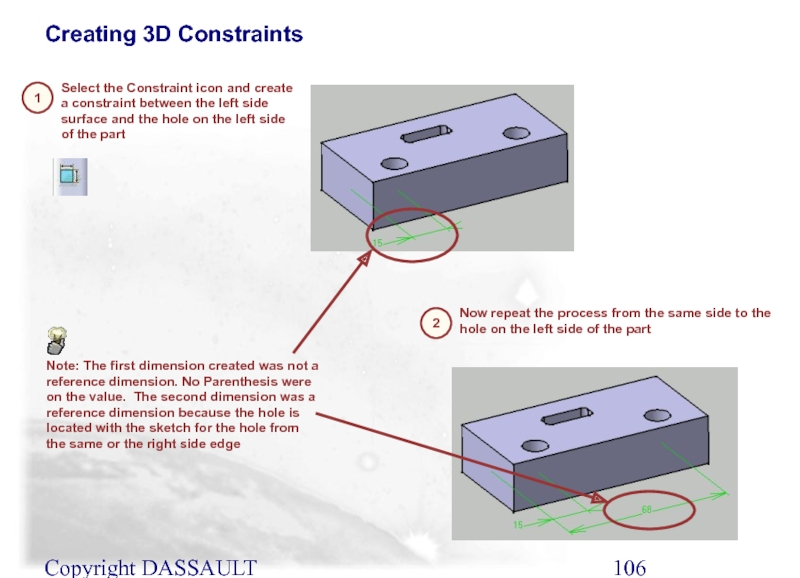
Creating 3D Constraints
1
Select the Constraint icon and create
2
Note: The first dimension created was not a reference dimension. No Parenthesis were on the value. The second dimension was a reference dimension because the hole is located with the sketch for the hole from the same or the right side edge
Now repeat the process from the same side to the hole on the left side of the part
Слайд 107Copyright DASSAULT SYSTEMES 2002
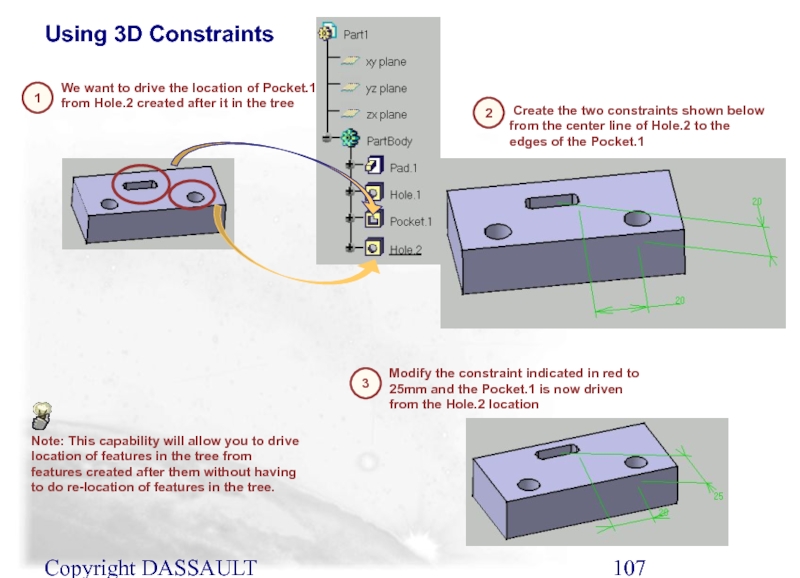
Using 3D Constraints
1
We want to drive the location
2
Modify the constraint indicated in red to 25mm and the Pocket.1 is now driven from the Hole.2 location
3
Create the two constraints shown below from the center line of Hole.2 to the edges of the Pocket.1
Note: This capability will allow you to drive location of features in the tree from features created after them without having to do re-location of features in the tree.
Слайд 108Copyright DASSAULT SYSTEMES 2002
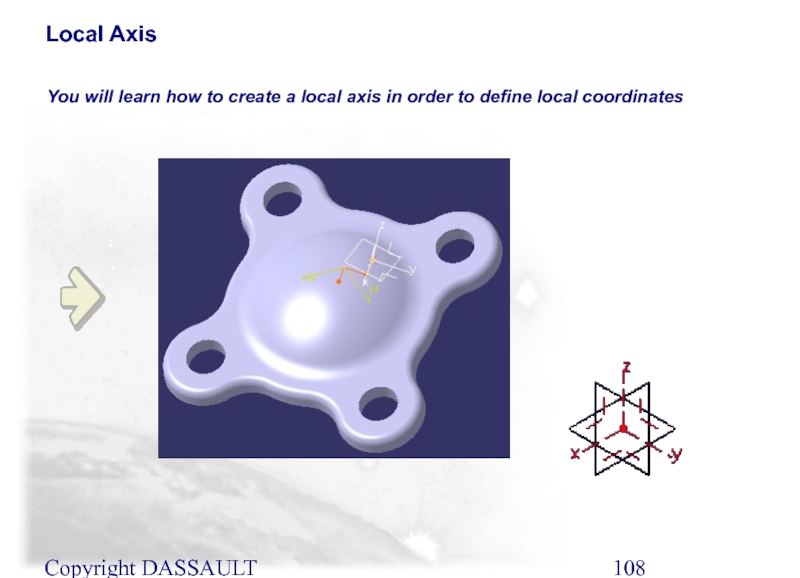
You will learn how to create a local
Local Axis
Слайд 109Copyright DASSAULT SYSTEMES 2002
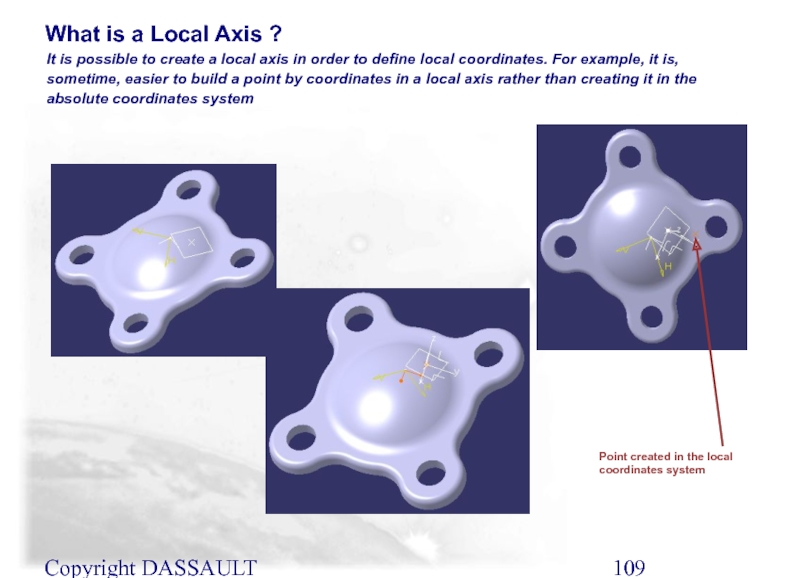
It is possible to create a local axis
What is a Local Axis ?
Point created in the local coordinates system
Слайд 110Copyright DASSAULT SYSTEMES 2002
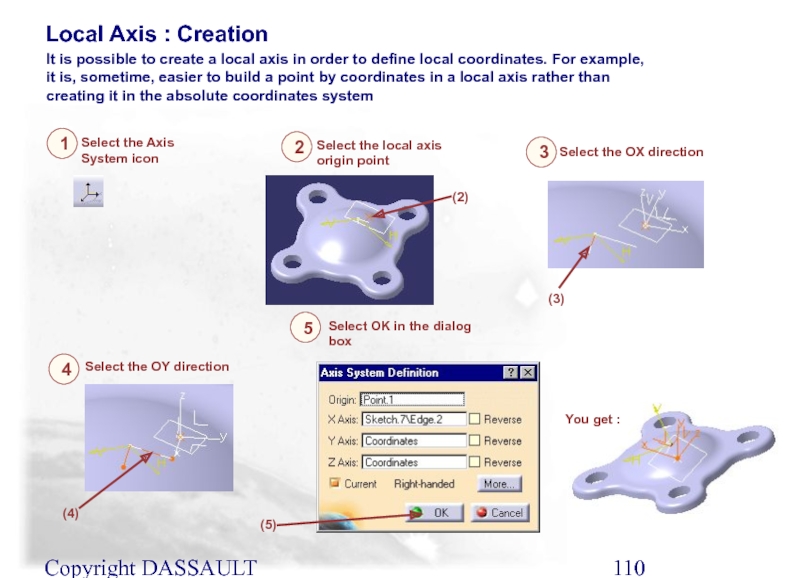
Local Axis : Creation
It is possible to create
Select the Axis System icon
Select the local axis origin point
(2)
Select the OX direction
Select the OY direction
You get :
(3)
(4)
Select OK in the dialog box
(5)
5
4
3
2
1
Слайд 111Copyright DASSAULT SYSTEMES 2002
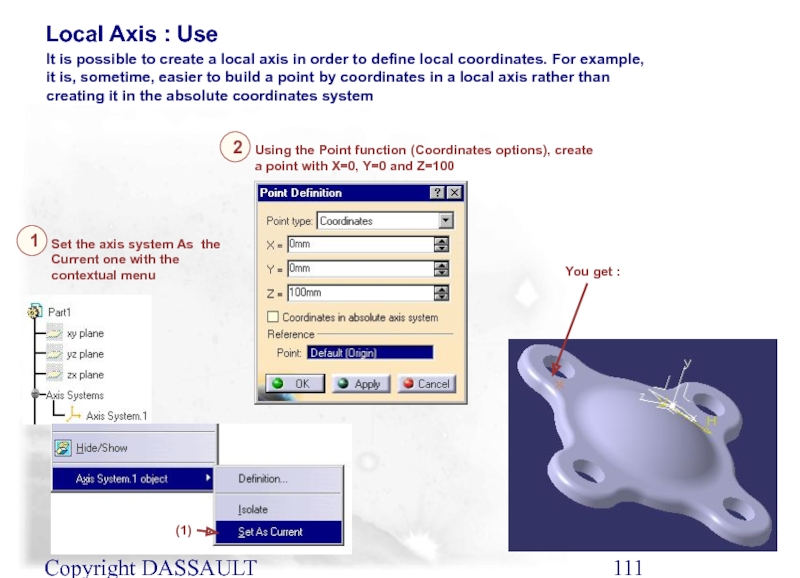
Local Axis : Use
It is possible to create
Set the axis system As the Current one with the contextual menu
You get :
Using the Point function (Coordinates options), create a point with X=0, Y=0 and Z=100
(1)
1
2
Слайд 112Copyright DASSAULT SYSTEMES 2002
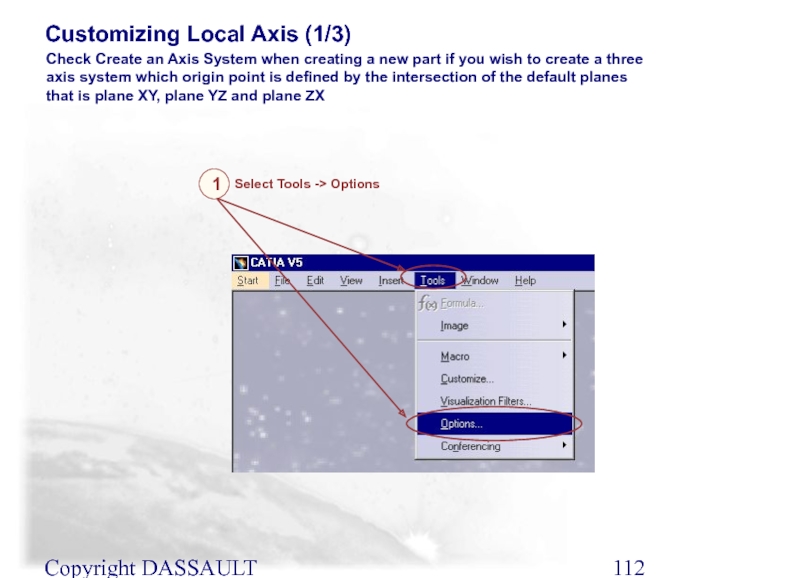
Customizing Local Axis (1/3)
Check Create an Axis System
Select Tools -> Options
1
Слайд 113Copyright DASSAULT SYSTEMES 2002
Customizing Local Axis (2/3)
In the Options dialog box,
2
Select the Create an Axis System when creating a new part option
3
Select OK
4
Слайд 114Copyright DASSAULT SYSTEMES 2002
Customizing Local Axis (3/3)
Double click on Part in
5
Select the File -> New command
6
The local axis is automatically created:
Слайд 115Copyright DASSAULT SYSTEMES 2002
Additional Information
Local Axis dialog box
To expand the dialog
To shrink the dialog box
To define the axis system origin
To define the OX axis
To define the Oy axis
To define the Oz axis
To reverse the OZ axis
To reverse the OY axis
To reverse the OX axis
Слайд 116Text with Leader
Flag Note with Leader
Annotation
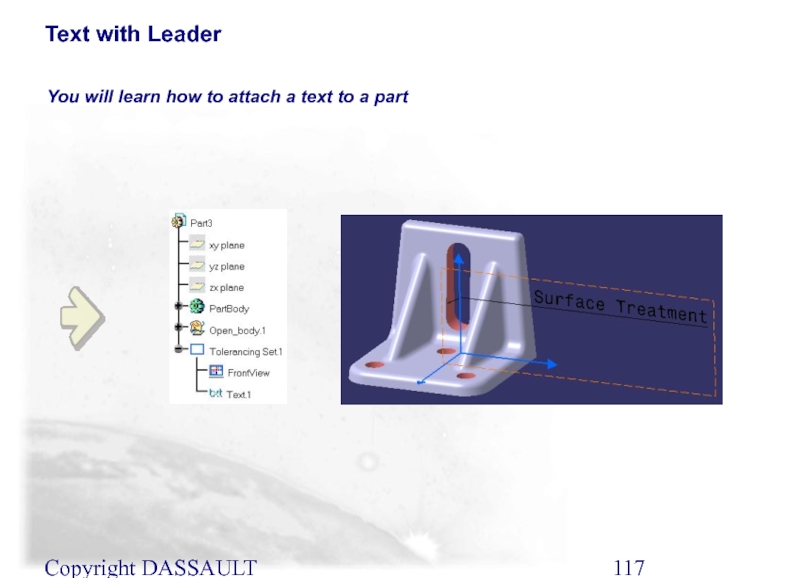
You will learn how to attach
Слайд 117Copyright DASSAULT SYSTEMES 2002
You will learn how to attach a text
Text with Leader
Слайд 118Copyright DASSAULT SYSTEMES 2002
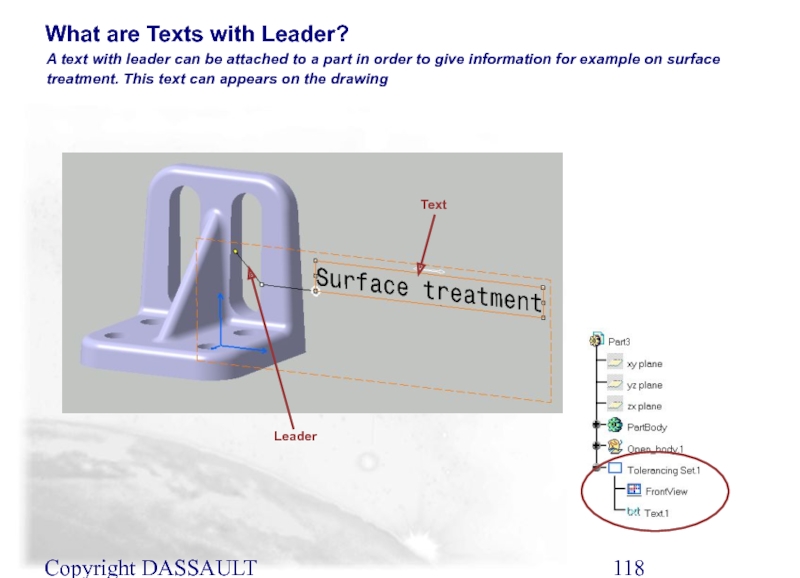
A text with leader can be attached to
What are Texts with Leader?
Text
Leader
Слайд 119Copyright DASSAULT SYSTEMES 2002
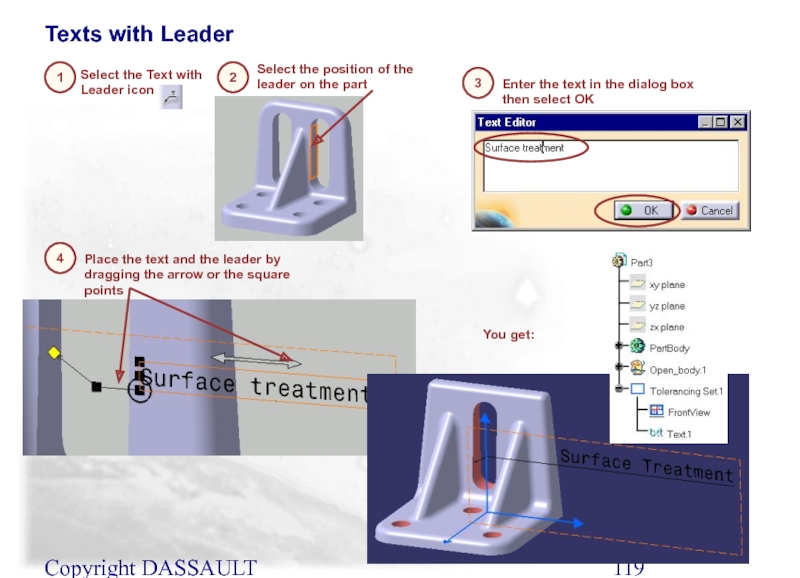
Select the Text with Leader icon
Texts with Leader
1
Select
2
Enter the text in the dialog box then select OK
3
Place the text and the leader by dragging the arrow or the square points
4
You get:
Слайд 120Copyright DASSAULT SYSTEMES 2002
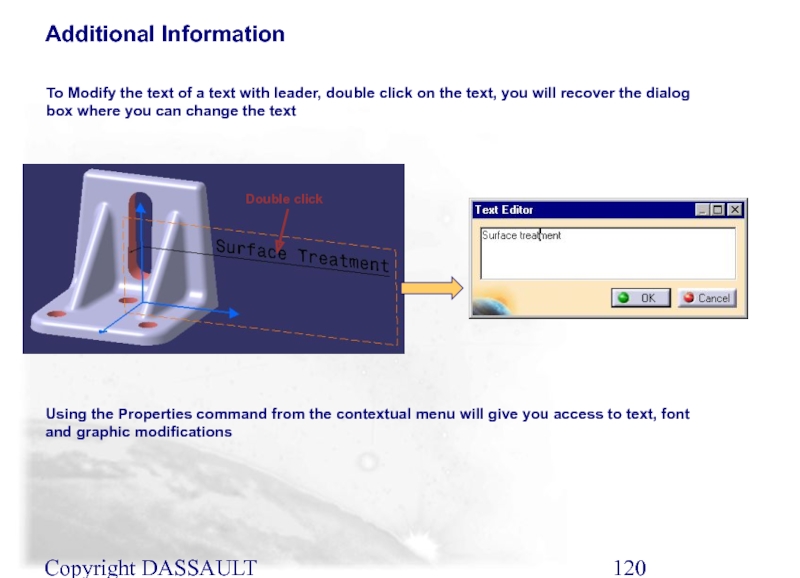
Double click
Additional Information
To Modify the text of a
Using the Properties command from the contextual menu will give you access to text, font and graphic modifications
Слайд 121Copyright DASSAULT SYSTEMES 2002
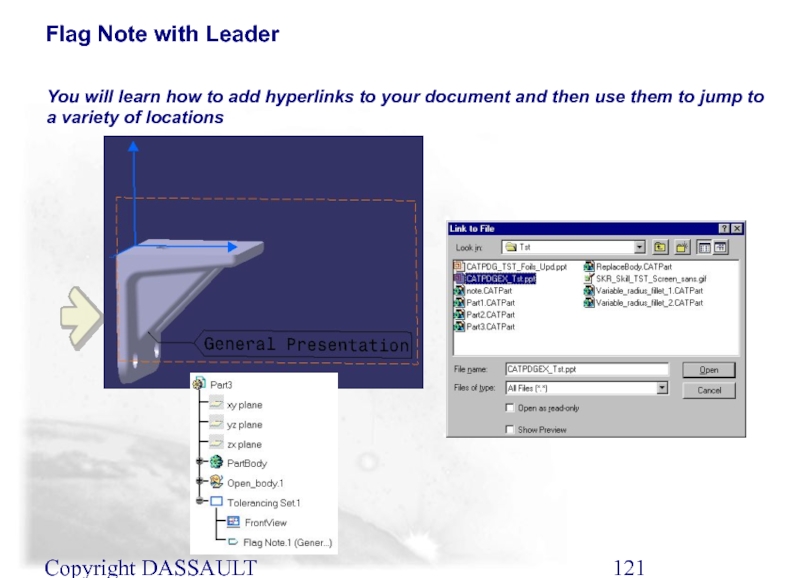
You will learn how to add hyperlinks to
Flag Note with Leader
Слайд 122Copyright DASSAULT SYSTEMES 2002
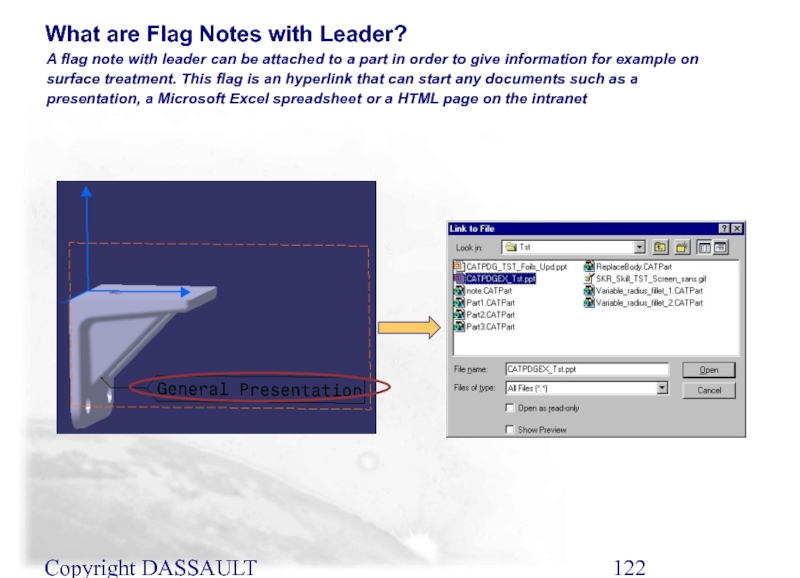
A flag note with leader can be attached
What are Flag Notes with Leader?
Слайд 123Copyright DASSAULT SYSTEMES 2002
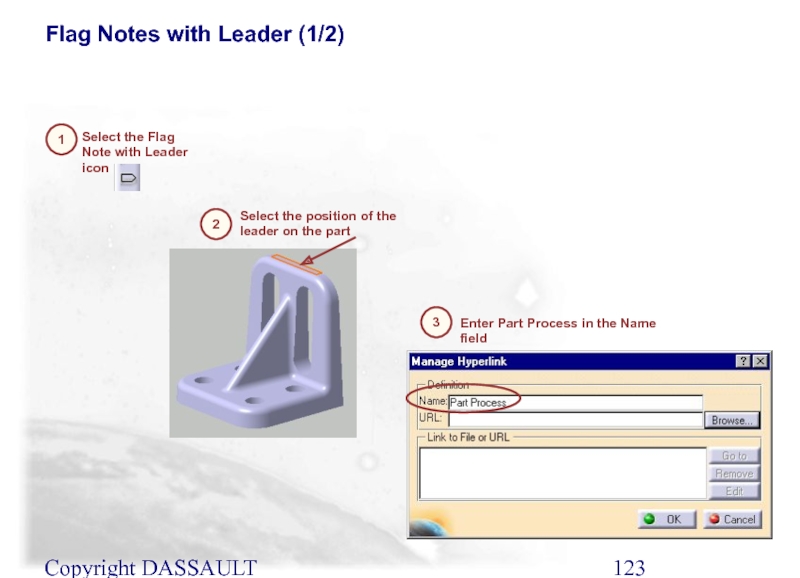
Enter Part Process in the Name field
Select the
Flag Notes with Leader (1/2)
1
Select the position of the leader on the part
2
3
Слайд 124Copyright DASSAULT SYSTEMES 2002
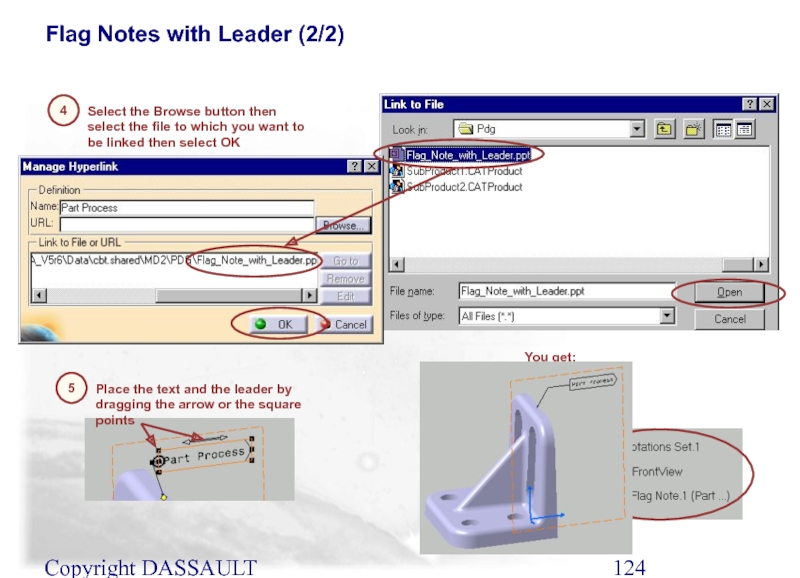
Flag Notes with Leader (2/2)
You get:
Place the text
5
Select the Browse button then select the file to which you want to be linked then select OK
4
Слайд 125Copyright DASSAULT SYSTEMES 2002
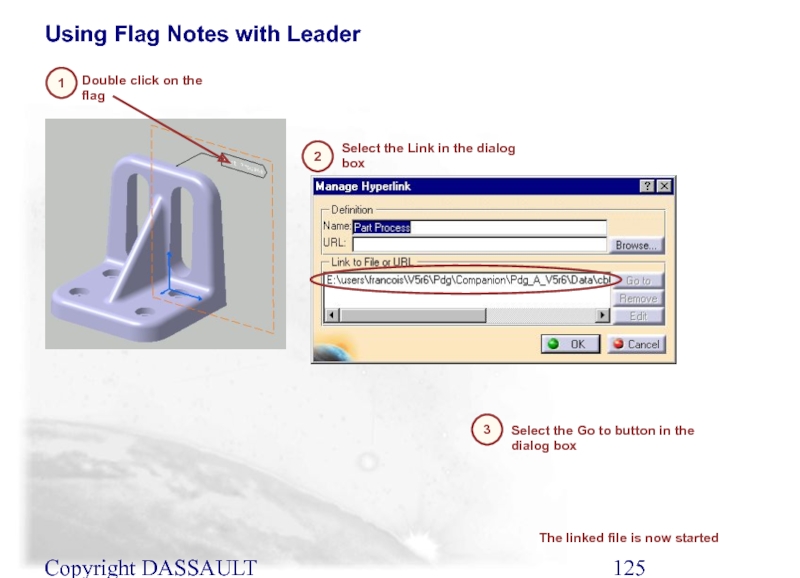
Select the Go to button in the dialog
Double click on the flag
Using Flag Notes with Leader
1
Select the Link in the dialog box
2
3
The linked file is now started
Слайд 126Copyright DASSAULT SYSTEMES 2002
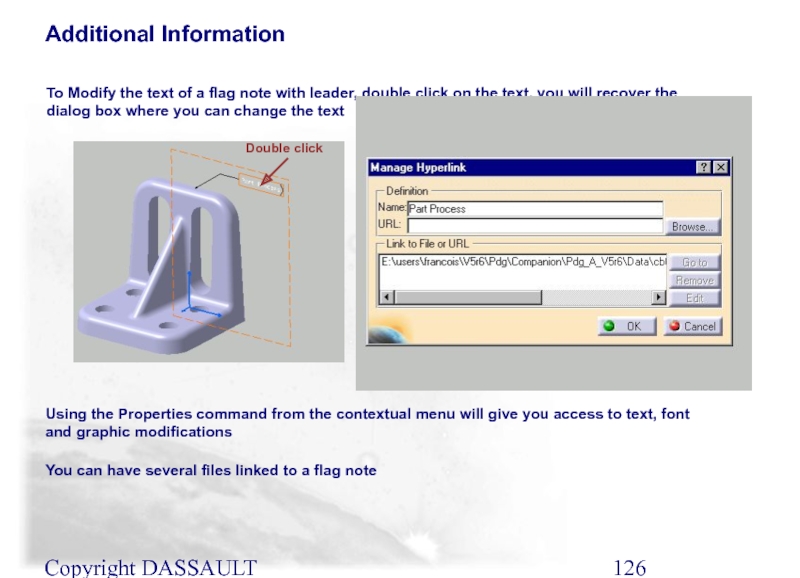
Additional Information
To Modify the text of a flag
Using the Properties command from the contextual menu will give you access to text, font and graphic modifications
Double click
You can have several files linked to a flag note
Слайд 127Analysis
You will learn how to analyze part in order to display
Analysing Threads and Taps
Draft Analysis
Слайд 128Copyright DASSAULT SYSTEMES 2002
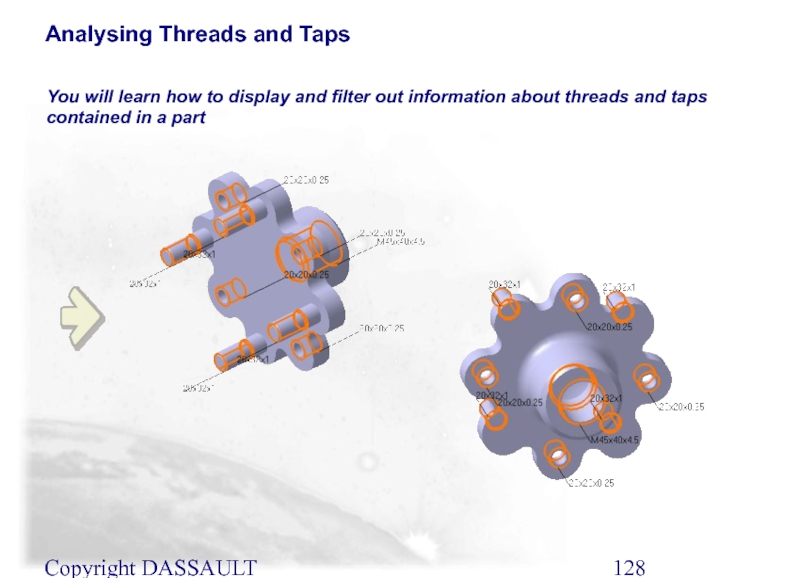
You will learn how to display and filter
Analysing Threads and Taps
Слайд 129Copyright DASSAULT SYSTEMES 2002
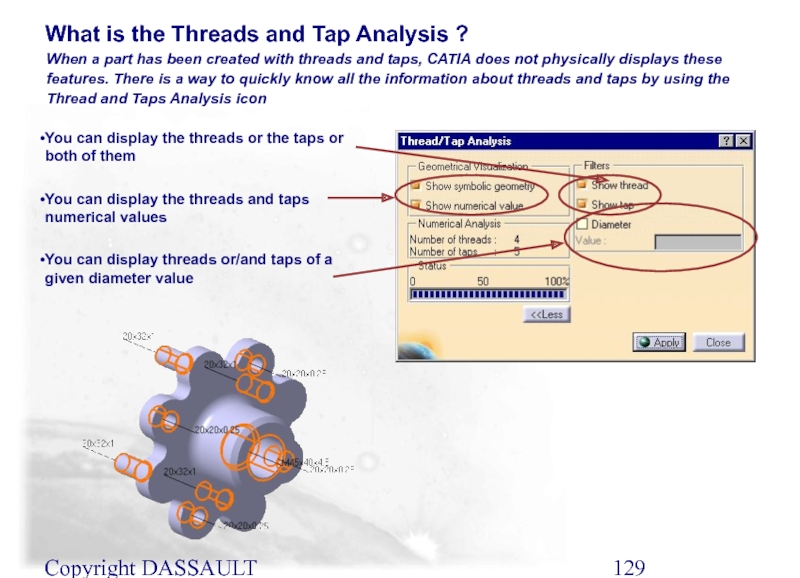
When a part has been created with threads
What is the Threads and Tap Analysis ?
You can display the threads or the taps or both of them
You can display the threads and taps numerical values
You can display threads or/and taps of a given diameter value
Слайд 130Copyright DASSAULT SYSTEMES 2002
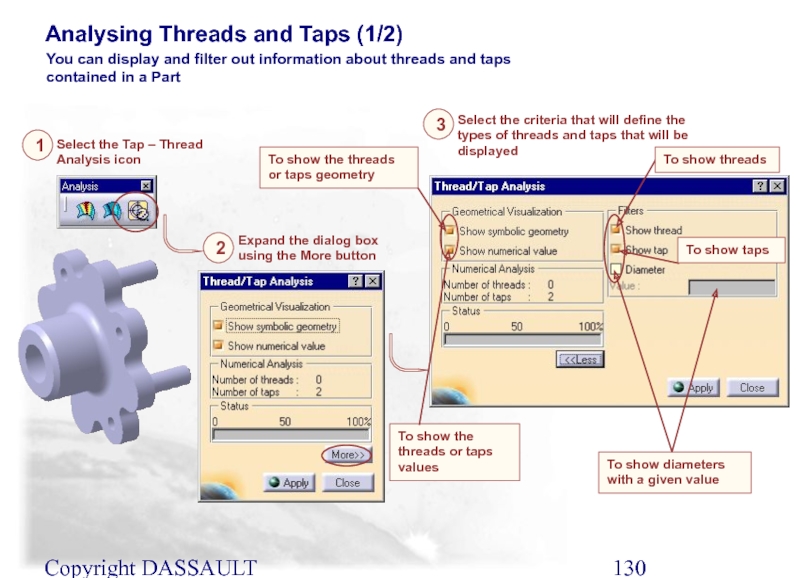
Analysing Threads and Taps (1/2)
You can display and
Select the Tap – Thread Analysis icon
Expand the dialog box using the More button
1
2
Select the criteria that will define the types of threads and taps that will be displayed
3
To show the threads or taps geometry
To show the threads or taps values
To show diameters with a given value
To show taps
To show threads
Слайд 131Copyright DASSAULT SYSTEMES 2002
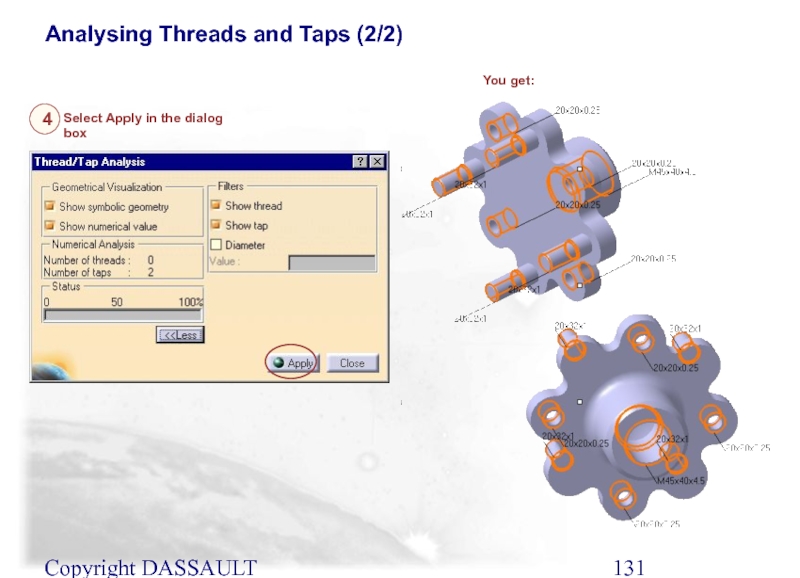
Analysing Threads and Taps (2/2)
Select Apply in the
You get:
4
Слайд 132Copyright DASSAULT SYSTEMES 2002
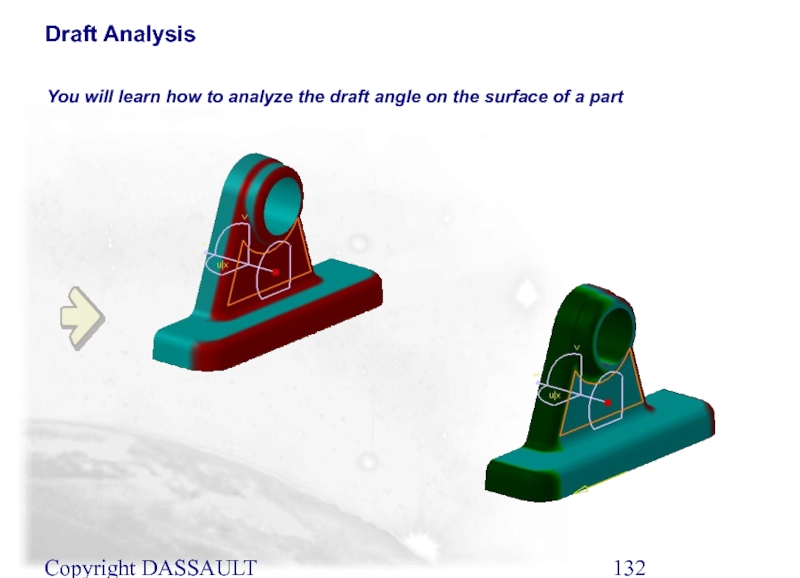
You will learn how to analyze the draft
Draft Analysis
Слайд 133Copyright DASSAULT SYSTEMES 2002
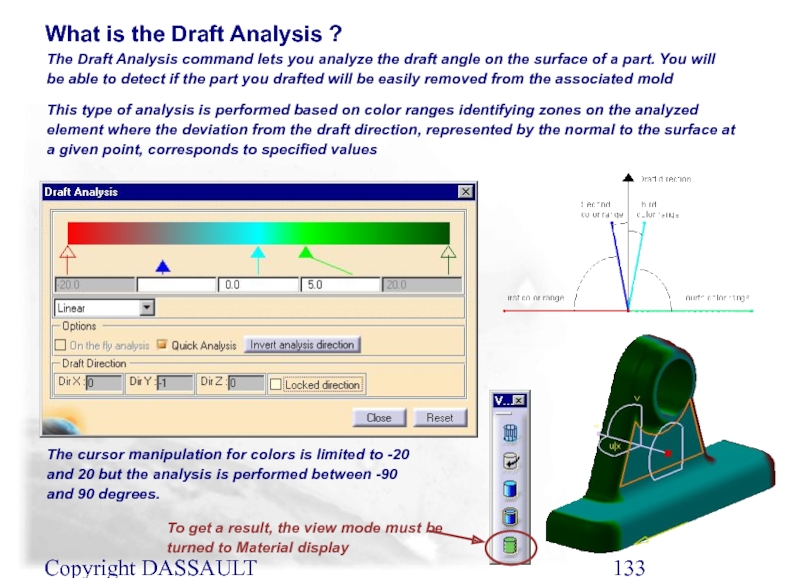
The Draft Analysis command lets you analyze the
What is the Draft Analysis ?
This type of analysis is performed based on color ranges identifying zones on the analyzed element where the deviation from the draft direction, represented by the normal to the surface at a given point, corresponds to specified values
The cursor manipulation for colors is limited to -20 and 20 but the analysis is performed between -90 and 90 degrees.
To get a result, the view mode must be turned to Material display
Слайд 134Copyright DASSAULT SYSTEMES 2002
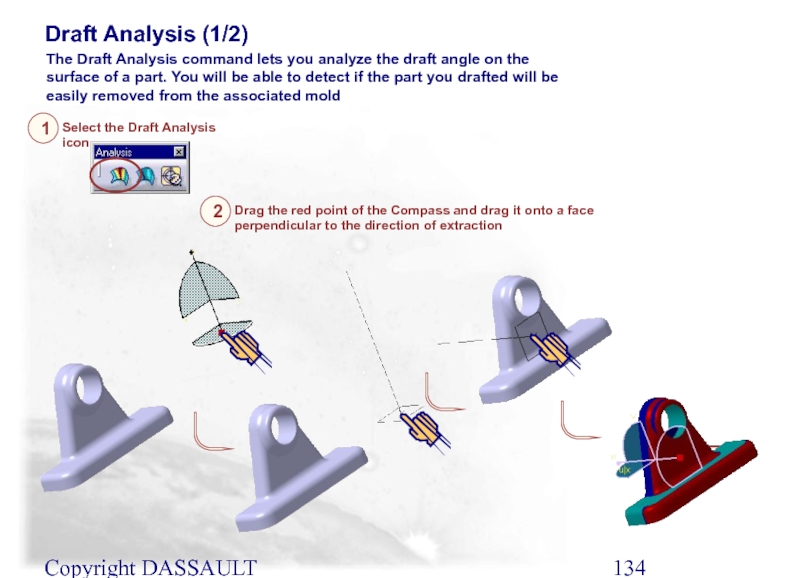
The Draft Analysis command lets you analyze the
Select the Draft Analysis icon
1
Draft Analysis (1/2)
Drag the red point of the Compass and drag it onto a face perpendicular to the direction of extraction
2
Слайд 135Copyright DASSAULT SYSTEMES 2002
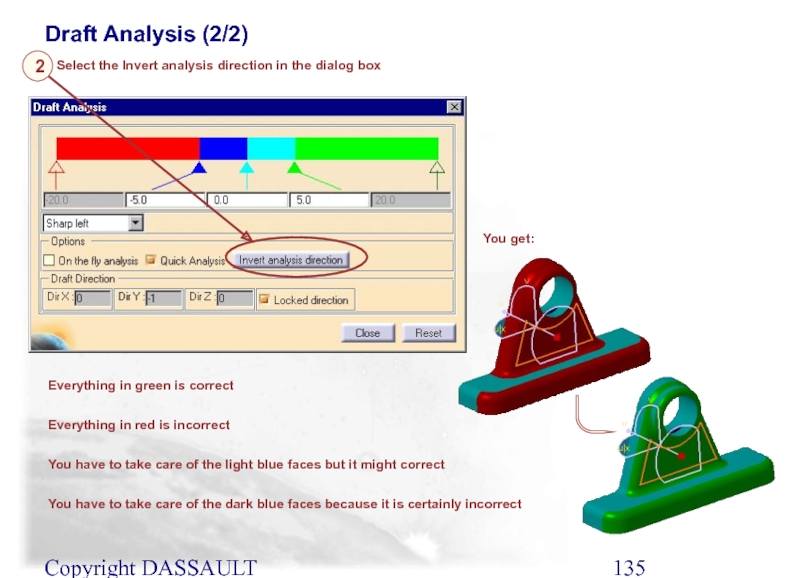
Select the Invert analysis direction in the dialog
Draft Analysis (2/2)
2
You get:
Everything in green is correct
Everything in red is incorrect
You have to take care of the light blue faces but it might correct
You have to take care of the dark blue faces because it is certainly incorrect
Слайд 136Copyright DASSAULT SYSTEMES 2002
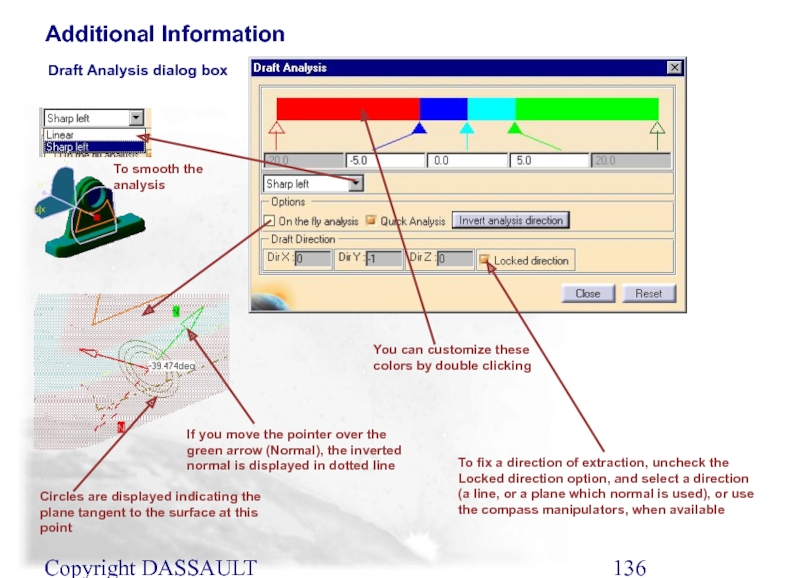
Additional Information
Draft Analysis dialog box
You can customize these
To smooth the analysis
To fix a direction of extraction, uncheck the Locked direction option, and select a direction (a line, or a plane which normal is used), or use the compass manipulators, when available
If you move the pointer over the green arrow (Normal), the inverted normal is displayed in dotted line
Circles are displayed indicating the plane tangent to the surface at this point
Слайд 137Measure, Mean Dimensions, Scan, Parents-Children
Cut, Paste, Isolate, Break
Inserting and Managing Bodies
Multi-Model
Sketch Selection with Multi-Documents Links
Scaling
Part Management
You will learn Part Management tools that you will need to design complex parts and integrate these parts into a Multi-model Environment
Слайд 138Copyright DASSAULT SYSTEMES 2002
In this lesson, you will see how to
Measure, Mean Dimensions, Scan, Parents-Children
Measuring Elements
Mean Dimensions
Scanning a Part
Parents-Children Relationship
Слайд 139Copyright DASSAULT SYSTEMES 2002
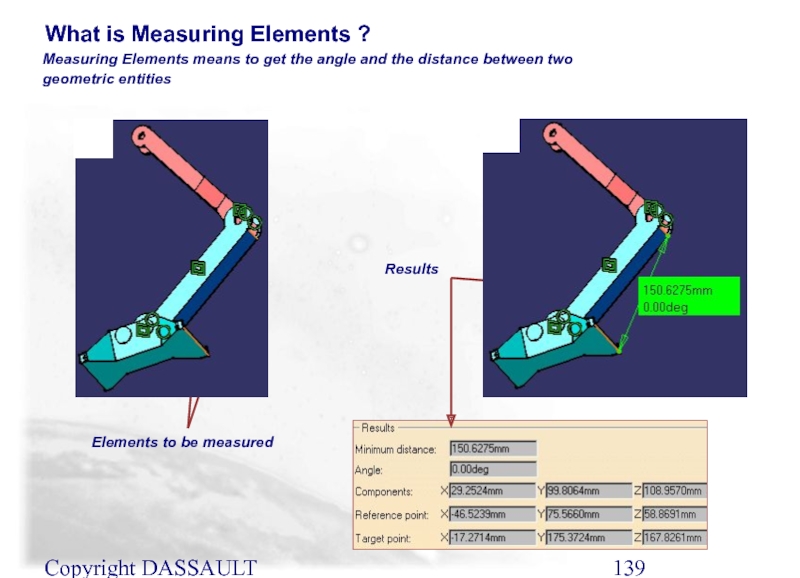
Measuring Elements means to get the angle and
What is Measuring Elements ?
Results
Elements to be measured
Слайд 140Copyright DASSAULT SYSTEMES 2002
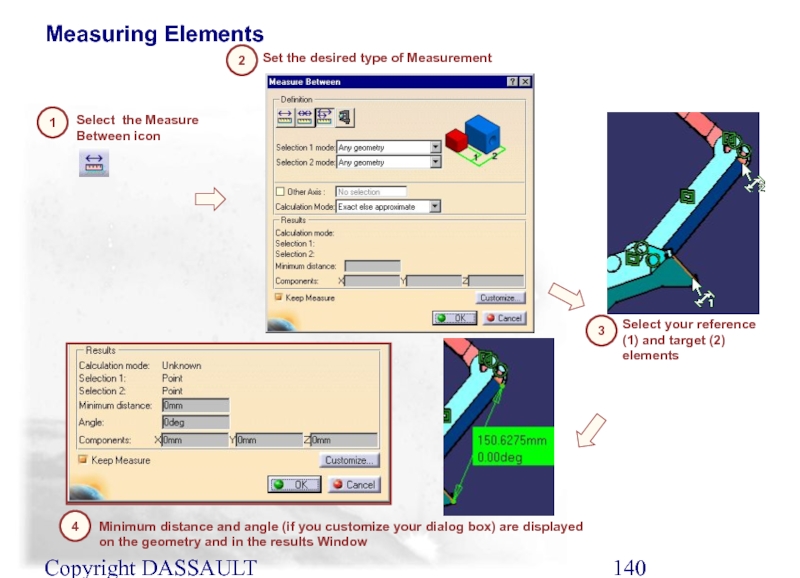
Measuring Elements
1
2
Set the desired type of Measurement
Select
3
Select your reference (1) and target (2) elements
4
Minimum distance and angle (if you customize your dialog box) are displayed on the geometry and in the results Window
Слайд 141Copyright DASSAULT SYSTEMES 2002
When creating dimensional constraints, you can define a
What are Mean Dimensions?
Dimension with a Tolerance
Mean dimension
Слайд 142Copyright DASSAULT SYSTEMES 2002
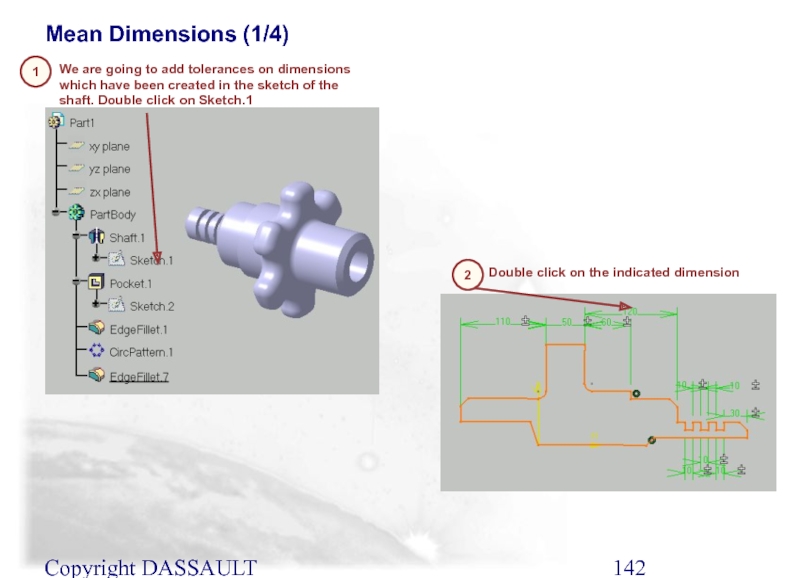
Mean Dimensions (1/4)
1
2
Double click on the indicated dimension
We are going to add tolerances on dimensions which have been created in the sketch of the shaft. Double click on Sketch.1
Слайд 143Copyright DASSAULT SYSTEMES 2002
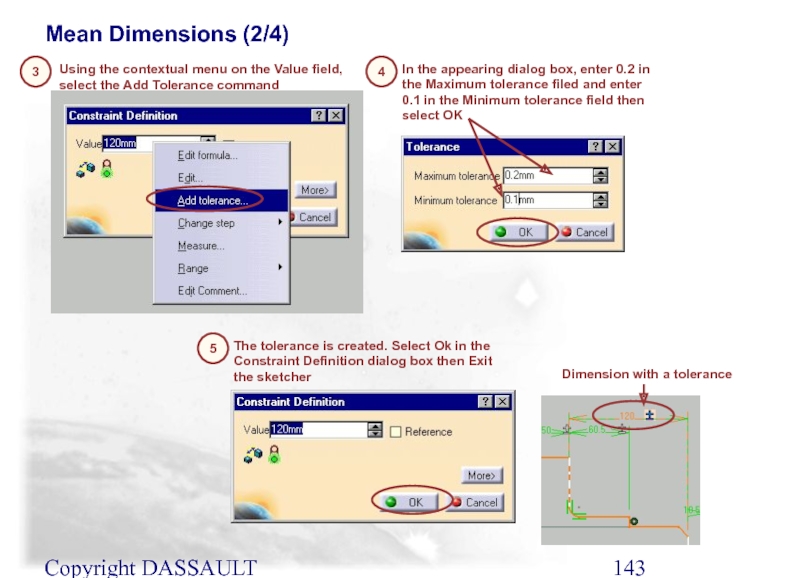
Mean Dimensions (2/4)
3
4
In the appearing dialog box, enter
Using the contextual menu on the Value field, select the Add Tolerance command
5
The tolerance is created. Select Ok in the Constraint Definition dialog box then Exit the sketcher
Dimension with a tolerance
Слайд 144Copyright DASSAULT SYSTEMES 2002
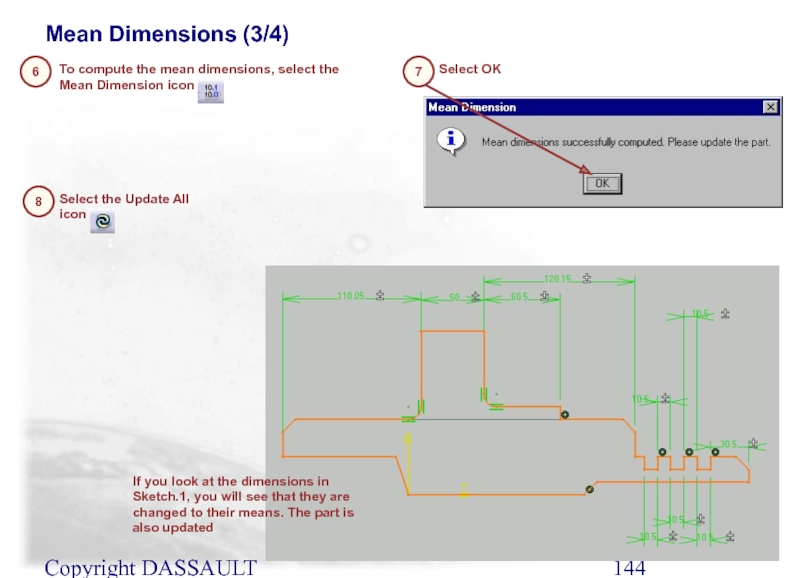
Mean Dimensions (3/4)
6
7
Select OK
To compute the mean
8
Select the Update All icon
If you look at the dimensions in Sketch.1, you will see that they are changed to their means. The part is also updated
Слайд 145Copyright DASSAULT SYSTEMES 2002
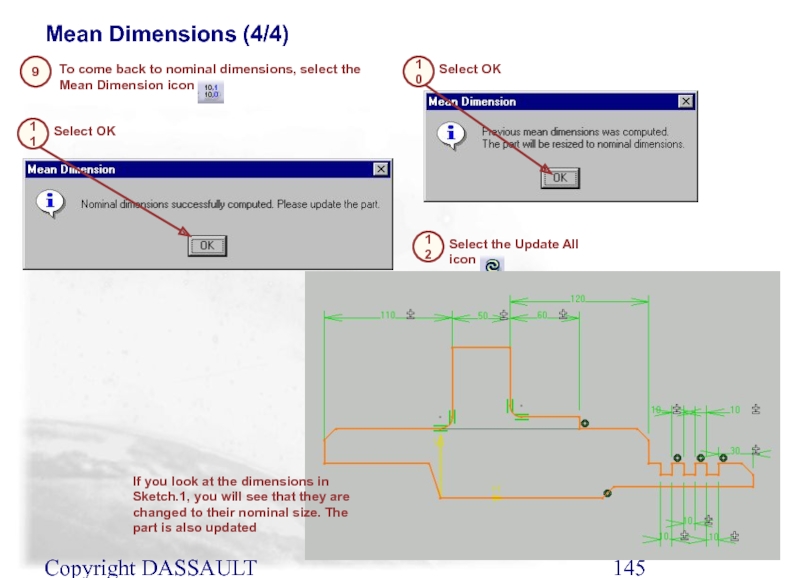
Mean Dimensions (4/4)
9
10
Select OK
To come back to
11
Select OK
12
Select the Update All icon
If you look at the dimensions in Sketch.1, you will see that they are changed to their nominal size. The part is also updated
Слайд 146Copyright DASSAULT SYSTEMES 2002
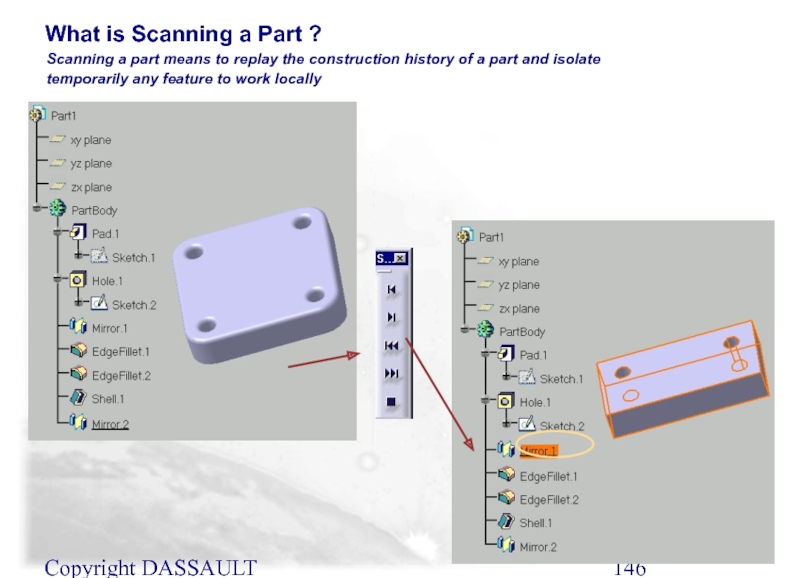
Scanning a part means to replay the construction
What is Scanning a Part ?
Слайд 147Copyright DASSAULT SYSTEMES 2002
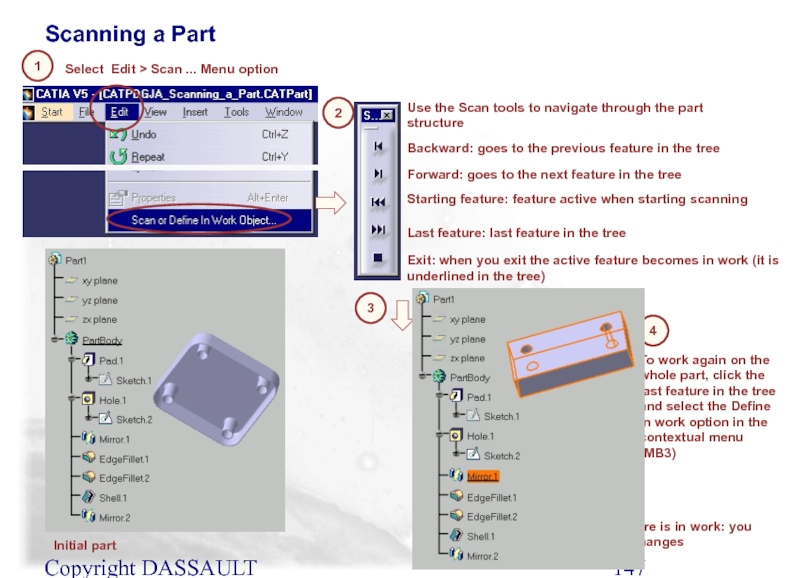
Scanning a Part
1
2
Use the Scan tools to navigate
Select Edit > Scan ... Menu option
Backward: goes to the previous feature in the tree
Forward: goes to the next feature in the tree
Starting feature: feature active when starting scanning
Last feature: last feature in the tree
Exit: when you exit the active feature becomes in work (it is underlined in the tree)
Initial part
The Mirror.1 feature is in work: you can make local changes
3
4
To work again on the whole part, click the last feature in the tree and select the Define in work option in the contextual menu (MB3)
Слайд 148Copyright DASSAULT SYSTEMES 2002
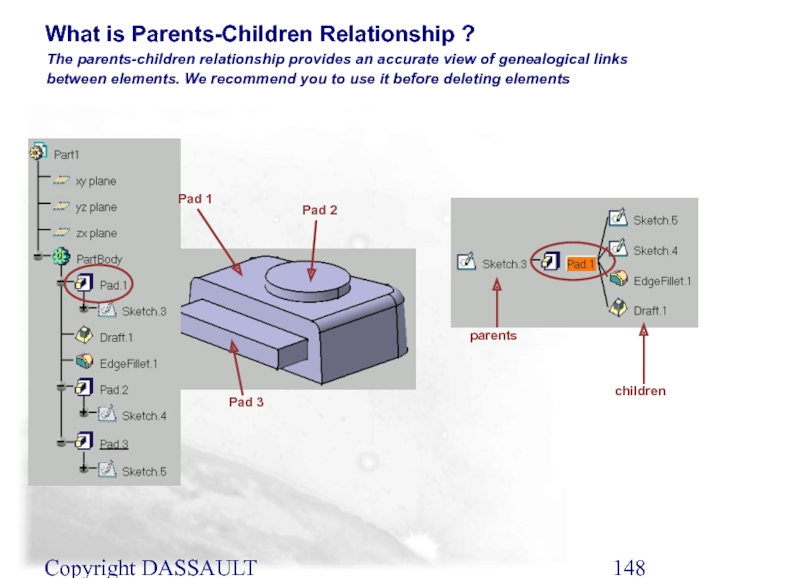
The parents-children relationship provides an accurate view of
What is Parents-Children Relationship ?
parents
children
Pad 1
Pad 2
Pad 3
Слайд 149Copyright DASSAULT SYSTEMES 2002
Pad 1
Parents-Children Relationship
2
Select the Parent-Children option
3
Activate the contextual
1
The graph allows you to show all parents / children (MB3)
Double-click a component to show/hide parents or children
parents
children
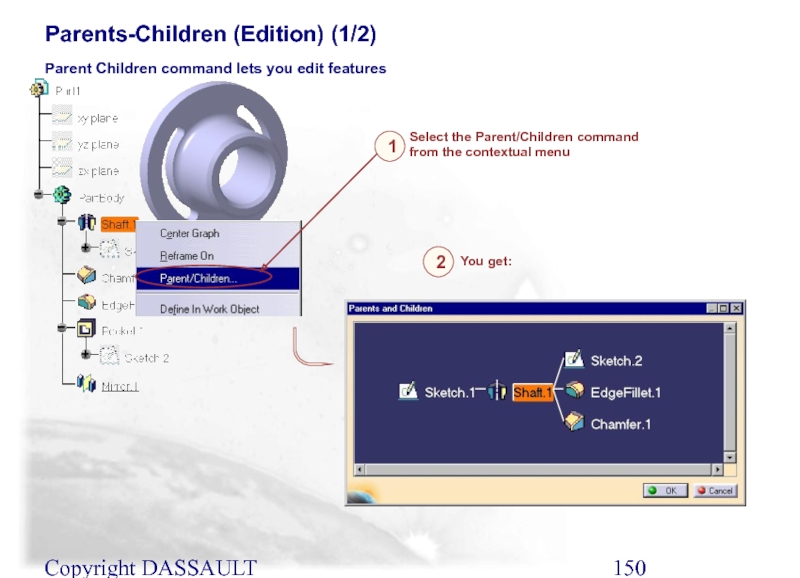
Слайд 150Copyright DASSAULT SYSTEMES 2002
Parents-Children (Edition) (1/2)
Select the Parent/Children command from the
Parent Children command lets you edit features
1
2
You get:
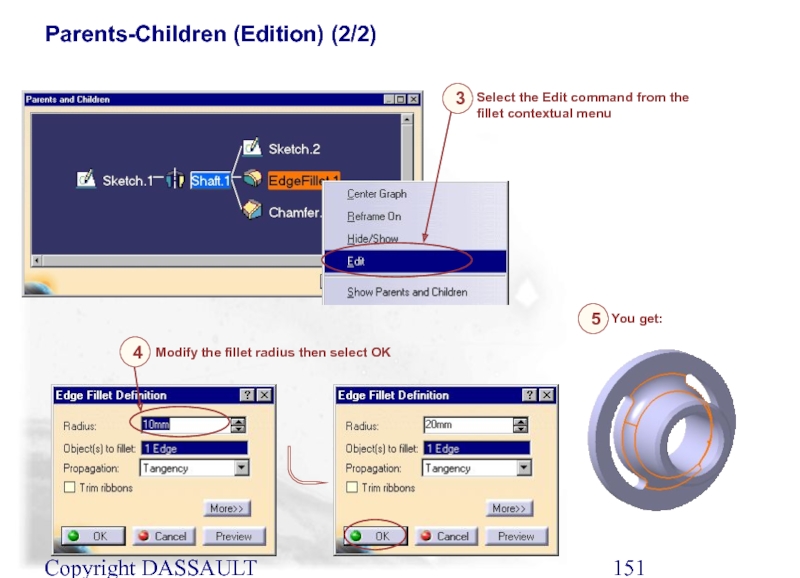
Слайд 151Copyright DASSAULT SYSTEMES 2002
Parents-Children (Edition) (2/2)
Select the Edit command from the
Modify the fillet radius then select OK
3
4
You get:
5
Слайд 152Copyright DASSAULT SYSTEMES 2002
In this lesson, you will see how to
Cut, Paste, Isolate, Break
Cut/Copy and Paste (Drag and Drop)
Isolate/Break
Слайд 153Copyright DASSAULT SYSTEMES 2002
Cut/Copy then Paste captures the node specified into
What is Cut/Copy and Paste (Drag and Drop) ?
Cut/Copy then Paste an be achieved by drag and drop. If the CTRL key is pressed during the drag and drop, the action is interpreted as a copy
Слайд 154Copyright DASSAULT SYSTEMES 2002
One way we can copy the limits of
Another variation for the fillet - Keeping the CTRL key pressed, Drag with the 1st. Mouse button to one of the base edges of the rectangular pad
We can copy the draft by using another variation - 3rd. Mouse button to copy Draft.1 from the tree then select a vertical face on the rectangular pad and 3rd. Mouse button to Paste
Cut/Copy and Paste (Drag and Drop)
2
3
1
Слайд 155Copyright DASSAULT SYSTEMES 2002
Isolate is used when 3D geometry is projected
What are Isolate and Break ?
Break is used to divide an isolated element into two parts at a specified point (usually to use one side of this element in the sketch)
Слайд 156Copyright DASSAULT SYSTEMES 2002
Using the Trim and Break icon in the
Starting with the geometry below, we want to add a pad
Isolate, Break (1/3)
2
1
Lines
Added pad
Diameter 100
Pad
Intersection between the pad and the sketch plane
Diameter 50
Create a pad with an length of 20
3
Слайд 157Copyright DASSAULT SYSTEMES 2002
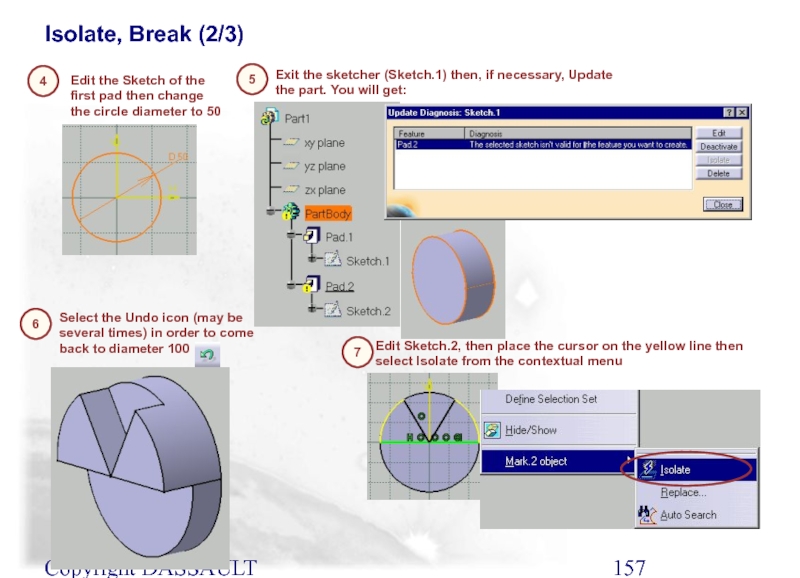
Edit the Sketch of the first pad then
Select the Undo icon (may be several times) in order to come back to diameter 100
Exit the sketcher (Sketch.1) then, if necessary, Update the part. You will get:
Isolate, Break (2/3)
5
6
4
Edit Sketch.2, then place the cursor on the yellow line then select Isolate from the contextual menu
7
Слайд 158Copyright DASSAULT SYSTEMES 2002
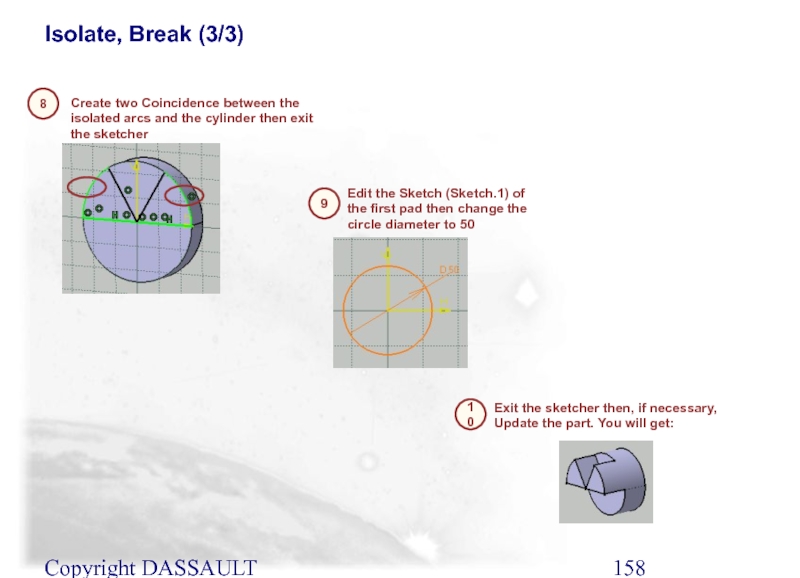
Create two Coincidence between the isolated arcs and
Exit the sketcher then, if necessary, Update the part. You will get:
Edit the Sketch (Sketch.1) of the first pad then change the circle diameter to 50
Isolate, Break (3/3)
9
10
8
Слайд 159Copyright DASSAULT SYSTEMES 2002
You will learn ways to manage Bodies using
Inserting and Managing Bodies
Inserting a Body
Assembling/Intersecting/Adding/Removing Bodies
Union Trimming Bodies
Removing Lumps
Replacing a Body
Change Boolean Type
Слайд 160Copyright DASSAULT SYSTEMES 2002
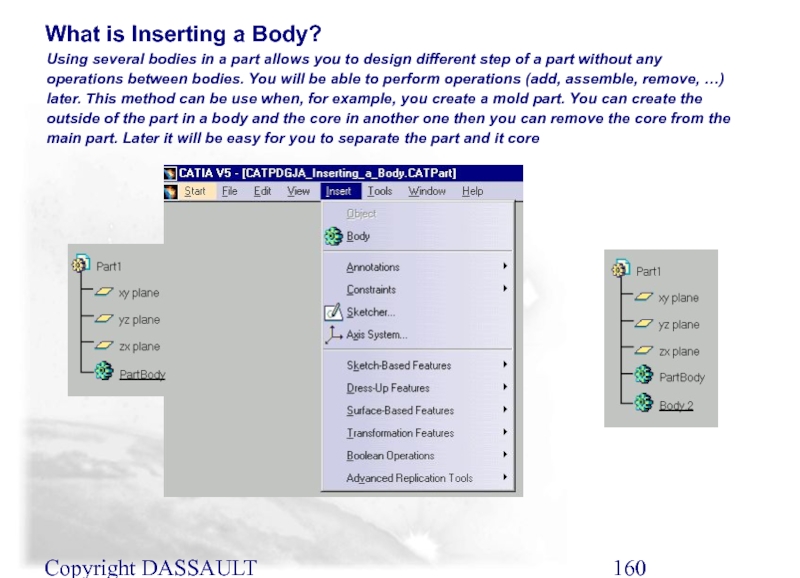
Using several bodies in a part allows you
What is Inserting a Body?
Слайд 161Copyright DASSAULT SYSTEMES 2002
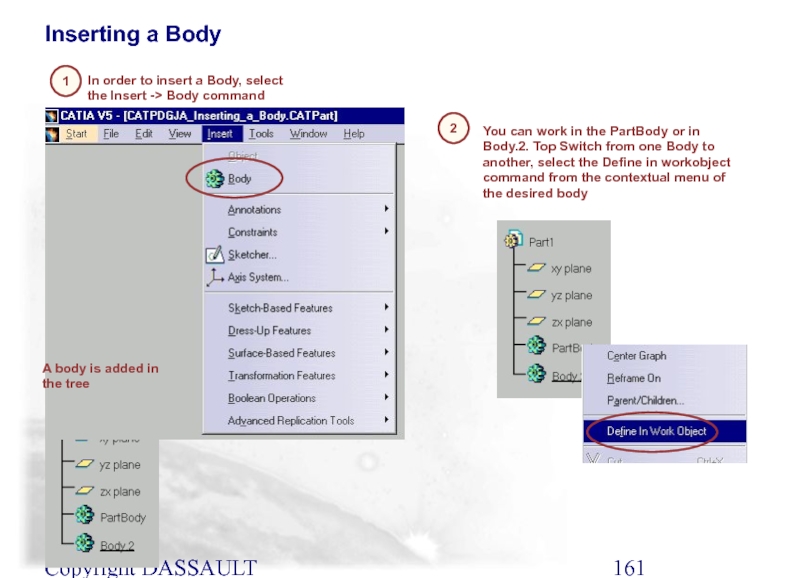
A body is added in the tree
In order
Inserting a Body
2
1
You can work in the PartBody or in Body.2. Top Switch from one Body to another, select the Define in workobject command from the contextual menu of the desired body
Слайд 162Copyright DASSAULT SYSTEMES 2002
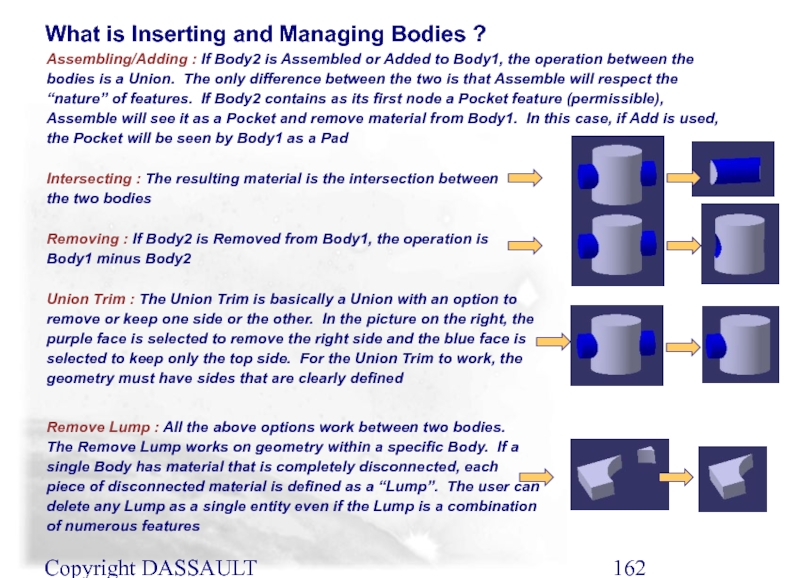
Assembling/Adding : If Body2 is Assembled or Added
What is Inserting and Managing Bodies ?
Intersecting : The resulting material is the intersection between the two bodies
Removing : If Body2 is Removed from Body1, the operation is Body1 minus Body2
Union Trim : The Union Trim is basically a Union with an option to remove or keep one side or the other. In the picture on the right, the purple face is selected to remove the right side and the blue face is selected to keep only the top side. For the Union Trim to work, the geometry must have sides that are clearly defined
Remove Lump : All the above options work between two bodies. The Remove Lump works on geometry within a specific Body. If a single Body has material that is completely disconnected, each piece of disconnected material is defined as a “Lump”. The user can delete any Lump as a single entity even if the Lump is a combination of numerous features
Слайд 163Copyright DASSAULT SYSTEMES 2002
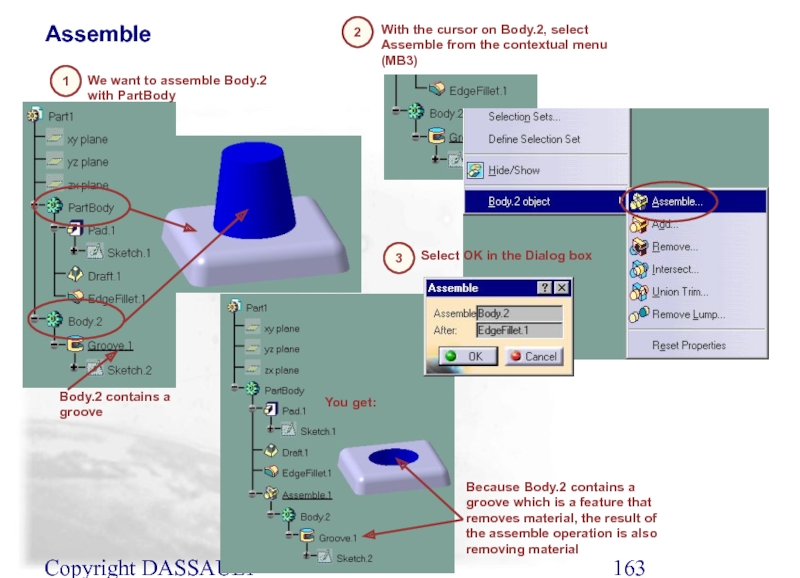
With the cursor on Body.2, select Assemble from
We want to assemble Body.2 with PartBody
Assemble
2
1
You get:
Body.2 contains a groove
Because Body.2 contains a groove which is a feature that removes material, the result of the assemble operation is also removing material
Select OK in the Dialog box
3
Слайд 164Copyright DASSAULT SYSTEMES 2002
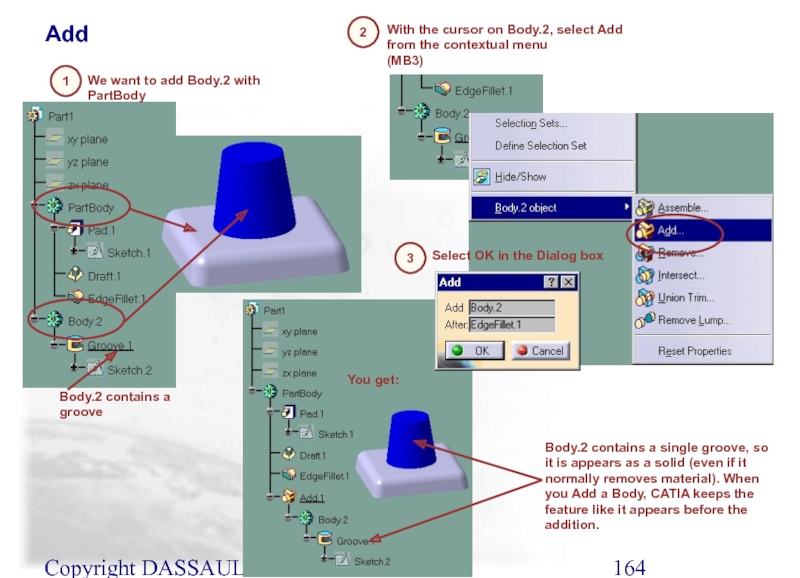
With the cursor on Body.2, select Add from
We want to add Body.2 with PartBody
Add
2
1
You get:
Body.2 contains a groove
Body.2 contains a single groove, so it is appears as a solid (even if it normally removes material). When you Add a Body, CATIA keeps the feature like it appears before the addition.
Select OK in the Dialog box
3
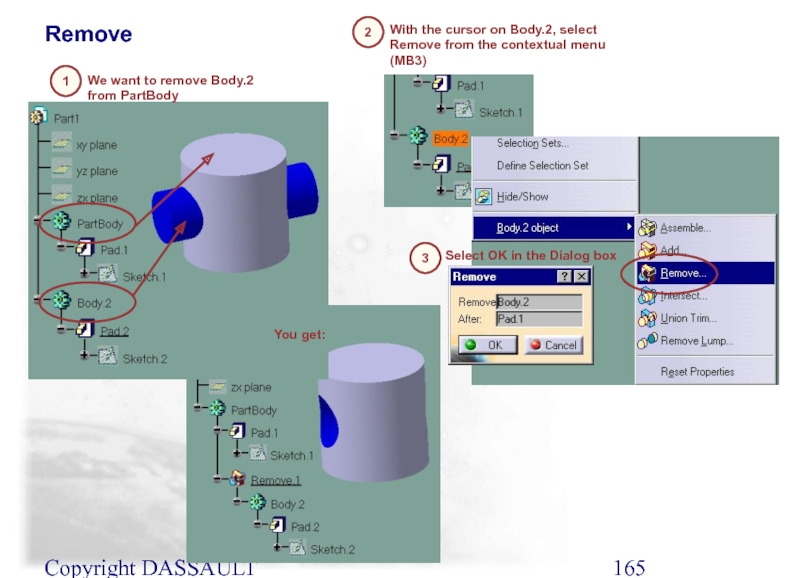
Слайд 165Copyright DASSAULT SYSTEMES 2002
With the cursor on Body.2, select Remove from
We want to remove Body.2 from PartBody
Remove
2
1
Select OK in the Dialog box
3
You get:
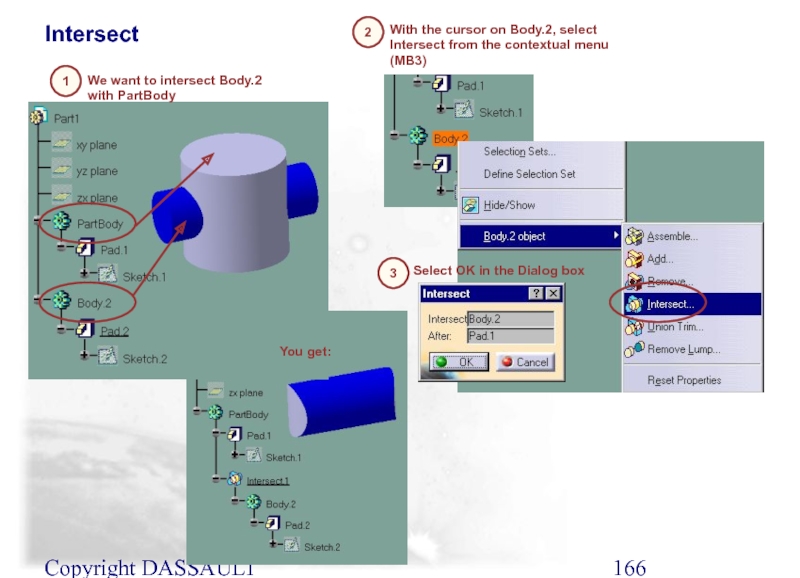
Слайд 166Copyright DASSAULT SYSTEMES 2002
Intersect
We want to intersect Body.2 with PartBody
1
With
2
Select OK in the Dialog box
3
You get:
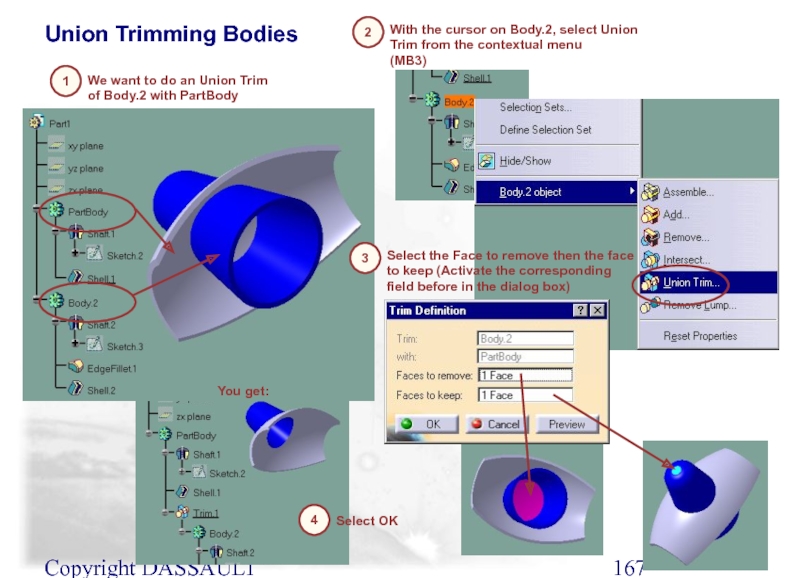
Слайд 167Copyright DASSAULT SYSTEMES 2002
Union Trimming Bodies
We want to do an Union
1
With the cursor on Body.2, select Union Trim from the contextual menu
(MB3)
2
Select the Face to remove then the face to keep (Activate the corresponding field before in the dialog box)
3
You get:
Select OK
4
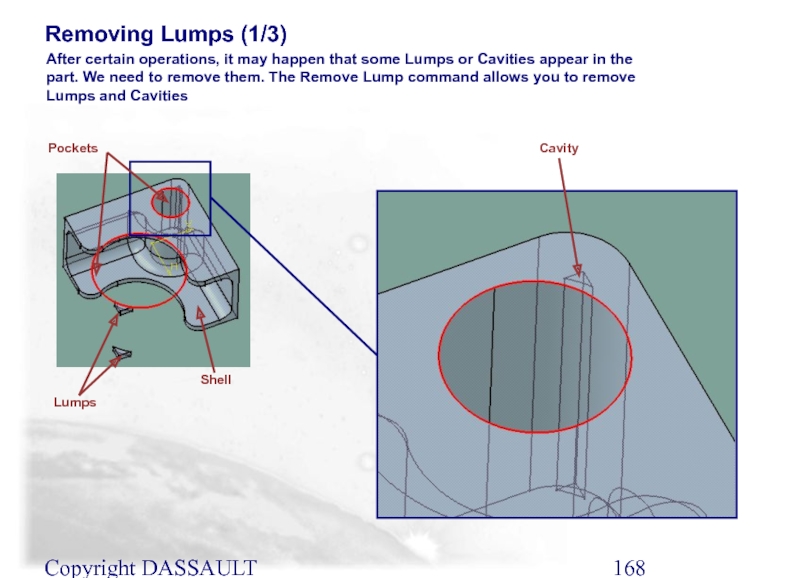
Слайд 168Copyright DASSAULT SYSTEMES 2002
Removing Lumps (1/3)
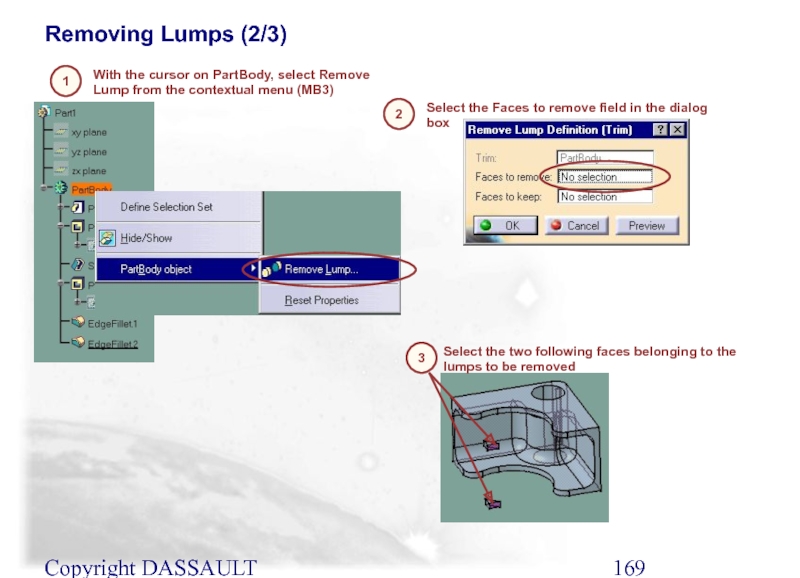
Cavity
After certain operations, it may
Lumps
Shell
Pockets
Слайд 169Copyright DASSAULT SYSTEMES 2002
Removing Lumps (2/3)
With the cursor on PartBody, select
1
Select the Faces to remove field in the dialog box
2
Select the two following faces belonging to the lumps to be removed
3
Слайд 170Copyright DASSAULT SYSTEMES 2002
Removing Lumps (3/3)
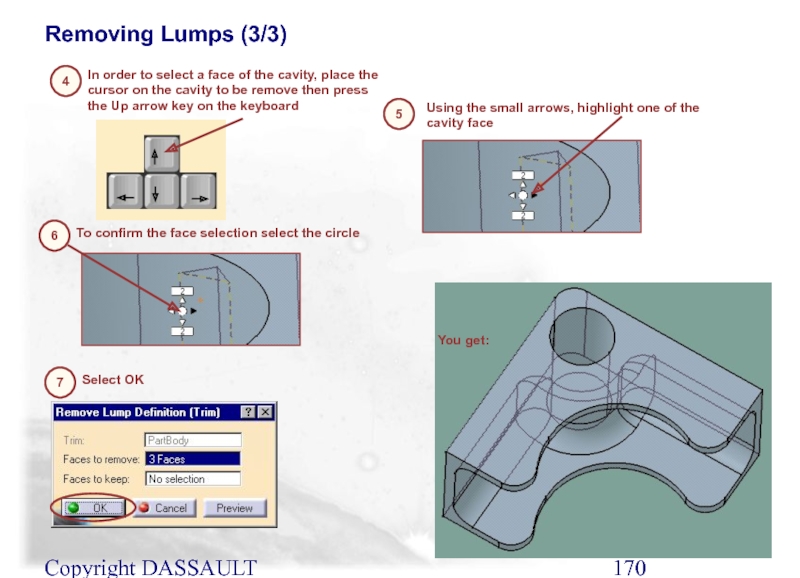
In order to select a face
4
Using the small arrows, highlight one of the cavity face
5
To confirm the face selection select the circle
6
Select OK
7
You get:
Слайд 171Copyright DASSAULT SYSTEMES 2002
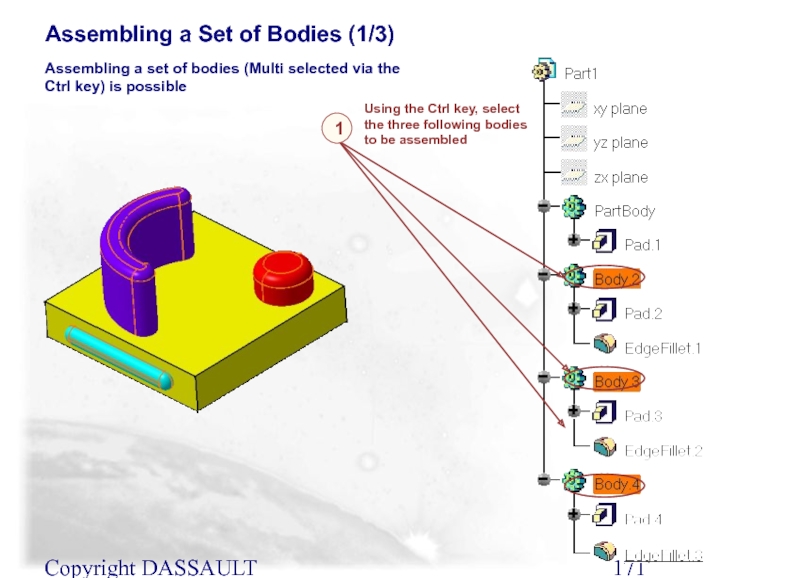
Assembling a Set of Bodies (1/3)
Assembling a set
Using the Ctrl key, select the three following bodies to be assembled
1
Слайд 172Copyright DASSAULT SYSTEMES 2002
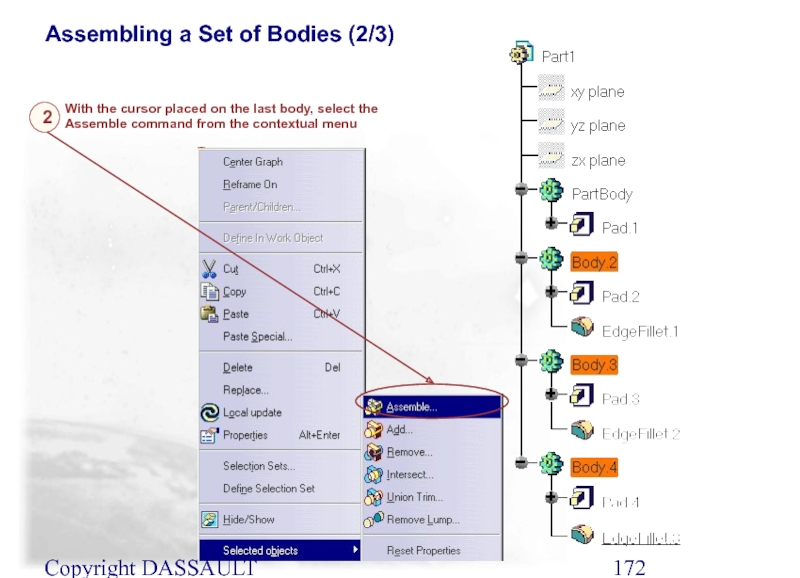
Assembling a Set of Bodies (2/3)
With the cursor
2
Слайд 173Copyright DASSAULT SYSTEMES 2002
Assembling a Set of Bodies (3/3)
Select OK in
3
You get:
Слайд 174Copyright DASSAULT SYSTEMES 2002
You can replace a body use in an
What is Replacing a Body?
Слайд 175Copyright DASSAULT SYSTEMES 2002
Select the Replace command from Body.3 contextual menu
Replacing
1
Body to be replaced
Replacing body
Select Body.4
2
Слайд 176Copyright DASSAULT SYSTEMES 2002
Select the following line in the dialog box
Replacing
3
Select the following face. This face is the face that will be removed during the Union Trim operation
4
Select OK
5
Слайд 177Copyright DASSAULT SYSTEMES 2002
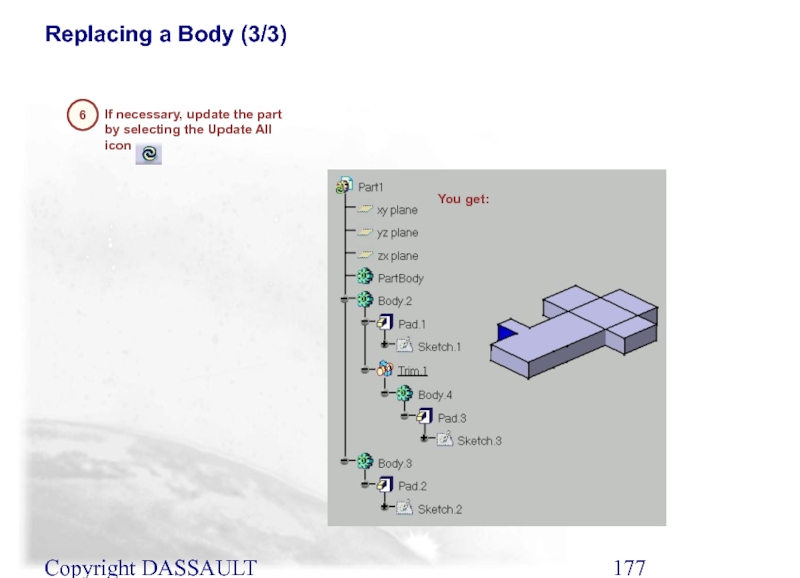
If necessary, update the part by selecting the
Replacing a Body (3/3)
6
You get:
Слайд 178Copyright DASSAULT SYSTEMES 2002
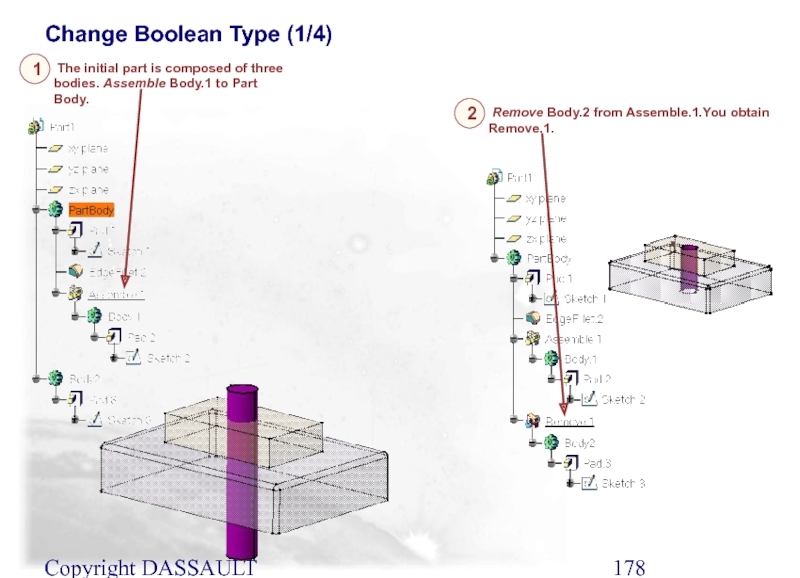
Change Boolean Type (1/4)
The initial part is
1
Remove Body.2 from Assemble.1.You obtain Remove.1.
2
Слайд 179Copyright DASSAULT SYSTEMES 2002
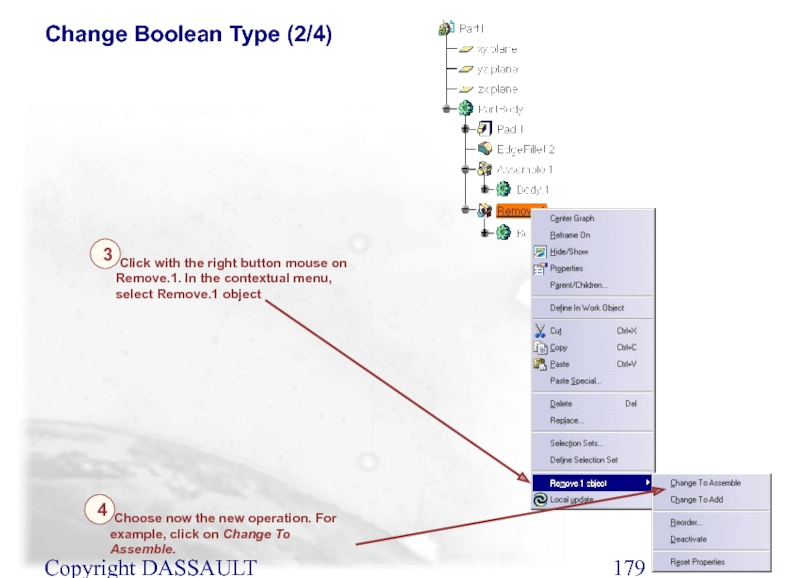
Change Boolean Type (2/4)
Click with the right
3
Choose now the new operation. For example, click on Change To Assemble.
4
Слайд 180Copyright DASSAULT SYSTEMES 2002
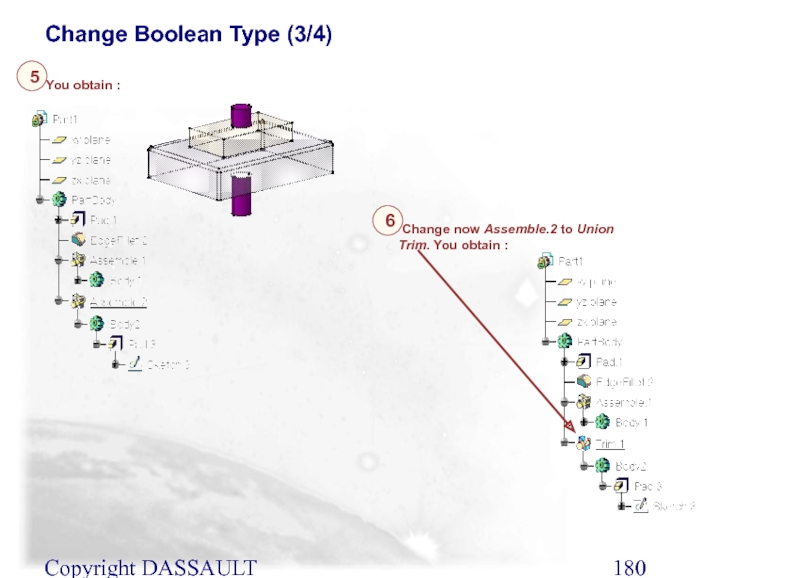
Change Boolean Type (3/4)
You obtain :
5
Change
6
Слайд 181Copyright DASSAULT SYSTEMES 2002
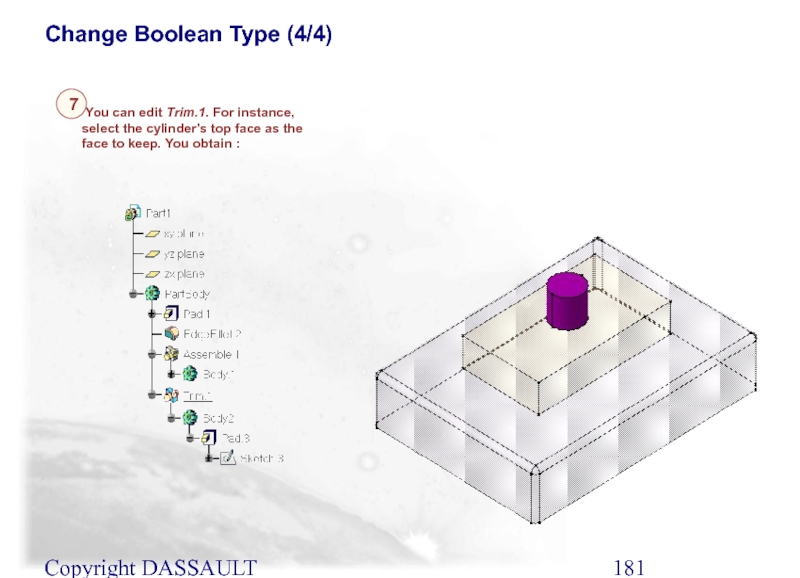
Change Boolean Type (4/4)
You can edit Trim.1.
7
Слайд 182Copyright DASSAULT SYSTEMES 2002
You will learn ways to use Multi-model links
Multi-Model Links
Establishing Multi-Model Links
Слайд 183Copyright DASSAULT SYSTEMES 2002
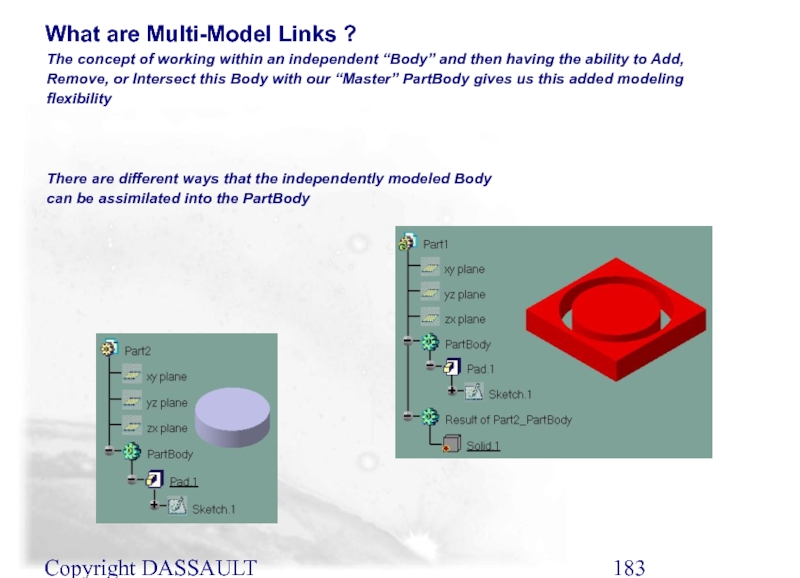
The concept of working within an independent “Body”
What are Multi-Model Links ?
There are different ways that the independently modeled Body can be assimilated into the PartBody
Слайд 184Copyright DASSAULT SYSTEMES 2002
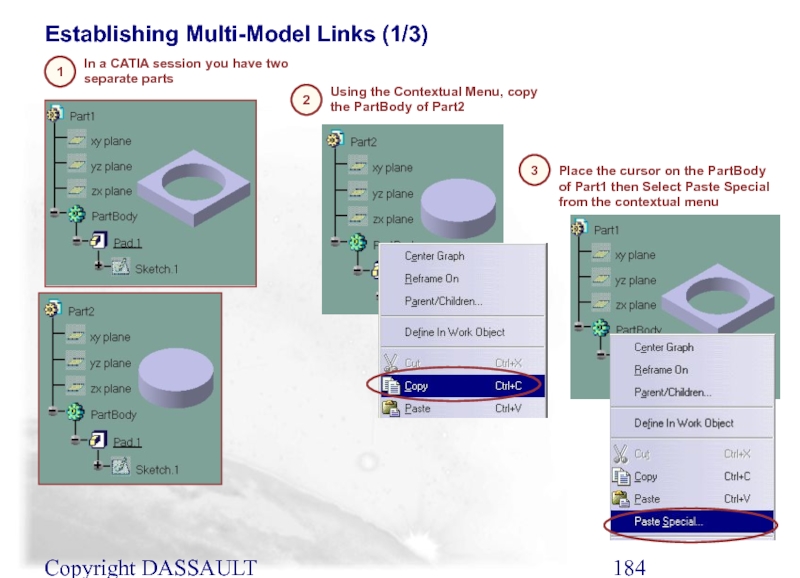
In a CATIA session you have two separate
Establishing Multi-Model Links (1/3)
1
Using the Contextual Menu, copy the PartBody of Part2
2
Place the cursor on the PartBody of Part1 then Select Paste Special from the contextual menu
3
Слайд 185Copyright DASSAULT SYSTEMES 2002
In the dialog box, select AsResultWithLink and the
Establishing Multi-Model Links (2/3)
Part1 becomes:
4
In Sketch.1 of part1, create a distance (10mm) between the circle and the copied cylinder then exit the sketcher
5
3
Слайд 186Copyright DASSAULT SYSTEMES 2002
Now, in Sketch.1 of part2, create a diameter
Establishing Multi-Model Links (3/3)
Part1 becomes:
7
With Part1 active, select the Update All icon
8
6
You get:
Слайд 187Copyright DASSAULT SYSTEMES 2002
Sketch Selection with Multi-Documents Links
It is now possible
Слайд 188Copyright DASSAULT SYSTEMES 2002
Sketch Selection with Multi-Documents Links (1/5)
After loading a
1
2
Display the two parts using the Window + Tile Horizontally command
You can copy a sketch in a document then paste it into another document keeping the link with the first one. You can use this copied sketch and in case of modification of the original sketch the document in which the copy is used will be also modified
You get:
Слайд 189Copyright DASSAULT SYSTEMES 2002
Sketch Selection with Multi-Documents Links (2/5)
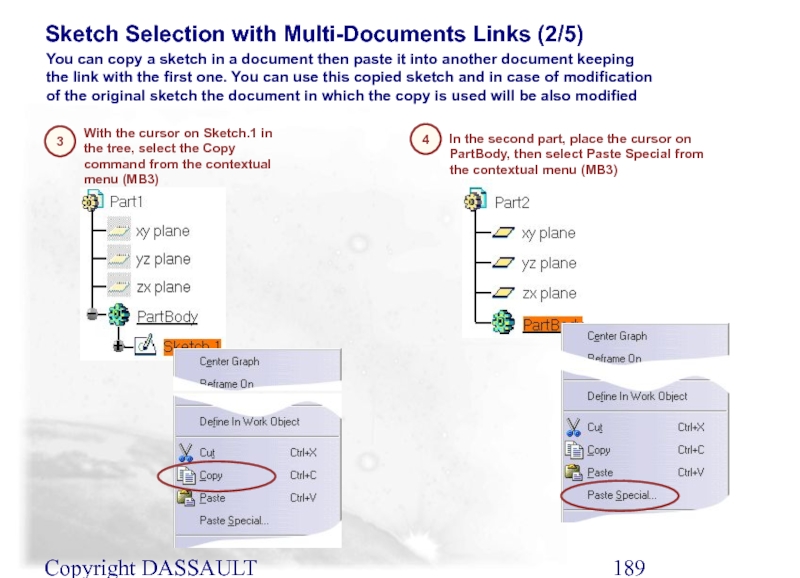
With the cursor
3
4
In the second part, place the cursor on PartBody, then select Paste Special from the contextual menu (MB3)
You can copy a sketch in a document then paste it into another document keeping the link with the first one. You can use this copied sketch and in case of modification of the original sketch the document in which the copy is used will be also modified
Слайд 190Copyright DASSAULT SYSTEMES 2002
Sketch Selection with Multi-Documents Links (3/5)
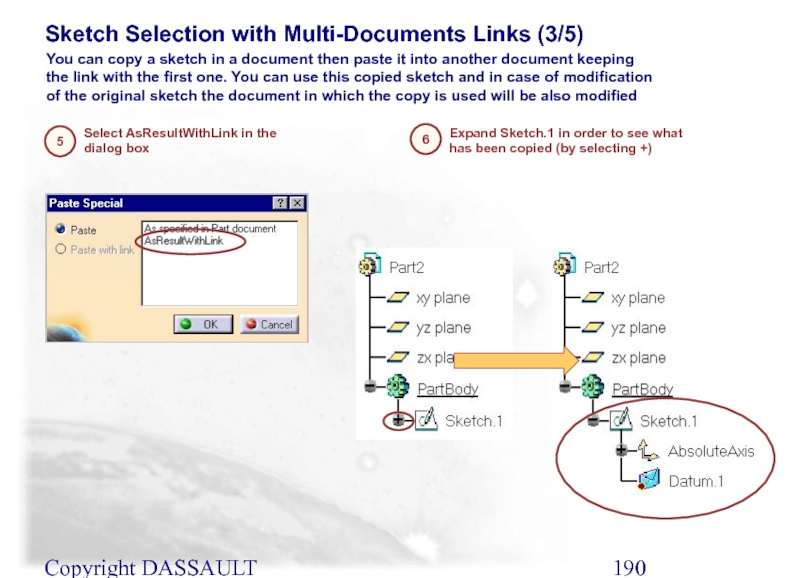
Select AsResultWithLink in
5
6
Expand Sketch.1 in order to see what has been copied (by selecting +)
You can copy a sketch in a document then paste it into another document keeping the link with the first one. You can use this copied sketch and in case of modification of the original sketch the document in which the copy is used will be also modified
Слайд 191Copyright DASSAULT SYSTEMES 2002
Sketch Selection with Multi-Documents Links (4/5)
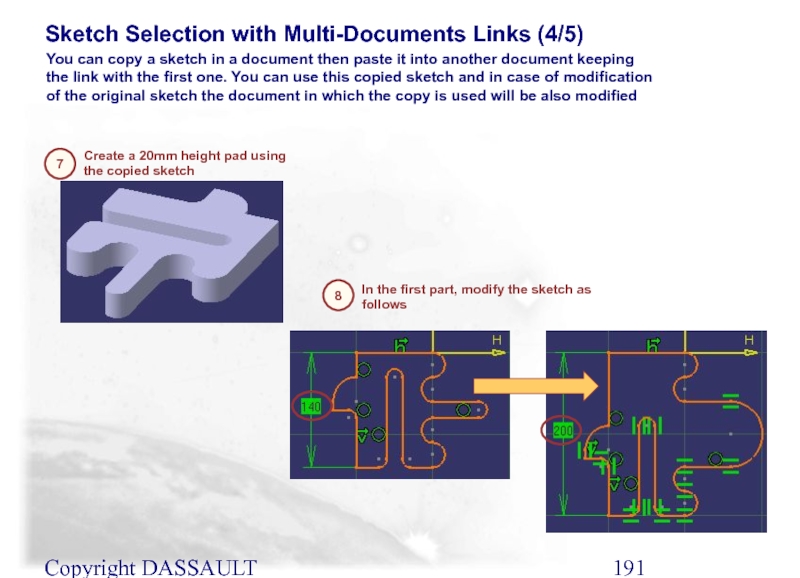
Create a 20mm
7
8
In the first part, modify the sketch as follows
You can copy a sketch in a document then paste it into another document keeping the link with the first one. You can use this copied sketch and in case of modification of the original sketch the document in which the copy is used will be also modified
Слайд 192Copyright DASSAULT SYSTEMES 2002
Sketch Selection with Multi-Documents Links (5/5)
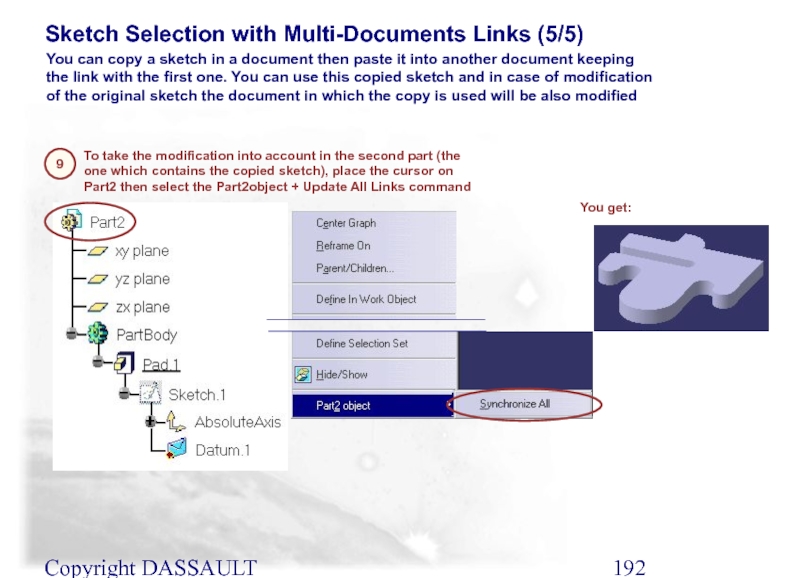
To take the
9
You can copy a sketch in a document then paste it into another document keeping the link with the first one. You can use this copied sketch and in case of modification of the original sketch the document in which the copy is used will be also modified
You get:
Слайд 193Copyright DASSAULT SYSTEMES 2002
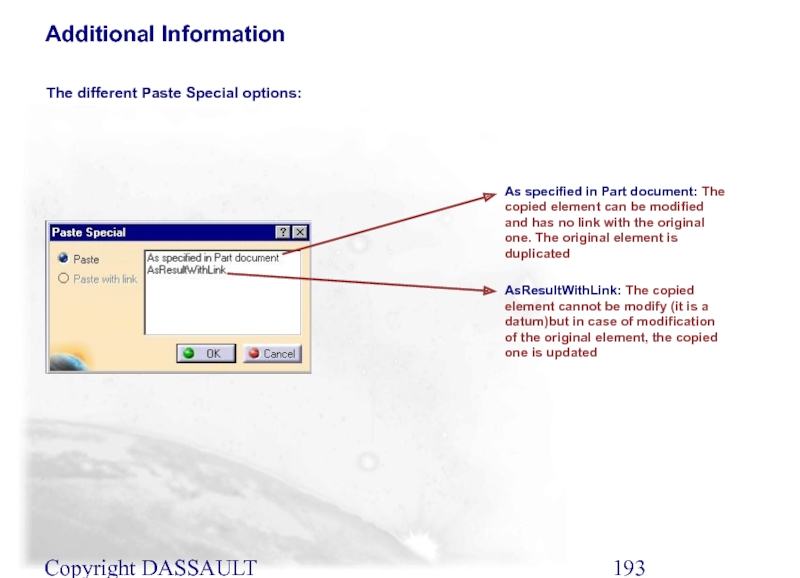
As specified in Part document: The copied element
AsResultWithLink: The copied element cannot be modify (it is a datum)but in case of modification of the original element, the copied one is updated
Additional Information
The different Paste Special options:
Слайд 194Copyright DASSAULT SYSTEMES 2002
You will learn how to apply an
Scaling
Scaling/Affinity
Слайд 195Copyright DASSAULT SYSTEMES 2002
A scaling is a part transformation which is
What is Scaling ?
The system computes the distance between all the points of the outer skin of the part and the reference point, then these distances are multiplied by the ratio to get the new distances between the reference point and all the point of the new outer skin
Слайд 196Copyright DASSAULT SYSTEMES 2002
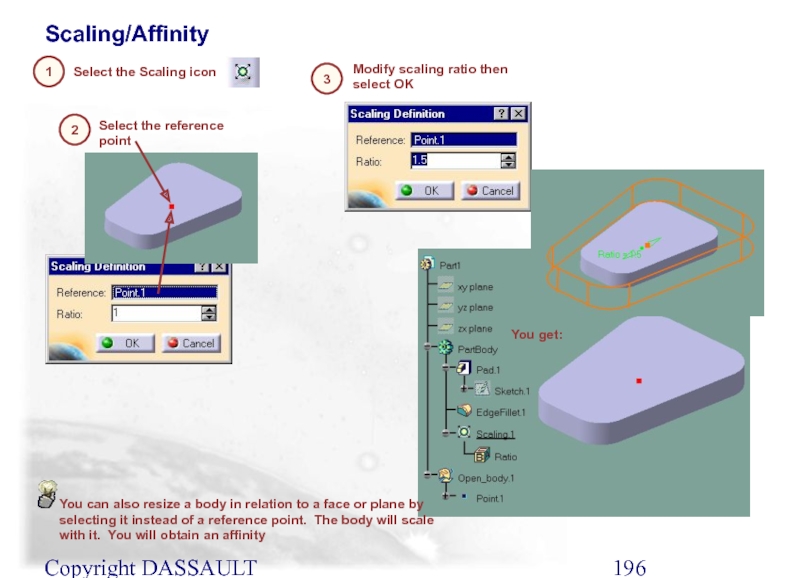
You can also resize a body in relation
Select the reference point
Select the Scaling icon
Modify scaling ratio then select OK
Scaling/Affinity
2
3
1
You get:
