- Главная
- Разное
- Дизайн
- Бизнес и предпринимательство
- Аналитика
- Образование
- Развлечения
- Красота и здоровье
- Финансы
- Государство
- Путешествия
- Спорт
- Недвижимость
- Армия
- Графика
- Культурология
- Еда и кулинария
- Лингвистика
- Английский язык
- Астрономия
- Алгебра
- Биология
- География
- Детские презентации
- Информатика
- История
- Литература
- Маркетинг
- Математика
- Медицина
- Менеджмент
- Музыка
- МХК
- Немецкий язык
- ОБЖ
- Обществознание
- Окружающий мир
- Педагогика
- Русский язык
- Технология
- Физика
- Философия
- Химия
- Шаблоны, картинки для презентаций
- Экология
- Экономика
- Юриспруденция
Development and design of Translation Management System презентация
Содержание
- 1. Development and design of Translation Management System
- 2. Introduction to BeConnected’s workflow BeConnected have 6
- 3. Log in page – for internal and
- 4. Landing page after log in – Dashboard
- 5. Continue – Dashboard – Internal resources –
- 6. Client Database – Client Search We need
- 7. Client Database – Client Profile – Basic
- 8. Client Database – Client Profile – Contact
- 9. Client Database – Client Profile – Price
- 10. Client Database – Client Profile – Payment
- 11. Client Database – Client Profile – Tasks
- 12. Resource Database – Resource Search We need
- 13. Resource Database – Resource Profile – Basic
- 14. Resource Database – Resource Profile – Calendar
- 15. Resource Database – Resource Profile – Properties
- 16. Resource Database – Resource Profile – Additional
- 17. Resource Database – Resource Profile – Price
- 18. Resource Database – Resource Profile – Payment
- 19. Resource Database – Resource Profile – Feedback
- 20. Resource Database – Resource Profile – Tasks
- 21. Quotes – possible projects – Quote window
- 22. Quotes – possible projects – Quote window
- 23. Quotes – possible projects – Quote window
- 24. Quotes – possible projects – Quote window
- 25. Orders/Projects – Select source for Project
- 26. Orders/Projects – Project window – project team
- 27. Orders/Projects – Project window – General This
- 28. Orders/Projects– Project window – Item All projects
- 29. Orders/Projects– Project window – Item – File
- 30. Orders/Projects – Project window – Output This
- 31. Orders/Projects – Project window – Invoices Usually
- 32. Orders/Projects – Project window – Tasks We
- 33. Orders/Projects – Jobs window – Summary view
- 34. Orders/Projects – Jobs window – Job details
- 35. Orders/Projects – Jobs window – Job request
- 36. Orders/Projects – Jobs window – Source data
- 37. Orders/Projects – Status report - Orders Status
- 38. Orders/Projects – Status report – Orders -
- 39. Continue - Orders/Projects – Status report –
- 40. Orders/Projects – Status report - Jobs Status
- 41. Orders/Projects – Status report – Jobs- Result
- 42. Continue - Orders/Projects – Status report –
- 43. Orders/Projects – Jobs chains We need
- 44. Orders/Projects – Templates – Order Template We
- 45. Invoices – via Dashboard – Billable items
- 46. Invoices – via Dashboard – Invoice view
- 47. Invoices – via Dashboard – Invoice view
- 48. Invoices – via Dashboard – Tasks and
- 49. Invoices – Receivables In this tab Receivables
- 50. Invoices – Credits On the Credits tab
- 51. Invoices – Payables In this tab Payables
- 52. Invoices – Payables – Resource invoice –
- 53. Invoices – Payables – Resource invoice –
- 54. Queries – Receivable We need to be
- 55. Queries – Receivable - Results In the
- 56. Continue - Queries – Receivable - Results
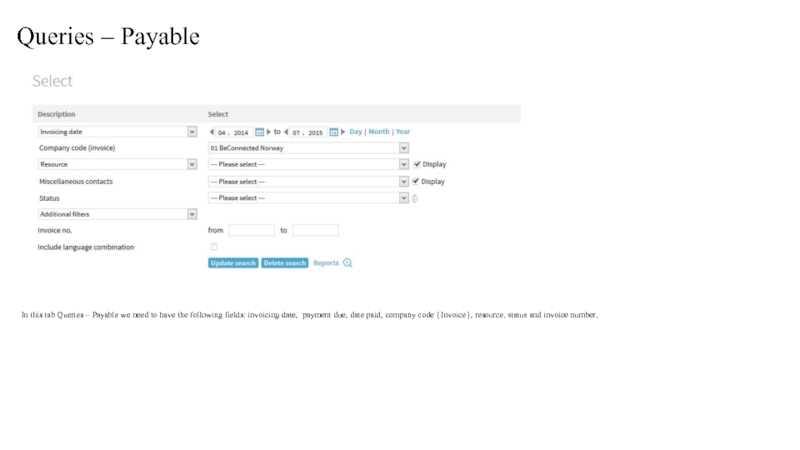
- 57. Queries – Payable In this tab Queries
- 58. Queries – Payable- Results In the results
- 59. Continue - Queries – Payable - Results
- 60. Queries – Gross Profit This tab, Gross
- 61. Queries – Gross Profit - Results In
- 62. Continue - Queries – Gross Profit –
- 63. Continue - Queries – Gross Profit –
- 64. Continue - Queries – Gross Profit –
- 65. Queries – Gross Profit Summary This tab,
- 66. Queries – Gross Profit Summary - Results
- 67. Queries – New customers We need to
- 68. Queries – New customers - Results The
- 69. Queries – Change log We need to
- 70. Queries – Change log - Results
- 71. Queries – Tasks We need to have
- 72. Queries – Tasks - Results The results
- 73. Queries – Cash flow We need to
- 74. Admin – Settings - Email As earlier
- 75. Admin – Settings – System values Here
- 76. Admin – Settings – System paths I
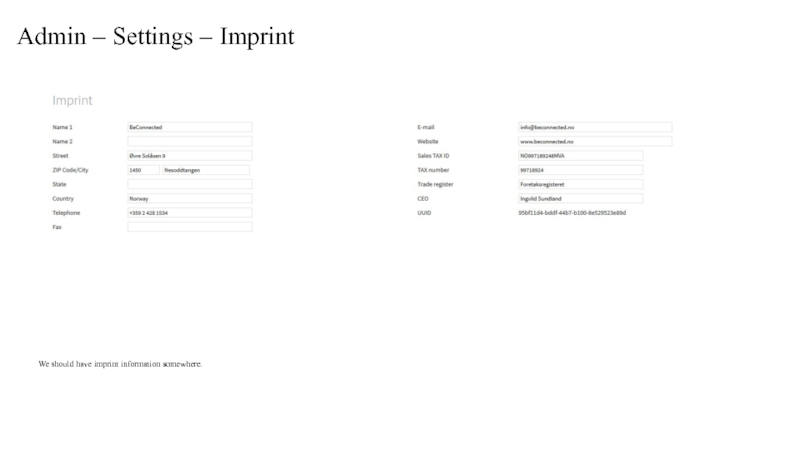
- 77. Admin – Settings – Imprint We should have imprint information somewhere.
- 78. Admin – Settings – Contacts - Customers
- 79. Admin – Settings – Quotes This is
- 80. Admin – Settings – Orders This is
- 81. Admin – Settings – Jobs This is
- 82. Admin – Settings – Company code This
- 83. Admin – Settings – Company codes –
- 84. Admin – Settings – Company codes –
- 85. Admin – Settings – Company codes –
- 86. Admin – Users – Internal and External
- 87. Admin – Users – Internal and External
- 88. Admin – Rights – Resources Internal Here
- 89. Admin – Rights – Resources Internal -
- 90. Admin – Rights – Resources External -
- 91. Admin – Rights – Dashboards This is
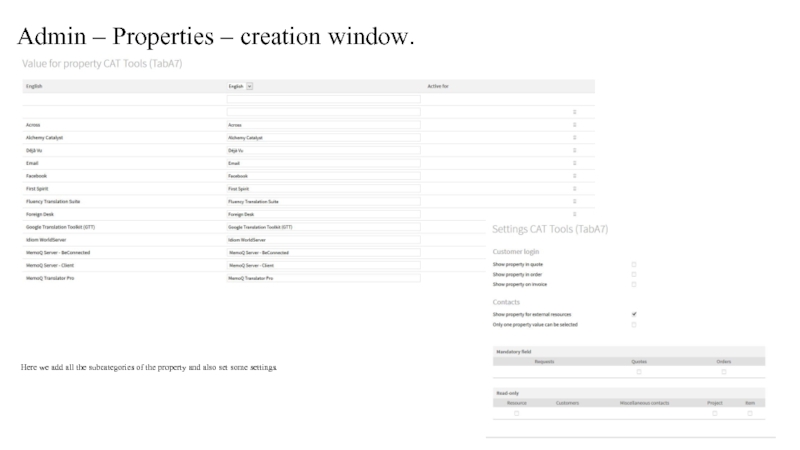
- 92. Admin – Properties This is where we
- 93. Admin – Properties – creation window. Here
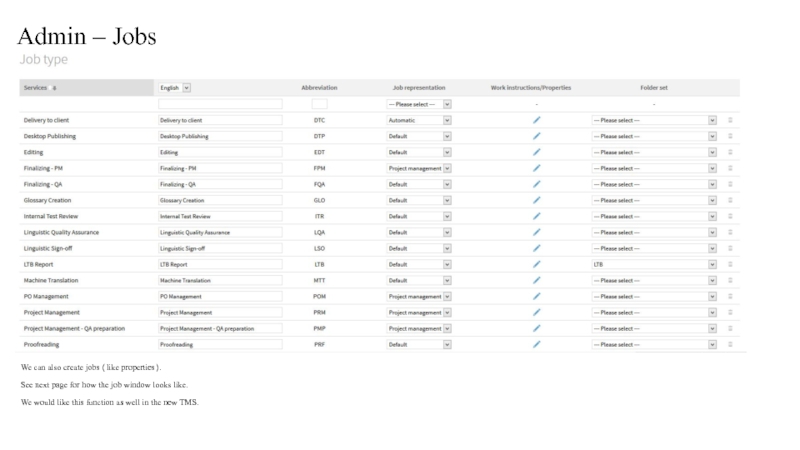
- 94. Admin – Jobs We can also create
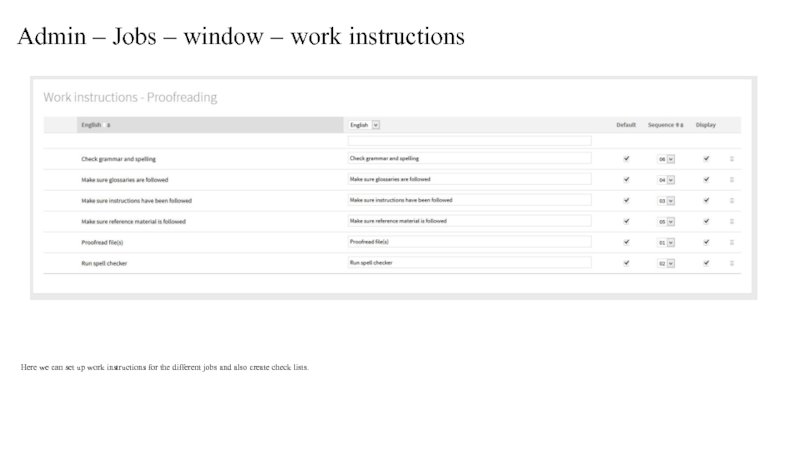
- 95. Admin – Jobs – window – work
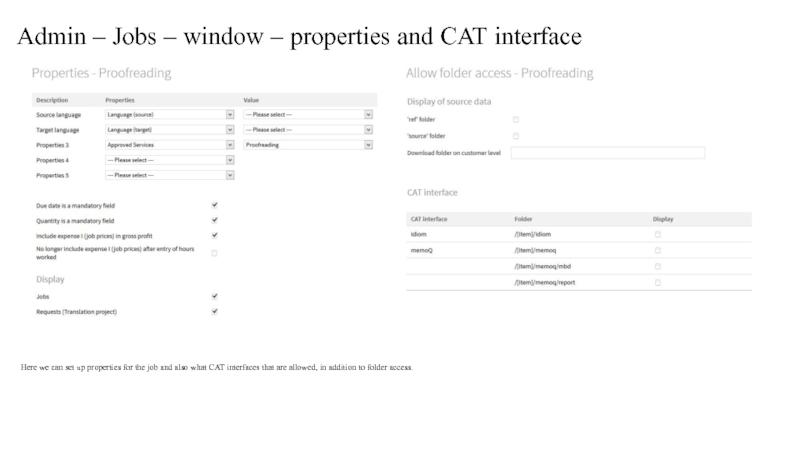
- 96. Admin – Jobs – window – properties
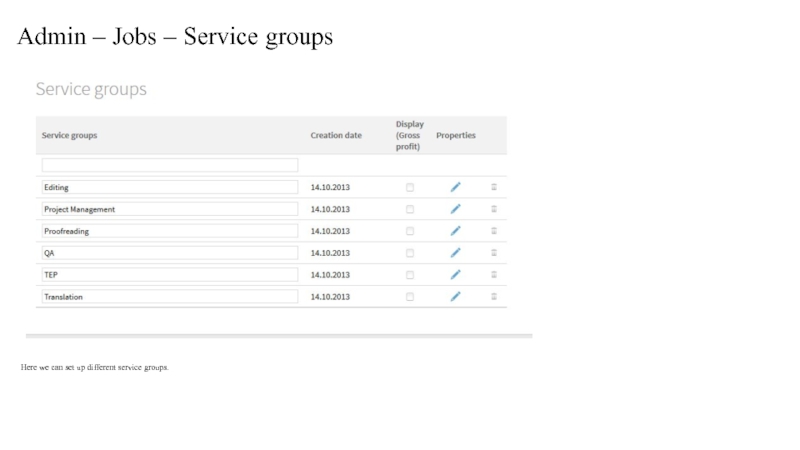
- 97. Admin – Jobs – Service groups Here we can set up different service groups.
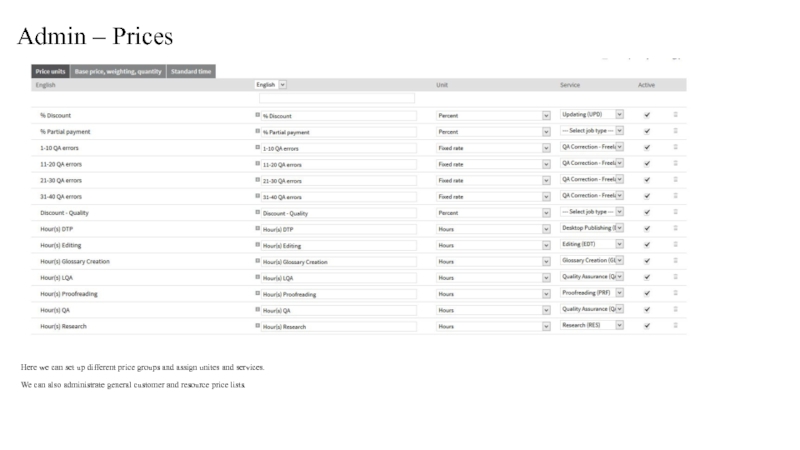
- 98. Admin – Prices Here we can set
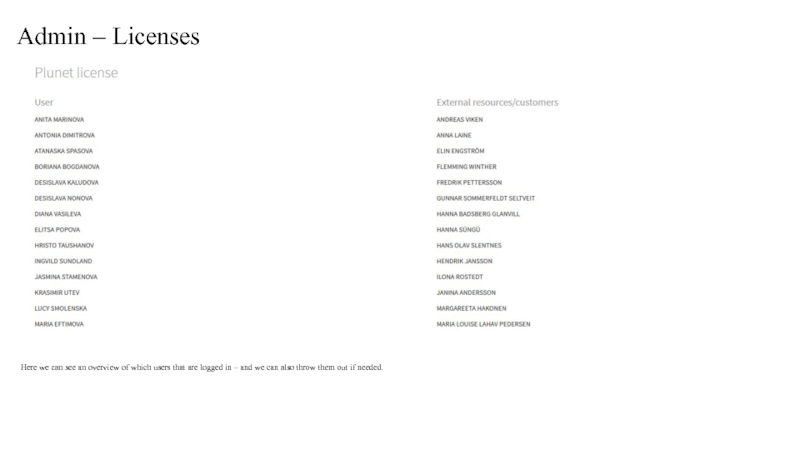
- 99. Admin – Licenses Here we can see
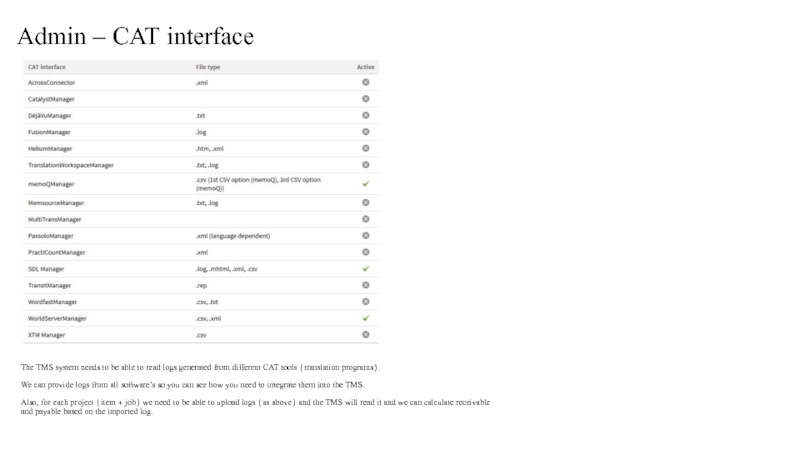
- 100. Admin – CAT interface The TMS system
- 101. Admin – Miscellaneous Here we can create
- 102. Admin – Miscellaneous - Currencies Here the
- 103. Admin – Miscellaneous – User Info Here
- 104. Admin – Miscellaneous – Task types +
- 105. Admin – Templates – Template sets We
- 106. Admin – Templates – Default expressions Here
- 107. Admin – Templates – Email Here we
- 108. Continue - Admin – Templates – Email
- 109. Admin – Folder sets Here we can
- 110. Continue - Admin – Folder sets -
- 111. Continue - Admin – Folder sets -
- 112. Admin – Text modules The text modules
- 113. Continue - Admin – Edit text modules
- 114. User profile – dashboard - Email In
- 115. User profile – Settings - Miscellaneous Here
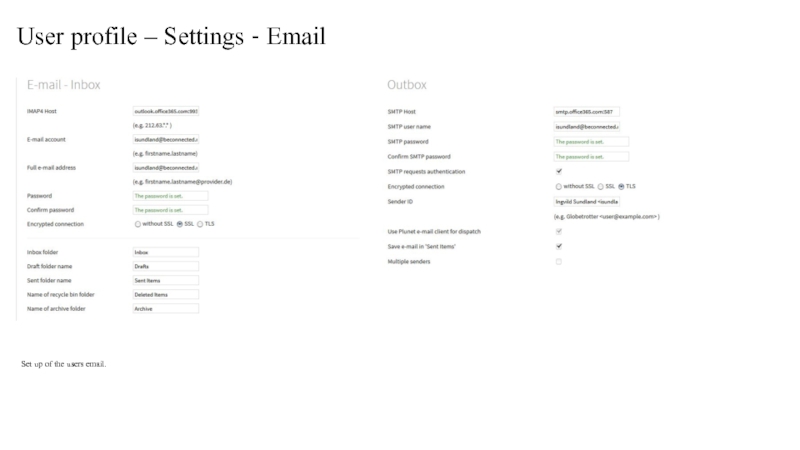
- 116. User profile – Settings - Email Set up of the users email.
- 117. User profile – Settings – Email signature
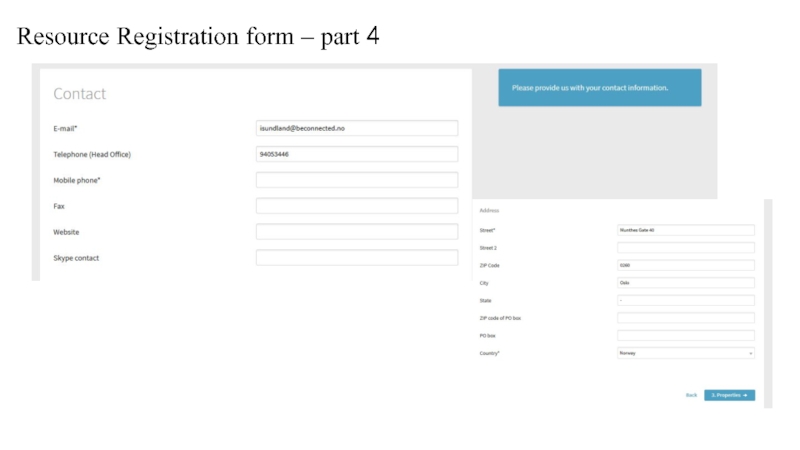
- 118. Resource Registration form – part 1 We
- 119. Resource Registration form – part 2
- 120. Resource Registration form – part 3
- 121. Resource Registration form – part 4
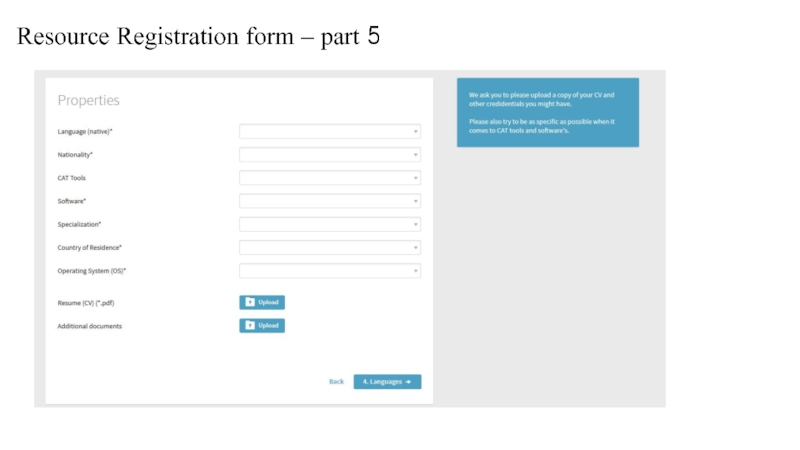
- 122. Resource Registration form – part 5
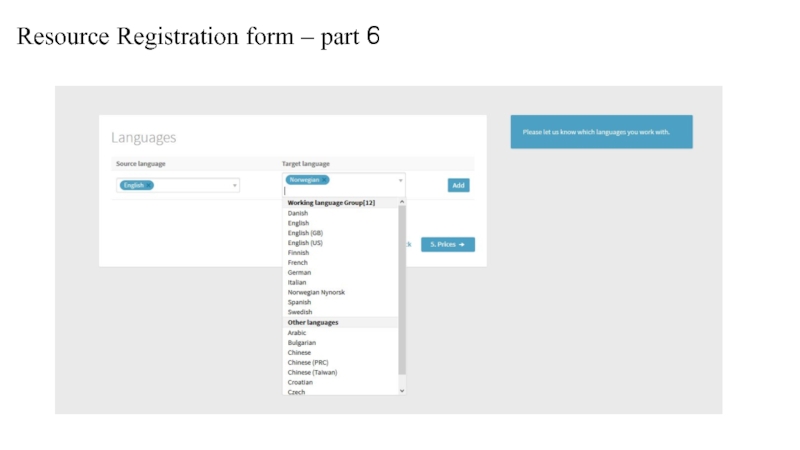
- 123. Resource Registration form – part 6
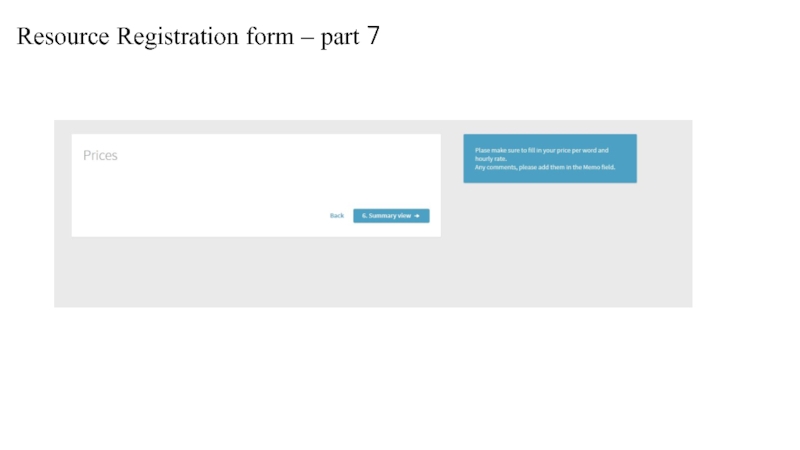
- 124. Resource Registration form – part 7
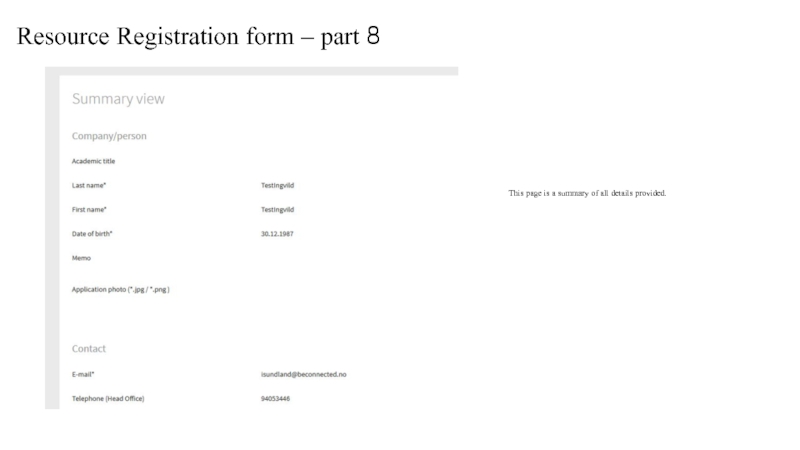
- 125. Resource Registration form – part 8 This page is a summary of all details provided.
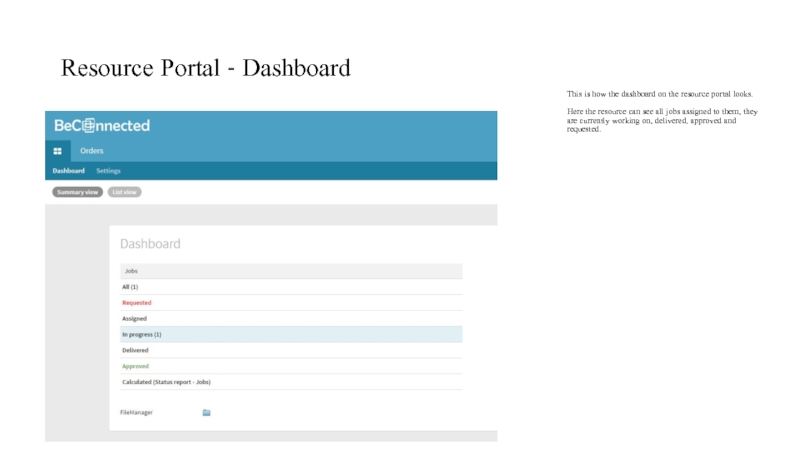
- 126. Resource Portal - Dashboard This is how
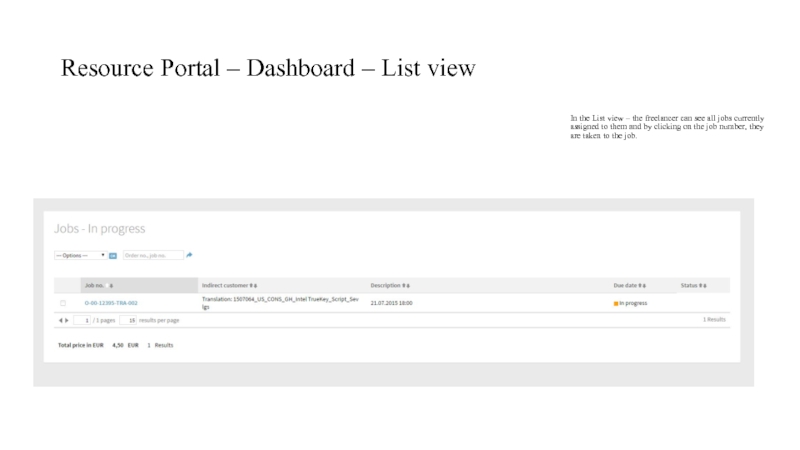
- 127. Resource Portal – Dashboard – List view
- 128. Resource Portal – Dashboard – List view
- 129. Resource Portal – Orders – Job details
- 130. Resource Portal – Orders – Source and
- 131. Resource Portal – Orders – Status report
- 132. Resource Portal – Dashboard – Settings Here
- 133. Functions we would like later on +
Слайд 1Development and design of Translation Management System
This is a description with
Слайд 2Introduction to BeConnected’s workflow
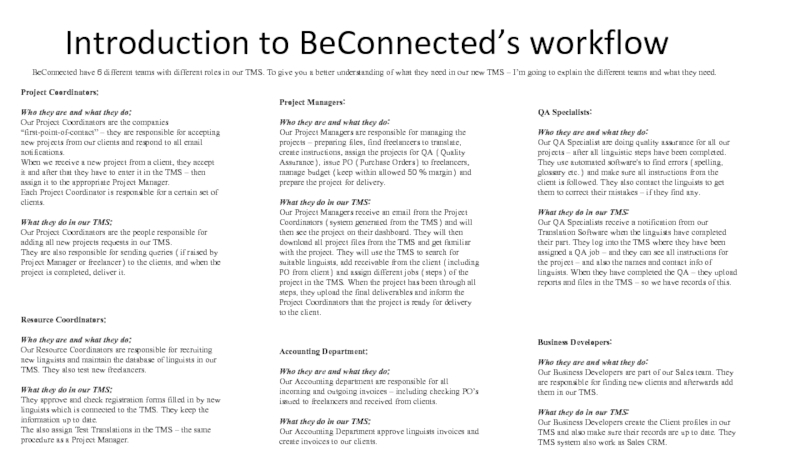
BeConnected have 6 different teams with different roles
Project Coordinators:
Who they are and what they do:
Our Project Coordinators are the companies “first-point-of-contact” – they are responsible for accepting new projects from our clients and respond to all email notifications.
When we receive a new project from a client, they accept it and after that they have to enter it in the TMS – then assign it to the appropriate Project Manager.
Each Project Coordinator is responsible for a certain set of clients.
What they do in our TMS:
Our Project Coordinators are the people responsible for adding all new projects requests in our TMS.
They are also responsible for sending queries (if raised by Project Manager or freelancer) to the clients, and when the project is completed, deliver it.
Project Managers:
Who they are and what they do:
Our Project Managers are responsible for managing the projects – preparing files, find freelancers to translate, create instructions, assign the projects for QA (Quality Assurance), issue PO (Purchase Orders) to freelancers, manage budget (keep within allowed 50 % margin) and prepare the project for delivery.
What they do in our TMS:
Our Project Managers receive an email from the Project Coordinators (system generated from the TMS) and will then see the project on their dashboard. They will then download all project files from the TMS and get familiar with the project. They will use the TMS to search for suitable linguists, add receivable from the client (including PO from client) and assign different jobs (steps) of the project in the TMS. When the project has been through all steps, they upload the final deliverables and inform the Project Coordinators that the project is ready for delivery to the client.
QA Specialists:
Who they are and what they do:
Our QA Specialist are doing quality assurance for all our projects – after all linguistic steps have been completed. They use automated software's to find errors (spelling, glossary etc.) and make sure all instructions from the client is followed. They also contact the linguists to get them to correct their mistakes – if they find any.
What they do in our TMS:
Our QA Specialists receive a notification from our Translation Software when the linguists have completed their part. They log into the TMS where they have been assigned a QA job – and they can see all instructions for the project – and also the names and contact info of linguists. When they have completed the QA – they upload reports and files in the TMS – so we have records of this.
Resource Coordinators:
Who they are and what they do:
Our Resource Coordinators are responsible for recruiting new linguists and maintain the database of linguists in our TMS. They also test new freelancers.
What they do in our TMS:
They approve and check registration forms filled in by new linguists which is connected to the TMS. They keep the information up to date.
The also assign Test Translations in the TMS – the same procedure as a Project Manager.
Accounting Department:
Who they are and what they do:
Our Accounting department are responsible for all incoming and outgoing invoices – including checking PO’s issued to freelancers and received from clients.
What they do in our TMS:
Our Accounting Department approve linguists invoices and create invoices to our clients.
Business Developers:
Who they are and what they do:
Our Business Developers are part of our Sales team. They are responsible for finding new clients and afterwards add them in our TMS.
What they do in our TMS:
Our Business Developers create the Client profiles in our TMS and also make sure their records are up to date. They TMS system also work as Sales CRM.
Слайд 3Log in page – for internal and external resources
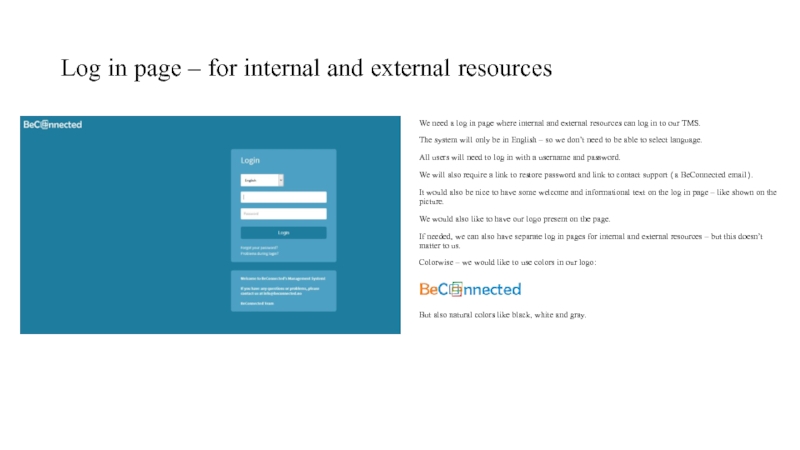
We need a
The system will only be in English – so we don’t need to be able to select language.
All users will need to log in with a username and password.
We will also require a link to restore password and link to contact support (a BeConnected email).
It would also be nice to have some welcome and informational text on the log in page – like shown on the picture.
We would also like to have our logo present on the page.
If needed, we can also have separate log in pages for internal and external resources – but this doesn’t matter to us.
Colorwise – we would like to use colors in our logo:
But also natural colors like black, white and gray.
Слайд 4Landing page after log in – Dashboard – Internal resources
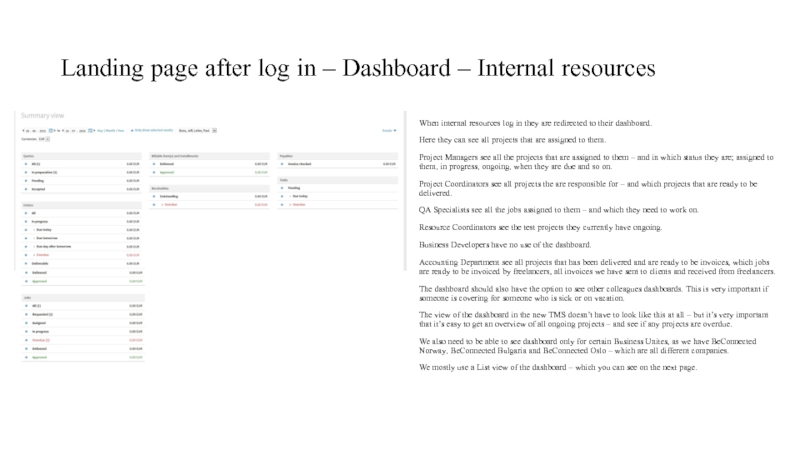
When internal
Here they can see all projects that are assigned to them.
Project Managers see all the projects that are assigned to them – and in which status they are; assigned to them, in progress, ongoing, when they are due and so on.
Project Coordinators see all projects the are responsible for – and which projects that are ready to be delivered.
QA Specialists see all the jobs assigned to them – and which they need to work on.
Resource Coordinators see the test projects they currently have ongoing.
Business Developers have no use of the dashboard.
Accounting Department see all projects that has been delivered and are ready to be invoices, which jobs are ready to be invoiced by freelancers, all invoices we have sent to clients and received from freelancers.
The dashboard should also have the option to see other colleagues dashboards. This is very important if someone is covering for someone who is sick or on vacation.
The view of the dashboard in the new TMS doesn’t have to look like this at all – but it’s very important that it’s easy to get an overview of all ongoing projects – and see if any projects are overdue.
We also need to be able to see dashboard only for certain Business Unites, as we have BeConnected Norway, BeConnected Bulgaria and BeConnected Oslo – which are all different companies.
We mostly use a List view of the dashboard – which you can see on the next page.
Слайд 5Continue – Dashboard – Internal resources – List view
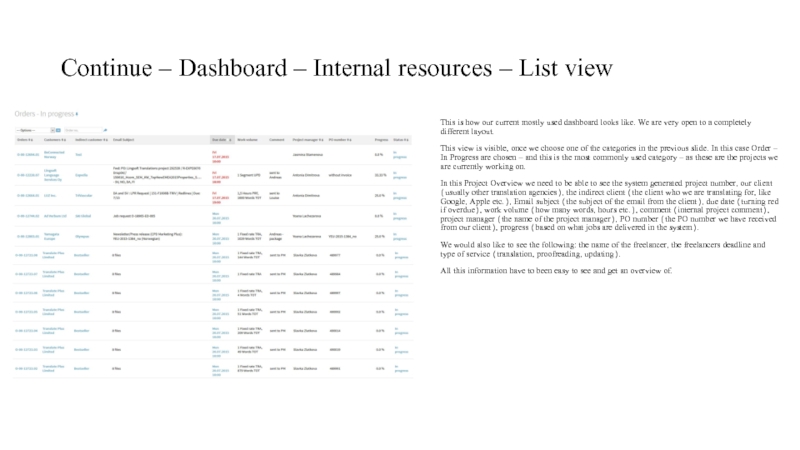
This is how
This view is visible, once we choose one of the categories in the previous slide. In this case Order – In Progress are chosen – and this is the most commonly used category – as these are the projects we are currently working on.
In this Project Overview we need to be able to see the system generated project number, our client (usually other translation agencies), the indirect client (the client who we are translating for, like Google, Apple etc.), Email subject (the subject of the email from the client), due date (turning red if overdue), work volume (how many words, hours etc.), comment (internal project comment), project manager (the name of the project manager), PO number (the PO number we have received from our client), progress (based on what jobs are delivered in the system).
We would also like to see the following: the name of the freelancer, the freelancers deadline and type of service (translation, proofreading, updating).
All this information have to been easy to see and get an overview of.
Слайд 6Client Database – Client Search
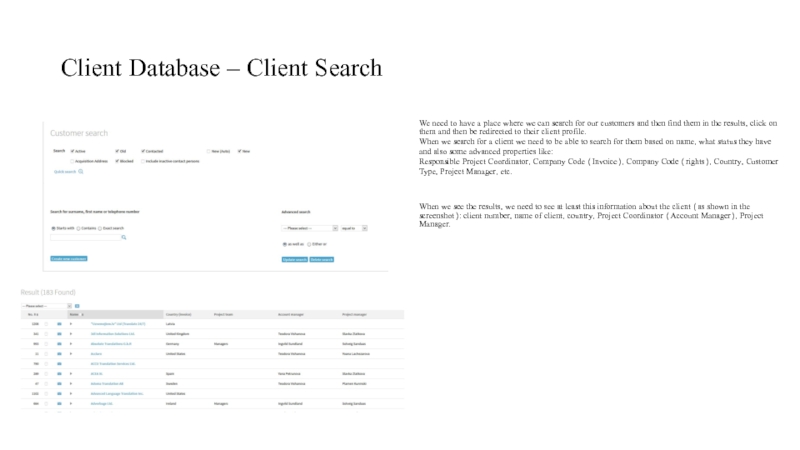
We need to have a place where
When we search for a client we need to be able to search for them based on name, what status they have and also some advanced properties like:
Responsible Project Coordinator, Company Code (Invoice), Company Code (rights), Country, Customer Type, Project Manager, etc.
When we see the results, we need to see at least this information about the client (as shown in the screenshot): client number, name of client, country, Project Coordinator (Account Manager), Project Manager.
Слайд 7Client Database – Client Profile – Basic Information
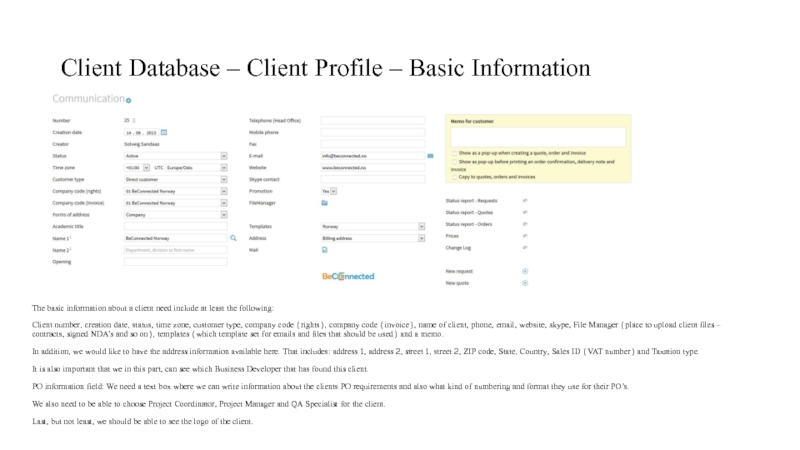
The basic information about
Client number, creation date, status, time zone, customer type, company code (rights), company code (invoice), name of client, phone, email, website, skype, File Manager (place to upload client files – contracts, signed NDA’s and so on), templates (which template set for emails and files that should be used) and a memo.
In addition, we would like to have the address information available here. That includes: address 1, address 2, street 1, street 2, ZIP code, State, Country, Sales ID (VAT number) and Taxation type.
It is also important that we in this part, can see which Business Developer that has found this client.
PO information field: We need a text box where we can write information about the clients PO requirements and also what kind of numbering and format they use for their PO’s.
We also need to be able to choose Project Coordinator, Project Manager and QA Specialist for the client.
Last, but not least, we should be able to see the logo of the client.
Слайд 8Client Database – Client Profile – Contact Persons
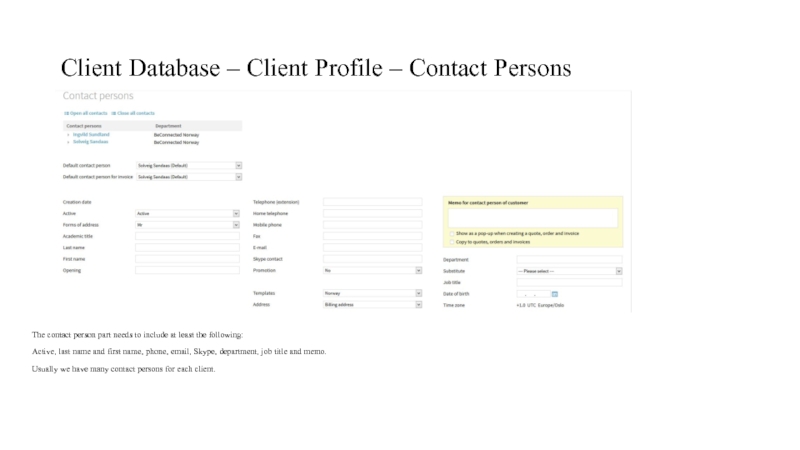
The contact person part
Active, last name and first name, phone, email, Skype, department, job title and memo.
Usually we have many contact persons for each client.
Слайд 9Client Database – Client Profile – Price Lists
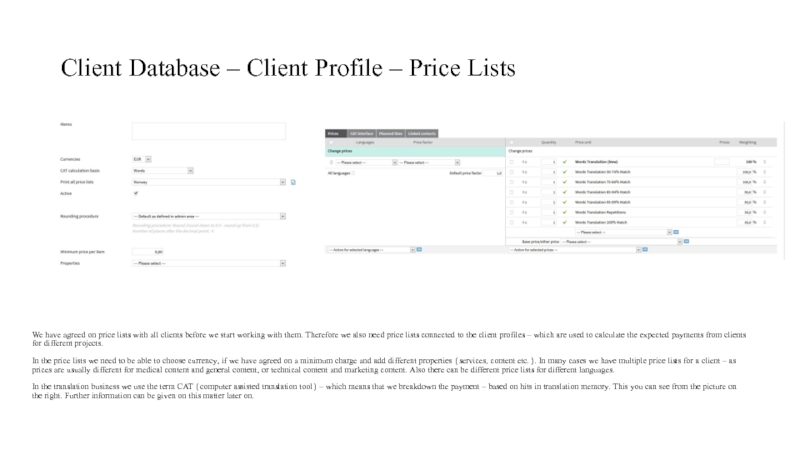
We have agreed on
In the price lists we need to be able to choose currency, if we have agreed on a minimum charge and add different properties (services, content etc.). In many cases we have multiple price lists for a client – as prices are usually different for medical content and general content, or technical content and marketing content. Also there can be different price lists for different languages.
In the translation business we use the term CAT (computer assisted translation tool) – which means that we breakdown the payment – based on hits in translation memory. This you can see from the picture on the right. Further information can be given on this matter later on.
Слайд 10Client Database – Client Profile – Payment information
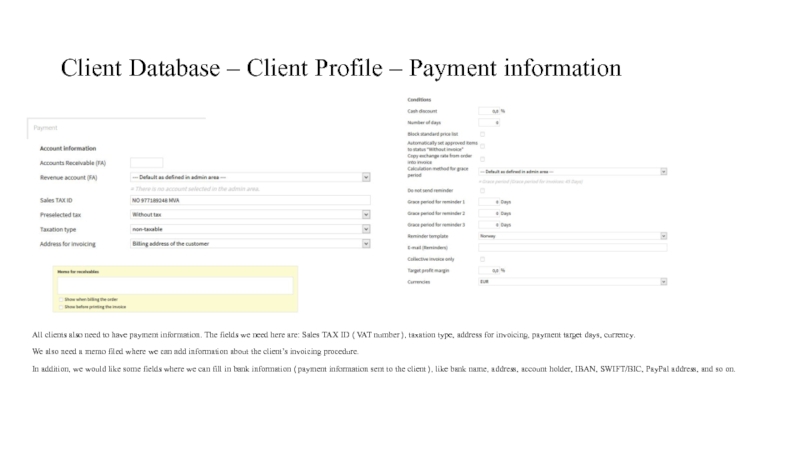
All clients also need
We also need a memo filed where we can add information about the client’s invoicing procedure.
In addition, we would like some fields where we can fill in bank information (payment information sent to the client), like bank name, address, account holder, IBAN, SWIFT/BIC, PayPal address, and so on.
Слайд 11Client Database – Client Profile – Tasks
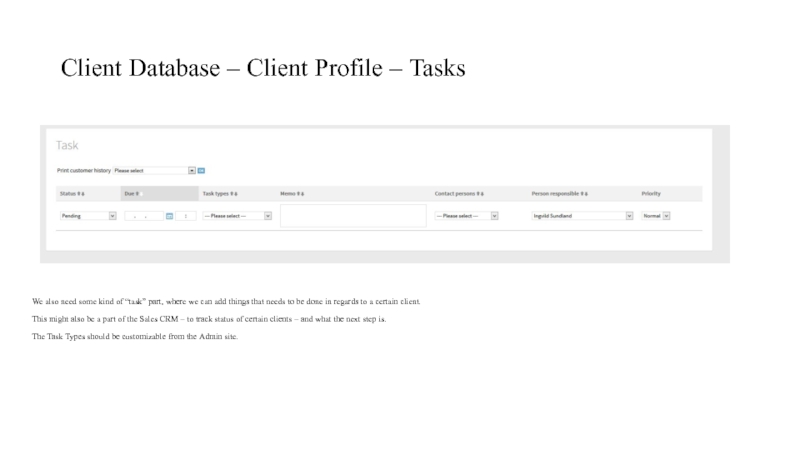
We also need some kind
This might also be a part of the Sales CRM – to track status of certain clients – and what the next step is.
The Task Types should be customizable from the Admin site.
Слайд 12Resource Database – Resource Search
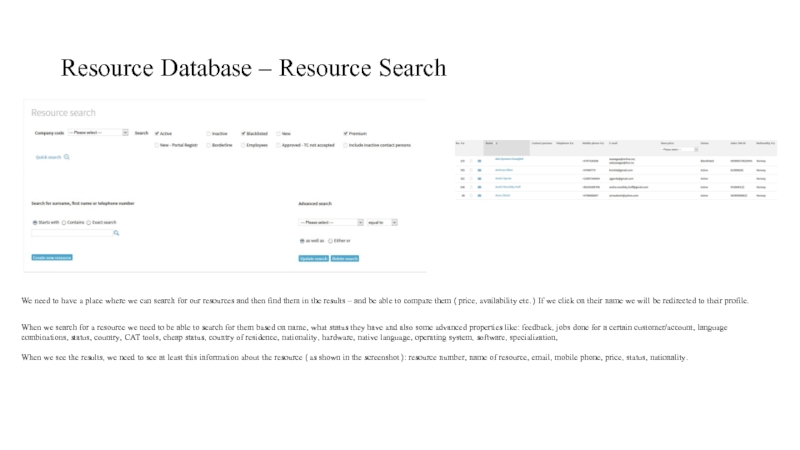
We need to have a place where
When we search for a resource we need to be able to search for them based on name, what status they have and also some advanced properties like: feedback, jobs done for a certain customer/account, language combinations, status, country, CAT tools, cheap status, country of residence, nationality, hardware, native language, operating system, software, specialization,
When we see the results, we need to see at least this information about the resource (as shown in the screenshot): resource number, name of resource, email, mobile phone, price, status, nationality.
Слайд 13Resource Database – Resource Profile – Basic Information
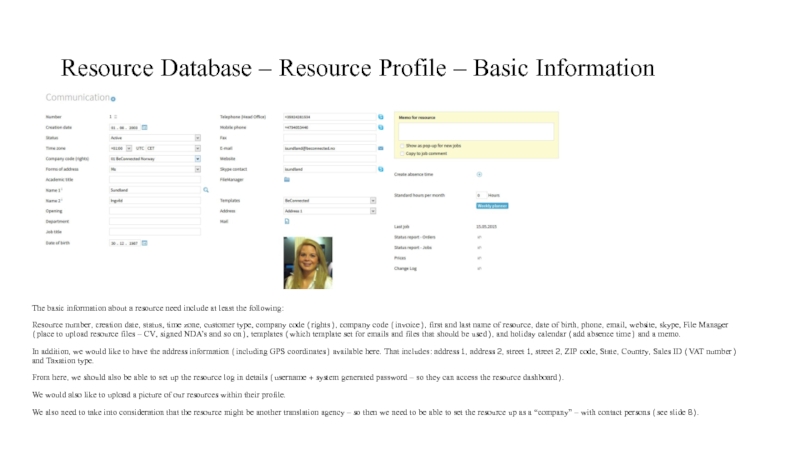
The basic information about
Resource number, creation date, status, time zone, customer type, company code (rights), company code (invoice), first and last name of resource, date of birth, phone, email, website, skype, File Manager (place to upload resource files – CV, signed NDA’s and so on), templates (which template set for emails and files that should be used), and holiday calendar (add absence time) and a memo.
In addition, we would like to have the address information (including GPS coordinates) available here. That includes: address 1, address 2, street 1, street 2, ZIP code, State, Country, Sales ID (VAT number) and Taxation type.
From here, we should also be able to set up the resource log in details (username + system generated password – so they can access the resource dashboard).
We would also like to upload a picture of our resources within their profile.
We also need to take into consideration that the resource might be another translation agency – so then we need to be able to set the resource up as a “company” – with contact persons (see slide 8).
Слайд 14Resource Database – Resource Profile – Calendar
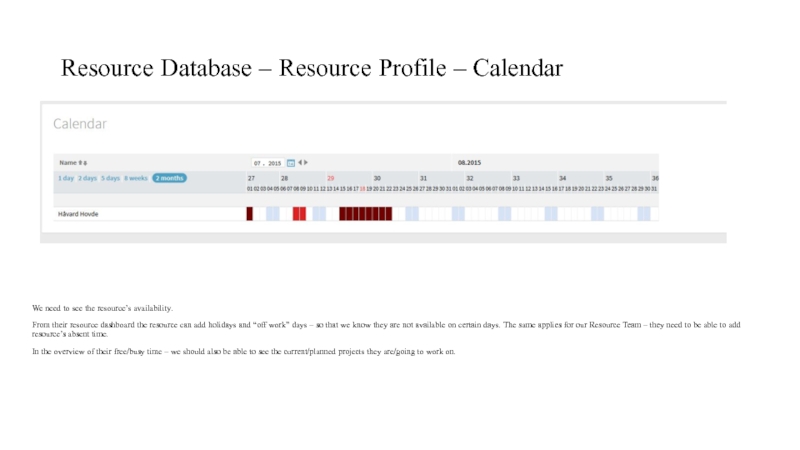
We need to see the
From their resource dashboard the resource can add holidays and “off work” days – so that we know they are not available on certain days. The same applies for our Resource Team – they need to be able to add resource’s absent time.
In the overview of their free/busy time – we should also be able to see the current/planned projects they are/going to work on.
Слайд 15Resource Database – Resource Profile – Properties – Advanced information
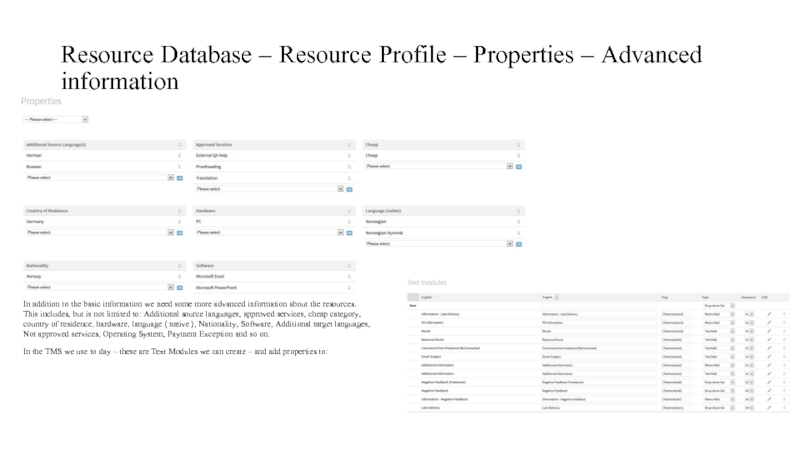
In addition
This includes, but is not limited to: Additional source languages, approved services, cheap category,
country of residence, hardware, language (native), Nationality, Software, Additional target languages,
Not approved services, Operating System, Payment Exception and so on.
In the TMS we use to day – these are Text Modules we can create – and add properties to:
Слайд 16Resource Database – Resource Profile – Additional information
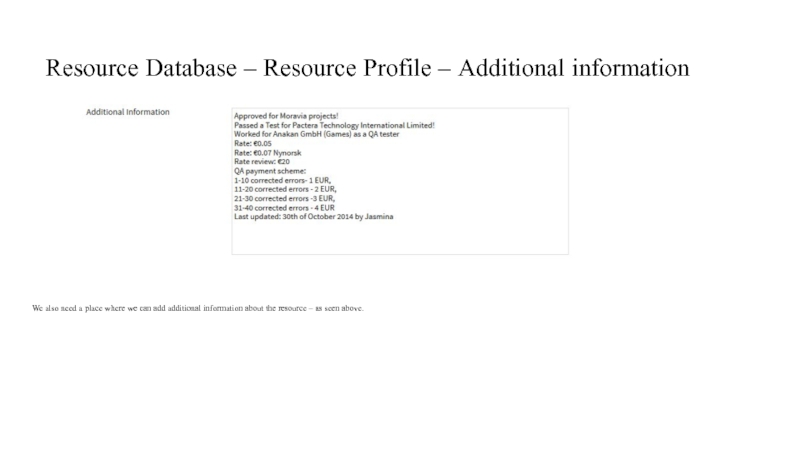
We also need a
Слайд 17Resource Database – Resource Profile – Price Lists
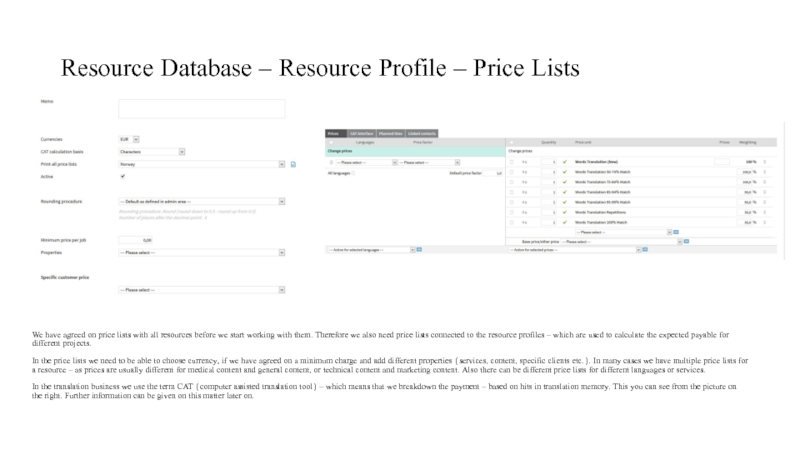
We have agreed on
In the price lists we need to be able to choose currency, if we have agreed on a minimum charge and add different properties (services, content, specific clients etc.). In many cases we have multiple price lists for a resource – as prices are usually different for medical content and general content, or technical content and marketing content. Also there can be different price lists for different languages or services.
In the translation business we use the term CAT (computer assisted translation tool) – which means that we breakdown the payment – based on hits in translation memory. This you can see from the picture on the right. Further information can be given on this matter later on.
Слайд 18Resource Database – Resource Profile – Payment information
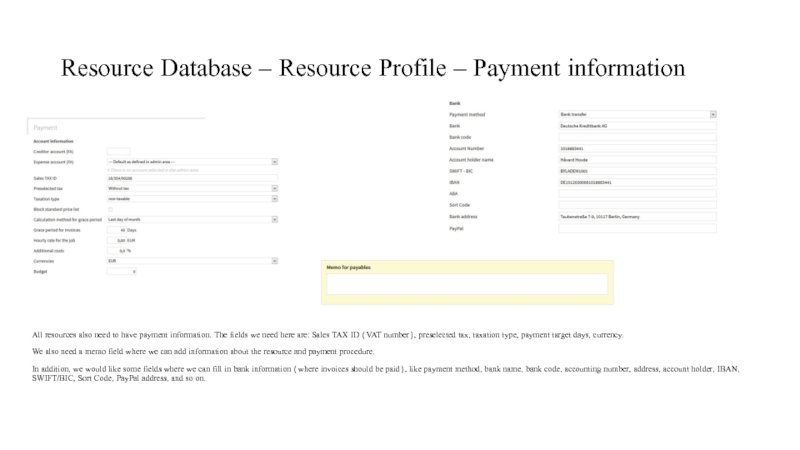
All resources also need
We also need a memo field where we can add information about the resource and payment procedure.
In addition, we would like some fields where we can fill in bank information (where invoices should be paid), like payment method, bank name, bank code, accounting number, address, account holder, IBAN, SWIFT/BIC, Sort Code, PayPal address, and so on.
Слайд 19Resource Database – Resource Profile – Feedback
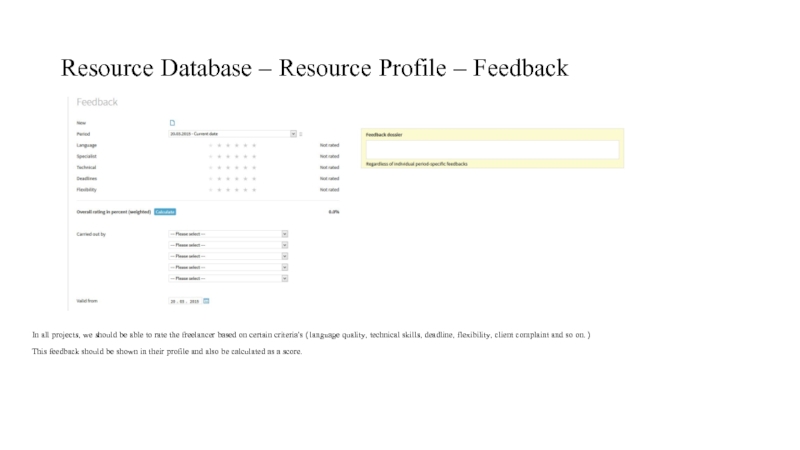
In all projects, we should
This feedback should be shown in their profile and also be calculated as a score.
Слайд 20Resource Database – Resource Profile – Tasks
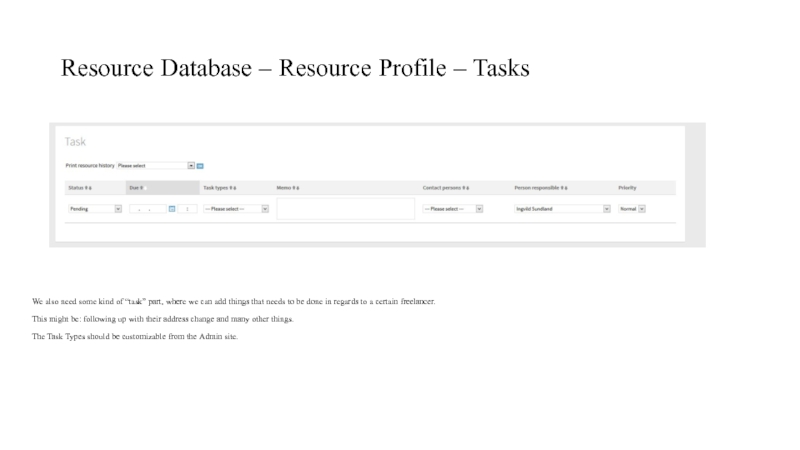
We also need some kind
This might be: following up with their address change and many other things.
The Task Types should be customizable from the Admin site.
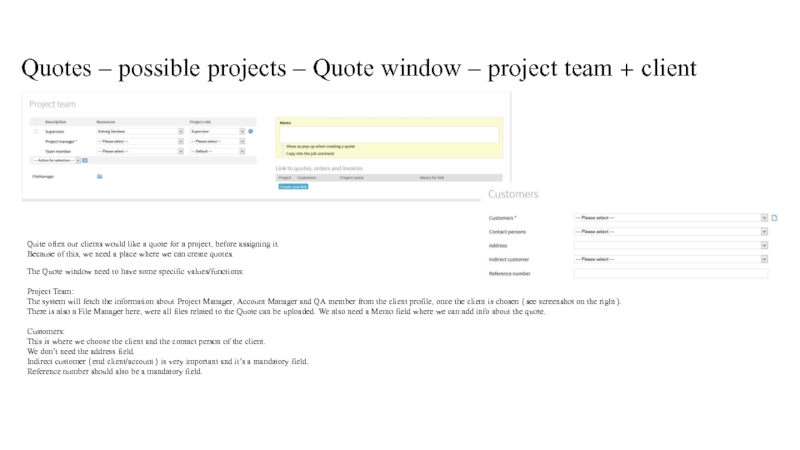
Слайд 21Quotes – possible projects – Quote window – project team +
Quite often our clients would like a quote for a project, before assigning it.
Because of this, we need a place where we can create quotes.
The Quote window need to have some specific values/functions:
Project Team:
The system will fetch the information about Project Manager, Account Manager and QA member from the client profile, once the client is chosen (see screenshot on the right).
There is also a File Manager here, were all files related to the Quote can be uploaded. We also need a Memo field where we can add info about the quote.
Customers:
This is where we choose the client and the contact person of the client.
We don’t need the address field.
Indirect customer (end client/account) is very important and it’s a mandatory field.
Reference number should also be a mandatory field.
Слайд 22Quotes – possible projects – Quote window – General
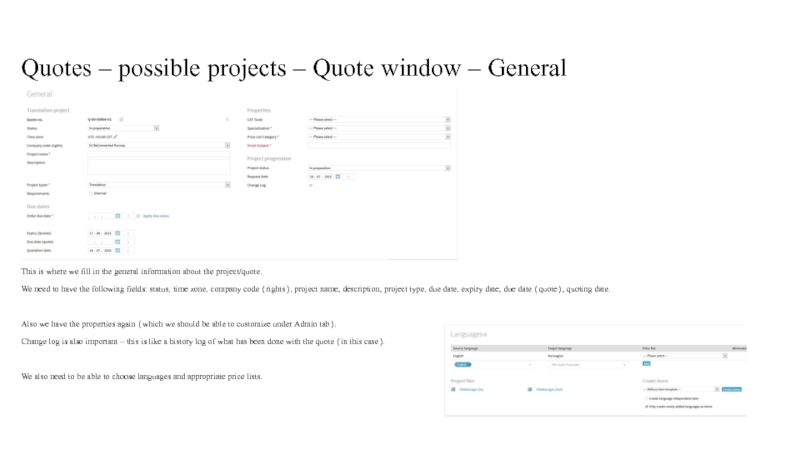
This is where
We need to have the following fields: status, time zone, company code (rights), project name, description, project type, due date, expiry date, due date (quote), quoting date.
Also we have the properties again (which we should be able to customize under Admin tab).
Change log is also important – this is like a history log of what has been done with the quote (in this case).
We also need to be able to choose languages and appropriate price lists.
Слайд 23Quotes – possible projects – Quote window – Item
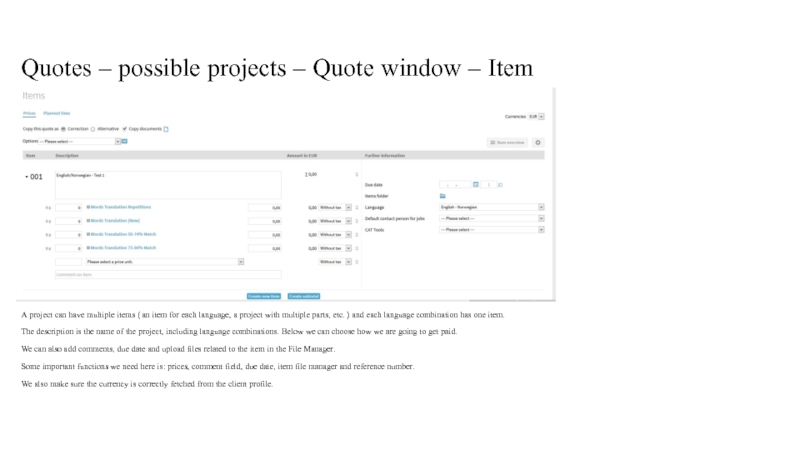
A project can
The description is the name of the project, including language combinations. Below we can choose how we are going to get paid.
We can also add comments, due date and upload files related to the item in the File Manager.
Some important functions we need here is: prices, comment field, due date, item file manager and reference number.
We also make sure the currency is correctly fetched from the client profile.
Слайд 24Quotes – possible projects – Quote window – Output
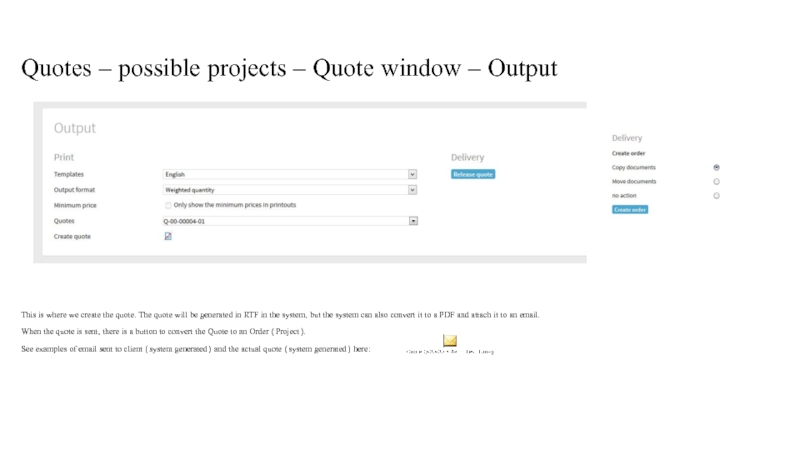
This is where
When the quote is sent, there is a button to convert the Quote to an Order (Project).
See examples of email sent to client (system generated) and the actual quote (system generated) here:
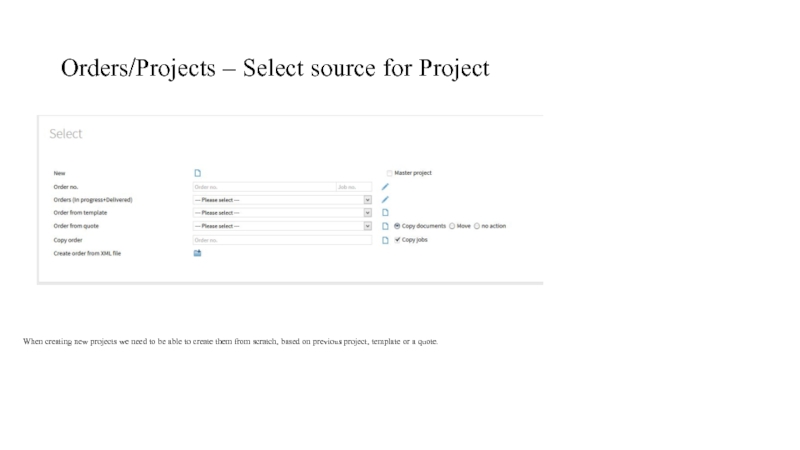
Слайд 25Orders/Projects – Select source for Project
When creating new projects we need
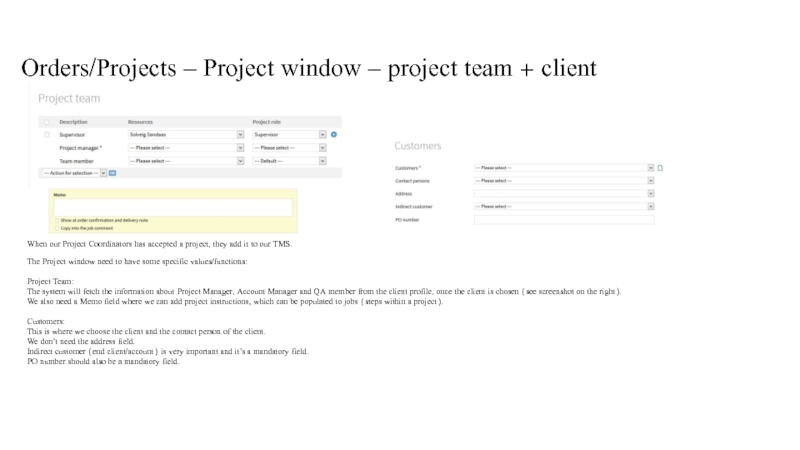
Слайд 26Orders/Projects – Project window – project team + client
When our Project
The Project window need to have some specific values/functions:
Project Team:
The system will fetch the information about Project Manager, Account Manager and QA member from the client profile, once the client is chosen (see screenshot on the right).
We also need a Memo field where we can add project instructions, which can be populated to jobs (steps within a project).
Customers:
This is where we choose the client and the contact person of the client.
We don’t need the address field.
Indirect customer (end client/account) is very important and it’s a mandatory field.
PO number should also be a mandatory field.
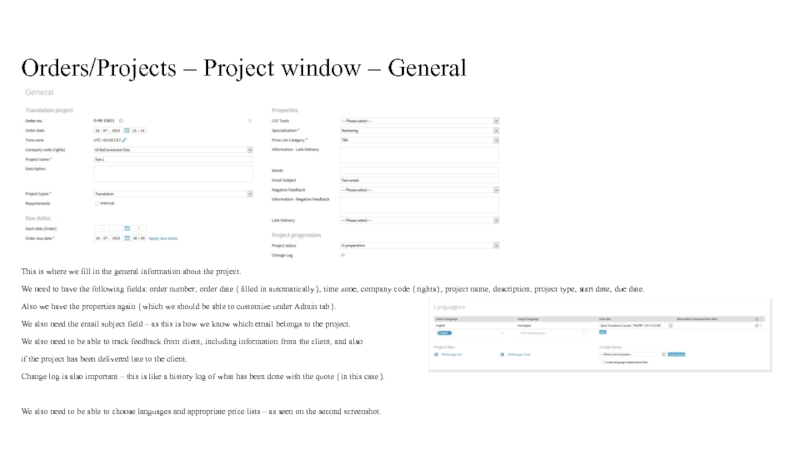
Слайд 27Orders/Projects – Project window – General
This is where we fill in
We need to have the following fields: order number, order date (filled in automatically), time zone, company code (rights), project name, description, project type, start date, due date.
Also we have the properties again (which we should be able to customize under Admin tab).
We also need the email subject field – as this is how we know which email belongs to the project.
We also need to be able to track feedback from client, including information from the client, and also
if the project has been delivered late to the client.
Change log is also important – this is like a history log of what has been done with the quote (in this case).
We also need to be able to choose languages and appropriate price lists – as seen on the second screenshot.
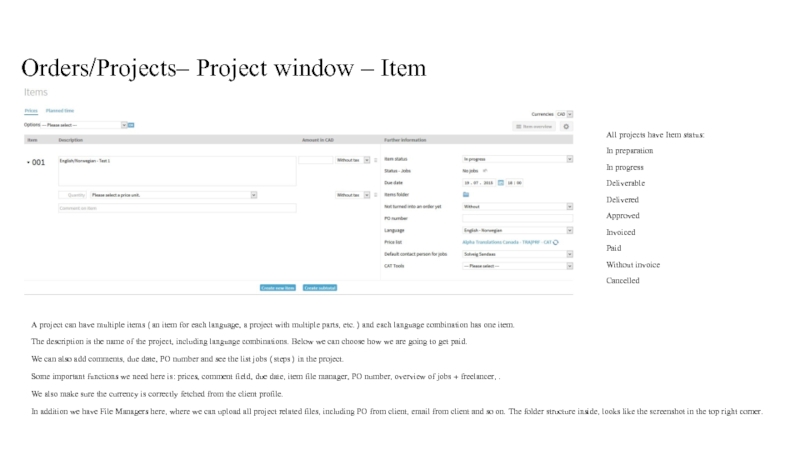
Слайд 28Orders/Projects– Project window – Item
All projects have Item status:
In preparation
In progress
Deliverable
Delivered
Approved
Invoiced
Paid
Without
Cancelled
A project can have multiple items (an item for each language, a project with multiple parts, etc.) and each language combination has one item.
The description is the name of the project, including language combinations. Below we can choose how we are going to get paid.
We can also add comments, due date, PO number and see the list jobs (steps) in the project.
Some important functions we need here is: prices, comment field, due date, item file manager, PO number, overview of jobs + freelancer, .
We also make sure the currency is correctly fetched from the client profile.
In addition we have File Managers here, where we can upload all project related files, including PO from client, email from client and so on. The folder structure inside, looks like the screenshot in the top right corner.
Слайд 29Orders/Projects– Project window – Item – File Manager
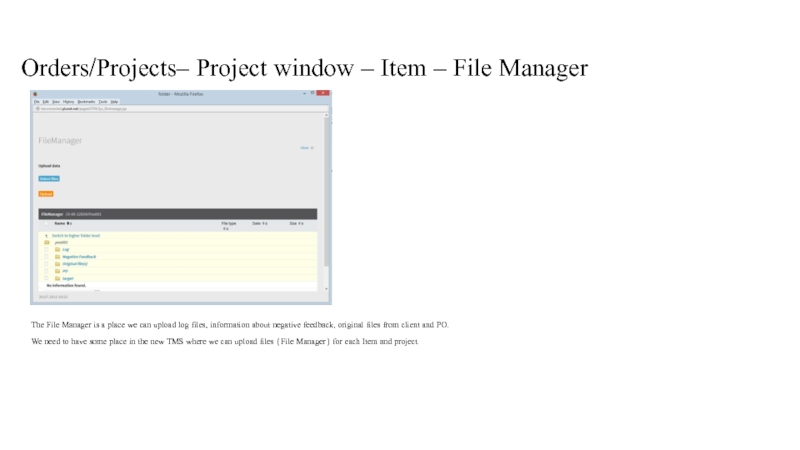
The File Manager is
We need to have some place in the new TMS where we can upload files (File Manager) for each Item and project.
Слайд 30Orders/Projects – Project window – Output
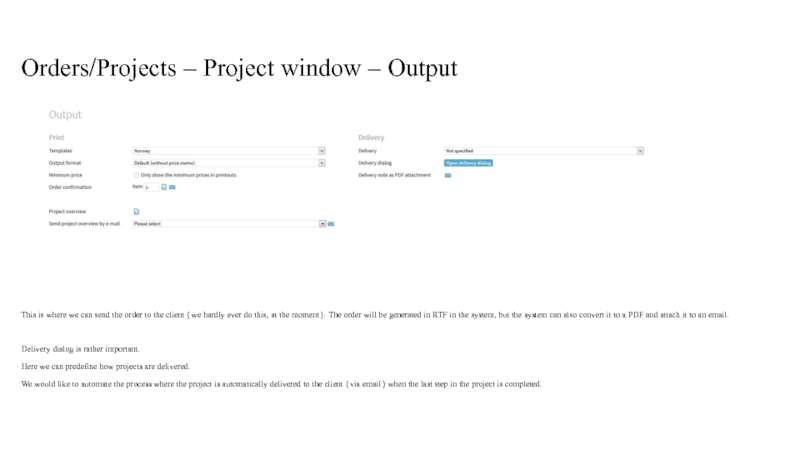
This is where we can send
Delivery dialog is rather important.
Here we can predefine how projects are delivered.
We would like to automate the process where the project is automatically delivered to the client (via email) when the last step in the project is completed.
Слайд 31Orders/Projects – Project window – Invoices
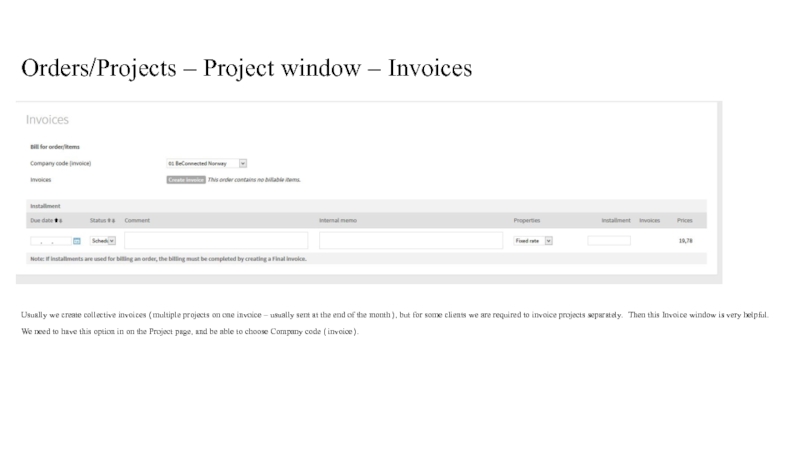
Usually we create collective invoices (multiple
We need to have this option in on the Project page, and be able to choose Company code (invoice).
Слайд 32Orders/Projects – Project window – Tasks
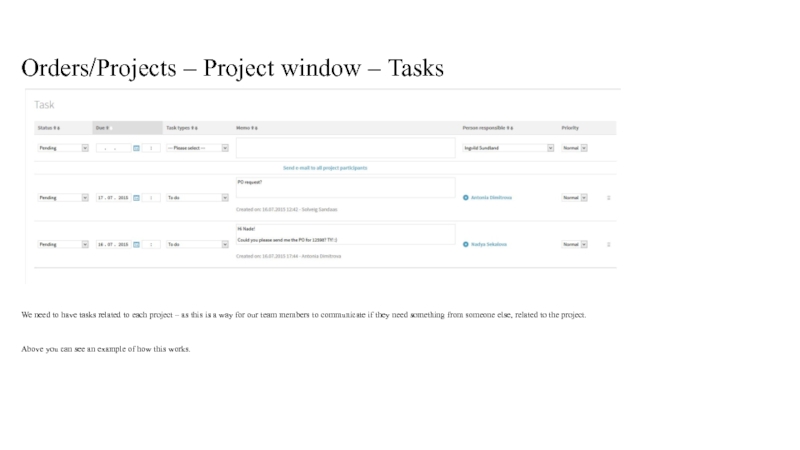
We need to have tasks related
Above you can see an example of how this works.
Слайд 33Orders/Projects – Jobs window – Summary view
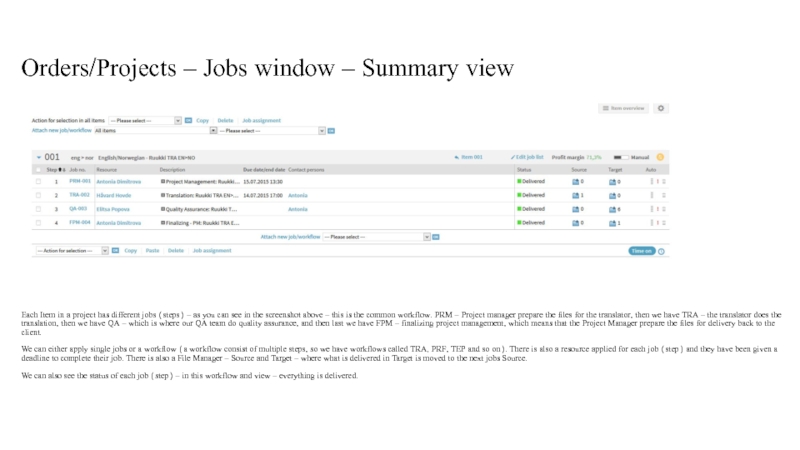
Each Item in a project
We can either apply single jobs or a workflow (a workflow consist of multiple steps, so we have workflows called TRA, PRF, TEP and so on). There is also a resource applied for each job (step) and they have been given a deadline to complete their job. There is also a File Manager – Source and Target – where what is delivered in Target is moved to the next jobs Source.
We can also see the status of each job (step) – in this workflow and view – everything is delivered.
Слайд 34Orders/Projects – Jobs window – Job details
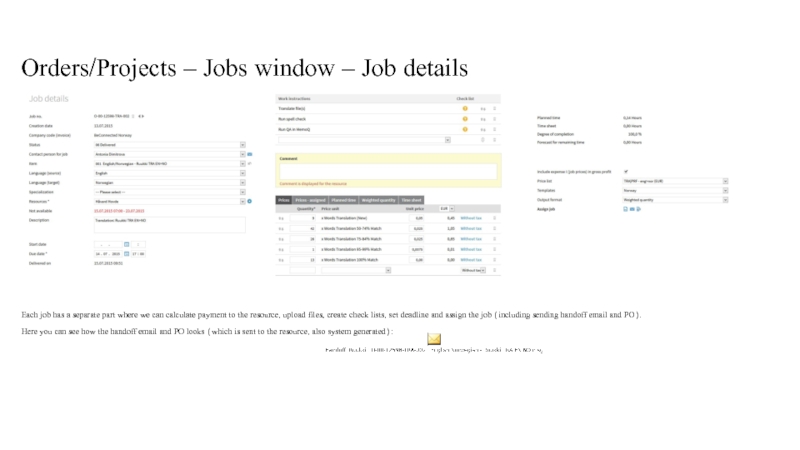
Each job has a separate
Here you can see how the handoff email and PO looks (which is sent to the resource, also system generated):
Слайд 35Orders/Projects – Jobs window – Job request
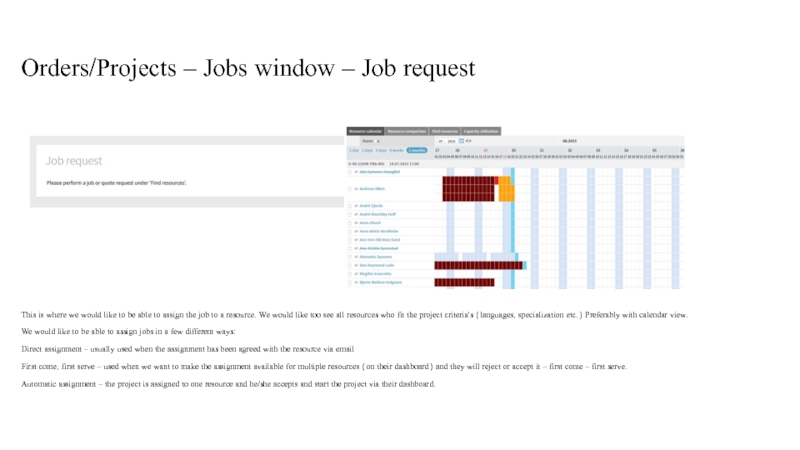
This is where we would
We would like to be able to assign jobs in a few different ways:
Direct assignment – usually used when the assignment has been agreed with the resource via email
First come, first serve – used when we want to make the assignment available for multiple resources (on their dashboard) and they will reject or accept it – first come – first serve.
Automatic assignment – the project is assigned to one resource and he/she accepts and start the project via their dashboard.
Слайд 36Orders/Projects – Jobs window – Source data
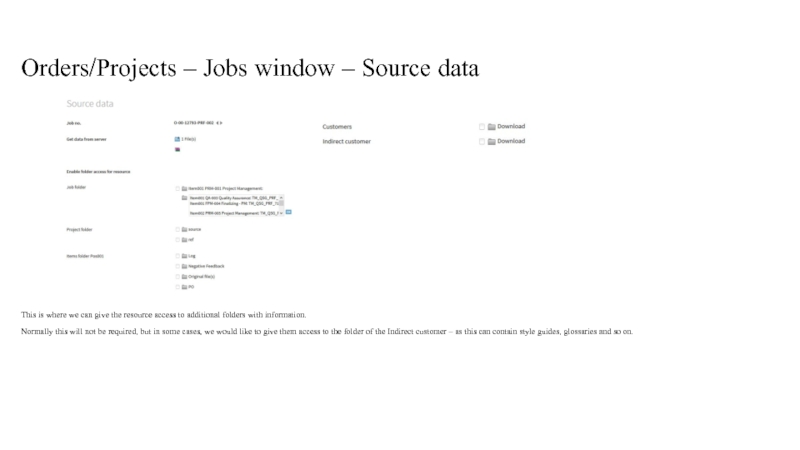
This is where we can
Normally this will not be required, but in some cases, we would like to give them access to the folder of the Indirect customer – as this can contain style guides, glossaries and so on.
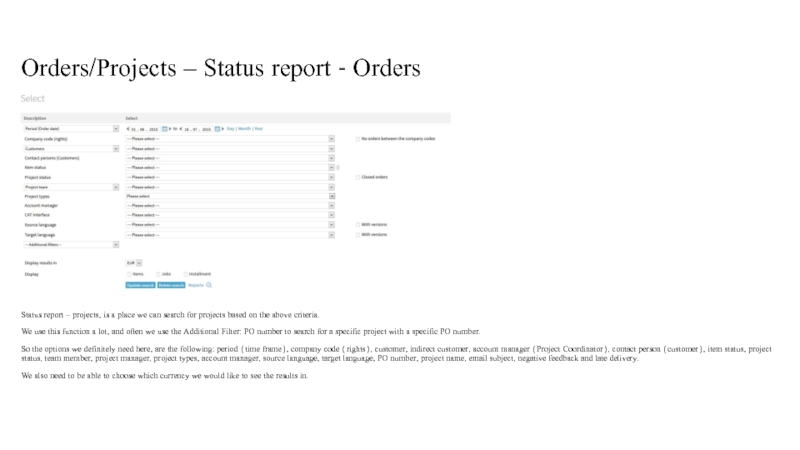
Слайд 37Orders/Projects – Status report - Orders
Status report – projects, is a
We use this function a lot, and often we use the Additional Filter: PO number to search for a specific project with a specific PO number.
So the options we definitely need here, are the following: period (time frame), company code (rights), customer, indirect customer, account manager (Project Coordinator), contact person (customer), item status, project status, team member, project manager, project types, account manager, source language, target language, PO number, project name, email subject, negative feedback and late delivery.
We also need to be able to choose which currency we would like to see the results in.
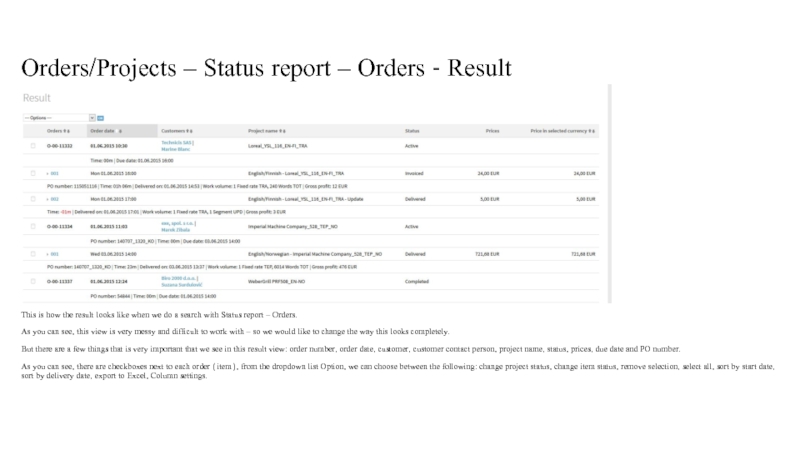
Слайд 38Orders/Projects – Status report – Orders - Result
This is how the
As you can see, this view is very messy and difficult to work with – so we would like to change the way this looks completely.
But there are a few things that is very important that we see in this result view: order number, order date, customer, customer contact person, project name, status, prices, due date and PO number.
As you can see, there are checkboxes next to each order (item), from the dropdown list Option, we can choose between the following: change project status, change item status, remove selection, select all, sort by start date, sort by delivery date, export to Excel, Column settings.
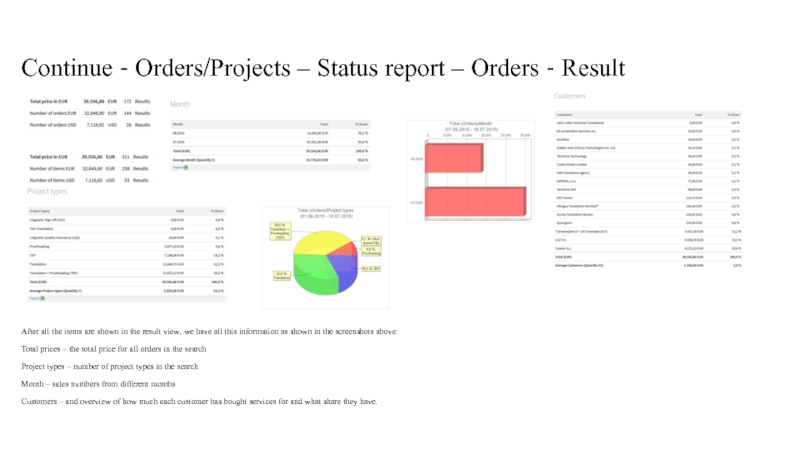
Слайд 39Continue - Orders/Projects – Status report – Orders - Result
After all
Total prices – the total price for all orders in the search
Project types – number of project types in the search
Month – sales numbers from different months
Customers – and overview of how much each customer has bought services for and what share they have.
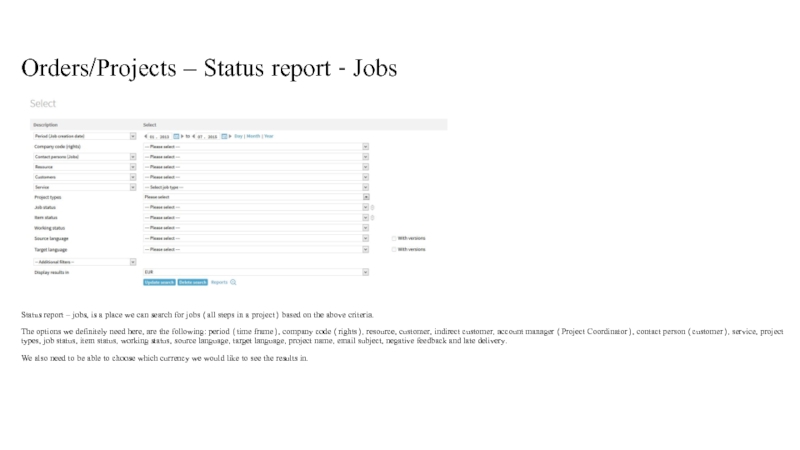
Слайд 40Orders/Projects – Status report - Jobs
Status report – jobs, is a
The options we definitely need here, are the following: period (time frame), company code (rights), resource, customer, indirect customer, account manager (Project Coordinator), contact person (customer), service, project types, job status, item status, working status, source language, target language, project name, email subject, negative feedback and late delivery.
We also need to be able to choose which currency we would like to see the results in.
Слайд 41Orders/Projects – Status report – Jobs- Result
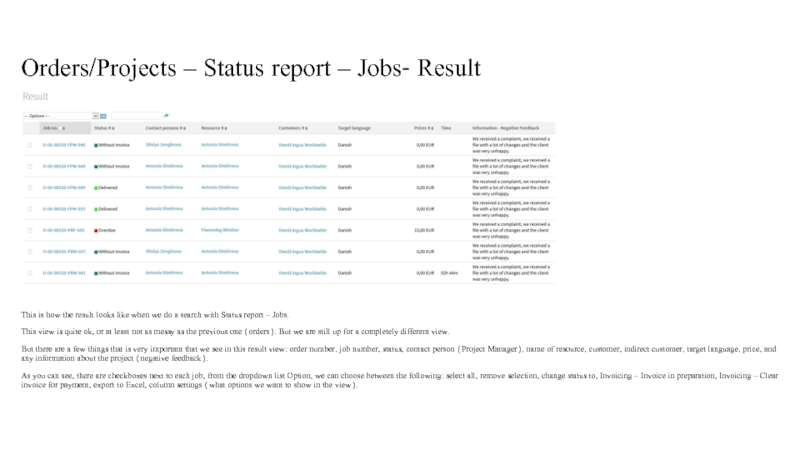
This is how the result
This view is quite ok, or at least not as messy as the previous one (orders). But we are still up for a completely different view.
But there are a few things that is very important that we see in this result view: order number, job number, status, contact person (Project Manager), name of resource, customer, indirect customer, target language, price, and any information about the project (negative feedback).
As you can see, there are checkboxes next to each job, from the dropdown list Option, we can choose between the following: select all, remove selection, change status to, Invoicing – Invoice in preparation, Invoicing – Clear invoice for payment, export to Excel, column settings (what options we want to show in the view).
Слайд 42Continue - Orders/Projects – Status report – Jobs- Result
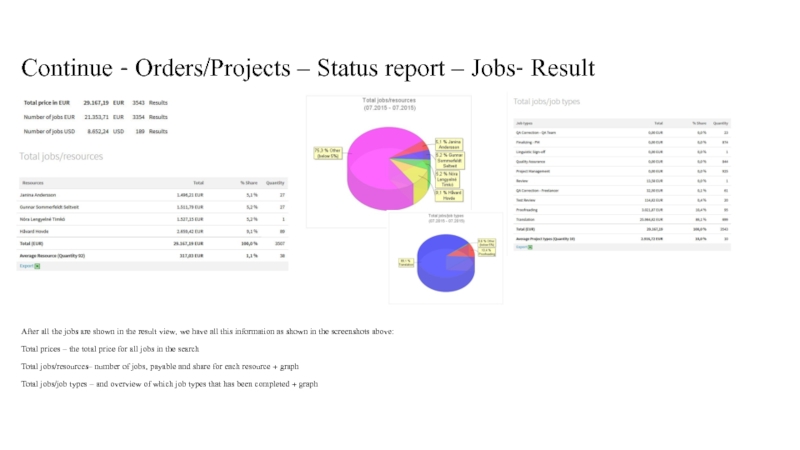
After all the
Total prices – the total price for all jobs in the search
Total jobs/resources– number of jobs, payable and share for each resource + graph
Total jobs/job types – and overview of which job types that has been completed + graph
Слайд 43Orders/Projects – Jobs chains
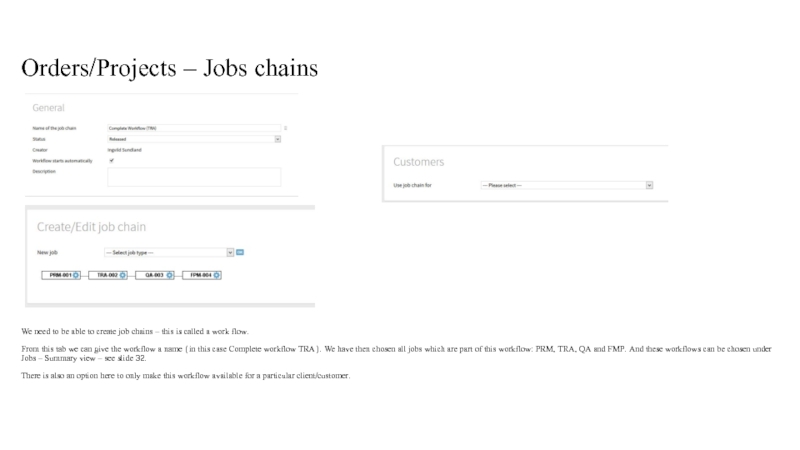
We need to be able to create job
From this tab we can give the workflow a name (in this case Complete workflow TRA). We have then chosen all jobs which are part of this workflow: PRM, TRA, QA and FMP. And these workflows can be chosen under Jobs – Summary view – see slide 32.
There is also an option here to only make this workflow available for a particular client/customer.
Слайд 44Orders/Projects – Templates – Order Template
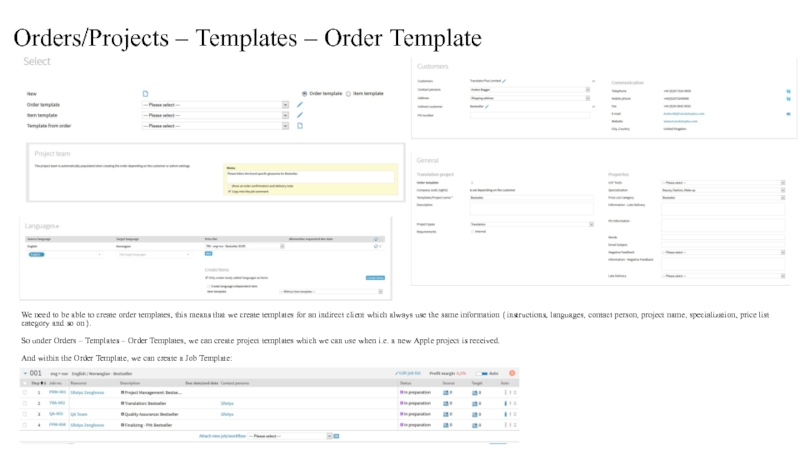
We need to be able to
So under Orders – Templates – Order Templates, we can create project templates which we can use when i.e. a new Apple project is received.
And within the Order Template, we can create a Job Template:
Слайд 45Invoices – via Dashboard – Billable items
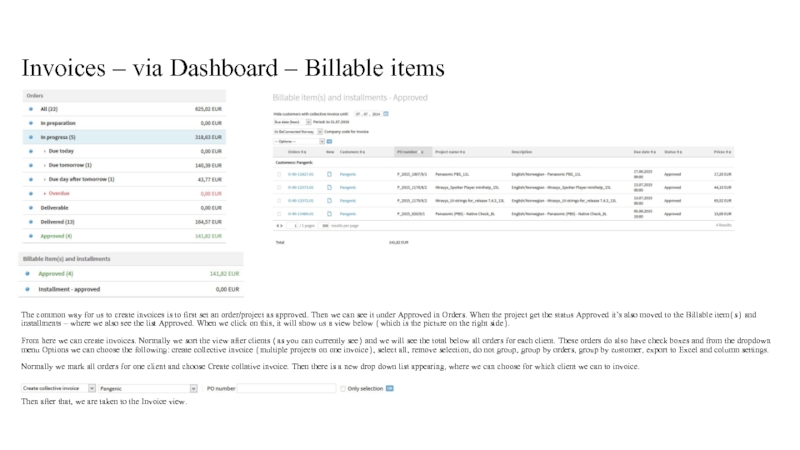
The common way for us
From here we can create invoices. Normally we sort the view after clients (as you can currently see) and we will see the total below all orders for each client. These orders do also have check boxes and from the dropdown menu Options we can choose the following: create collective invoice (multiple projects on one invoice), select all, remove selection, do not group, group by orders, group by customer, export to Excel and column settings.
Normally we mark all orders for one client and choose Create collative invoice. Then there is a new drop down list appearing, where we can choose for which client we can to invoice.
Then after that, we are taken to the Invoice view.
Слайд 46Invoices – via Dashboard – Invoice view – General + customers
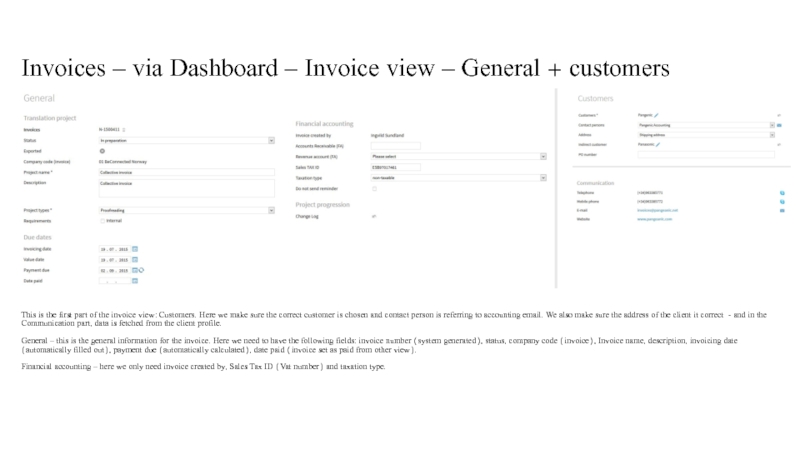
This
General – this is the general information for the invoice. Here we need to have the following fields: invoice number (system generated), status, company code (invoice), Invoice name, description, invoicing date (automatically filled out), payment due (automatically calculated), date paid (invoice set as paid from other view).
Financial accounting – here we only need invoice created by, Sales Tax ID (Vat number) and taxation type.
Слайд 47Invoices – via Dashboard – Invoice view – Items
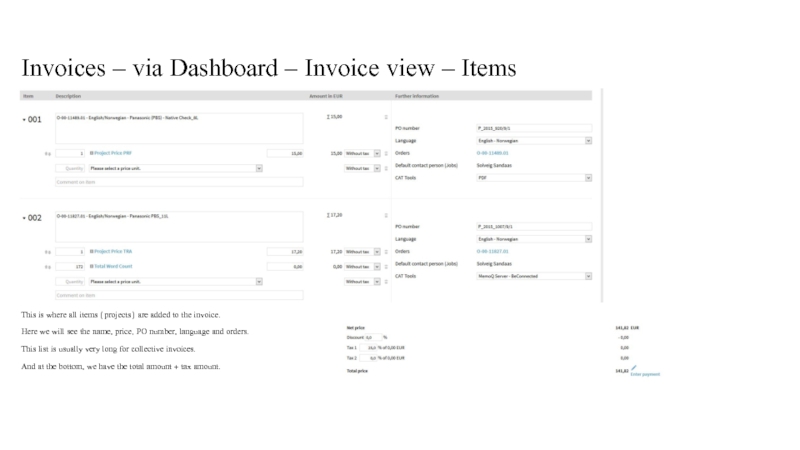
This is where
Here we will see the name, price, PO number, language and orders.
This list is usually very long for collective invoices.
And at the bottom, we have the total amount + tax amount.
Слайд 48Invoices – via Dashboard – Tasks and Output
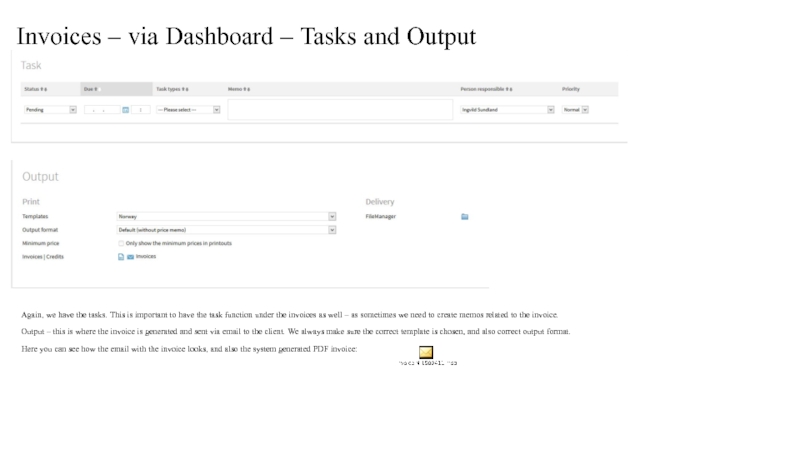
Again, we have the
Output – this is where the invoice is generated and sent via email to the client. We always make sure the correct template is chosen, and also correct output format.
Here you can see how the email with the invoice looks, and also the system generated PDF invoice:
Слайд 49Invoices – Receivables
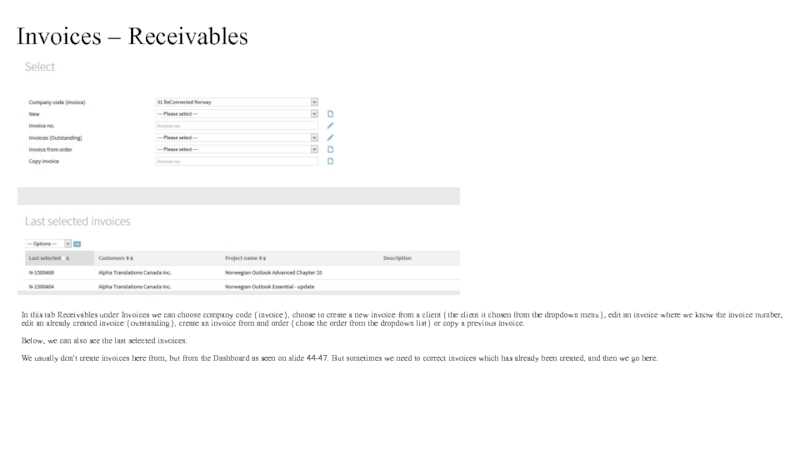
In this tab Receivables under Invoices we can choose
Below, we can also see the last selected invoices.
We usually don't create invoices here from, but from the Dashboard as seen on slide 44-47. But sometimes we need to correct invoices which has already been created, and then we go here.
Слайд 50Invoices – Credits
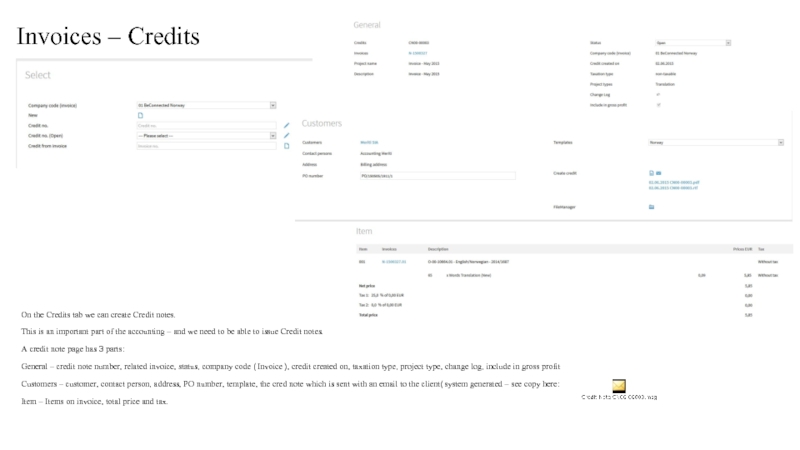
On the Credits tab we can create Credit notes.
This
A credit note page has 3 parts:
General – credit note number, related invoice, status, company code (Invoice), credit created on, taxation type, project type, change log, include in gross profit
Customers – customer, contact person, address, PO number, template, the cred note which is sent with an email to the client(system generated – see copy here:
Item – Items on invoice, total price and tax.
Слайд 51Invoices – Payables
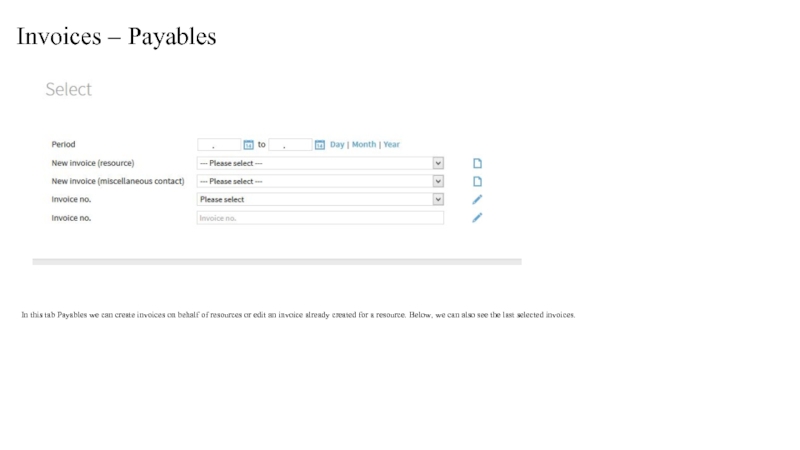
In this tab Payables we can create invoices on
Слайд 52Invoices – Payables – Resource invoice – General invoice data
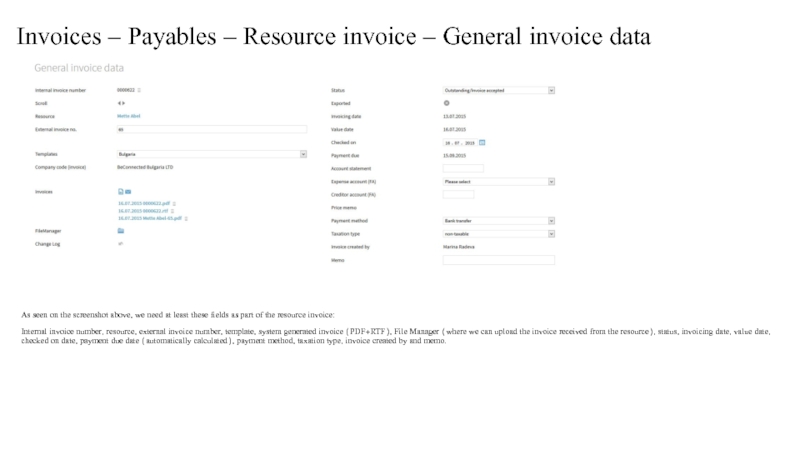
As seen
Internal invoice number, resource, external invoice number, template, system generated invoice (PDF+RTF), File Manager (where we can upload the invoice received from the resource), status, invoicing date, value date, checked on date, payment due date (automatically calculated), payment method, taxation type, invoice created by and memo.
Слайд 53Invoices – Payables – Resource invoice – Item – Edit invoice
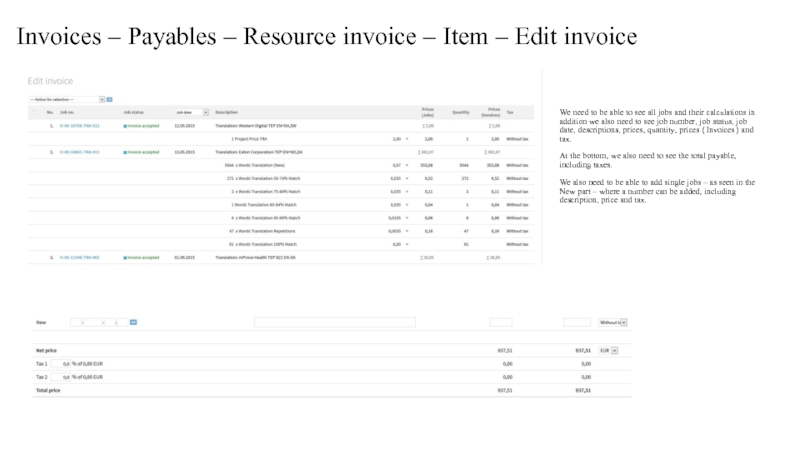
We
At the bottom, we also need to see the total payable, including taxes.
We also need to be able to add single jobs – as seen in the New part – where a number can be added, including description, price and tax.
Слайд 54Queries – Receivable
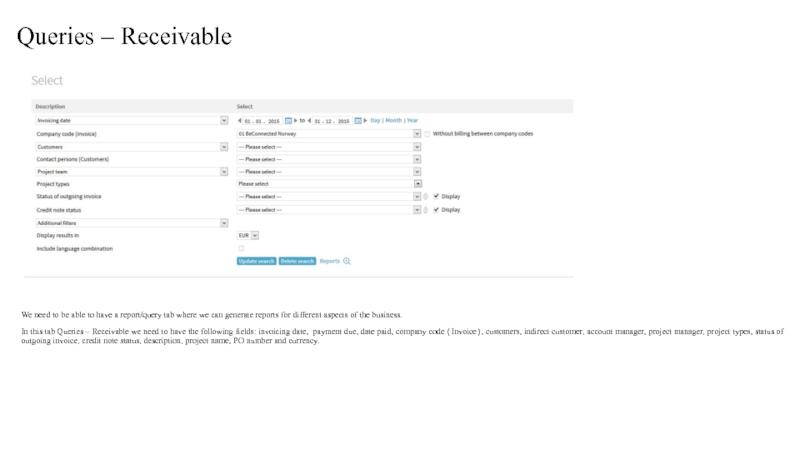
We need to be able to have a report/query
In this tab Queries – Receivable we need to have the following fields: invoicing date, payment due, date paid, company code (Invoice), customers, indirect customer, account manager, project manager, project types, status of outgoing invoice, credit note status, description, project name, PO number and currency.
Слайд 55Queries – Receivable - Results
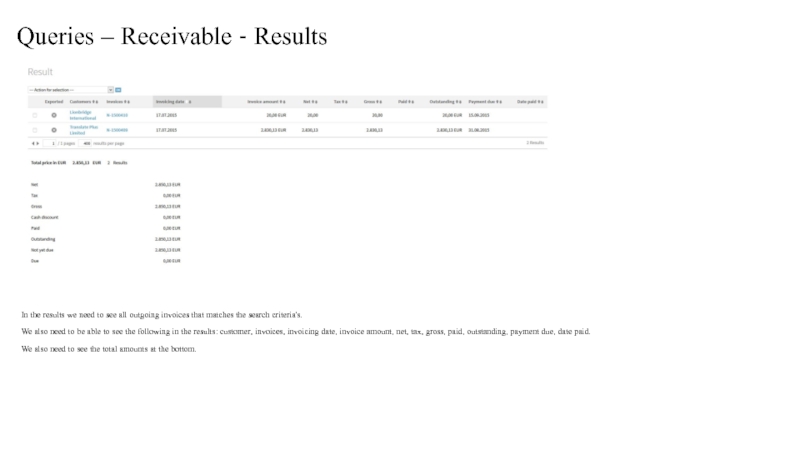
In the results we need to see
We also need to be able to see the following in the results: customer, invoices, invoicing date, invoice amount, net, tax, gross, paid, outstanding, payment due, date paid.
We also need to see the total amounts at the bottom.
Слайд 56Continue - Queries – Receivable - Results
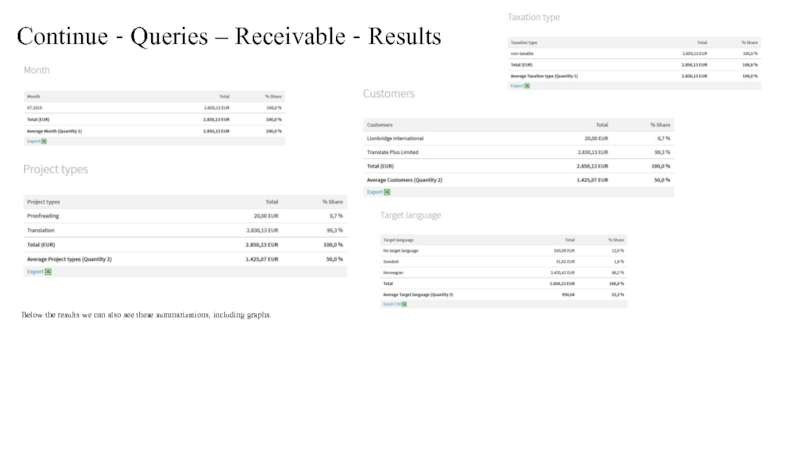
Below the results we can
Слайд 57Queries – Payable
In this tab Queries – Payable we need to
Слайд 58Queries – Payable- Results
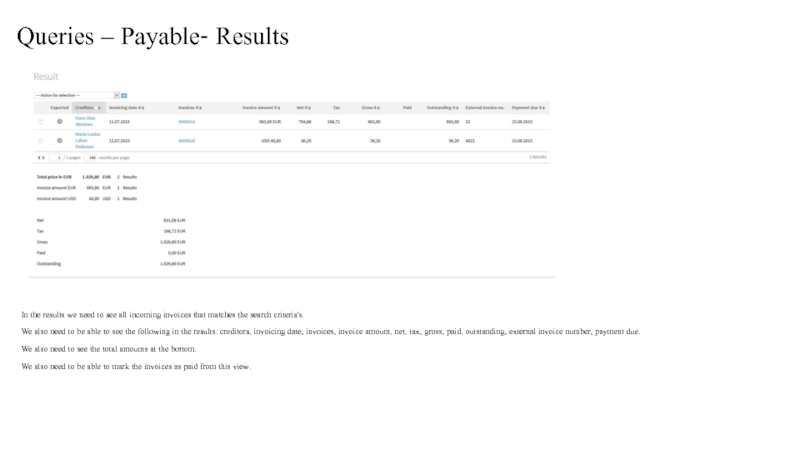
In the results we need to see all
We also need to be able to see the following in the results: creditors, invoicing date, invoices, invoice amount, net, tax, gross, paid, outstanding, external invoice number, payment due.
We also need to see the total amounts at the bottom.
We also need to be able to mark the invoices as paid from this view.
Слайд 59Continue - Queries – Payable - Results
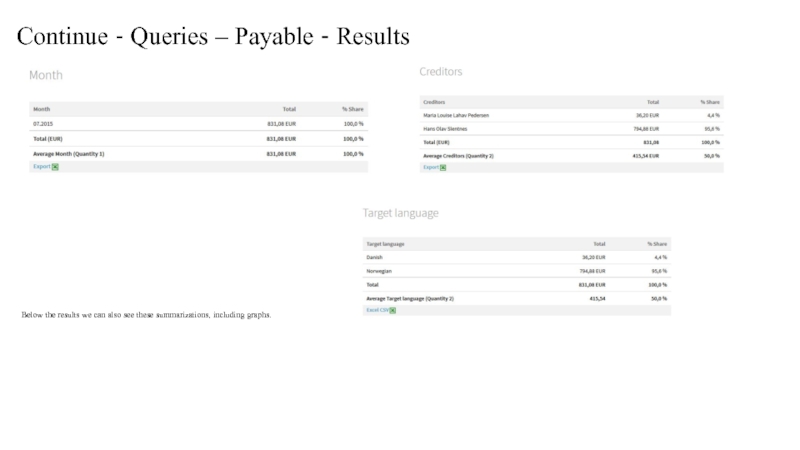
Below the results we can
Слайд 60Queries – Gross Profit
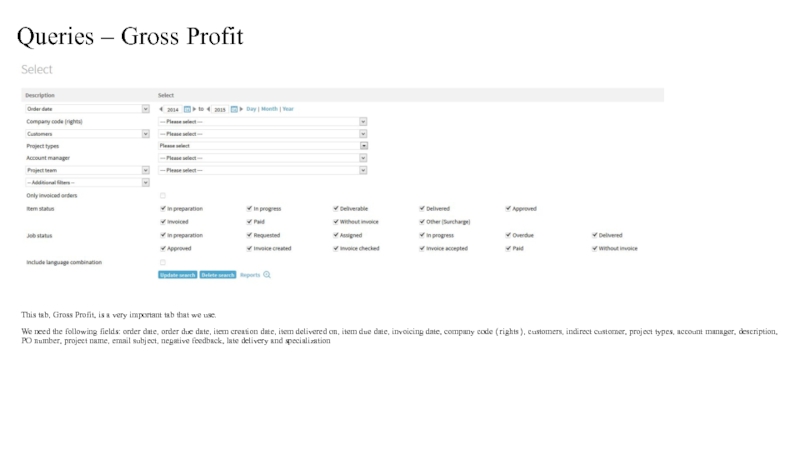
This tab, Gross Profit, is a very important
We need the following fields: order date, order due date, item creation date, item delivered on, item due date, invoicing date, company code (rights), customers, indirect customer, project types, account manager, description, PO number, project name, email subject, negative feedback, late delivery and specialization
Слайд 61Queries – Gross Profit - Results
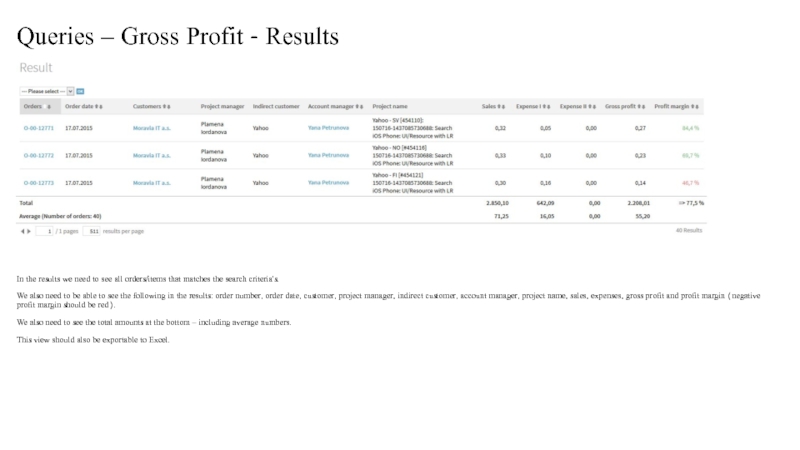
In the results we need to
We also need to be able to see the following in the results: order number, order date, customer, project manager, indirect customer, account manager, project name, sales, expenses, gross profit and profit margin (negative profit margin should be red).
We also need to see the total amounts at the bottom – including average numbers.
This view should also be exportable to Excel.
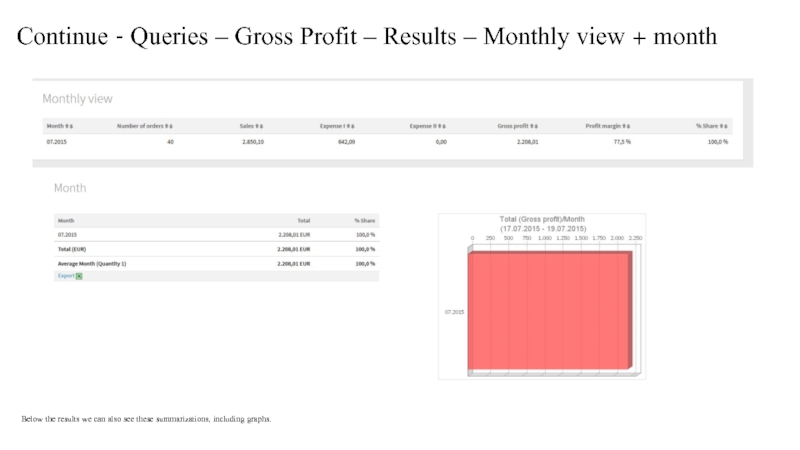
Слайд 62Continue - Queries – Gross Profit – Results – Monthly view
Below the results we can also see these summarizations, including graphs.
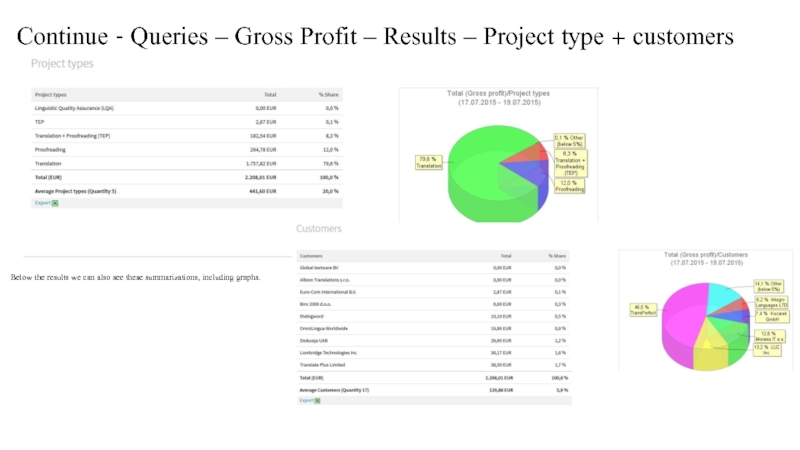
Слайд 63Continue - Queries – Gross Profit – Results – Project type
Below the results we can also see these summarizations, including graphs.
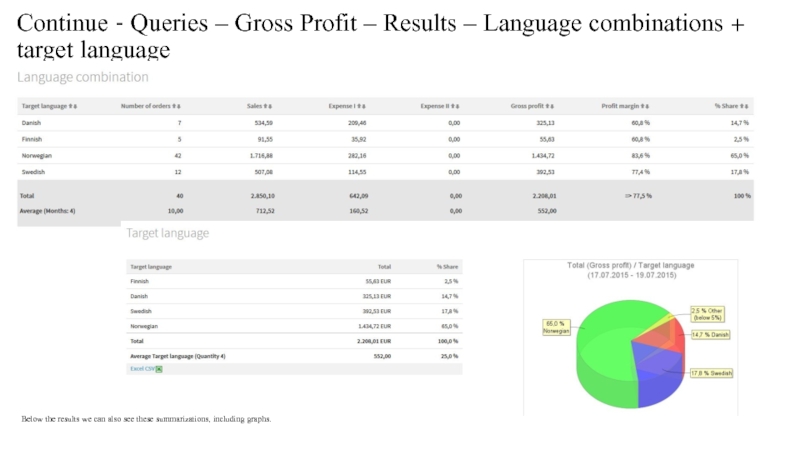
Слайд 64Continue - Queries – Gross Profit – Results – Language combinations
Below the results we can also see these summarizations, including graphs.
Слайд 65Queries – Gross Profit Summary
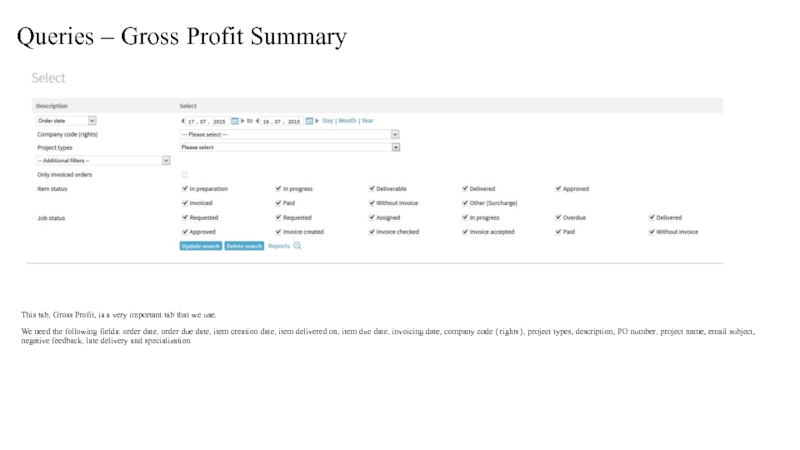
This tab, Gross Profit, is a very
We need the following fields: order date, order due date, item creation date, item delivered on, item due date, invoicing date, company code (rights), project types, description, PO number, project name, email subject, negative feedback, late delivery and specialization
Слайд 66Queries – Gross Profit Summary - Results
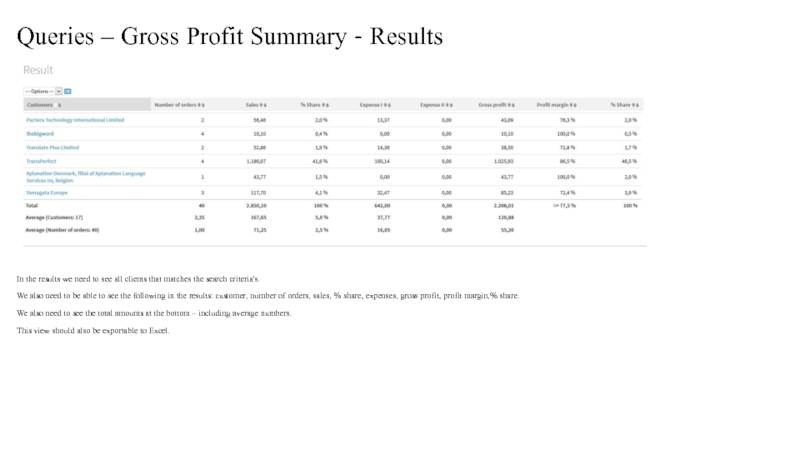
In the results we need
We also need to be able to see the following in the results: customer, number of orders, sales, % share, expenses, gross profit, profit margin,% share.
We also need to see the total amounts at the bottom – including average numbers.
This view should also be exportable to Excel.
Слайд 67Queries – New customers
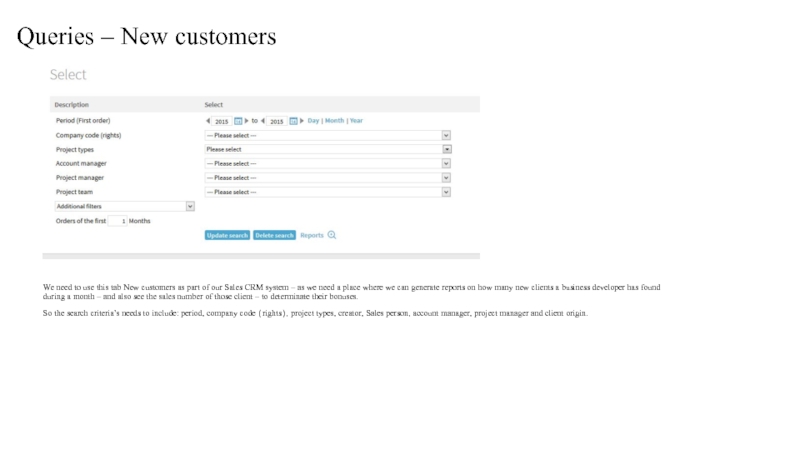
We need to use this tab New customers
So the search criteria’s needs to include: period, company code (rights), project types, creator, Sales person, account manager, project manager and client origin.
Слайд 68Queries – New customers - Results
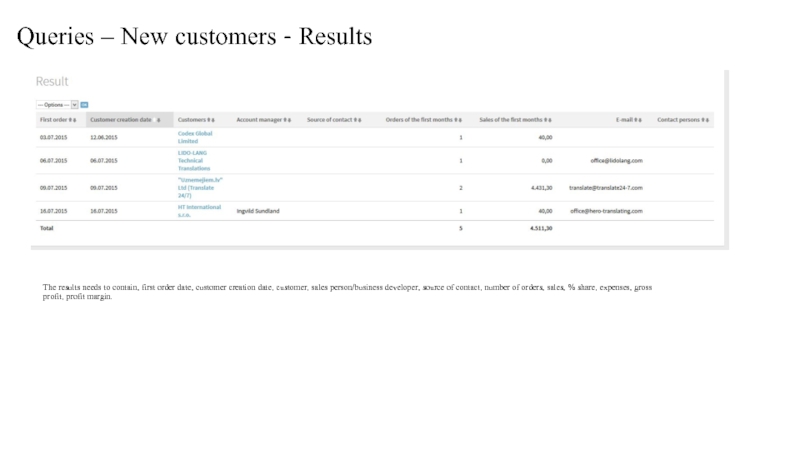
The results needs to contain, first
Слайд 69Queries – Change log
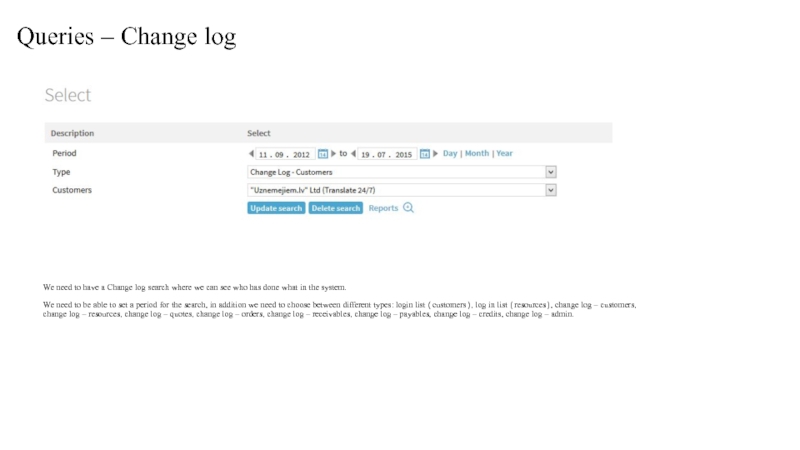
We need to have a Change log search
We need to be able to set a period for the search, in addition we need to choose between different types: login list (customers), log in list (resources), change log – customers, change log – resources, change log – quotes, change log – orders, change log – receivables, change log – payables, change log – credits, change log – admin.
Слайд 70Queries – Change log - Results
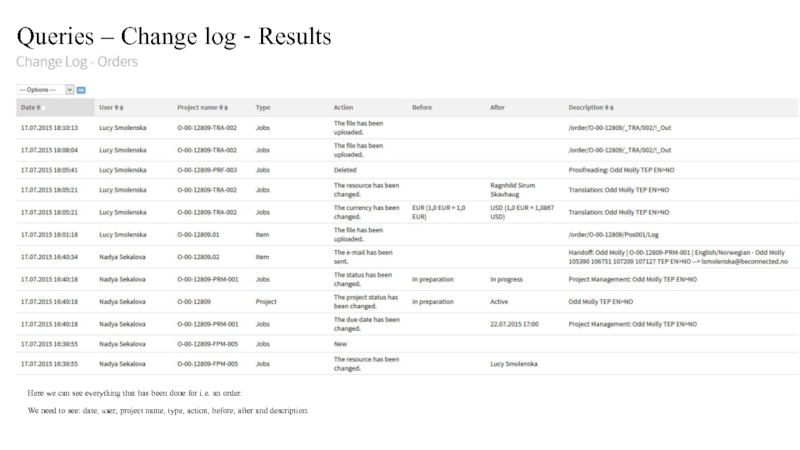
Here we can see everything that
We need to see: date, user, project name, type, action, before, after and description.
Слайд 71Queries – Tasks
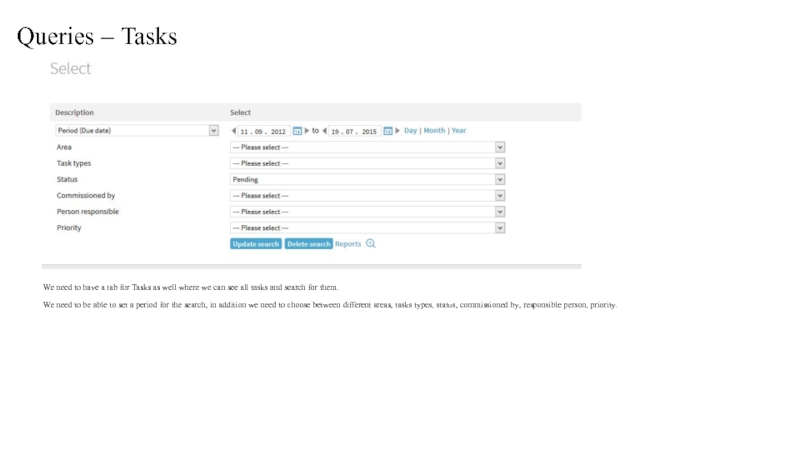
We need to have a tab for Tasks as
We need to be able to set a period for the search, in addition we need to choose between different areas, tasks types, status, commissioned by, responsible person, priority.
Слайд 72Queries – Tasks - Results
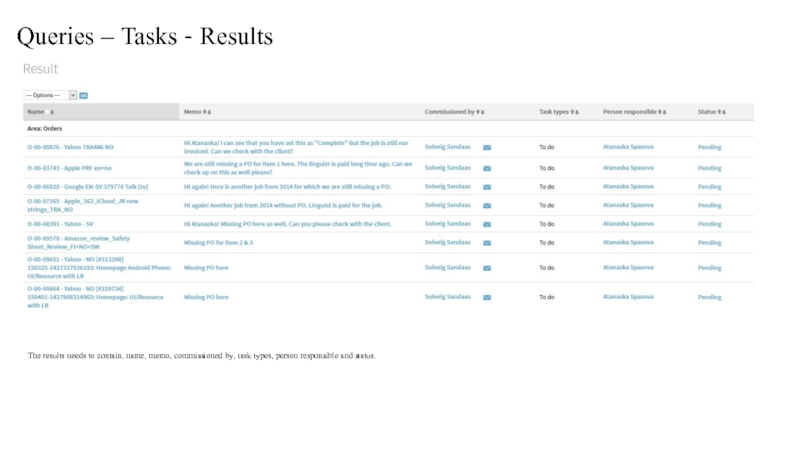
The results needs to contain, name, memo,
Слайд 73Queries – Cash flow
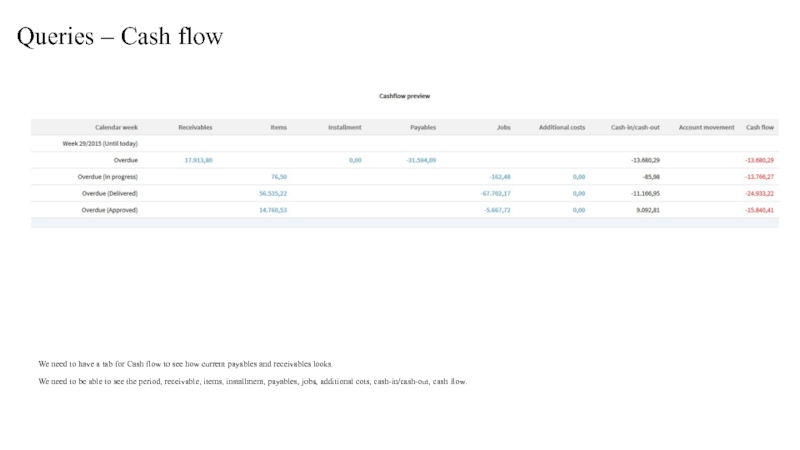
We need to have a tab for Cash
We need to be able to see the period, receivable, items, installment, payables, jobs, additional cots, cash-in/cash-out, cash flow.
Слайд 74Admin – Settings - Email
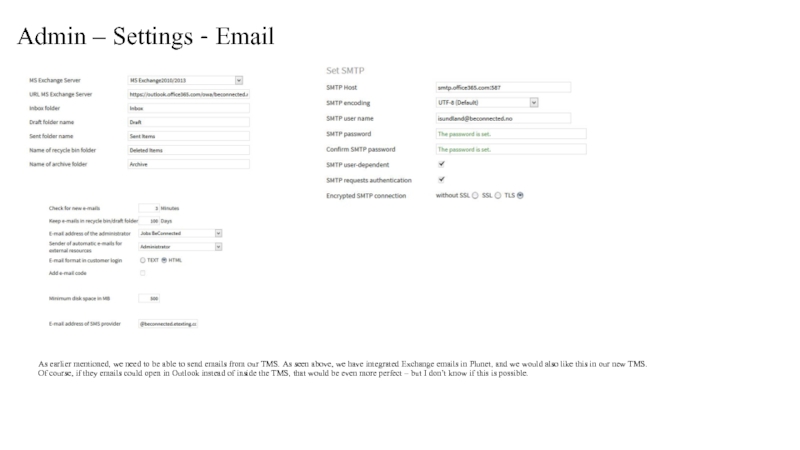
As earlier mentioned, we need to be
Слайд 75Admin – Settings – System values
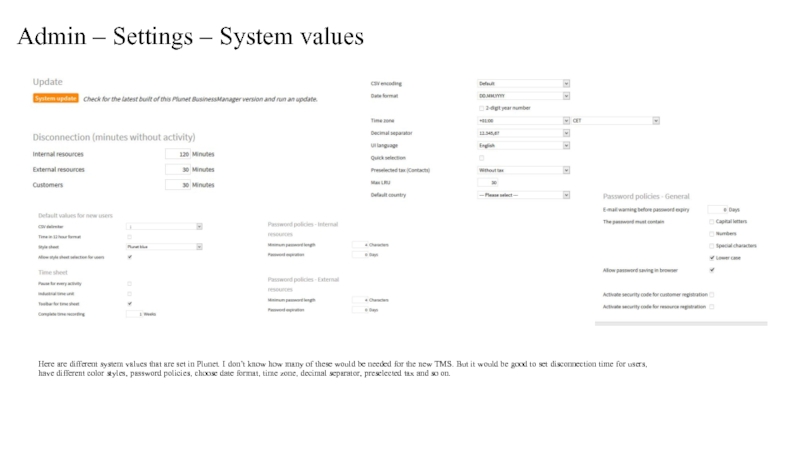
Here are different system values that
Слайд 76Admin – Settings – System paths
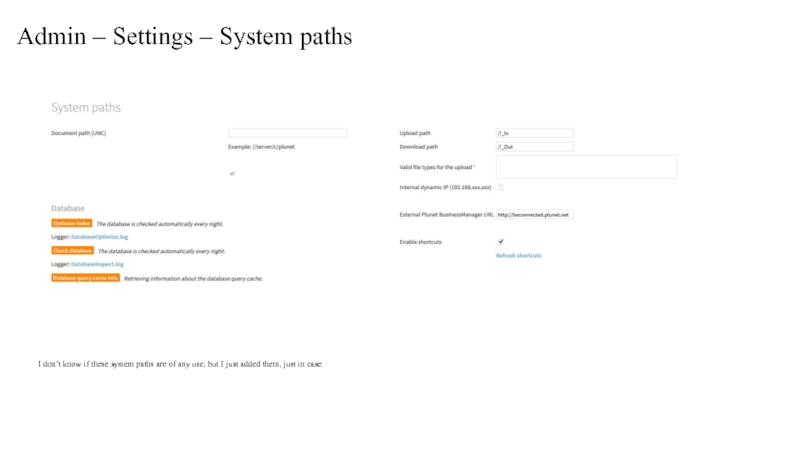
I don’t know if these system
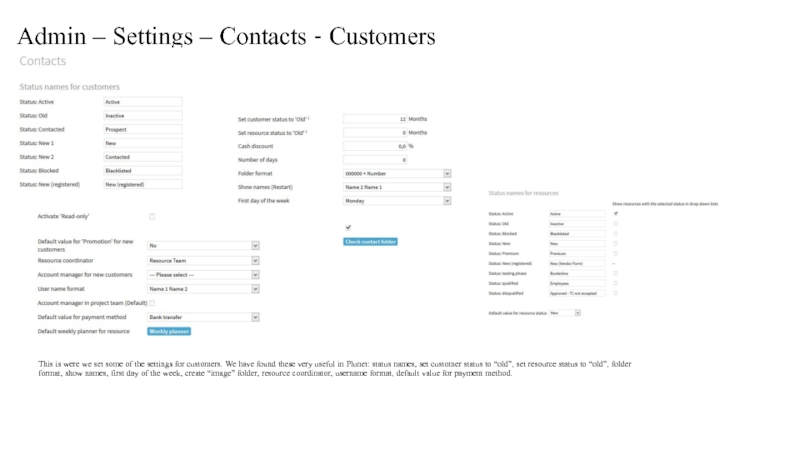
Слайд 78Admin – Settings – Contacts - Customers
This is were we set
Слайд 79Admin – Settings – Quotes
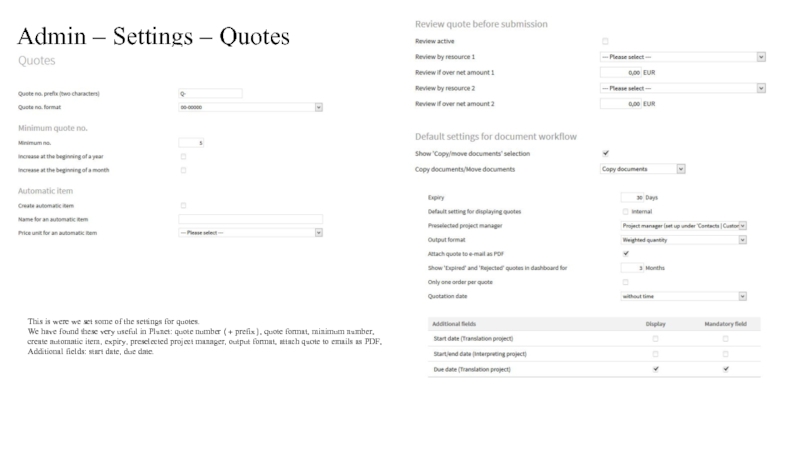
This is were we set some of
We have found these very useful in Plunet: quote number (+ prefix), quote format, minimum number,
create automatic item, expiry, preselected project manager, output format, attach quote to emails as PDF,
Additional fields: start date, due date.
Слайд 80Admin – Settings – Orders
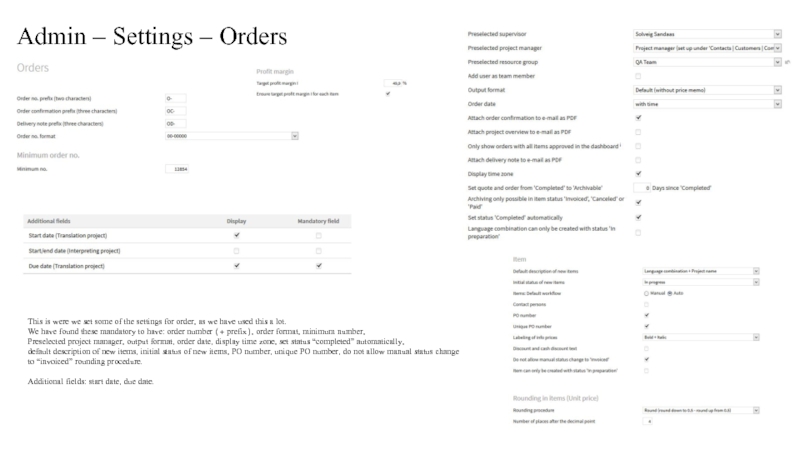
This is were we set some of
We have found these mandatory to have: order number (+ prefix), order format, minimum number,
Preselected project manager, output format, order date, display time zone, set status “completed” automatically,
default description of new items, initial status of new items, PO number, unique PO number, do not allow manual status change
to “invoiced” rounding procedure.
Additional fields: start date, due date.
Слайд 81Admin – Settings – Jobs
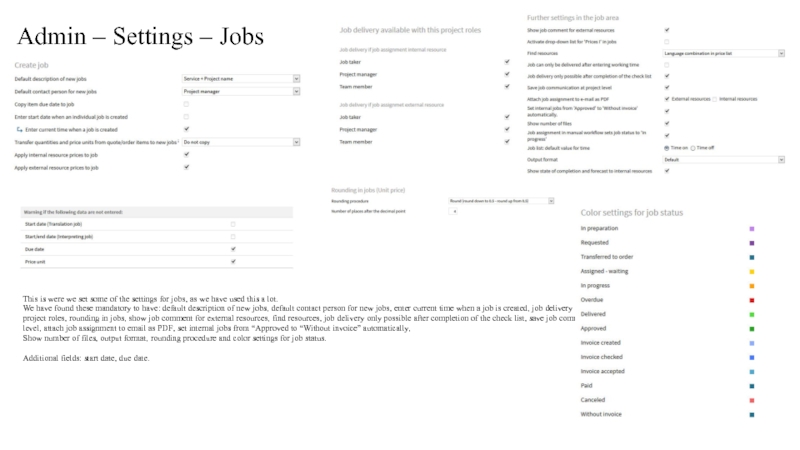
This is were we set some of
We have found these mandatory to have: default description of new jobs, default contact person for new jobs, enter current time when a job is created, job delivery available with this project roles, rounding in jobs, show job comment for external resources, find resources, job delivery only possible after completion of the check list, save job communication at job level, attach job assignment to email as PDF, set internal jobs from “Approved to “Without invoice” automatically,
Show number of files, output format, rounding procedure and color settings for job status.
Additional fields: start date, due date.
Слайд 82Admin – Settings – Company code
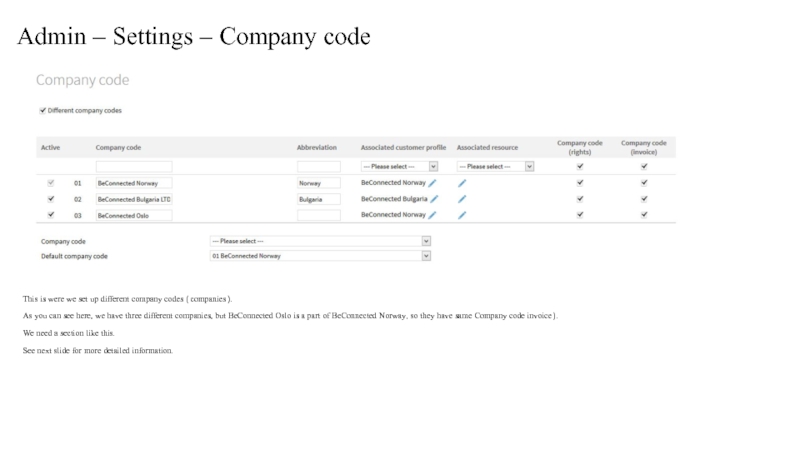
This is were we set up
As you can see here, we have three different companies, but BeConnected Oslo is a part of BeConnected Norway, so they have same Company code invoice).
We need a section like this.
See next slide for more detailed information.
Слайд 83Admin – Settings – Company codes – Receivables Settings
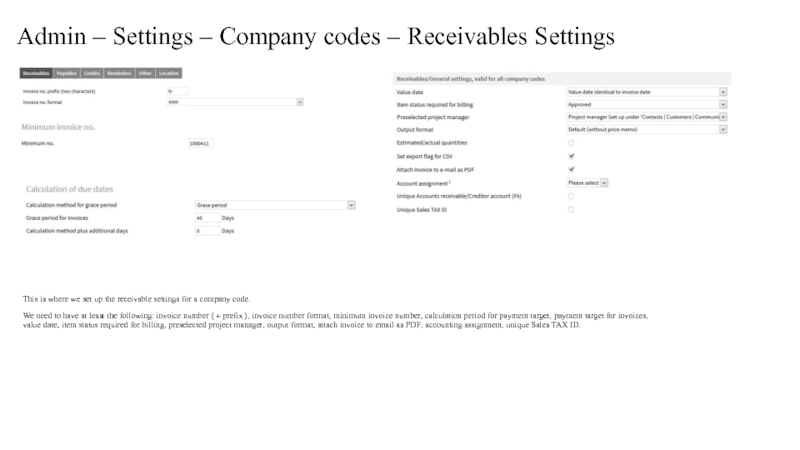
This is where
We need to have at least the following: invoice number (+ prefix), invoice number format, minimum invoice number, calculation period for payment target, payment target for invoices, value date, item status required for billing, preselected project manager, output format, attach invoice to email as PDF, accounting assignment, unique Sales TAX ID.
Слайд 84Admin – Settings – Company codes – Payables + Credits
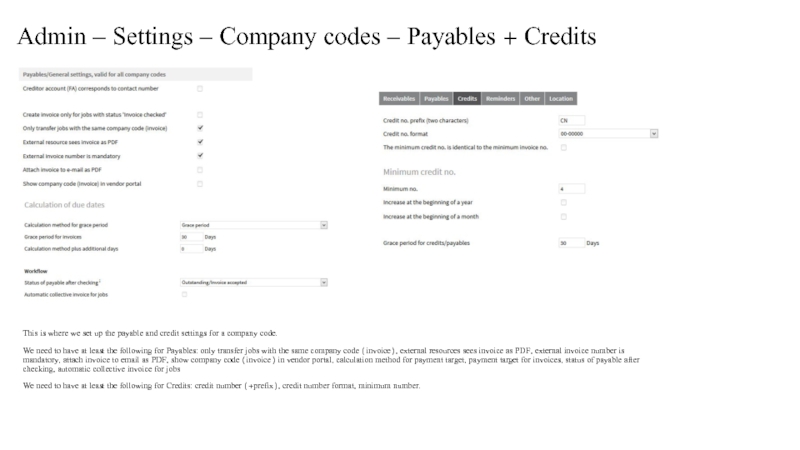
This is
We need to have at least the following for Payables: only transfer jobs with the same company code (invoice), external resources sees invoice as PDF, external invoice number is mandatory, attach invoice to email as PDF, show company code (invoice) in vendor portal, calculation method for payment target, payment target for invoices, status of payable after checking, automatic collective invoice for jobs
We need to have at least the following for Credits: credit number (+prefix), credit number format, minimum number.
Слайд 85Admin – Settings – Company codes – Reminders + Other
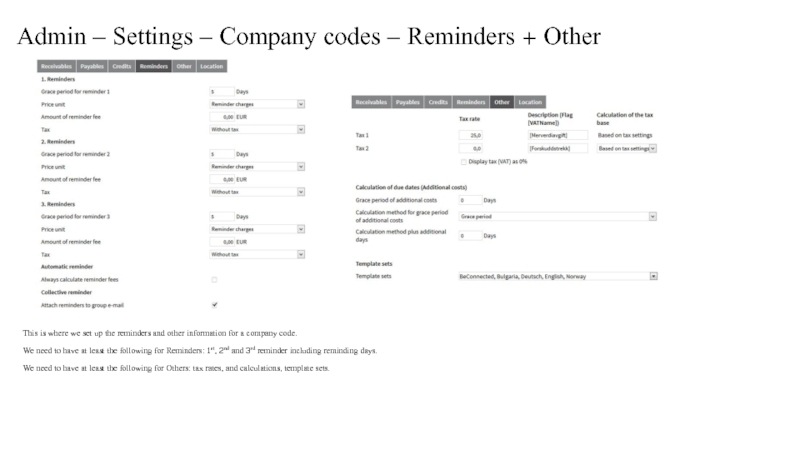
This is
We need to have at least the following for Reminders: 1st, 2nd and 3rd reminder including reminding days.
We need to have at least the following for Others: tax rates, and calculations, template sets.
Слайд 86Admin – Users – Internal and External resources
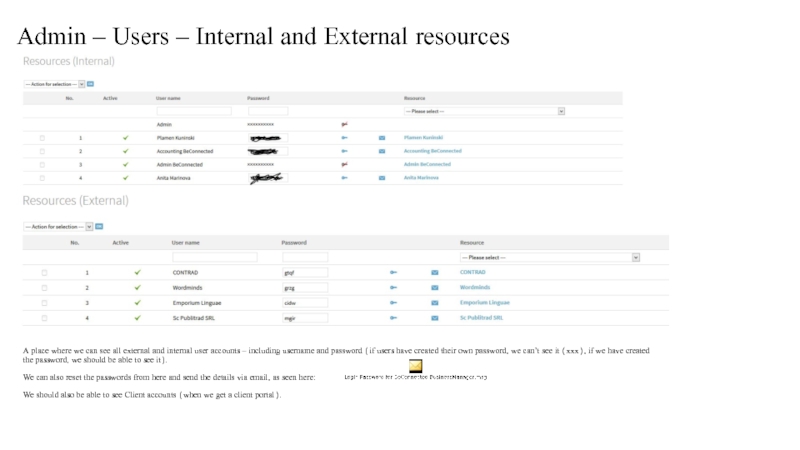
A place where we
We can also reset the passwords from here and send the details via email, as seen here:
We should also be able to see Client accounts (when we get a client portal).
Слайд 87Admin – Users – Internal and External resources – disable log
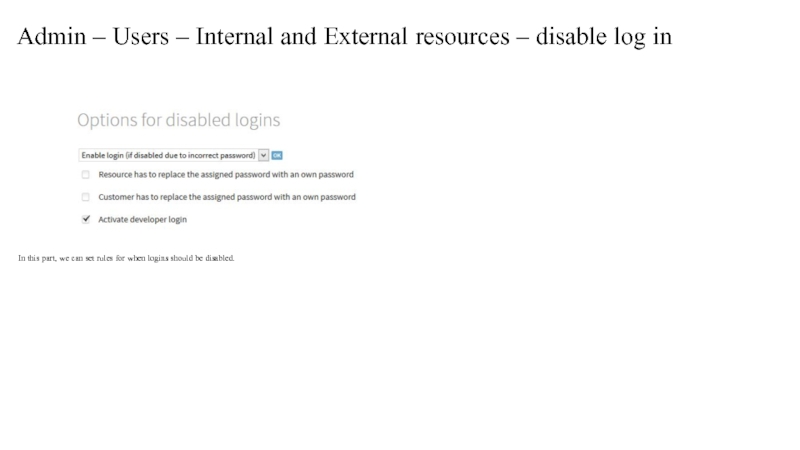
In this part, we can set rules for when logins should be disabled.
Слайд 88Admin – Rights – Resources Internal
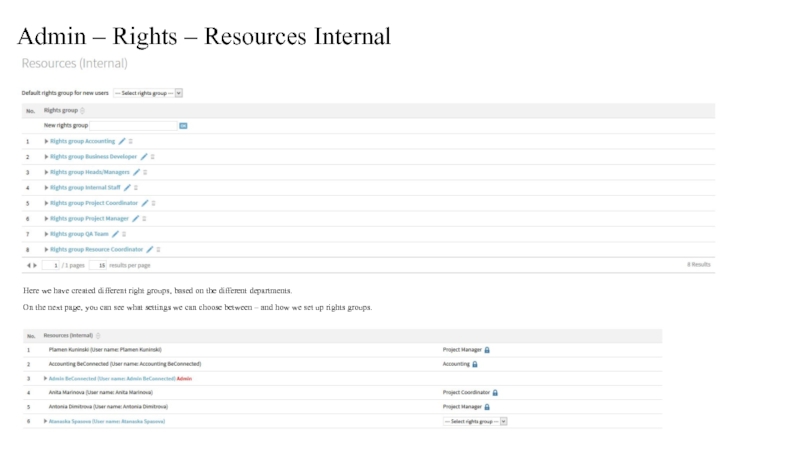
Here we have created different right
On the next page, you can see what settings we can choose between – and how we set up rights groups.
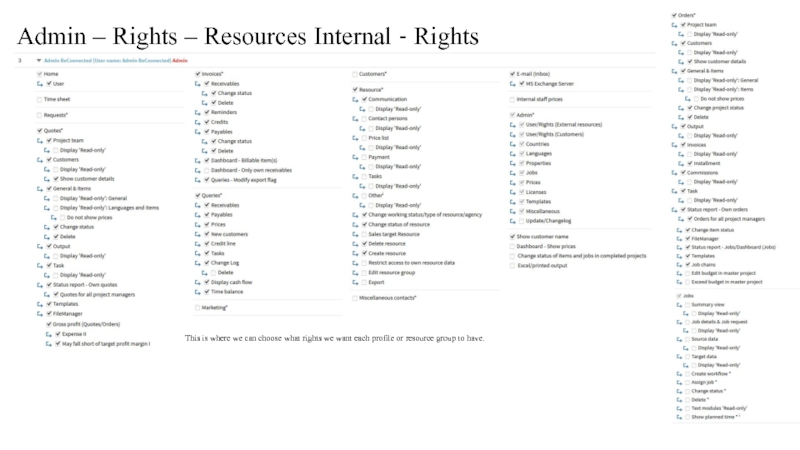
Слайд 89Admin – Rights – Resources Internal - Rights
This is where we
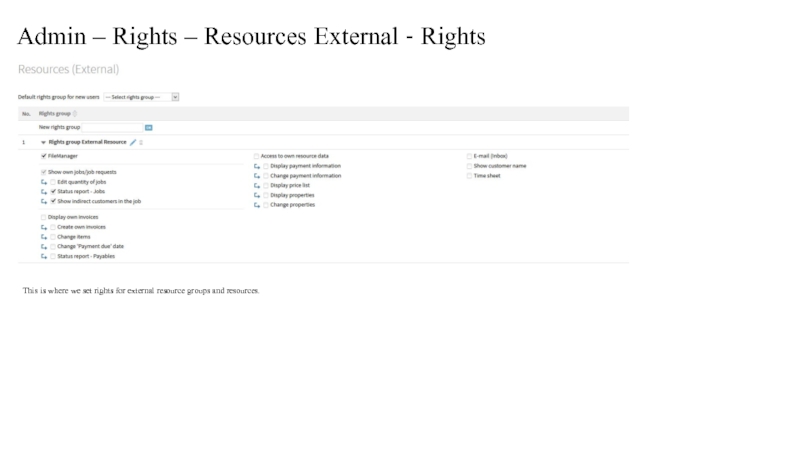
Слайд 90Admin – Rights – Resources External - Rights
This is where we
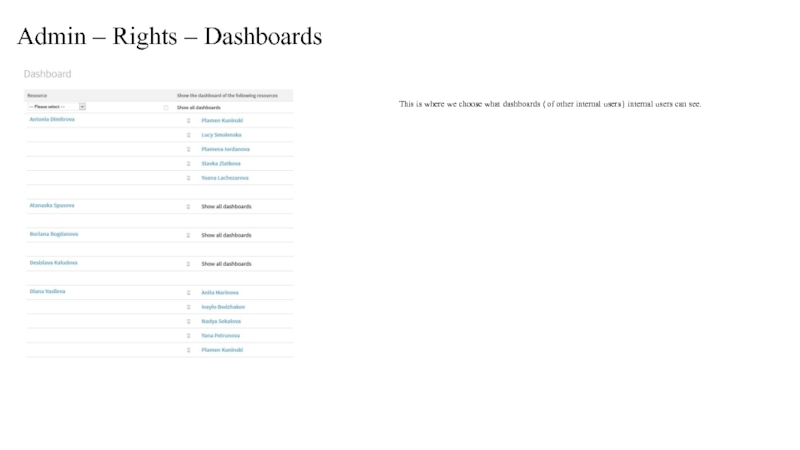
Слайд 91Admin – Rights – Dashboards
This is where we choose what dashboards
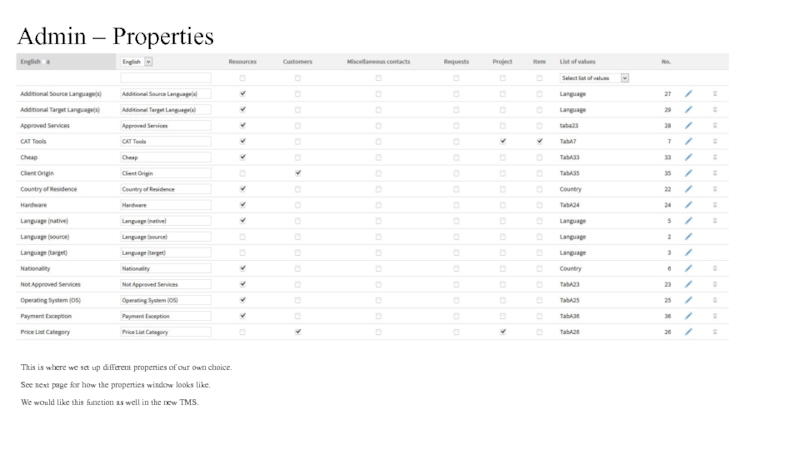
Слайд 92Admin – Properties
This is where we set up different properties of
See next page for how the properties window looks like.
We would like this function as well in the new TMS.
Слайд 93Admin – Properties – creation window.
Here we add all the subcategories
Слайд 94Admin – Jobs
We can also create jobs (like properties).
See next page
We would like this function as well in the new TMS.
Слайд 95Admin – Jobs – window – work instructions
Here we can set
Слайд 96Admin – Jobs – window – properties and CAT interface
Here we
Слайд 98Admin – Prices
Here we can set up different price groups and
We can also administrate general customer and resource price lists.
Слайд 99Admin – Licenses
Here we can see an overview of which users
Слайд 100Admin – CAT interface
The TMS system needs to be able to
We can provide logs from all software’s so you can see how you need to integrate them into the TMS.
Also, for each project (item + job) we need to be able to upload logs (as above) and the TMS will read it and we can calculate receivable and payable based on the imported log.
Слайд 101Admin – Miscellaneous
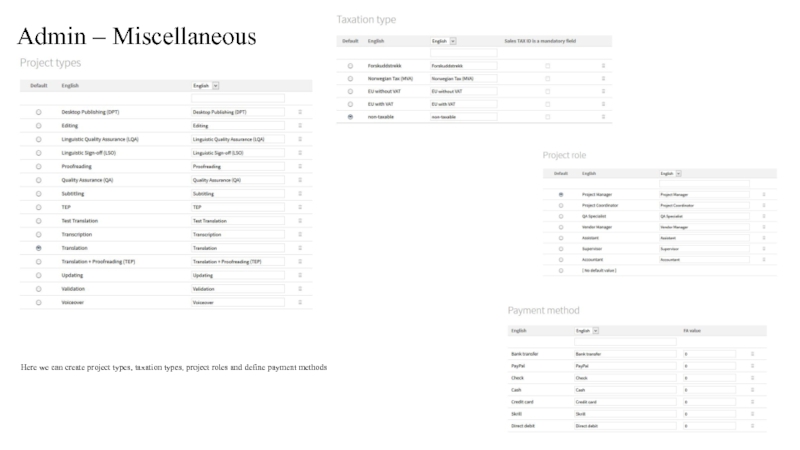
Here we can create project types, taxation types, project
Слайд 102Admin – Miscellaneous - Currencies
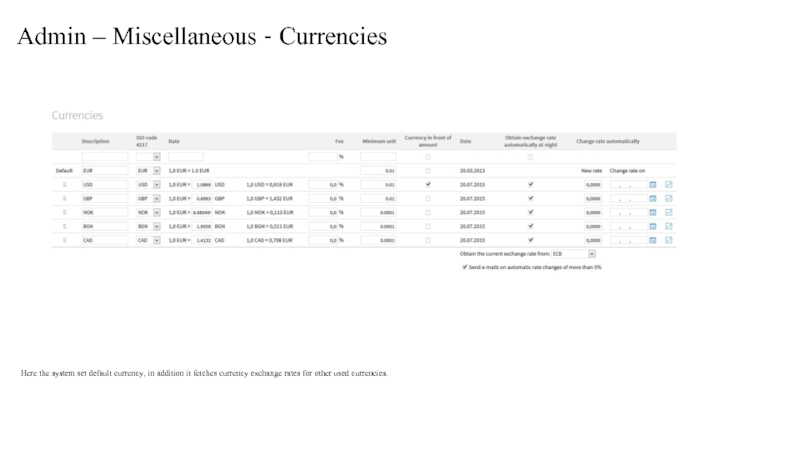
Here the system set default currency, in
Слайд 103Admin – Miscellaneous – User Info
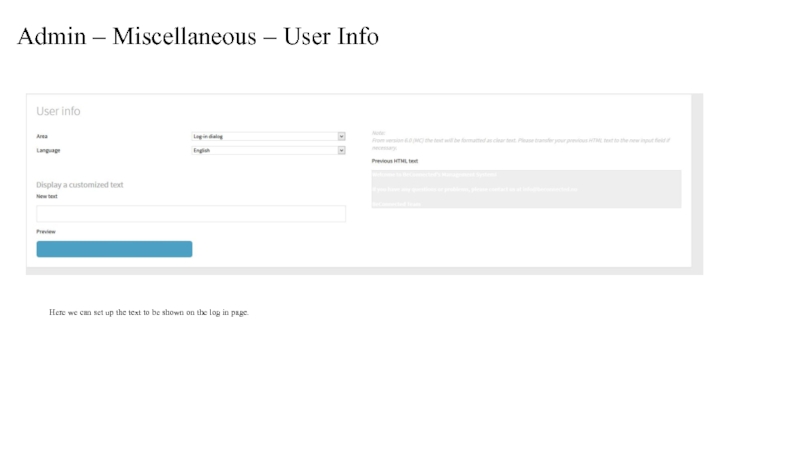
Here we can set up the
Слайд 104Admin – Miscellaneous – Task types + Rejection of quotes
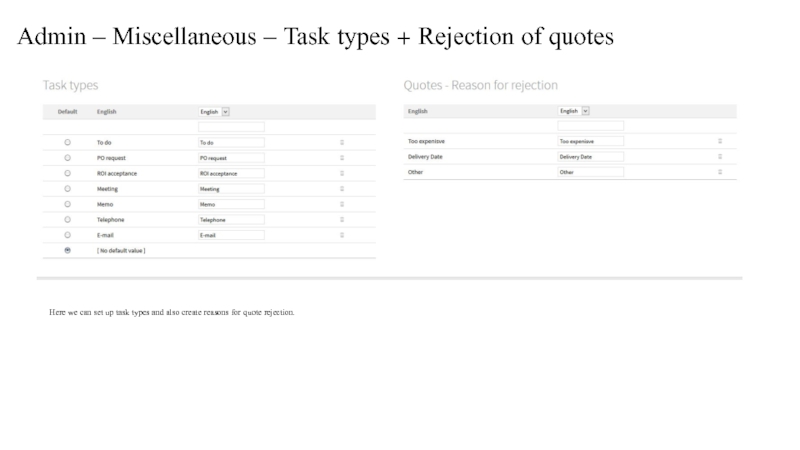
Here we
Слайд 105Admin – Templates – Template sets
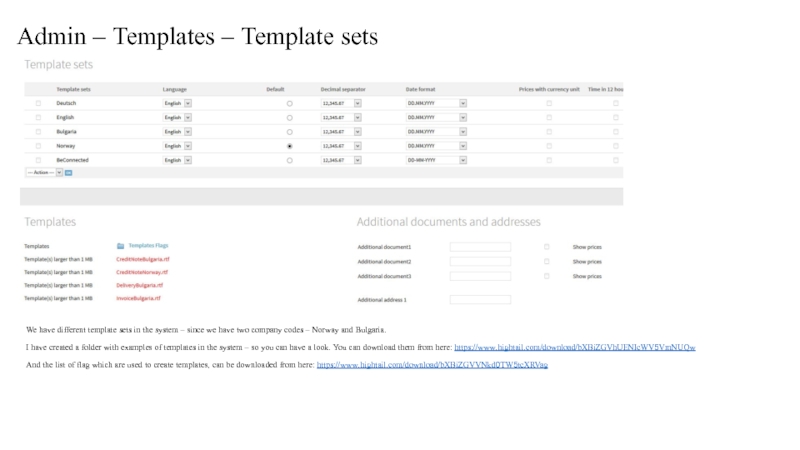
We have different template sets in
I have created a folder with examples of templates in the system – so you can have a look. You can download them from here: https://www.hightail.com/download/bXBiZGVhUENIcWV5VmNUQw
And the list of flag which are used to create templates, can be downloaded from here: https://www.hightail.com/download/bXBiZGVVNkd0TW5tcXRVag
Слайд 106Admin – Templates – Default expressions
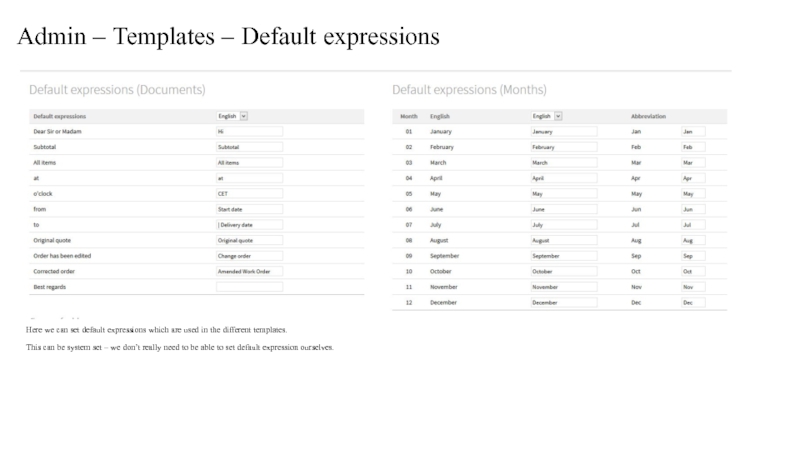
Here we can set default expressions
This can be system set – we don’t really need to be able to set default expression ourselves.
Слайд 107Admin – Templates – Email
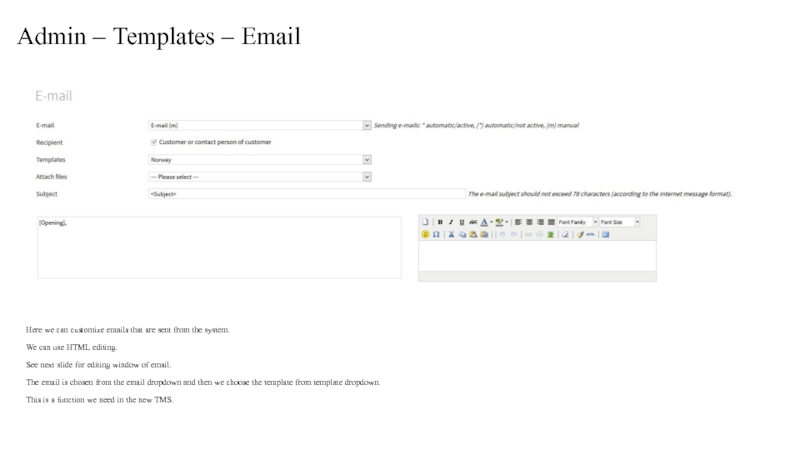
Here we can customize emails that are
We can use HTML editing.
See next slide for editing window of email.
The email is chosen from the email dropdown and then we choose the template from template dropdown.
This is a function we need in the new TMS.
Слайд 108Continue - Admin – Templates – Email
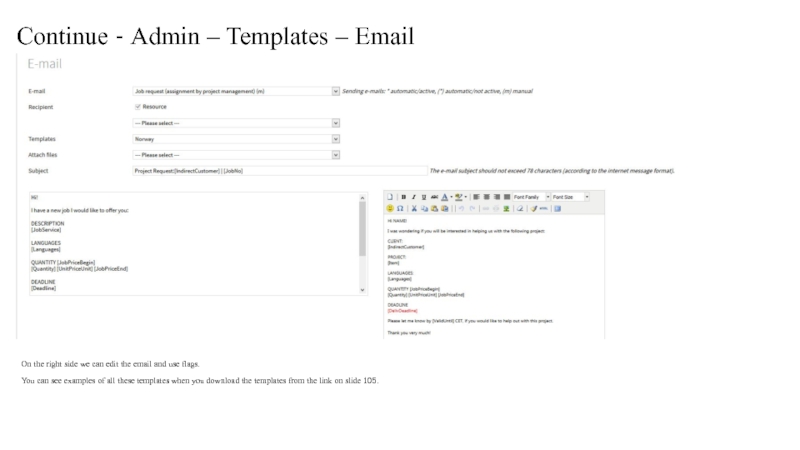
On the right side we
You can see examples of all these templates when you download the templates from the link on slide 105.
Слайд 109Admin – Folder sets
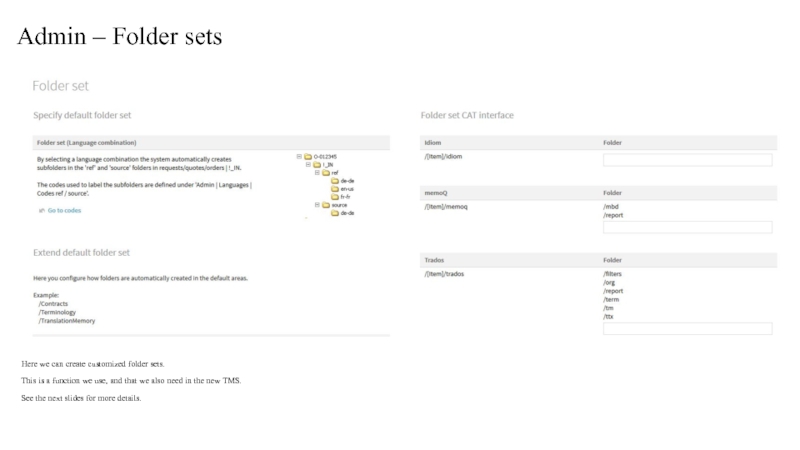
Here we can create customized folder sets.
This is
See the next slides for more details.
Слайд 110Continue - Admin – Folder sets - Areas
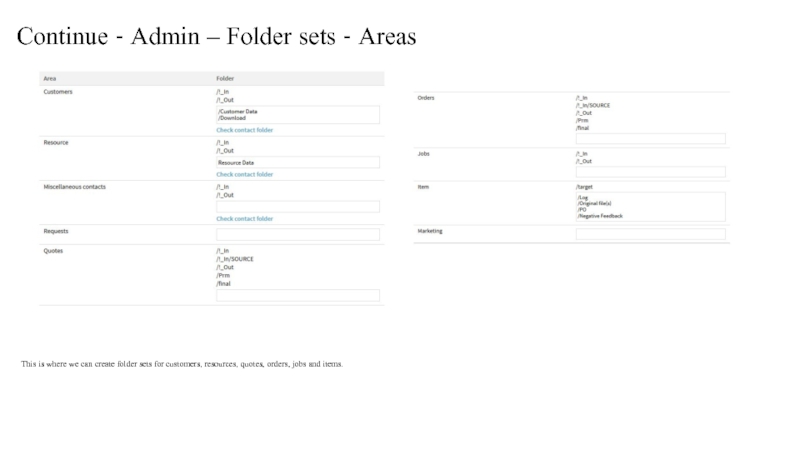
This is where we
Слайд 111Continue - Admin – Folder sets - for templates
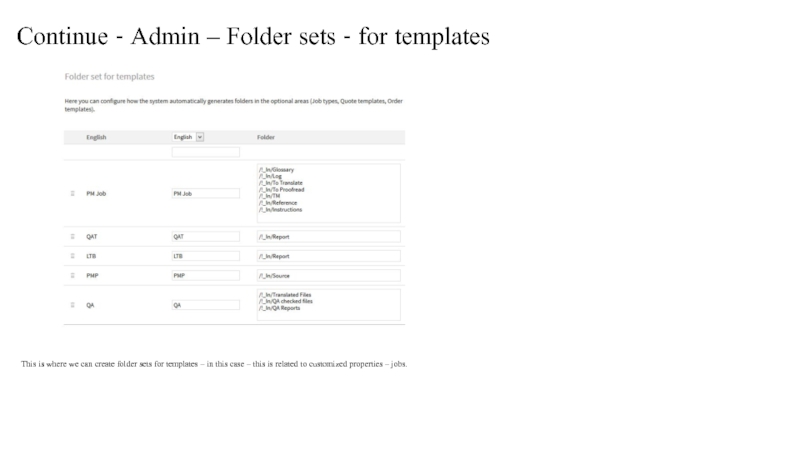
This is where
Слайд 112Admin – Text modules
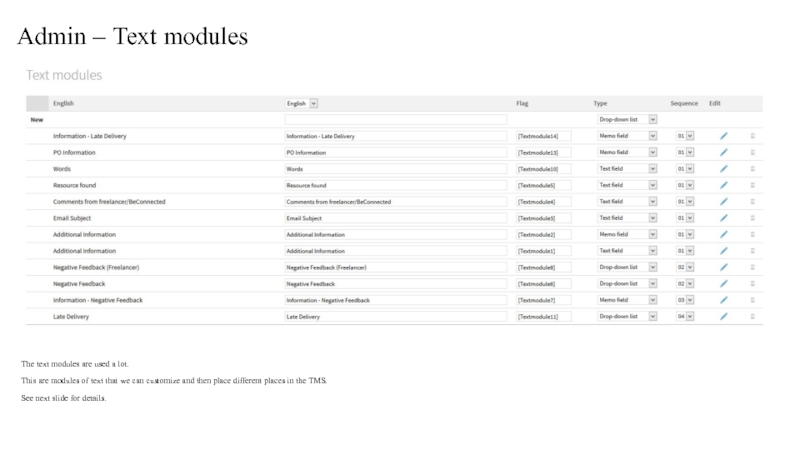
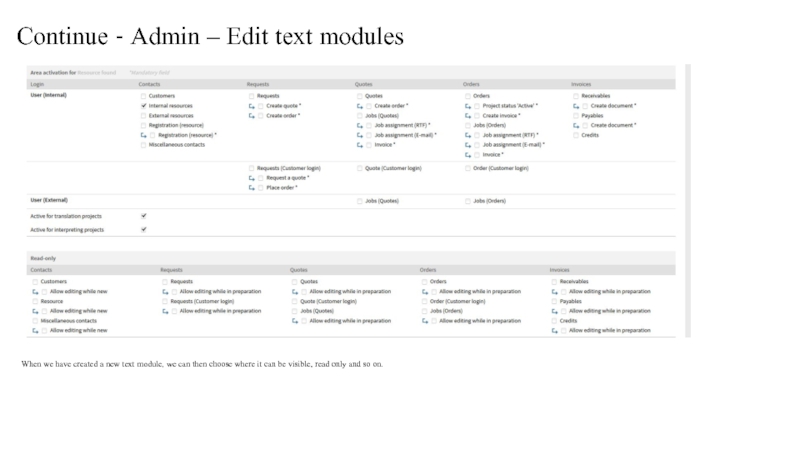
The text modules are used a lot.
This are
See next slide for details.
Слайд 113Continue - Admin – Edit text modules
When we have created a
Слайд 114User profile – dashboard - Email
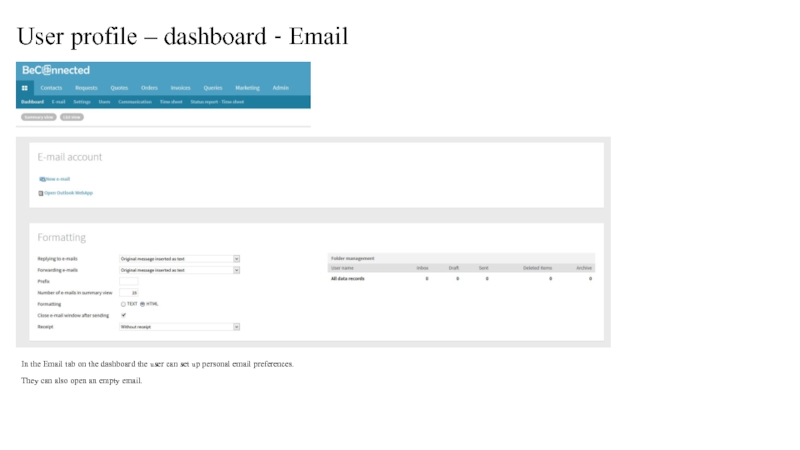
In the Email tab on the
They can also open an empty email.
Слайд 115User profile – Settings - Miscellaneous
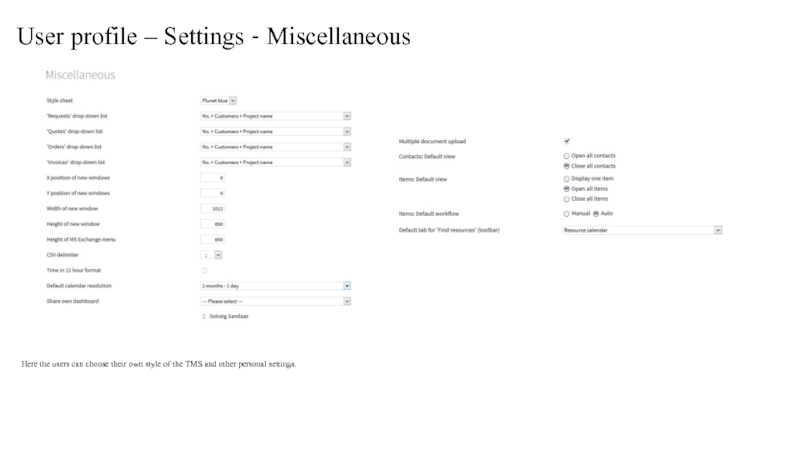
Here the users can choose their
Слайд 117User profile – Settings – Email signature
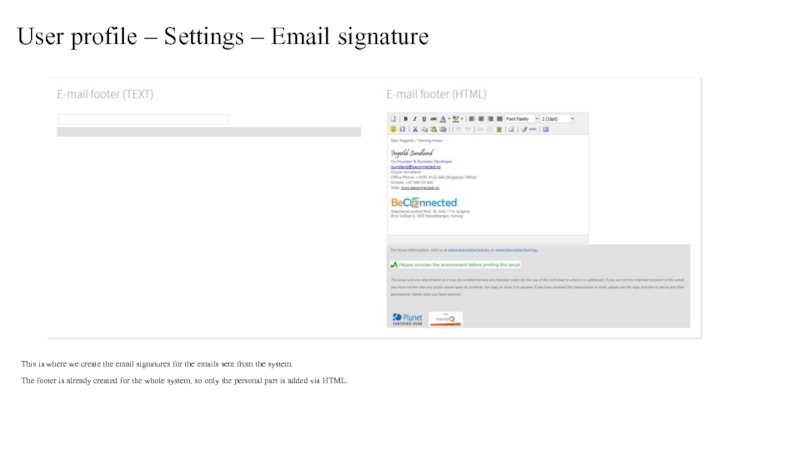
This is where we create
The footer is already created for the whole system, so only the personal part is added via HTML.
Слайд 118Resource Registration form – part 1
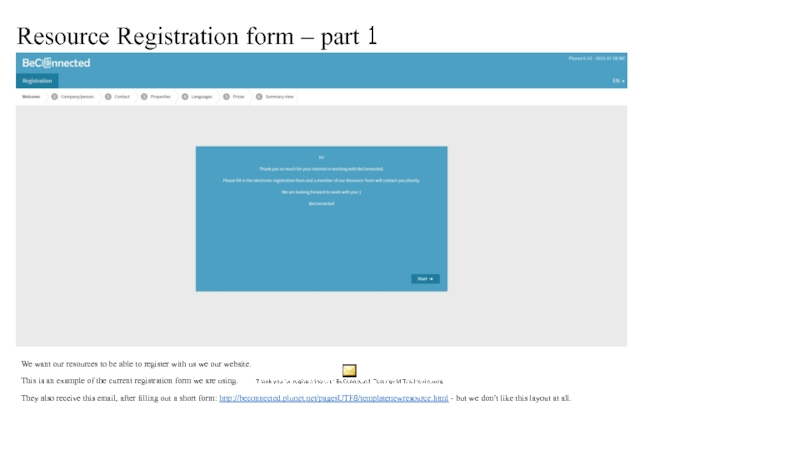
We want our resources to be
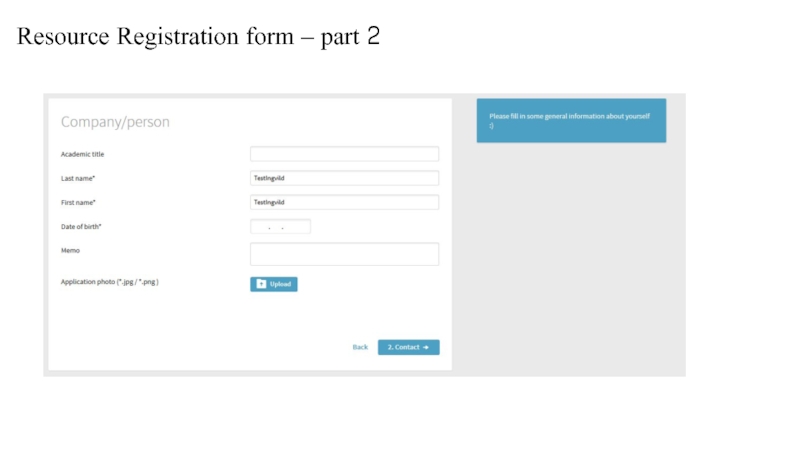
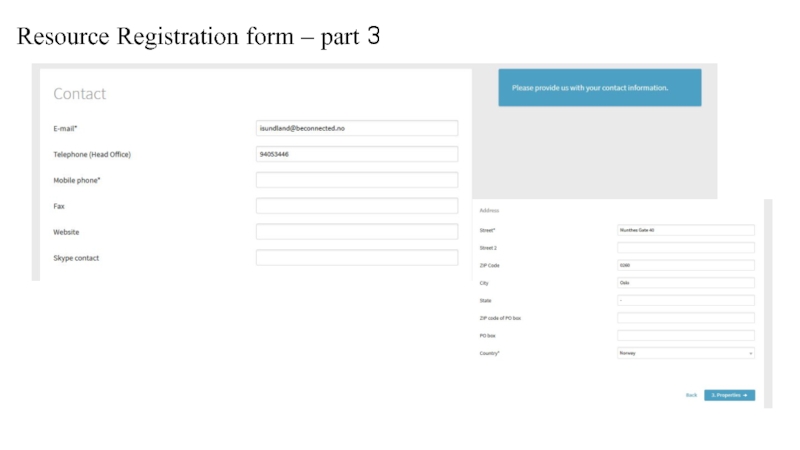
This is an example of the current registration form we are using.
They also receive this email, after filling out a short form: http://beconnected.plunet.net/pagesUTF8/templatenewresource.html - but we don’t like this layout at all.
Слайд 126Resource Portal - Dashboard
This is how the dashboard on the resource
Here the resource can see all jobs assigned to them, they are currently working on, delivered, approved and requested.
Слайд 127Resource Portal – Dashboard – List view
In the List view –
Слайд 128Resource Portal – Dashboard – List view
In the List view –
Слайд 129Resource Portal – Orders – Job details
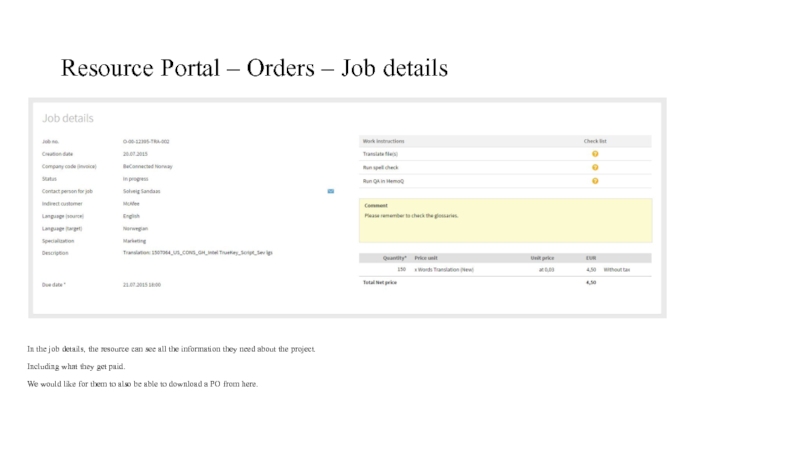
In the job details, the
Including what they get paid.
We would like for them to also be able to download a PO from here.
Слайд 130Resource Portal – Orders – Source and Target data
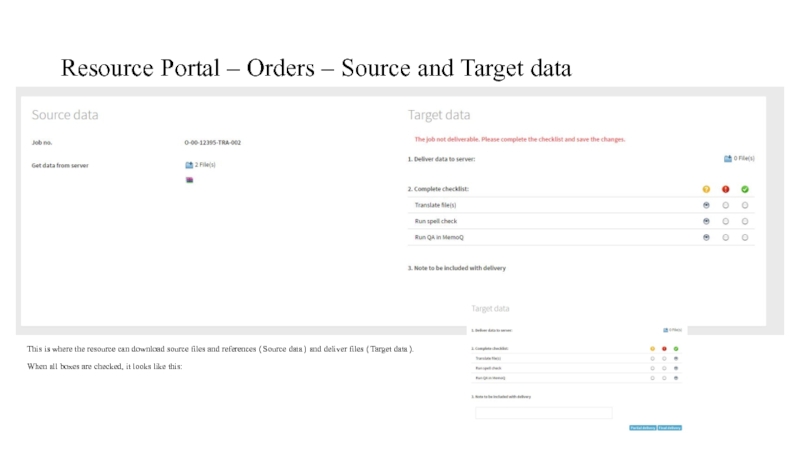
This is where
When all boxes are checked, it looks like this:
Слайд 131Resource Portal – Orders – Status report - jobs
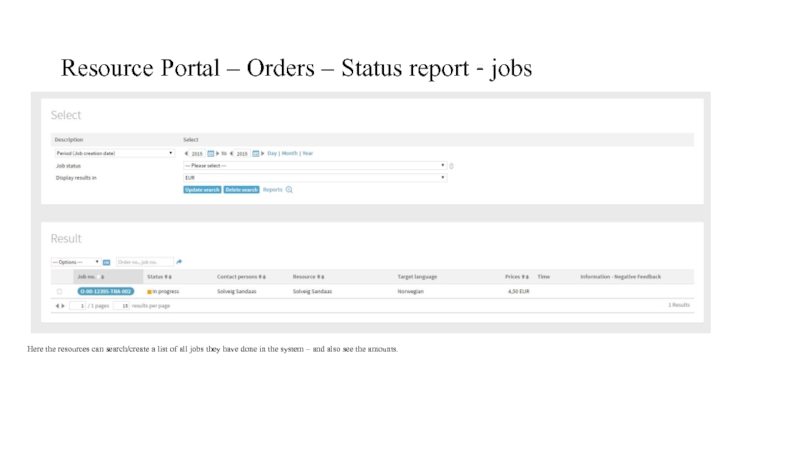
Here the resources
Слайд 132Resource Portal – Dashboard – Settings
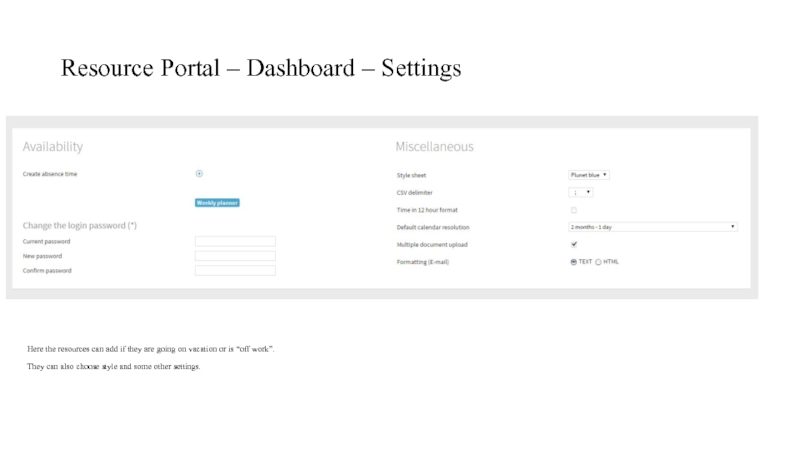
Here the resources can add if
They can also choose style and some other settings.
Слайд 133Functions we would like later on + last info
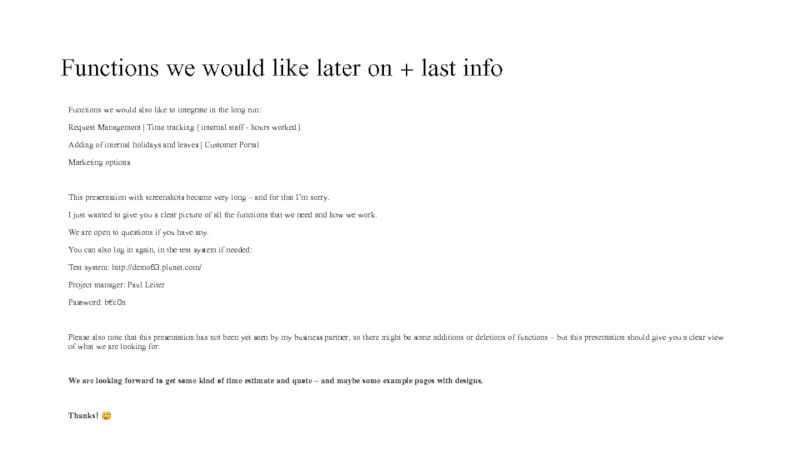
Functions we would
Request Management | Time tracking (internal staff - hours worked)
Adding of internal holidays and leaves | Customer Portal
Marketing options
This presentation with screenshots became very long – and for that I’m sorry.
I just wanted to give you a clear picture of all the functions that we need and how we work.
We are open to questions if you have any.
You can also log in again, in the test system if needed:
Test system: http://demo63.plunet.com/
Project manager: Paul Leiter
Password: b€c0n
Please also note that this presentation has not been yet seen by my business partner, so there might be some additions or deletions of functions – but this presentation should give you a clear view of what we are looking for.
We are looking forward to get some kind of time estimate and quote – and maybe some example pages with designs.
Thanks! ☺
