- Главная
- Разное
- Дизайн
- Бизнес и предпринимательство
- Аналитика
- Образование
- Развлечения
- Красота и здоровье
- Финансы
- Государство
- Путешествия
- Спорт
- Недвижимость
- Армия
- Графика
- Культурология
- Еда и кулинария
- Лингвистика
- Английский язык
- Астрономия
- Алгебра
- Биология
- География
- Детские презентации
- Информатика
- История
- Литература
- Маркетинг
- Математика
- Медицина
- Менеджмент
- Музыка
- МХК
- Немецкий язык
- ОБЖ
- Обществознание
- Окружающий мир
- Педагогика
- Русский язык
- Технология
- Физика
- Философия
- Химия
- Шаблоны, картинки для презентаций
- Экология
- Экономика
- Юриспруденция
Working with the node network презентация
Содержание
- 1. Working with the node network
- 2. Session content TerraLive survey results &
- 3. TerraLive survey results What aspect of Terragen
- 4. Sessions’ goals and methods Discuss the process
- 5. Stage 1 of 7 Adding a terrain in TG
- 6. Creating a basic terrain A fractal
- 7. Creating a basic terrain A heigthfield is
- 8. Disabling “fractal detail” Unchecking “add fractal detail”
- 9. Disabling “fractal detail” →
- 10. Stage 1 summary Height fields and
- 11. Stage 2 of 7 Adding outcrops/overhangs by using “redirect shaders”
- 12. Compute normal The normal is a line
- 13. TEX coords from XYZ Abbreviation for “Texture
- 14. Compute Terrain Computes both the normals as
- 15. Stage 2 result →
- 16. Stage 2 summary Redirect shaders “trick” the
- 17. Stage 3 of 7 Adding strata by using the “Strata & Outcrops Shader”
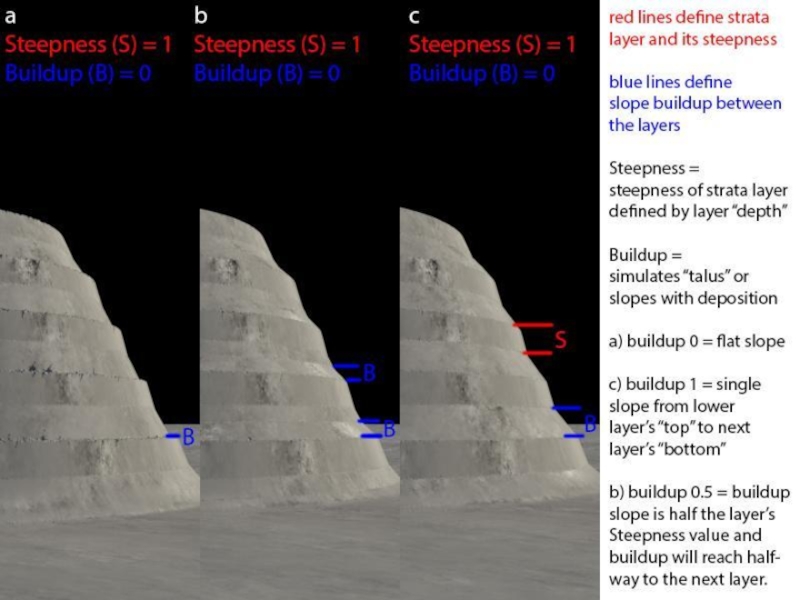
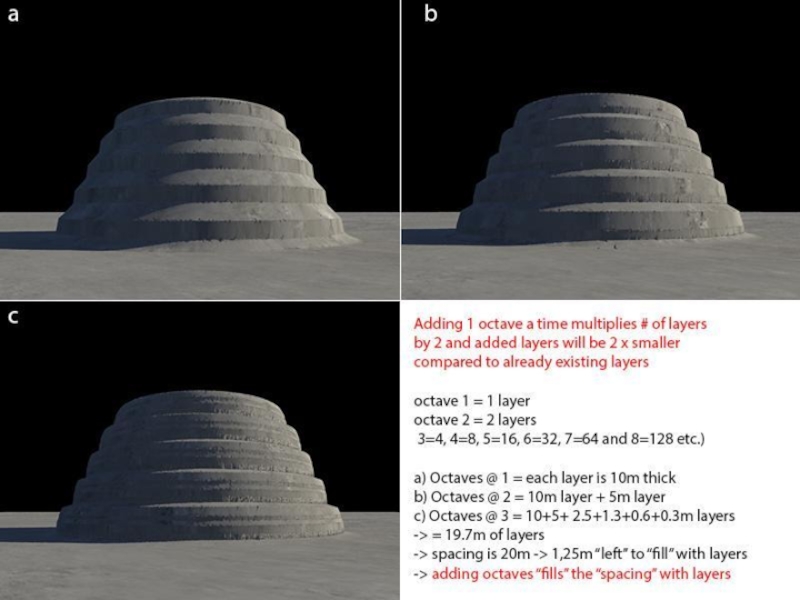
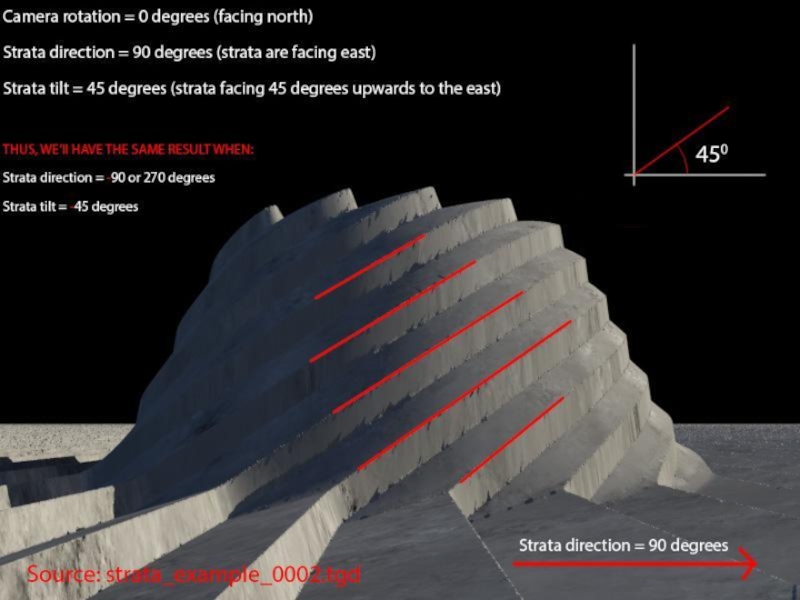
- 18. Strata & Outcrops Shader Various settings for
- 23. Stage 3 result →
- 24. Stage 3 summary Strata & Outcrops Shader
- 25. Stage 4 of 7 Adding cracks by using a “blue node mini network”
- 26. Stage 4 result →
- 27. Stage 4 summary Blue nodes aren’t that
- 28. Stage 5 of 7 Adding surface shaders
- 29. Stage 5 result →
- 30. Stage 5 summary Surface layers are key
- 31. Stage 6 of 7 Adding fake stones
- 32. Stage 6 result →
- 33. Stage 6 summary Fake stones can make/break
- 34. Stage 7 of 7 Adding water
- 35. Stage 7 result →
- 36. Stage 7 summary Lake object is a
- 37. Workflow paradigm Create base terrain Fractal based

Слайд 2Session content
TerraLive survey results & conclusion:
Many common problems are related
to difficulties with working with the node network.
Brief introduction to the User Interface*
Building a basic scene
Step by step explanation of scene creation and node network procedure to obtain desired result.
Brief introduction to the User Interface*
Building a basic scene
Step by step explanation of scene creation and node network procedure to obtain desired result.

Слайд 3TerraLive survey results
What aspect of Terragen 2 do you think holds
back beginners most?
The User Interface (minimalistic, luckily not Maya!)
Working with nodes
The math → wrong!
Lack of (simple) documentation
The User Interface (minimalistic, luckily not Maya!)
Working with nodes
The math → wrong!
Lack of (simple) documentation

Слайд 4Sessions’ goals and methods
Discuss the process of creating this scene:
Create basic
terrain
Detail with displacements
“Compute” nodes
Mask displacements
Blue node mini-network
Apply surface layers
Mask surface layers
Add objects to the scene
Rendering our scene
Detail with displacements
“Compute” nodes
Mask displacements
Blue node mini-network
Apply surface layers
Mask surface layers
Add objects to the scene
Rendering our scene


Слайд 6Creating a basic terrain
A fractal is a mathematical noise function with
endlessly repeating “self-similar” patterns.
In TG fractals have 3 dimensions and are not bound to a restricted area, like with height fields.
Fractals also output/generate greyscale values, like height fields.
Like height fields the gray scale value is “displaced” to create elevations.
In TG fractals have 3 dimensions and are not bound to a restricted area, like with height fields.
Fractals also output/generate greyscale values, like height fields.
Like height fields the gray scale value is “displaced” to create elevations.

Слайд 7Creating a basic terrain
A heigthfield is a 2D image storing elevation
data
as greyscale values where:
- Black = no elevation - White = max elevation
The elevation altitude range is stored as meta-data in the heightfield file
- Black = no elevation - White = max elevation
The elevation altitude range is stored as meta-data in the heightfield file
→

Слайд 8Disabling “fractal detail”
Unchecking
“add fractal detail”
will disable fractal
enhancements
made to the
height
field


Слайд 10Stage 1 summary
Height fields and fractals generate greyscale values.
Height fields have
boundaries
Fractals have no boundaries, you can cover an entire planet with 1 fractal.
In TG, height fields are “spiced up” with fractal detail by default.
However, this can lead to problems when adding displacements or stones at a later stage
Disabling “fractal detail” in the heightfield allows:
Smoother basis to start with
Full control on adding detail how and where you like


Слайд 12Compute normal
The normal is a line or vector which is perpendicular
to the surface.
Every polygon has its own normal.
Polygons intersect at a vertex (plural: vertices).
The vertex normal is an averaged normal of its adjacent polygons.
Without a computed normal TG uses the local “Up” vector, which is the vector pointing away from the centre of the planet.
http://en.wikipedia.org/wiki/Surface_normal
http://www.planetside.co.uk/forums/index.php?topic=1249.msg12539#msg12539

Слайд 13TEX coords from XYZ
Abbreviation for “Texture coordinates from the X, Y
and Z position” for the terrain.
Needed for:
Aligning non-displacing shaders with the terrain (surface layers etc.) to make shaders “aware” of displaced surfaces.
Calculating altitude, allowing for restriction by altitude
Needed for:
Aligning non-displacing shaders with the terrain (surface layers etc.) to make shaders “aware” of displaced surfaces.
Calculating altitude, allowing for restriction by altitude

Слайд 14Compute Terrain
Computes both the normals as well as the “texture coordinates”.
Allows
for:
Altitude/slope restriction by providing altitude and direction of the surface normals
Surface shaders to match the displaced geometry
Altitude/slope restriction by providing altitude and direction of the surface normals
Surface shaders to match the displaced geometry


Слайд 16Stage 2 summary
Redirect shaders “trick” the displacement from a fractal to
go into X, Y or Z direction, depending on where you plug the fractal in.
When you restrict
for slope → use “compute normal”
for altitude → use “Tex coords from XYZ”
for slope and altitude → use “compute terrain”
The gradient patch size can be considered as filter which “averages” the normals for the “patch size” to prevent displacement (spikes) intersecting with each other.
A very small scale patch size ~ local normal
A very large scale patch size ~ average normal for great area


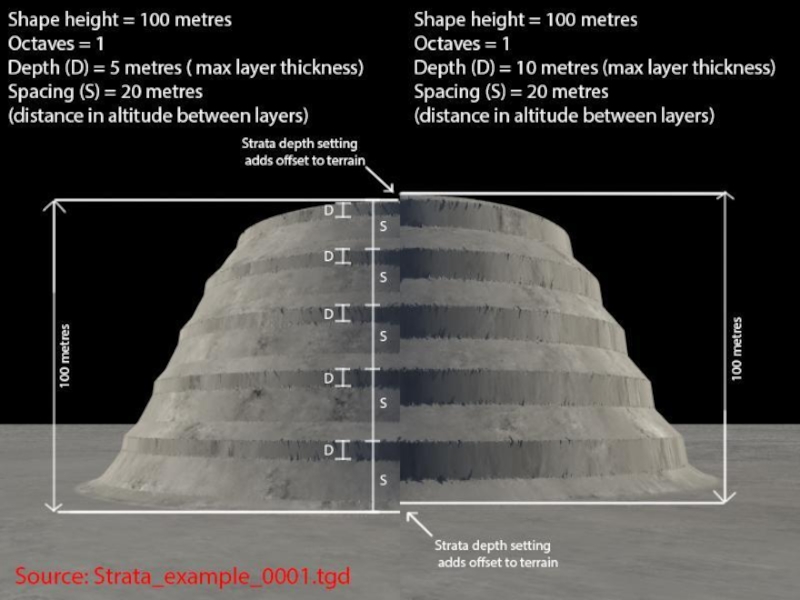
Слайд 18Strata & Outcrops Shader
Various settings for creating all kinds of effects…
Let’s
have a look!


Слайд 24Stage 3 summary
Strata & Outcrops Shader is very versatile
Mixing strata to
have them “intersect” often gives very interesting results
Don’t “over do” the settings to avoid staircasing and other unnatural effects
Restrict strata by slope and altitude to break up appearance, as the shader can be visually quite dominant
Don’t “over do” the settings to avoid staircasing and other unnatural effects
Restrict strata by slope and altitude to break up appearance, as the shader can be visually quite dominant


Слайд 27Stage 4 summary
Blue nodes aren’t that scary, huh!? ☺
The “Get position…”
nodes asks TG
“what’s the current state of the terrain at this point in the network?
What are the coordinates? → “Get” coordinates
Multiplying the result of “Get Position”, using a vector can stretch the coordinates and thus will stretch anything downstream of it.
To warp a function you need “Get position in texture” to start. Why?
Because the warp shader works in “texture space” and not in normals as obtained by “Get Position”


Слайд 30Stage 5 summary
Surface layers are key in shading your terrain, as
they:
Add diffuse (colour) shading to your terrain
Restrict slope/altitude
Offer advanced coverage effects which interacts with the displacement (Sunday)
Offer stacking of shaders by having a “child layer” input port, which allows for:
Adding additional surface layers of colour
Acting as a “placeholder” to merge in blue node networks, fake stones or other shaders
Everything connected to the “child layer” input port has the same restrictions as its parent surface layer!
 shading")


Слайд 33Stage 6 summary
Fake stones can make/break your work
Difficult to work with
due to settings and displacing them nicely
Feed fake stone output into a surface layers child input
Enable surface layer’s smoothing to avoid many problems with displacing fake stones, as:
Stones will incorporate existing displacement
Smoothing reverts displacements to the point of the last compute terrain
The displacements calculated there will be smoothed
Multiples layers with different sizes is the way to go
Merge layers of stones using the “highest” mode avoids stones placed on each other


Слайд 36Stage 7 summary
Lake object is a “disc” object, but you can
use a plane object as well.
Keep the lake object as small as possible, why?
Water is rendered first, followed by the terrain and objects.
Keeping lake object small will reduce “overdraw” of your render and thus will reduce rendertime
The best trick ever to minimize rendertime for water:
http://www.planetside.co.uk/forums/index.php?topic=8793.0
If you don’t need transparency or can’t see it, then disable it to save rendertime.
Wave scale is very important in communicating the scale of your scene with the viewer!

Слайд 37Workflow paradigm
Create base terrain
Fractal based
Heightfield based
Compute normal/XYZ/terrain, but when?
Normal ➔ when
restricting for slope
XYZ ➔ when restricting for altitude
Terrain ➔ when restricting for slope+altitude
Displace/detail terrain
Powerfractals
Voronoi
Etc.
Compute terrain
Shade/Texture terrain
Surface layer shaders
Image map shaders
Fake stone layers
Etc.
Planet shader
XYZ ➔ when restricting for altitude
Terrain ➔ when restricting for slope+altitude
Displace/detail terrain
Powerfractals
Voronoi
Etc.
Compute terrain
Shade/Texture terrain
Surface layer shaders
Image map shaders
Fake stone layers
Etc.
Planet shader