- Главная
- Разное
- Дизайн
- Бизнес и предпринимательство
- Аналитика
- Образование
- Развлечения
- Красота и здоровье
- Финансы
- Государство
- Путешествия
- Спорт
- Недвижимость
- Армия
- Графика
- Культурология
- Еда и кулинария
- Лингвистика
- Английский язык
- Астрономия
- Алгебра
- Биология
- География
- Детские презентации
- Информатика
- История
- Литература
- Маркетинг
- Математика
- Медицина
- Менеджмент
- Музыка
- МХК
- Немецкий язык
- ОБЖ
- Обществознание
- Окружающий мир
- Педагогика
- Русский язык
- Технология
- Физика
- Философия
- Химия
- Шаблоны, картинки для презентаций
- Экология
- Экономика
- Юриспруденция
Mail Systems and Business Collaboration. (Week 2) презентация
Содержание
- 1. Mail Systems and Business Collaboration. (Week 2)
- 2. Overview Configuring Microsoft Outlook Configuring
- 3. Overview Configuring Microsoft Outlook Configuring
- 4. Configuring Microsoft Outlook Go to Tools
- 5. Configuring Microsoft Outlook Enter the following
- 6. Configuring Microsoft Outlook Click on the
- 7. Overview Configuring Microsoft Outlook Configuring
- 8. Configuring Microsoft Entourage Go to Entourage->Account
- 9. Configuring Microsoft Entourage In the Edit Account window,
- 10. Configuring Microsoft Entourage Under Server Information, enter
- 11. Overview Configuring Microsoft Outlook Configuring
- 12. Configuring Microsoft Outlook Express Go to
- 13. Configuring Microsoft Outlook Express On the
- 14. Configuring Windows Mail Go to Tools
- 15. Configuring Windows Mail Enter your E-mail username and Password
- 16. Overview Configuring Microsoft Outlook Configuring
- 17. Exchange Resource Forest How to implement
- 18. Exchange Resource Forest Why forests are
- 19. Exchange Resource Forest Can we deploy
- 20. Exchange Resource Forest Cross-forest Multiple
- 21. Exchange Resource Forest Resource forest
- 22. Exchange Resource Forest No problems related
- 23. Overview Configuring mailbox-enabled and mail-enabled user
- 24. Overview Configuring mailbox-enabled and mail-enabled user
- 25. Configuring mailbox-enabled and mail-enabled user accounts
- 26. Configuring mailbox-enabled and mail-enabled user accounts Mailbox
- 27. Configuring mailbox-enabled and mail-enabled user accounts
- 28. Configuring mailbox-enabled and mail-enabled user accounts
- 29. Configuring mailbox-enabled and mail-enabled user accounts
- 30. Configuring mailbox-enabled and mail-enabled user accounts Modifying
- 31. Configuring mailbox-enabled and mail-enabled user accounts Working
- 32. Configuring mailbox-enabled and mail-enabled user accounts Managing
- 33. Configuring mailbox-enabled and mail-enabled user accounts Managing
- 34. Configuring mailbox-enabled and mail-enabled user accounts Managing
- 35. Configuring mailbox-enabled and mail-enabled user accounts Configuring
- 36. Overview Configuring mailbox-enabled and mail-enabled user
- 37. Configuring mail-enabled groups Managing Mail-Enabled Groups
- 38. Configuring mail-enabled groups Managing Mail-Enabled Groups
- 39. Configuring mail-enabled groups Managing Mail-Enabled Groups
- 40. Configuring mail-enabled groups Modifying Distribution Groups
- 41. Configuring mail-enabled groups Managing Dynamic Distribution Groups
- 42. Configuring mail-enabled groups Managing Dynamic Distribution Groups
- 43. Configuring mail-enabled groups Modifying Dynamic Distribution Groups
- 44. Overview Configuring mailbox-enabled and mail-enabled user
- 45. Configuring mail contacts Creating Contacts with
- 46. Configuring mail contacts Creating Contacts with the Exchange Management Shell
- 47. Configuring mail contacts Creating Contacts with
- 48. Configuring mail contacts Modifying Mail Contacts
- 49. Overview Configuring mailbox-enabled and mail-enabled user
- 50. Configuring resource mailboxes Creating Resource
- 51. Configuring resource mailboxes Creating Resource Mailboxes with the Exchange Management Shell
- 52. Configuring resource mailboxes Modifying Resource
- 53. Configuring resource mailboxes Modifying Resource
- 54. Configuring resource mailboxes Modifying Resource
- 55. Overview Understanding Public Folders Managing Public Folders
- 56. Overview Understanding Public Folders Managing Public Folders
- 57. Understanding Public Folders A cross between replicated file share and mailbox
- 58. Overview Understanding Public Folders Managing Public Folders
- 59. Managing Public Folders Creating the public
- 60. Managing Public Folders Exploring the Public
- 61. Managing Public Folders Performing General Public
- 62. Managing Public Folders Managing Public Folder Permissions
- 63. Managing Public Folders Client Permissions
- 64. Managing Public Folders Using Outlook [1]
- 65. Managing Public Folders Using the Public
- 66. Managing Public Folders Working with the
- 67. Overview Messaging records management Server-based rules
- 68. Overview Messaging records management Server-based rules
- 69. Messaging records management Configuring Message Compliance
- 70. Messaging records management Configuring Message Compliance
- 71. Messaging records management Configuring Managed Folder
- 72. Messaging records management Configuring Managed Content
- 73. Messaging records management Configuring Managed Folder
- 74. Messaging records management Configuring the Managed
- 75. Messaging records management Configuring Message Classification Exchange Server 2007 Default Classifications
- 76. Messaging records management Configuring Message Classification in Outlook 2007
- 77. Messaging records management Configuring Rights Management Service (RMS) Exchange Agent
- 78. Messaging records management Configuring Transport Rules
- 79. Messaging records management Transport Actions [1]
- 80. Messaging records management Working with Transport
- 81. Messaging records management Configuring Policies and
- 82. Messaging records management Configuring Address Lists
- 83. Overview Messaging records management Server-based rules
- 84. Configuring and managing antispam settings Configuring
- 85. Configuring and managing antispam settings IP Allow Lists IP Block Lists
- 86. Configuring and managing antispam settings Recipient Filtering Sender Filtering
- 87. Configuring and managing antispam settings Sender ID Sender Reputation
- 88. Configuring and managing antispam settings Attachment Filtering
- 89. Configuring Microsoft Forefront Security for Exchange Server
- 90. Configuring Microsoft Forefront Security for Exchange Server
- 91. Configuring Microsoft Forefront Security for Exchange Server
Слайд 2Overview
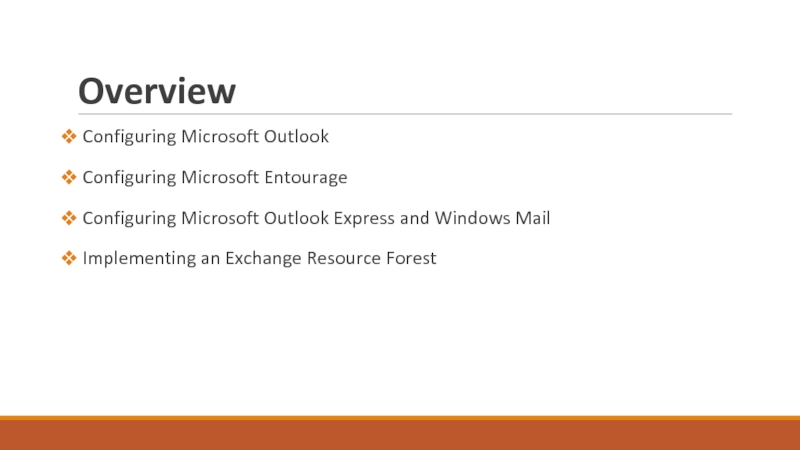
Configuring Microsoft Outlook
Configuring Microsoft Entourage
Configuring Microsoft Outlook
Implementing an Exchange Resource Forest
Слайд 3Overview
Configuring Microsoft Outlook
Configuring Microsoft Entourage
Configuring Microsoft Outlook
Implementing an Exchange Resource Forest
Слайд 4Configuring Microsoft Outlook
Go to Tools > Account Settings
On the
Select "Manually configure server settings or additional server types" and click Next
Select Internet E-mail and click Next
Слайд 5Configuring Microsoft Outlook
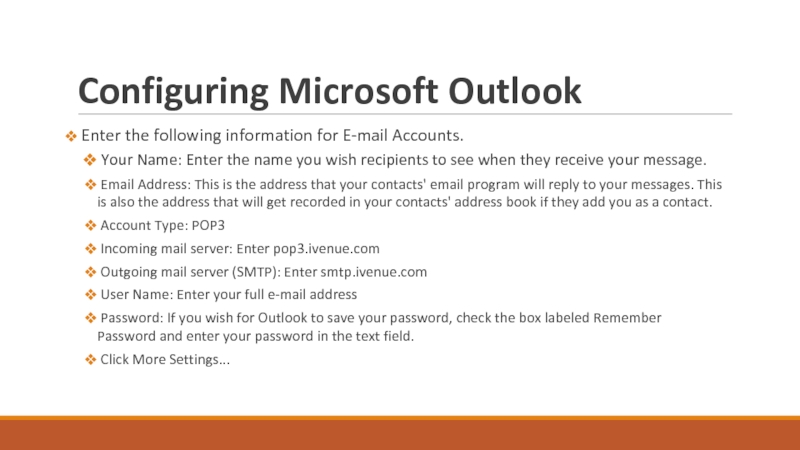
Enter the following information for E-mail Accounts.
Your
Email Address: This is the address that your contacts' email program will reply to your messages. This is also the address that will get recorded in your contacts' address book if they add you as a contact.
Account Type: POP3
Incoming mail server: Enter pop3.ivenue.com
Outgoing mail server (SMTP): Enter smtp.ivenue.com
User Name: Enter your full e-mail address
Password: If you wish for Outlook to save your password, check the box labeled Remember Password and enter your password in the text field.
Click More Settings...
Слайд 6Configuring Microsoft Outlook
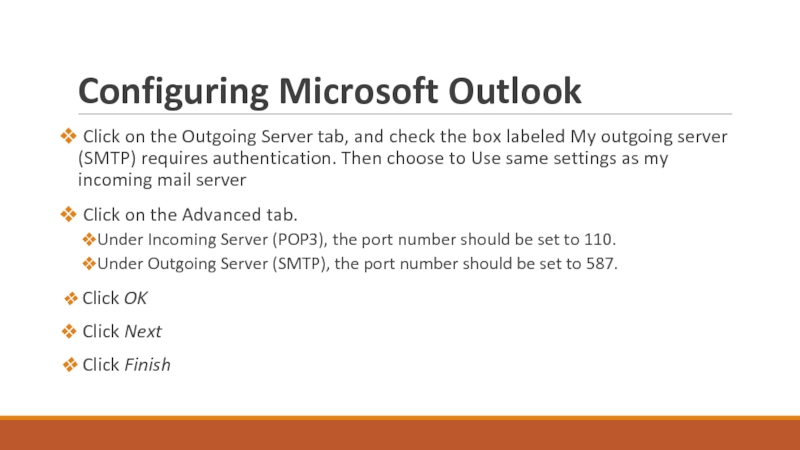
Click on the Outgoing Server tab, and check
Click on the Advanced tab.
Under Incoming Server (POP3), the port number should be set to 110.
Under Outgoing Server (SMTP), the port number should be set to 587.
Click OK
Click Next
Click Finish
Слайд 7Overview
Configuring Microsoft Outlook
Configuring Microsoft Entourage
Configuring Microsoft Outlook
Implementing an Exchange Resource Forest
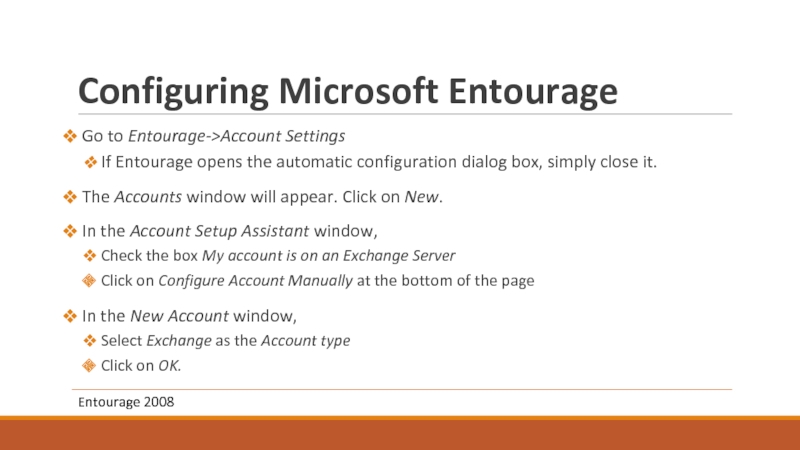
Слайд 8Configuring Microsoft Entourage
Go to Entourage->Account Settings
If Entourage opens the
The Accounts window will appear. Click on New.
In the Account Setup Assistant window,
Check the box My account is on an Exchange Server
Click on Configure Account Manually at the bottom of the page
In the New Account window,
Select Exchange as the Account type
Click on OK.
Entourage 2008
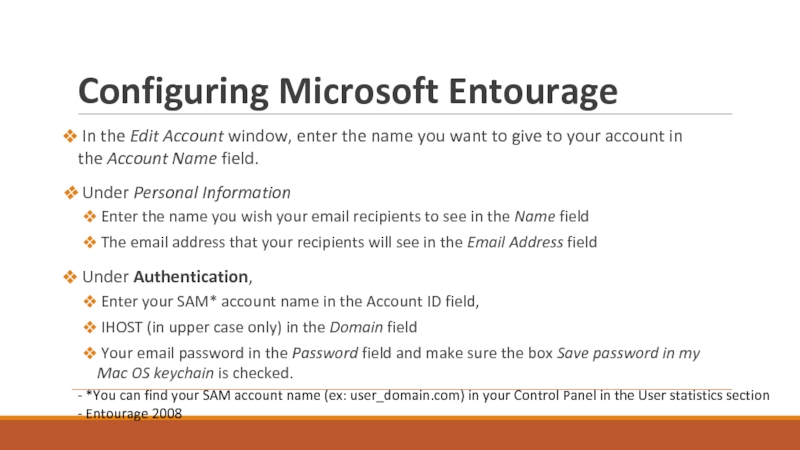
Слайд 9Configuring Microsoft Entourage
In the Edit Account window, enter the name you want
Under Personal Information
Enter the name you wish your email recipients to see in the Name field
The email address that your recipients will see in the Email Address field
Under Authentication,
Enter your SAM* account name in the Account ID field,
IHOST (in upper case only) in the Domain field
Your email password in the Password field and make sure the box Save password in my Mac OS keychain is checked.
- *You can find your SAM account name (ex: user_domain.com) in your Control Panel in the User statistics section
- Entourage 2008
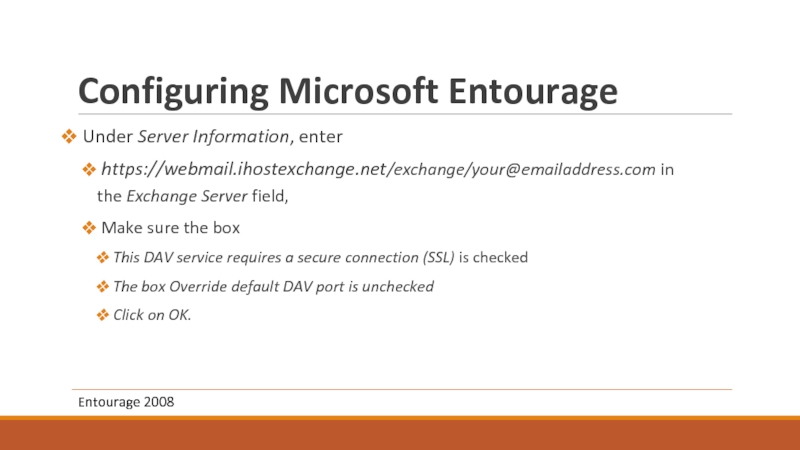
Слайд 10Configuring Microsoft Entourage
Under Server Information, enter
https://webmail.ihostexchange.net/exchange/your@emailaddress.com in the Exchange Server field,
This DAV service requires a secure connection (SSL) is checked
The box Override default DAV port is unchecked
Click on OK.
Entourage 2008
Слайд 11Overview
Configuring Microsoft Outlook
Configuring Microsoft Entourage
Configuring Microsoft Outlook
Implementing an Exchange Resource Forest
Слайд 12Configuring Microsoft Outlook Express
Go to Tools > Accounts
Click
Enter your Display name. The display name is the name that will appear when others receive mail from your account.
Click the Next button to continue.
Enter your E-mail address in the text box and click the Next button.
Слайд 13Configuring Microsoft Outlook Express
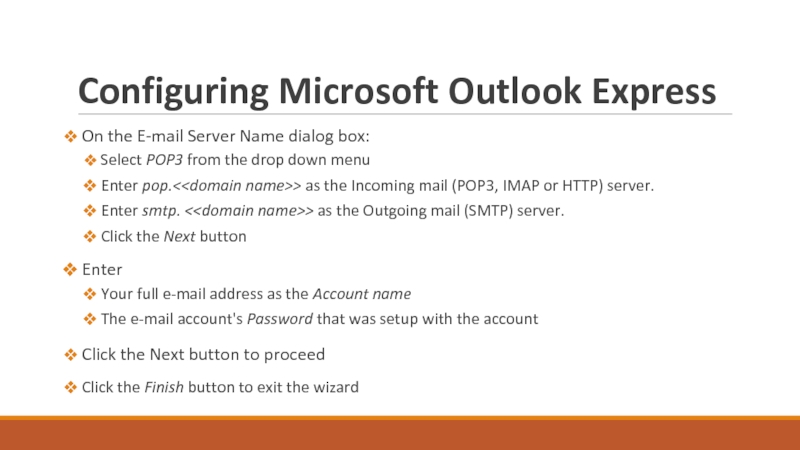
On the E-mail Server Name dialog box:
Enter pop.<
Enter smtp. <
Click the Next button
Enter
Your full e-mail address as the Account name
The e-mail account's Password that was setup with the account
Click the Next button to proceed
Click the Finish button to exit the wizard
Слайд 14Configuring Windows Mail
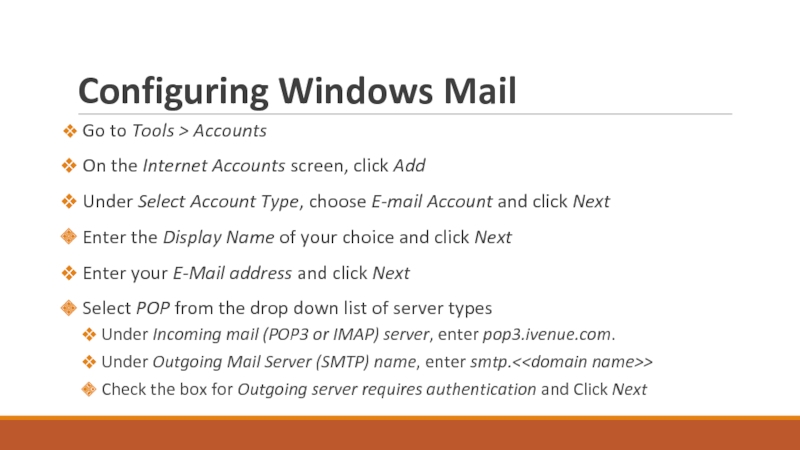
Go to Tools > Accounts
On the Internet Accounts screen,
Under Select Account Type, choose E-mail Account and click Next
Enter the Display Name of your choice and click Next
Enter your E-Mail address and click Next
Select POP from the drop down list of server types
Under Incoming mail (POP3 or IMAP) server, enter pop3.ivenue.com.
Under Outgoing Mail Server (SMTP) name, enter smtp.<
Check the box for Outgoing server requires authentication and Click Next
Слайд 15Configuring Windows Mail
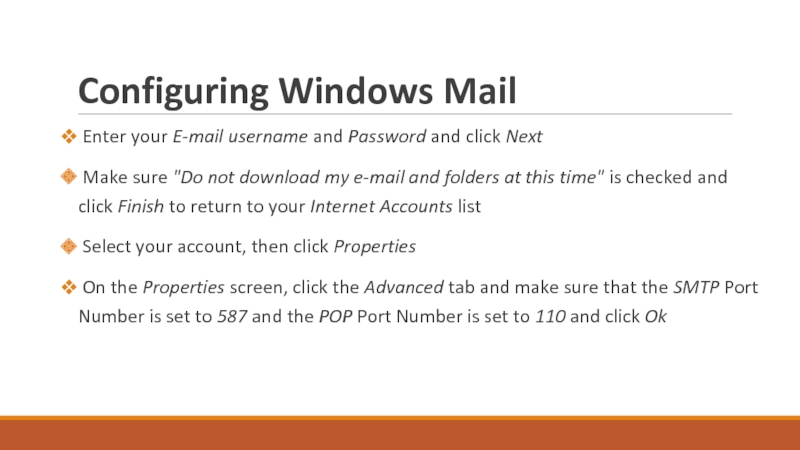
Enter your E-mail username and Password and click Next
Make sure "Do
Select your account, then click Properties
On the Properties screen, click the Advanced tab and make sure that the SMTP Port Number is set to 587 and the POP Port Number is set to 110 and click Ok
Слайд 16Overview
Configuring Microsoft Outlook
Configuring Microsoft Entourage
Configuring Microsoft Outlook
Implementing an Exchange Resource Forest
Слайд 17Exchange Resource Forest
How to implement Exchange Server 2007 in an
Слайд 18Exchange Resource Forest
Why forests are kept separated?
Multiple businesses that require
Different schema requirements
Company merger or acquisition process
Слайд 19Exchange Resource Forest
Can we deploy Exchange Server 2007 with single
How about multiple forests?
Possible topologies
Cross-forest
Resource forest
Слайд 20Exchange Resource Forest
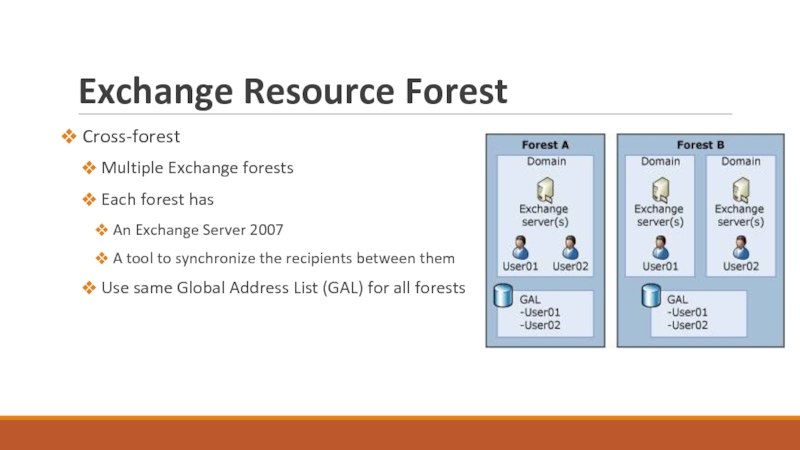
Cross-forest
Multiple Exchange forests
Each forest has
An
A tool to synchronize the recipients between them
Use same Global Address List (GAL) for all forests
Слайд 21Exchange Resource Forest
Resource forest
One forest with Exchange 2007 installed
One or more account forests
Users are hosted here
Mailboxes are associated with the users from the account mailbox
Слайд 22Exchange Resource Forest
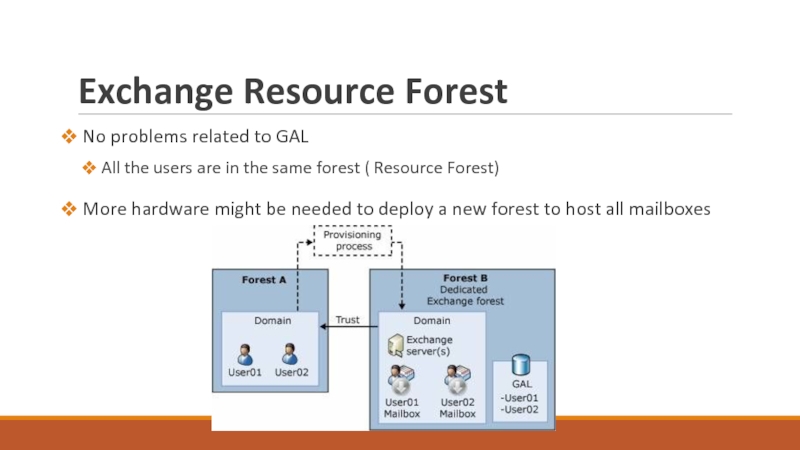
No problems related to GAL
All the users
More hardware might be needed to deploy a new forest to host all mailboxes
Слайд 23Overview
Configuring mailbox-enabled and mail-enabled user accounts
Configuring mail-enabled groups
Configuring
Configuring resource mailboxes
Слайд 24Overview
Configuring mailbox-enabled and mail-enabled user accounts
Configuring mail-enabled groups
Configuring
Configuring resource mailboxes
Слайд 25Configuring mailbox-enabled and mail-enabled user accounts
Basic types of recipients in
Users
Groups
Contacts
Public folders
Слайд 26Configuring mailbox-enabled and mail-enabled user accounts
Mailbox Enabled vs. Mail-enabled
A user
Send/Receive messages
Store messages on Exchange server
A mail-enabled user is simply a user who has an email address but who does not have a mailbox on an Exchange server
Can receive email
Can not send email
Слайд 27Configuring mailbox-enabled and mail-enabled user accounts
Managing User Accounts and Mailboxes
[1] Refer to Exercise 5.1 of the Configuration Study Guide: Creating a New Mailbox-Enabled User
[2] Refer to Exercise 5.2 of the Configuration Study Guide: Mailbox-Enabling an Existing User
Слайд 28Configuring mailbox-enabled and mail-enabled user accounts
Managing User Accounts and Mailboxes
Слайд 29Configuring mailbox-enabled and mail-enabled user accounts
Managing User Accounts and Mailboxes
[1] Refer to Exercise 5.3 of the Configuration Study Guide:
Creating a New User Account in Active Directory Users and Computers
Слайд 30Configuring mailbox-enabled and mail-enabled user accounts
Modifying Mailbox-Enabled User Accounts
Performing
Managing Mailbox Properties
Слайд 31Configuring mailbox-enabled and mail-enabled user accounts
Working with Deleted Mailboxes
[1] Refer to
Слайд 32Configuring mailbox-enabled and mail-enabled user accounts
Managing Mail-Enabled User Accounts
Creating Mail
[1] Refer to Exercise 5.5 of the Configuration Study Guide: Creating a New Mail-Enabled User
[2] Refer to Exercise 5.6 of the Configuration Study Guide: Mail-Enabling an Existing User
Слайд 33Configuring mailbox-enabled and mail-enabled user accounts
Managing Mail-Enabled User Accounts
Creating Mail
Слайд 34Configuring mailbox-enabled and mail-enabled user accounts
Managing Mail Users
Performing Basic Management
Managing Mail User’s Properties
Слайд 35Configuring mailbox-enabled and mail-enabled user accounts
Configuring Send As and Full Access
Departmental mailboxes
Project mailboxes
Customer comments and suggestions mailboxes
Send As
[1] Refer to Exercise 5.7 of the Configuration Study Guide:
Configuring Send As Permissions on a Mailbox Using Exchange Management Console
Слайд 36Overview
Configuring mailbox-enabled and mail-enabled user accounts
Configuring mail-enabled groups
Configuring
Configuring resource mailboxes
Слайд 37Configuring mail-enabled groups
Managing Mail-Enabled Groups
Creating Distribution Groups with the
[1] Refer to Exercise 5.8 of the Configuration Study Guide: Creating a New Distribution Group
[2] Refer to Exercise 5.9of the Configuration Study Guide: Mail-Enabling an Existing Security Group
Слайд 38Configuring mail-enabled groups
Managing Mail-Enabled Groups
Creating Distribution Groups with the
Слайд 39Configuring mail-enabled groups
Managing Mail-Enabled Groups
Creating Groups with the Active
[1] Refer to Exercise 5.10 of the Configuration Study Guide: Creating a New Group in Active Directory
Слайд 40Configuring mail-enabled groups
Modifying Distribution Groups
Performing Basic Management from the
Слайд 41Configuring mail-enabled groups
Managing Dynamic Distribution Groups
Creating Dynamic Distribution Groups with
[1] Refer to Exercise 5.11 of the Configuration Study Guide: Creating a New Distribution Group
Слайд 42Configuring mail-enabled groups
Managing Dynamic Distribution Groups
Creating Dynamic Distribution Groups with
Слайд 43Configuring mail-enabled groups
Modifying Dynamic Distribution Groups
Performing Basic Management from the
Слайд 44Overview
Configuring mailbox-enabled and mail-enabled user accounts
Configuring mail-enabled groups
Configuring
Configuring resource mailboxes
Слайд 45Configuring mail contacts
Creating Contacts with the Exchange Management Console
[1] Refer
[2] Refer to Exercise 5.13 of the Configuration Study Guide: Mail-Enabling an Existing Contact
Слайд 47Configuring mail contacts
Creating Contacts with the Active Directory Users and
[1] Refer to Exercise 5.14 of the Configuration Study Guide:
Creating a New Contact in Active Directory Users and Computers
Слайд 48Configuring mail contacts
Modifying Mail Contacts
Performing Basic Management from the
Слайд 49Overview
Configuring mailbox-enabled and mail-enabled user accounts
Configuring mail-enabled groups
Configuring
Configuring resource mailboxes
Слайд 50 Configuring resource mailboxes
Creating Resource Mailboxes with the Exchange Management
[1] Refer to Exercise 5.15 of the Configuration Study Guide: Creating a New Resource Mailbox
Слайд 51 Configuring resource mailboxes
Creating Resource Mailboxes with the Exchange Management
Слайд 52 Configuring resource mailboxes
Modifying Resource Mailboxes
Performing Basic Management from
Слайд 53 Configuring resource mailboxes
Modifying Resource Mailboxes
Moving Mailboxes using the
[1] Refer to Exercise 5.16 of the Configuration Study Guide:
Moving a Mailbox with the Exchange Management Console
Слайд 54 Configuring resource mailboxes
Modifying Resource Mailboxes
Moving Mailboxes using the
Слайд 59Managing Public Folders
Creating the public folder database
[1] Refer to Exercise
Слайд 60Managing Public Folders
Exploring the Public Folder Management Options
Using the
Using the Exchange Management Shell
Слайд 61Managing Public Folders
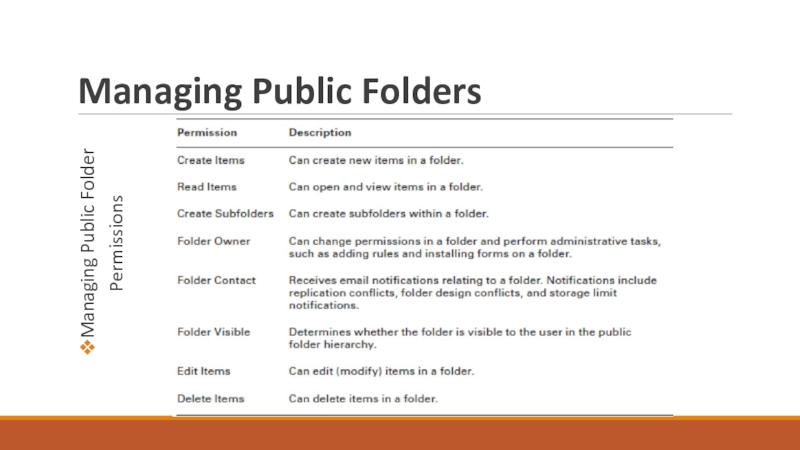
Performing General Public Folder Tasks
Manipulating Individual Public
Manipulating Public Folder Mail Attributes
Managing Public Folder Databases
Managing Public Folder Permissions
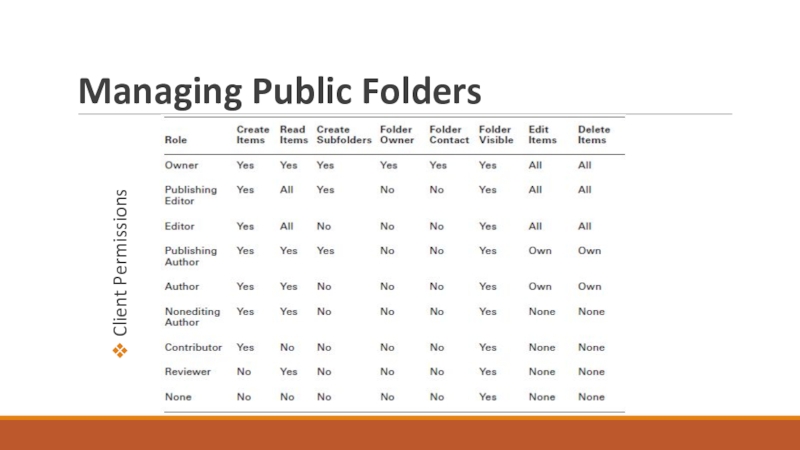
Client Permissions
Слайд 64Managing Public Folders
Using Outlook
[1] Refer to Exercise 6.2 of the
Слайд 65Managing Public Folders
Using the Public Folder Management Console
Using the
Using Other Public Folder Tools
Слайд 66Managing Public Folders
Working with the Public Folder Hierarchy
Replicating Public
Performing Public Folder Replication
[1] Refer to Exercise 6.3 of the Configuration Study Guide: Creating Public Folder Replicas
Слайд 67Overview
Messaging records management
Server-based rules
Message classifications
Server-based policies
Configuring and managing antispam settings
Слайд 68Overview
Messaging records management
Server-based rules
Message classifications
Server-based policies
Configuring and managing antispam settings
Слайд 69Messaging records management
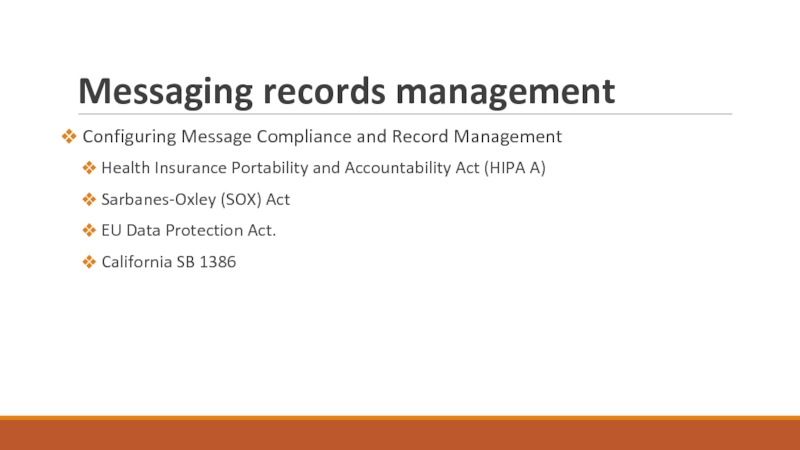
Configuring Message Compliance and Record Management
Health Insurance
Sarbanes-Oxley (SOX) Act
EU Data Protection Act.
California SB 1386
Слайд 70Messaging records management
Configuring Message Compliance and Record Management
Message Record Management
Key Points in Planning and Deploying MRM
Слайд 71Messaging records management
Configuring Managed Folder
Managed Custom Folders
Managed Default
[1] Refer to Exercise 7.1 of the Configuration Study Guide:
Creating a Managed Folder Using the Exchange Management Console
[2] Refer to Exercise 7.2 of the Configuration Study Guide:
Creating a Managed Folder Using the Exchange Management Shell
Слайд 72Messaging records management
Configuring Managed Content Settings
[1] Refer to Exercise 7.3
Creating a Managed Folder Using the Exchange Management Console
[2] Refer to Exercise 7.4 of the Configuration Study Guide:
Creating a Managed Folder Using the Exchange Management Shell
Слайд 73Messaging records management
Configuring Managed Folder Mailbox Policies
[1] Refer to Exercise
Creating a Managed Folder Mailbox Policy Using the Exchange Management Console
[2] Refer to Exercise 7.6 of the Configuration Study Guide:
Creating a Managed Folder Mailbox Policy Using the Exchange Management Shell
[3] Refer to Exercise 7.7 of the Configuration Study Guide:
Applying a Managed Folder Mailbox Policy Using the Exchange Management Console
[4] Refer to Exercise 7.8 of the Configuration Study Guide:
Applying a Managed Folder Mailbox Policy Using the Exchange Management Shell
Слайд 74Messaging records management
Configuring the Managed Folder Assistant
[1] Refer to Exercise
Scheduling the Managed Folder Assistant Using the Exchange Management Console
[2] Refer to Exercise 7.10 of the Configuration Study Guide:
Scheduling the Managed Folder Assistant Using the Exchange Management Shell
Слайд 75Messaging records management
Configuring Message Classification
Exchange Server 2007 Default Classifications
Слайд 78Messaging records management
Configuring Transport Rules
Transport Predicates
[1] Refer to Table
[2] Refer to Table 7.3 of the Configuration Study Guide: Predicates Available on a Edge Transport Server
Слайд 79Messaging records management
Transport Actions
[1] Refer to Table 7.4 of the
[1] Refer to Table 7.5 of the Configuration Study Guide: Available Actions on Edge Transport Server
Слайд 80Messaging records management
Working with Transport Rules
Designing and Planning tips…
[1] Refer to Exercise 7.11 of the Configuration Study Guide:
Creating a New Transport Rule Using the Exchange Management Console
[2] Refer to Exercise 7.12 of the Configuration Study Guide:
Creating a New Transport Rule Using the Exchange Management Shell
Слайд 81Messaging records management
Configuring Policies and Address Lists
Configuring Email Address
[1] Refer to Exercise 7.13 of the Configuration Study Guide:
Creating a New Email Address Policy Using the Exchange Management Console
[2] Refer to Exercise 7.14 of the Configuration Study Guide:
Creating a New Email Address Policy Using the Exchange Management Shell
Слайд 82Messaging records management
Configuring Address Lists
Configuring Address Lists
[1] Refer to
Creating a New Address List Using the Exchange Management Console
[2] Refer to Exercise 7.16 of the Configuration Study Guide:
Creating a New Address List Using the Exchange Management Shell
Слайд 83Overview
Messaging records management
Server-based rules
Message classifications
Server-based policies
Configuring and managing antispam settings
Слайд 84Configuring and managing antispam settings
Configuring Antivirus and Antispam
Content Filtering
Exceptions
Action
Слайд 89Configuring Microsoft Forefront
Security for Exchange Server
Installing Forefront Security for Exchange
[1] Refer to Exercise 7.19 of the Configuration Study Guide: Installing Forefront Security for Exchange Server
Слайд 90Configuring Microsoft Forefront
Security for Exchange Server
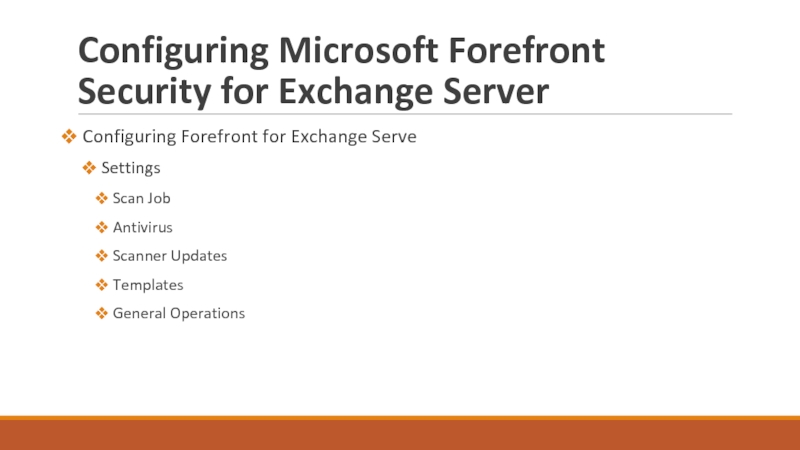
Configuring Forefront for Exchange Serve
Scan Job
Antivirus
Scanner Updates
Templates
General Operations
Слайд 91Configuring Microsoft Forefront
Security for Exchange Server
Configuring Forefront for Exchange Serve
Report
Notification
Incidents
Quarantine




![Configuring mailbox-enabled and mail-enabled user accountsWorking with Deleted Mailboxes[1] Refer to Exercise 5.4 of the](/img/tmb/4/323380/51c28ba8585cf3f5d81d7e171b50978c-800x.jpg)
![Configuring mail-enabled groups Managing Mail-Enabled Groups Creating Distribution Groups with the Exchange Management Console[1] Refer](/img/tmb/4/323380/c20969f348d0db1e04ccd745fb955931-800x.jpg)
![Configuring mail-enabled groupsManaging Dynamic Distribution Groups Creating Dynamic Distribution Groups with the Exchange Management Console[1]](/img/tmb/4/323380/4d4cf7223e80f554ae169c588168f38d-800x.jpg)
![Configuring mail contacts Creating Contacts with the Exchange Management Console[1] Refer to Exercise 5.12 of](/img/tmb/4/323380/7200719a1e42020b742c6b244c5abfe9-800x.jpg)
![Configuring mail contacts Creating Contacts with the Active Directory Users and Computers Console[1] Refer to](/img/tmb/4/323380/1d4f39ac5f06f738ba2441cc6c9620e5-800x.jpg)

![Configuring resource mailboxes Creating Resource Mailboxes with the Exchange Management Console[1] Refer to Exercise](/img/tmb/4/323380/a3ffd41bae168994042f2cae46663549-800x.jpg)
![Configuring resource mailboxes Modifying Resource Mailboxes Moving Mailboxes using the Exchange Management Console[1] Refer](/img/tmb/4/323380/6b261d8a8ac04b60e36a987ae54c2611-800x.jpg)
![Managing Public Folders Creating the public folder database[1] Refer to Exercise 6.1 of the Configuration](/img/tmb/4/323380/0a16aa0a351203e524a55cc2ea85be6a-800x.jpg)

![Managing Public Folders Using Outlook[1] Refer to Exercise 6.2 of the Configuration Study Guide: Creating](/img/tmb/4/323380/5c401d7698c0dc2b7d496eca05cc45ba-800x.jpg)
![Messaging records management Configuring Managed Folder Managed Custom Folders Managed Default Folders[1] Refer to Exercise](/img/tmb/4/323380/4fa528aeba4bebc85d10da1052f0e1b0-800x.jpg)
![Messaging records management Configuring Managed Content Settings[1] Refer to Exercise 7.3 of the Configuration Study](/img/tmb/4/323380/554b96cf57b1b1f19568f0394ee281bb-800x.jpg)
![Messaging records management Configuring Managed Folder Mailbox Policies[1] Refer to Exercise 7.5 of the Configuration](/img/tmb/4/323380/9809878962a2a81639313aa04dbc70c5-800x.jpg)
![Messaging records management Configuring the Managed Folder Assistant[1] Refer to Exercise 7.9 of the Configuration](/img/tmb/4/323380/19a7067bf0aa621c2baf8a6eecc153bb-800x.jpg)

![Messaging records management Configuring Transport Rules Transport Predicates[1] Refer to Table 7.2 of the Configuration](/img/tmb/4/323380/e7f504af4c3218affdcdf48eac54741f-800x.jpg)
![Messaging records management Transport Actions[1] Refer to Table 7.4 of the Configuration Study Guide: Available](/img/tmb/4/323380/3dbd5cd544df1987b209863c651a8b8b-800x.jpg)
![Messaging records management Working with Transport Rules Designing and Planning tips… [1] Refer to Exercise](/img/tmb/4/323380/545712a2845e2dc26ffa504ef89a3958-800x.jpg)
![Messaging records management Configuring Policies and Address Lists Configuring Email Address Policies[1] Refer to Exercise](/img/tmb/4/323380/15c987828e31c05c0e919ab0cdcf19cc-800x.jpg)
![Messaging records management Configuring Address Lists Configuring Address Lists[1] Refer to Exercise 7.15 of the](/img/tmb/4/323380/63d4ebccc1bbeb7e972b50da7292bee9-800x.jpg)
![Configuring Microsoft Forefront Security for Exchange Server Installing Forefront Security for Exchange Server[1] Refer to](/img/tmb/4/323380/da8112f6dc73109c894b734365cbe840-800x.jpg)
