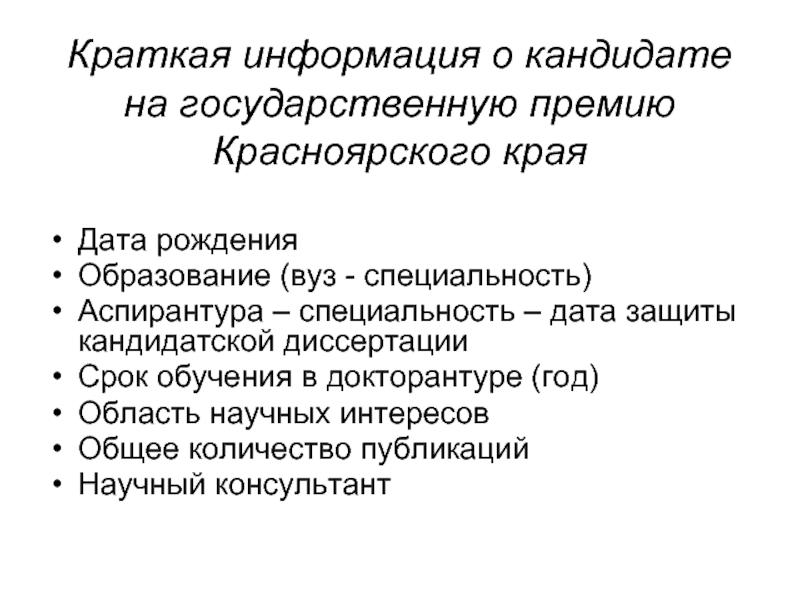
- Главная
- Разное
- Дизайн
- Бизнес и предпринимательство
- Аналитика
- Образование
- Развлечения
- Красота и здоровье
- Финансы
- Государство
- Путешествия
- Спорт
- Недвижимость
- Армия
- Графика
- Культурология
- Еда и кулинария
- Лингвистика
- Английский язык
- Астрономия
- Алгебра
- Биология
- География
- Детские презентации
- Информатика
- История
- Литература
- Маркетинг
- Математика
- Медицина
- Менеджмент
- Музыка
- МХК
- Немецкий язык
- ОБЖ
- Обществознание
- Окружающий мир
- Педагогика
- Русский язык
- Технология
- Физика
- Философия
- Химия
- Шаблоны, картинки для презентаций
- Экология
- Экономика
- Юриспруденция
Mf series second half презентация
Содержание
- 1. Mf series second half
- 2. MF SERIES MAINTENANCE
- 3. MF SERIES MAINTENANCE The
- 4. MF SERIES MAINTENANCE TOOLS
- 5. MF SERIES MAINTENANCE Remove the front/top panel.
- 6. MF SERIES MAINTENANCE Switch OFF the machine
- 7. MF SERIES MAINTENANCE Scoop out all ice
- 8. MF SERIES MAINTENANCE Remove the metal clamp
- 9. MF SERIES MAINTENANCE ….the water into a rag then.....
- 10. MF SERIES MAINTENANCE ….place again the tube on the outlet port.
- 11. MF SERIES MAINTENANCE Prepare the cleaning solution
- 12. MF SERIES MAINTENANCE MF 22: 1,5 LITER WATER
- 13. MF SERIES MAINTENANCE Remove the water reservoir
- 14. MF SERIES MAINTENANCE Leave the machine in
- 15. MF SERIES MAINTENANCE With the help of
- 16. MF SERIES MAINTENANCE Jump with a wire
- 17. MF SERIES MAINTENANCE … move the master switch to ON position. ON
- 18. MF SERIES MAINTENANCE Few minutes later the
- 19. MF SERIES MAINTENANCE As soon as the
- 20. MF SERIES MAINTENANCE Once empty the bucket
- 21. MF SERIES MAINTENANCE When sure that no
- 22. MF SERIES MAINTENANCE ….place again the water
- 23. MF SERIES MAINTENANCE Scoop out the flake ice produced with cleaning/sanitizing solution.
- 24. MF SERIES MAINTENANCE Wash the inside of
- 25. MAINTENANCE REMEMBER. To prevent the accumulation
- 26. MF SERIES MAINTENANCE It is possible to
- 27. MF SERIES MAINTENANCE The unit frame is
- 28. MF SERIES SERVICE ANALYSIS
- 29. MF SERIES SERVICE ANALYSIS Bin Full situation: Green and Yellow LED ON.
- 30. MF SERIES SERVICE ANALYSIS Check for the
- 31. MF SERIES SERVICE ANALYSIS The two eyes
- 32. MF SERIES SERVICE ANALYSIS Check also for
- 33. MF SERIES SERVICE ANALYSIS The power signal
- 34. MF SERIES SERVICE ANALYSIS If re-adjusted, be
- 35. MF SERIES SERVICE ANALYSIS ATTENTION. The Optical
- 36. MF SERIES SERVICE ANALYSIS No water situation: Green and Yellow LED ON.
- 37. MF SERIES SERVICE ANALYSIS Check first for
- 38. MF SERIES SERVICE ANALYSIS ……for the water filter located on the water inlet line…..
- 39. MF SERIES SERVICE ANALYSIS ……for the water strainer located inside the water inlet fitting…..
- 40. MF SERIES SERVICE ANALYSIS …..for the correct
- 41. MF SERIES SERVICE ANALYSIS In case of
- 42. MF SERIES SERVICE ANALYSIS …..or for any
- 43. MF SERIES SERVICE ANALYSIS ATTENTION. The water
- 44. MF SERIES SERVICE ANALYSIS 3’ waiting time: Green LED ON Red LED blinking
- 45. MF SERIES SERVICE ANALYSIS It is a
- 46. MF SERIES SERVICE ANALYSIS Too low ambient temperature(
- 47. MF SERIES SERVICE ANALYSIS It is a
- 48. MF SERIES SERVICE ANALYSIS Too high condensing
- 49. MF SERIES SERVICE ANALYSIS On Air Cooled
- 50. MF SERIES SERVICE ANALYSIS On Air Cooled
- 51. MF SERIES SERVICE ANALYSIS On Air Cooled
- 52. MF SERIES SERVICE ANALYSIS Check also for
- 53. MF SERIES SERVICE ANALYSIS One more possibility
- 54. MF SERIES SERVICE ANALYSIS During normal operation
- 55. MF SERIES SERVICE ANALYSIS In case the
- 56. MF SERIES SERVICE ANALYSIS On Water Cooled
- 57. MF SERIES SERVICE ANALYSIS On Water Cooled
- 58. MF SERIES SERVICE ANALYSIS Too high evaporating
- 59. MF SERIES SERVICE ANALYSIS Check if ice
- 60. MF SERIES SERVICE ANALYSIS If no ice
- 61. MF SERIES SERVICE ANALYSIS …...while suction pressure must be 2.5 bar (35 PSI)
- 62. MF SERIES SERVICE ANALYSIS If no ice
- 63. MF SERIES SERVICE ANALYSIS If no ice
- 64. MF SERIES SERVICE ANALYSIS No rotation of drive motor Green and Yellow LED ON.
- 65. MF SERIES SERVICE ANALYSIS If the drive
- 66. MF SERIES SERVICE ANALYSIS If the drive
- 67. MF SERIES SERVICE ANALYSIS If the drive
- 68. MF SERIES SERVICE ANALYSIS If the drive
- 69. MF SERIES SERVICE ANALYSIS Slow rotation of drive motor (
- 70. MF SERIES SERVICE ANALYSIS Check for: Worn out drive motor bearings
- 71. MF SERIES SERVICE ANALYSIS Check for:
- 72. MF SERIES SERVICE ANALYSIS
- 73. MF SERIES SERVICE ANALYSIS Check for:
- 74. MF SERIES SERVICE ANALYSIS OK! KO!
- 75. MF SERIES SERVICE ANALYSIS Check for:
- 76. MF SERIES SERVICE ANALYSIS
- 77. MF SERIES SERVICE ANALYSIS Wrong rotation of
- 78. MF SERIES SERVICE ANALYSIS Check for:
- 79. MF SERIES SERVICE ANALYSIS Check for:
- 80. MF SERIES SERVICE ANALYSIS Check for:
- 81. MF SERIES SERVICE ANALYSIS Additional reasons for
- 82. MF SERIES SERVICE ANALYSIS Magnetic sensor
- 83. MF SERIES SERVICE ANALYSIS Magnetic sensor
- 84. MF SERIES SERVICE ANALYSIS Automatic reset mode
- 85. MF SERIES SERVICE ANALYSIS Manual reset mode
- 86. MF SERIES REPLACEMENT OF THE AUGER, WATER SEAL AND BEARINGS
- 87. MF 22-30 SERIES REPLACEMENT OF AUGER, WATER
- 88. MF 22-30 SERIES REPLACEMENT OF AUGER, WATER SEAL AND BEARINGS ……the sides/rear panel.
- 89. MF 22-30 SERIES REPLACEMENT OF AUGER, WATER
- 90. MF 22-30 SERIES REPLACEMENT OF AUGER, WATER
- 91. MF 22-30 SERIES REPLACEMENT OF AUGER, WATER
- 92. MF 22-30 SERIES REPLACEMENT OF AUGER, WATER
- 93. MF 22-30 SERIES REPLACEMENT OF AUGER, WATER
- 94. MF 22-30 SERIES REPLACEMENT OF AUGER, WATER
- 95. MF 22-30 SERIES REPLACEMENT OF AUGER, WATER
- 96. MF 22-30 SERIES REPLACEMENT OF AUGER, WATER
- 97. MF 22-30 SERIES REPLACEMENT OF AUGER, WATER
- 98. MF 22-30 SERIES REPLACEMENT OF AUGER, WATER
- 99. MF 22-30 SERIES REPLACEMENT OF AUGER, WATER
- 100. MF 22-30 SERIES REPLACEMENT OF AUGER, WATER
- 101. MF 22-30 SERIES REPLACEMENT OF AUGER, WATER
- 102. MF 22-30 SERIES REPLACEMENT OF AUGER, WATER
- 103. MF 22-30 SERIES REPLACEMENT OF AUGER, WATER
- 104. MF 41-51-61 SERIES REPLACEMENT OF AUGER, WATER
- 105. MF 41-51-61 SERIES REPLACEMENT OF AUGER, WATER SEAL AND BEARINGS ……the sides/rear panel.
- 106. REPLACEMENT OF AUGER, WATER SEAL AND BEARINGS
- 107. MF 41-51-61 SERIES REPLACEMENT OF AUGER, WATER
- 108. MF 41-51-61 SERIES REPLACEMENT OF AUGER, WATER
- 109. MF 41-51-61 SERIES REPLACEMENT OF AUGER, WATER
- 110. MF 41-51-61 SERIES REPLACEMENT OF AUGER, WATER
- 111. MF 41-51-61 SERIES REPLACEMENT OF AUGER, WATER
- 112. MF 41-51-61 SERIES REPLACEMENT OF AUGER, WATER
- 113. MF 41-51-61 SERIES REPLACEMENT OF AUGER, WATER
- 114. MF 41-51-61 SERIES REPLACEMENT OF AUGER, WATER
- 115. MF 41-51-61 SERIES REPLACEMENT OF AUGER, WATER
- 116. MF 41-51-61 SERIES REPLACEMENT OF AUGER, WATER
- 117. MF 41-51-61 SERIES REPLACEMENT OF AUGER, WATER
- 118. MF 41-51-61 SERIES REPLACEMENT OF AUGER, WATER
- 119. MF 41-51-61 SERIES REPLACEMENT OF AUGER, WATER
- 120. MF 41-51-61 SERIES REPLACEMENT OF AUGER, WATER
- 121. MF 41-51-61 SERIES REPLACEMENT OF AUGER, WATER
- 122. MF 41-51-61 SERIES REPLACEMENT OF AUGER, WATER
- 123. MF 41-51-61 SERIES REPLACEMENT OF AUGER, WATER
- 124. MF 41-51-61 SERIES REPLACEMENT OF AUGER, WATER
- 125. MF SERIES END A SCOTSMAN EUROPE presentation Author: R. Ceriani


Слайд 3MF SERIES
MAINTENANCE
The most important program on the maintenance of the Flaker
Sanitizing: Every month
Cleaning: Every six
On next slides will be shown the procedure for sanitizing and cleaning.

Слайд 4MF SERIES
MAINTENANCE
TOOLS REQUIRED
Medium Phillips Screwdriver
Medium Flat Screwdriver
Pair of
Bucket
Different types of brush
Approved Cleaner/Sanitiser


Слайд 6MF SERIES
MAINTENANCE
Switch OFF the machine at main power switch….
…..and close the
OFF
CLOSED


Слайд 8MF SERIES
MAINTENANCE
Remove the metal clamp and disconnect the water tube from
Collect….


Слайд 11MF SERIES
MAINTENANCE
Prepare the cleaning solution by diluting in a plastic bucket
")
Слайд 12MF SERIES
MAINTENANCE
MF 22: 1,5 LITER WATER WITH 150 CC CLEANER
MF 30: 2 LITERS
MF 41/51: 4 LITERS WATER WITH 400 CC CLEANER
MF 61: 4 LITERS WATER WITH 400 CC CLEANER PER EVAPORATOR

Слайд 13MF SERIES
MAINTENANCE
Remove the water reservoir cover then….
….slowly pour onto the water

Слайд 14MF SERIES
MAINTENANCE
Leave the machine in OFF mode for approximately 20 minutes

Слайд 15MF SERIES
MAINTENANCE
With the help of a brush dissolve the most resistant

Слайд 16MF SERIES
MAINTENANCE
Jump with a wire or connect together the two metal


Слайд 18MF SERIES
MAINTENANCE
Few minutes later the machine start up to produce and
 into")
Слайд 19MF SERIES
MAINTENANCE
As soon as the level of the water into the

Слайд 20MF SERIES
MAINTENANCE
Once empty the bucket open the water tap so to

Слайд 21MF SERIES
MAINTENANCE
When sure that no more trace of cleaning solution is

Слайд 22MF SERIES
MAINTENANCE
….place again the water reservoir cover paying attention to remove


Слайд 24MF SERIES
MAINTENANCE
Wash the inside of the storage bin with sanitizing solution

Слайд 25MAINTENANCE
REMEMBER. To prevent the accumulation of undesirable bacteria it is necessary
MF SERIES

Слайд 26MF SERIES
MAINTENANCE
It is possible to change a little bit the quality

Слайд 27MF SERIES
MAINTENANCE
The unit frame is equipped by five series of holes
Higher level is for wetter ice while lower level for drier ice.


Слайд 30MF SERIES
SERVICE ANALYSIS
Check for the correct operation of the Optical Ice

Слайд 31MF SERIES
SERVICE ANALYSIS
The two eyes placed on the opposite side of

Слайд 32MF SERIES
SERVICE ANALYSIS
Check also for any possible accumulation of scale around

Слайд 33MF SERIES
SERVICE ANALYSIS
The power signal transmitted by the Optical Ice Level

Слайд 34MF SERIES
SERVICE ANALYSIS
If re-adjusted, be sure first of the correct tripping

Слайд 35MF SERIES
SERVICE ANALYSIS
ATTENTION. The Optical Ice Level Control can be affected
Avoid to leave the machine in operation directly under the sun light and/or without the service panels.


Слайд 40MF SERIES
SERVICE ANALYSIS
…..for the correct cleaning of the orifice of the
If not clean it with a small metal pin.

Слайд 41MF SERIES
SERVICE ANALYSIS
In case of water into the water reservoir check

Слайд 42MF SERIES
SERVICE ANALYSIS
…..or for any loosing wire between the two metal
…...the PC Board connector (red color two pins connector).

Слайд 43MF SERIES
SERVICE ANALYSIS
ATTENTION. The water level sensor operate by transmitting a
A minimum of 30µS electrical conductivity water is required for correct operation of the machine.


Слайд 45MF SERIES
SERVICE ANALYSIS
It is a normal situation at every machine start
When needed the 3’ waiting time can be by-passed by jumping the two contacts J3…..
…...and Switch OFF and ON the machine.


Слайд 47MF SERIES
SERVICE ANALYSIS
It is a typical winter situation.
When the machine is

Слайд 48MF SERIES
SERVICE ANALYSIS
Too high condensing temperature (>60ºC or >70ºC)
Green and Red
Green and Red LED ON.")
Слайд 49MF SERIES
SERVICE ANALYSIS
On Air Cooled Version check first for the correct
Power to the motor

Слайд 50MF SERIES
SERVICE ANALYSIS
On Air Cooled Version check first for the correct
Power to the motor
Open winding of the motor

Слайд 51MF SERIES
SERVICE ANALYSIS
On Air Cooled Version check first for the correct
Power to the motor
Open winding of the motor
Fan blade loose on fan motor shaft

Слайд 52MF SERIES
SERVICE ANALYSIS
Check also for any possibility of fan motor overheating

Слайд 53MF SERIES
SERVICE ANALYSIS
One more possibility (very rare) it is a faulty
160 V
 it is a faulty PC Board (TRIAC) that")
Слайд 54MF SERIES
SERVICE ANALYSIS
During normal operation mode the fan motor is energized
…...is not energized at all during its OFF mode.

Слайд 55MF SERIES
SERVICE ANALYSIS
In case the power during the OFF mode is


Слайд 57MF SERIES
SERVICE ANALYSIS
On Water Cooled Version check first for the:
Water
Correct operation of the water regulating valve

Слайд 58MF SERIES
SERVICE ANALYSIS
Too high evaporating temperature after 10’ operation
Green LED ON
Yellow

Слайд 59MF SERIES
SERVICE ANALYSIS
Check if ice is produced during the first ten

Слайд 60MF SERIES
SERVICE ANALYSIS
If no ice is produced check for:
Refrigerant charge.

")
Слайд 62MF SERIES
SERVICE ANALYSIS
If no ice is produced check for:
Refrigerant charge

Слайд 63MF SERIES
SERVICE ANALYSIS
If no ice is produced check for:
Refrigerant charge
Power out on the contacts 7 and 8 of the PC Board


Слайд 65MF SERIES
SERVICE ANALYSIS
If the drive motor doesn’t turn check for:
Power

Слайд 66MF SERIES
SERVICE ANALYSIS
If the drive motor doesn’t turn check for:
Power
Drive motor with open winding

Слайд 67MF SERIES
SERVICE ANALYSIS
If the drive motor doesn’t turn check for:
Power
Drive motor with open winding
Drive motor capacitor worn-out
KO

Слайд 68MF SERIES
SERVICE ANALYSIS
If the drive motor doesn’t turn check for:
Power
Drive motor with open winding
Drive motor capacitor worn-out
Looked rotor


Слайд 71MF SERIES
SERVICE ANALYSIS
Check for:
Worn out drive motor bearings
Worn


Слайд 73MF SERIES
SERVICE ANALYSIS
Check for:
Worn out drive motor bearings
Worn
Worn out auger/freezer


Слайд 75MF SERIES
SERVICE ANALYSIS
Check for:
Worn out drive motor bearings
Worn
Worn out auger/freezer
Worn out gear box bearing/gears


Слайд 77MF SERIES
SERVICE ANALYSIS
Wrong rotation of drive motor (opposite direction)
Green and Yellow
Green and Yellow LED ON.")
Слайд 78MF SERIES
SERVICE ANALYSIS
Check for:
Correct wires connection to the drive motor
OK

Слайд 79MF SERIES
SERVICE ANALYSIS
Check for:
Correct wires connection to the drive motor
Drive motor capacitor worn-out
KO

Слайд 80MF SERIES
SERVICE ANALYSIS
Check for:
Correct wires connection to the drive motor
Drive motor capacitor unloaded
Freeze up of the evaporator

Слайд 81MF SERIES
SERVICE ANALYSIS
Additional reasons for the tripping OFF at Rotation Error
Magnetic sensor unplugged

Слайд 82MF SERIES
SERVICE ANALYSIS
Magnetic sensor unplugged
Magnetic sensor too far from
0.5÷1 mm

Слайд 83MF SERIES
SERVICE ANALYSIS
Magnetic sensor unplugged
Magnetic sensor too far from
Magnetic cylinder partially or fully demagnetized

Слайд 84MF SERIES
SERVICE ANALYSIS
Automatic
reset mode
Manual
reset mode
Bin Full
No Water
Too Low
Too Hi Condensing Temperature
Too Hi Evaporating Temperature
No Rotation
Wrong Rotation
Slow Rotation

Слайд 85MF SERIES
SERVICE ANALYSIS
Manual reset mode
The New Flaker PC Board Trip OFF
In this way the New PC Board should avoid any Tripping OFF due to possible magnetic fields and/or micro black OUT of power supply that can affect the correct operation of the Flaker machine.


Слайд 87MF 22-30 SERIES
REPLACEMENT OF AUGER, WATER SEAL AND BEARINGS
Remove first the


Слайд 89MF 22-30 SERIES
REPLACEMENT OF AUGER, WATER SEAL AND BEARINGS
Unloose the wing
…..remove the metal rod securing the plastic ice chute to the ice spout.

Слайд 90MF 22-30 SERIES
REPLACEMENT OF AUGER, WATER SEAL AND BEARINGS
Cut the plastic
…..two polystyrene insulation from the spout.

Слайд 91MF 22-30 SERIES
REPLACEMENT OF AUGER, WATER SEAL AND BEARINGS
Unscrew and remove

Слайд 92MF 22-30 SERIES
REPLACEMENT OF AUGER, WATER SEAL AND BEARINGS
Grasp with a

Слайд 93MF 22-30 SERIES
REPLACEMENT OF AUGER, WATER SEAL AND BEARINGS
Parts pulled out
ice breaker assembly
auger
top half of the water seal

Слайд 94MF 22-30 SERIES
REPLACEMENT OF AUGER, WATER SEAL AND BEARINGS
With a clip

Слайд 95MF 22-30 SERIES
REPLACEMENT OF AUGER, WATER SEAL AND BEARINGS
Unloose and remove

Слайд 96MF 22-30 SERIES
REPLACEMENT OF AUGER, WATER SEAL AND BEARINGS
…...remove the ice

Слайд 97MF 22-30 SERIES
REPLACEMENT OF AUGER, WATER SEAL AND BEARINGS
Clean away the

Слайд 98MF 22-30 SERIES
REPLACEMENT OF AUGER, WATER SEAL AND BEARINGS
…... as well

Слайд 99MF 22-30 SERIES
REPLACEMENT OF AUGER, WATER SEAL AND BEARINGS
Slide off from

Слайд 100MF 22-30 SERIES
REPLACEMENT OF AUGER, WATER SEAL AND BEARINGS
Unloose and remove

Слайд 101MF 22-30 SERIES
REPLACEMENT OF AUGER, WATER SEAL AND BEARINGS
…... raise the
Using a suitable wooden dowel inserted through the top of the freezer…...

Слайд 102MF 22-30 SERIES
REPLACEMENT OF AUGER, WATER SEAL AND BEARINGS
…...tap the lower
…….and the lower bearing out the bottom of the freezer.

Слайд 103MF 22-30 SERIES
REPLACEMENT OF AUGER, WATER SEAL AND BEARINGS
It is good
A Kit is available for this purpose containing a can of waterproof special grease.

Слайд 104MF 41-51-61 SERIES
REPLACEMENT OF AUGER, WATER SEAL AND BEARINGS
Remove first the


Слайд 106REPLACEMENT OF AUGER, WATER SEAL AND BEARINGS
Unloose the wing nut then…...
…..remove the metal rod securing the plastic ice chute to the ice spout.
MF 41-51-61 SERIES

Слайд 107MF 41-51-61 SERIES
REPLACEMENT OF AUGER, WATER SEAL AND BEARINGS
Remove the ice

Слайд 108MF 41-51-61 SERIES
REPLACEMENT OF AUGER, WATER SEAL AND BEARINGS
Unscrew the screw
…..then remove the strips from the insulated plastic ice spout.

Слайд 109MF 41-51-61 SERIES
REPLACEMENT OF AUGER, WATER SEAL AND BEARINGS
Remove from the

Слайд 110MF 41-51-61 SERIES
REPLACEMENT OF AUGER, WATER SEAL AND BEARINGS
….unloose the two
….and remove it.

Слайд 111MF 41-51-61 SERIES
REPLACEMENT OF AUGER, WATER SEAL AND BEARINGS
Remove the plastic
….then unloose the four bolts holding the ice breaker to the upper flange of the freezer.

Слайд 112MF 41-51-61 SERIES
REPLACEMENT OF AUGER, WATER SEAL AND BEARINGS
With a couple

Слайд 113MF 41-51-61 SERIES
REPLACEMENT OF AUGER, WATER SEAL AND BEARINGS
…. pull out

Слайд 114MF 41-51-61 SERIES
REPLACEMENT OF AUGER, WATER SEAL AND BEARINGS
Parts pulled out
ice breaker assembly
auger
top half of the water seal

Слайд 115MF 41-51-61 SERIES
REPLACEMENT OF AUGER, WATER SEAL AND BEARINGS
With a screwdriver

Слайд 116MF 41-51-61 SERIES
REPLACEMENT OF AUGER, WATER SEAL AND BEARINGS
Unloose and remove

Слайд 117MF 41-51-61 SERIES
REPLACEMENT OF AUGER, WATER SEAL AND BEARINGS
…...remove the ice

Слайд 118MF 41-51-61 SERIES
REPLACEMENT OF AUGER, WATER SEAL AND BEARINGS
Clean away the

Слайд 119MF 41-51-61 SERIES
REPLACEMENT OF AUGER, WATER SEAL AND BEARINGS
…... as well

Слайд 120MF 41-51-61 SERIES
REPLACEMENT OF AUGER, WATER SEAL AND BEARINGS
Slide off from

Слайд 121MF 41-51-61 SERIES
REPLACEMENT OF AUGER, WATER SEAL AND BEARINGS
Unloose and remove

Слайд 122MF 41-51-61 SERIES
REPLACEMENT OF AUGER, WATER SEAL AND BEARINGS
…... raise the
Using two flat screwdrivers remove…..

Слайд 123MF 41-51-61 SERIES
REPLACEMENT OF AUGER, WATER SEAL AND BEARINGS
….. the bottom

Слайд 124MF 41-51-61 SERIES
REPLACEMENT OF AUGER, WATER SEAL AND BEARINGS
It is good
A Kit is available for this purpose containing a can of waterproof special grease.