- Главная
- Разное
- Дизайн
- Бизнес и предпринимательство
- Аналитика
- Образование
- Развлечения
- Красота и здоровье
- Финансы
- Государство
- Путешествия
- Спорт
- Недвижимость
- Армия
- Графика
- Культурология
- Еда и кулинария
- Лингвистика
- Английский язык
- Астрономия
- Алгебра
- Биология
- География
- Детские презентации
- Информатика
- История
- Литература
- Маркетинг
- Математика
- Медицина
- Менеджмент
- Музыка
- МХК
- Немецкий язык
- ОБЖ
- Обществознание
- Окружающий мир
- Педагогика
- Русский язык
- Технология
- Физика
- Философия
- Химия
- Шаблоны, картинки для презентаций
- Экология
- Экономика
- Юриспруденция
BoardDiag Test Environment & Coverage презентация
Содержание
- 1. BoardDiag Test Environment & Coverage
- 2. 2. Recommended repair process Defective samples
- 3. 3. Qualcomm Download Mode Qualcomm main
- 4. 4. How to enter Qdload(= Qualcomm Download)
- 5. 4. How to enter Qdload(= Qualcomm Download)
- 6. 5. How to use BoardDiag(1) Booting Problem
- 7. 5. How to use BoardDiag(2) 3) Restore
- 8. 6. BoardDiag Setting Detail(1) Image Extraction
- 9. 6. BoardDiag Setting Detail(2) 2) Board Diag
- 10. 6. BoardDiag Setting Detail(3) 3) Restore Device
- 11. 6. BoardDiag Setting Detail(4) 4) Select model,
- 12. 6. BoardDiag Setting Detail(5) 6) Test Results
- 13. 6. BoardDiag Setting Detail(6) - Sample Test AP/EMMC(read&write)/SDRAM diagnosis testing Test completed. All Pass
- 14. 7. Repair guide based on diagnosis “Device
- 15. 7. Repair guide based on diagnosis 2)
- 16. 7. Repair guide based on diagnosis 3)
- 17. 7. Repair guide based on diagnosis 4)
- 18. 7. Repair guide based on diagnosis 5)
- 19. 7. Repair guide based on diagnosis
- 20. 7. Repair guide based on diagnosis
Слайд 11. BoardDiag Test Environment & Coverage
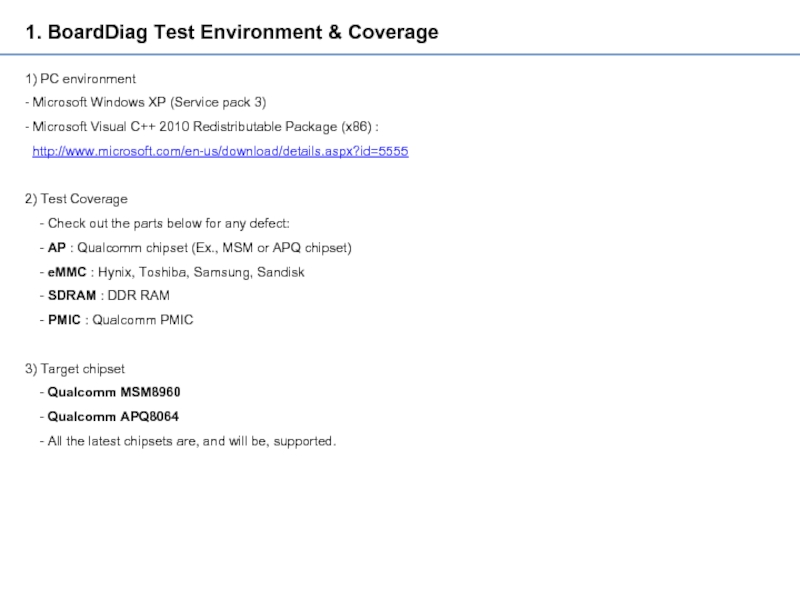
1) PC environment
- Microsoft Windows XP
- Microsoft Visual C++ 2010 Redistributable Package (x86) :
http://www.microsoft.com/en-us/download/details.aspx?id=5555
2) Test Coverage
- Check out the parts below for any defect:
- AP : Qualcomm chipset (Ex., MSM or APQ chipset)
- eMMC : Hynix, Toshiba, Samsung, Sandisk
- SDRAM : DDR RAM
- PMIC : Qualcomm PMIC
3) Target chipset
- Qualcomm MSM8960
- Qualcomm APQ8064
- All the latest chipsets are, and will be, supported.
Слайд 22. Recommended repair process
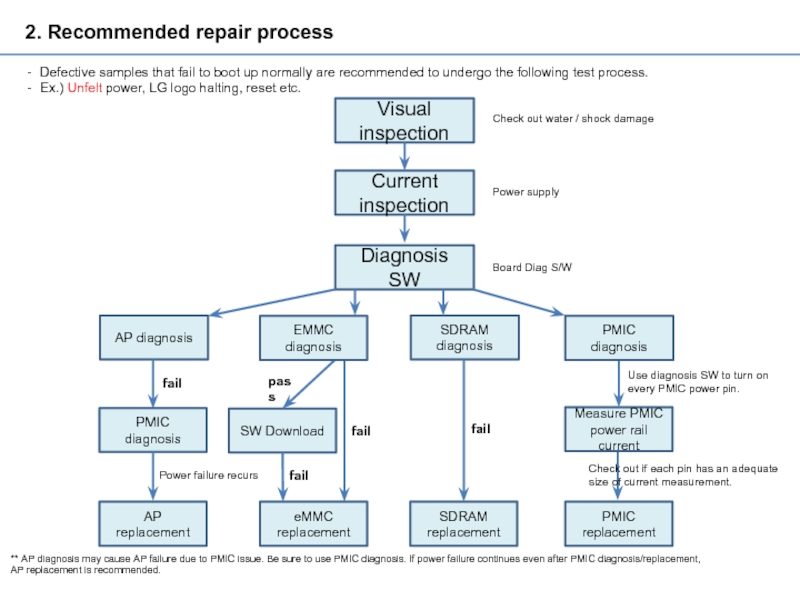
Defective samples that fail to boot up
Ex.) Unfelt power, LG logo halting, reset etc.
Visual inspection
Current inspection
Diagnosis SW
SDRAM diagnosis
SW Download
eMMC replacement
SDRAM replacement
Measure PMIC power rail current
PMIC replacement
pass
fail
fail
fail
Use diagnosis SW to turn on
every PMIC power pin.
Check out if each pin has an adequate
size of current measurement.
Check out water / shock damage
Power supply
Board Diag S/W
EMMC diagnosis
PMIC diagnosis
AP diagnosis
AP replacement
Power failure recurs
PMIC diagnosis
fail
** AP diagnosis may cause AP failure due to PMIC issue. Be sure to use PMIC diagnosis. If power failure continues even after PMIC diagnosis/replacement,
AP replacement is recommended.
Слайд 33. Qualcomm Download Mode
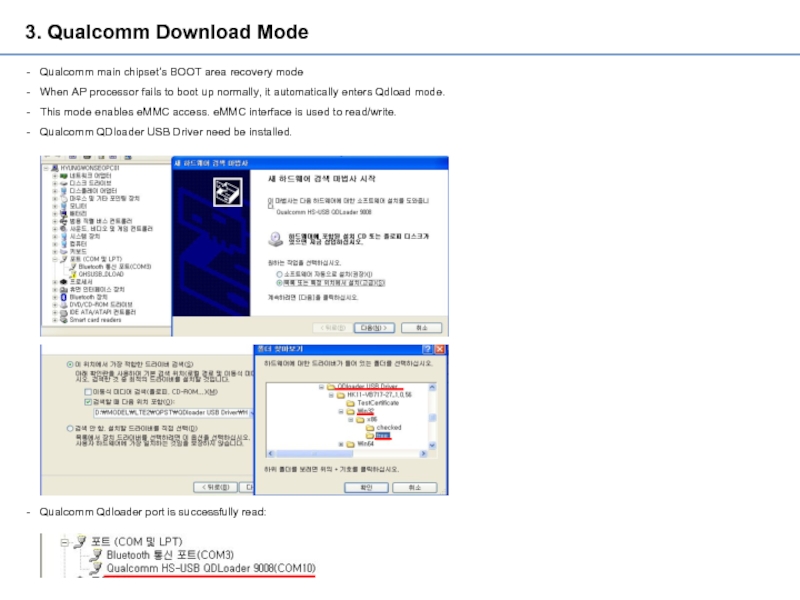
Qualcomm main chipset’s BOOT area recovery mode
When
This mode enables eMMC access. eMMC interface is used to read/write.
Qualcomm QDloader USB Driver need be installed.
Qualcomm Qdloader port is successfully read:
Слайд 44. How to enter Qdload(= Qualcomm Download) mode (1)
BoardDiag diagnosis SW
port or USB serial port is held.
Upon initial USB cable connection, don’t do the following if it’s already in Qdload mode.
Use either way below(#1 recommended) to connect the USB cable while the pin is grounded.
Check out the Device Manager for ports(COM or LPT). If Qualcomm HS-USB Qdloader 9008 port is activated, Qdload mode is successfully
ready to work!!
As for the USB cable, the SW download cable v2.1 (910K) for service is recommended!!
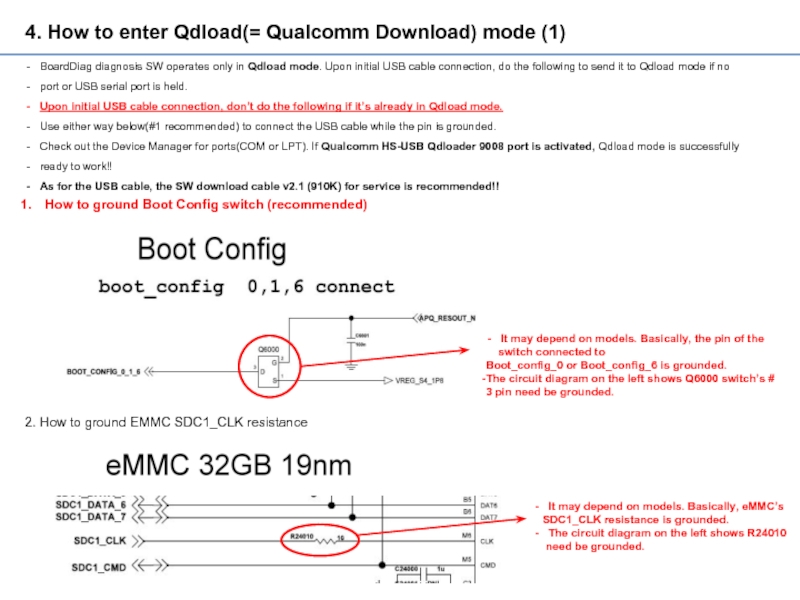
How to ground Boot Config switch (recommended)
2. How to ground EMMC SDC1_CLK resistance
It may depend on models. Basically, the pin of the
switch connected to
Boot_config_0 or Boot_config_6 is grounded.
The circuit diagram on the left shows Q6000 switch’s #
3 pin need be grounded.
It may depend on models. Basically, eMMC’s
SDC1_CLK resistance is grounded.
The circuit diagram on the left shows R24010
need be grounded.
Слайд 54. How to enter Qdload(= Qualcomm Download) mode (2)
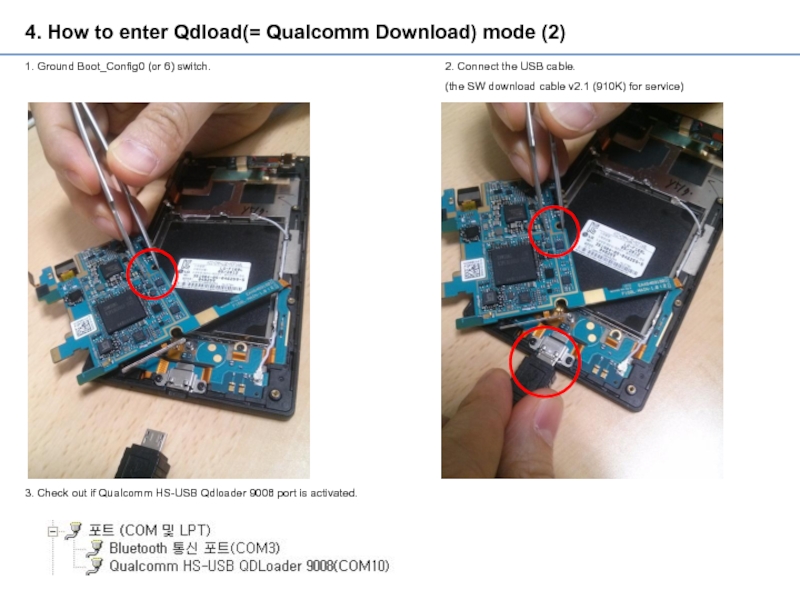
1. Ground Boot_Config0
2. Connect the USB cable.
(the SW download cable v2.1 (910K) for service)
3. Check out if Qualcomm HS-USB Qdloader 9008 port is activated.
Слайд 65. How to use BoardDiag(1)
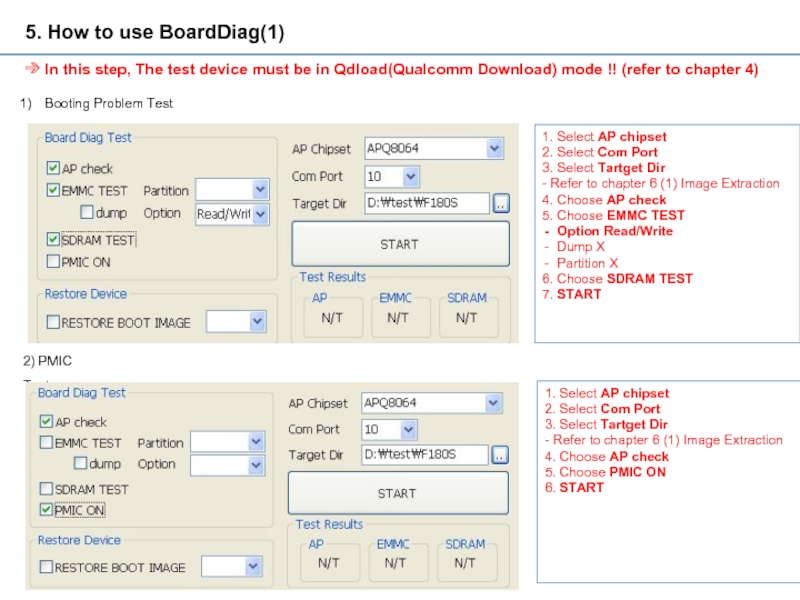
Booting Problem Test
1. Select AP chipset
2. Select
3. Select Tartget Dir
- Refer to chapter 6 (1) Image Extraction
4. Choose AP check
5. Choose EMMC TEST
Option Read/Write
Dump X
Partition X
6. Choose SDRAM TEST
7. START
2) PMIC Test
1. Select AP chipset
2. Select Com Port
3. Select Tartget Dir
- Refer to chapter 6 (1) Image Extraction
4. Choose AP check
5. Choose PMIC ON
6. START
➔ In this step, The test device must be in Qdload(Qualcomm Download) mode !! (refer to chapter 4)
Слайд 75. How to use BoardDiag(2)
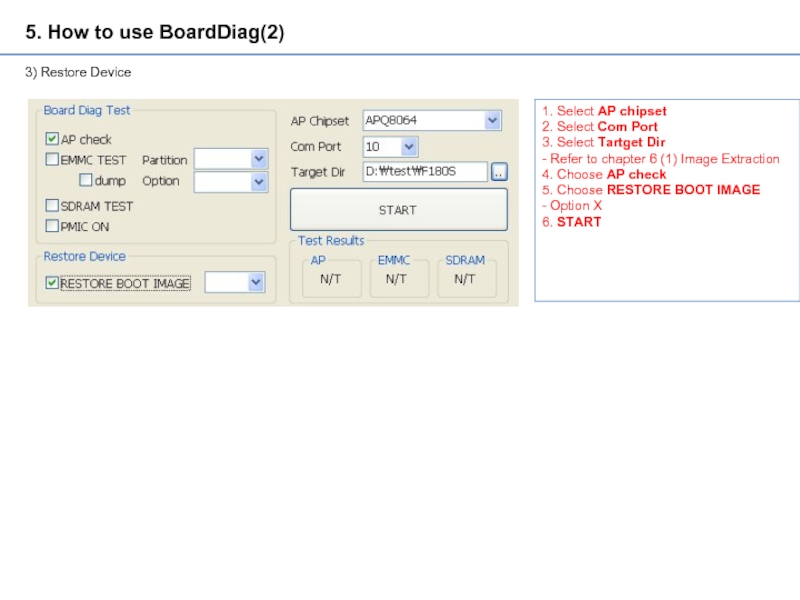
3) Restore Device
1. Select AP chipset
2. Select
3. Select Tartget Dir
- Refer to chapter 6 (1) Image Extraction
4. Choose AP check
5. Choose RESTORE BOOT IMAGE
- Option X
6. START
Слайд 86. BoardDiag Setting Detail(1)
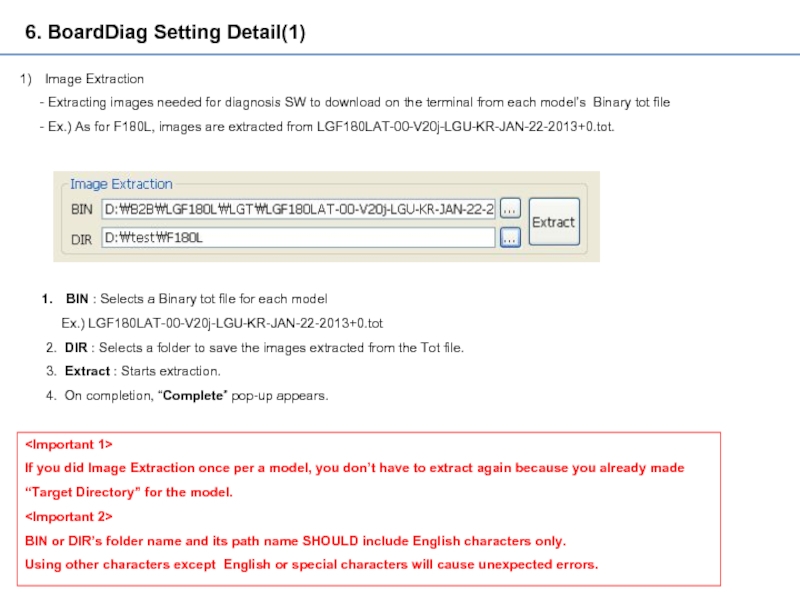
Image Extraction
- Extracting images needed for
- Ex.) As for F180L, images are extracted from LGF180LAT-00-V20j-LGU-KR-JAN-22-2013+0.tot.
BIN : Selects a Binary tot file for each model
Ex.) LGF180LAT-00-V20j-LGU-KR-JAN-22-2013+0.tot
2. DIR : Selects a folder to save the images extracted from the Tot file.
3. Extract : Starts extraction.
4. On completion, “Complete” pop-up appears.
If you did Image Extraction once per a model, you don’t have to extract again because you already made
“Target Directory” for the model.
BIN or DIR’s folder name and its path name SHOULD include English characters only.
Using other characters except English or special characters will cause unexpected errors.
Слайд 96. BoardDiag Setting Detail(2)
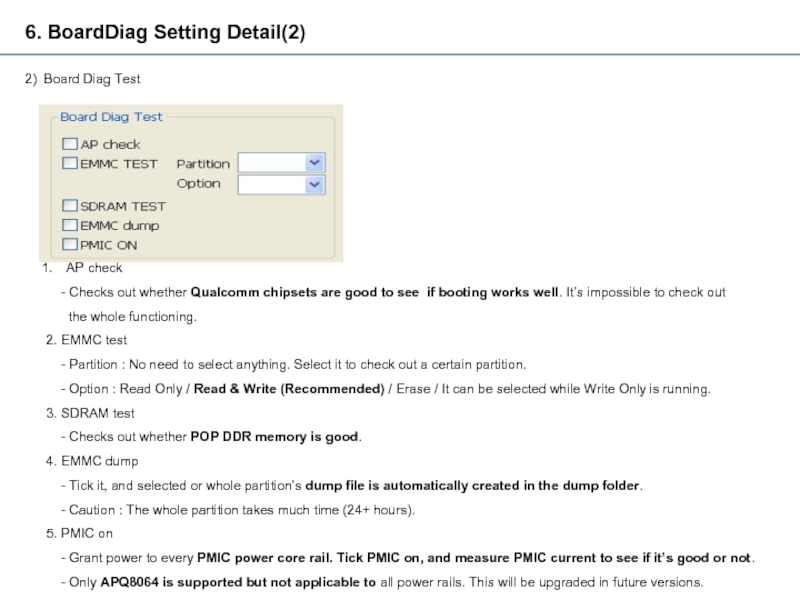
2) Board Diag Test
AP check
-
the whole functioning.
2. EMMC test
- Partition : No need to select anything. Select it to check out a certain partition.
- Option : Read Only / Read & Write (Recommended) / Erase / It can be selected while Write Only is running.
3. SDRAM test
- Checks out whether POP DDR memory is good.
4. EMMC dump
- Tick it, and selected or whole partition’s dump file is automatically created in the dump folder.
- Caution : The whole partition takes much time (24+ hours).
5. PMIC on
- Grant power to every PMIC power core rail. Tick PMIC on, and measure PMIC current to see if it’s good or not.
- Only APQ8064 is supported but not applicable to all power rails. This will be upgraded in future versions.
Слайд 106. BoardDiag Setting Detail(3)
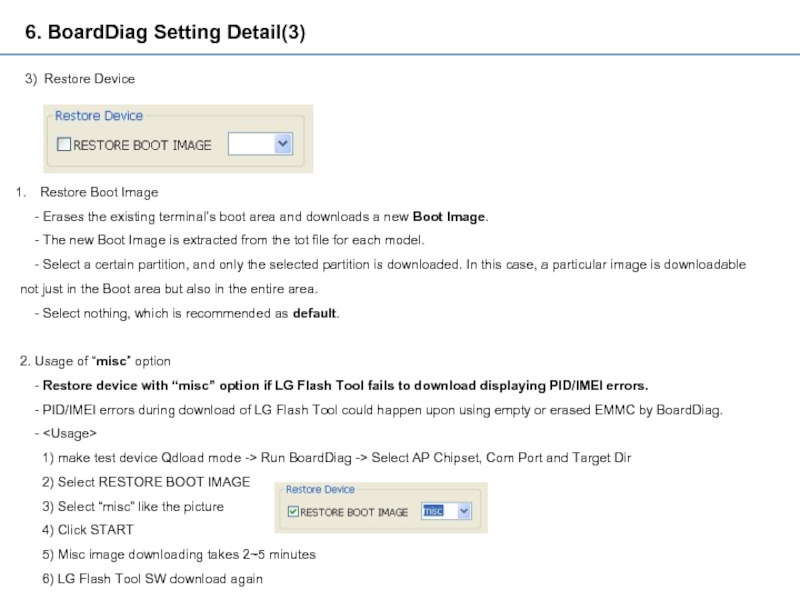
3) Restore Device
Restore Boot Image
- Erases
- The new Boot Image is extracted from the tot file for each model.
- Select a certain partition, and only the selected partition is downloaded. In this case, a particular image is downloadable
not just in the Boot area but also in the entire area.
- Select nothing, which is recommended as default.
2. Usage of “misc” option
- Restore device with “misc” option if LG Flash Tool fails to download displaying PID/IMEI errors.
- PID/IMEI errors during download of LG Flash Tool could happen upon using empty or erased EMMC by BoardDiag.
-
1) make test device Qdload mode -> Run BoardDiag -> Select AP Chipset, Com Port and Target Dir
2) Select RESTORE BOOT IMAGE
3) Select “misc” like the picture
4) Click START
5) Misc image downloading takes 2~5 minutes
6) LG Flash Tool SW download again
Слайд 116. BoardDiag Setting Detail(4)
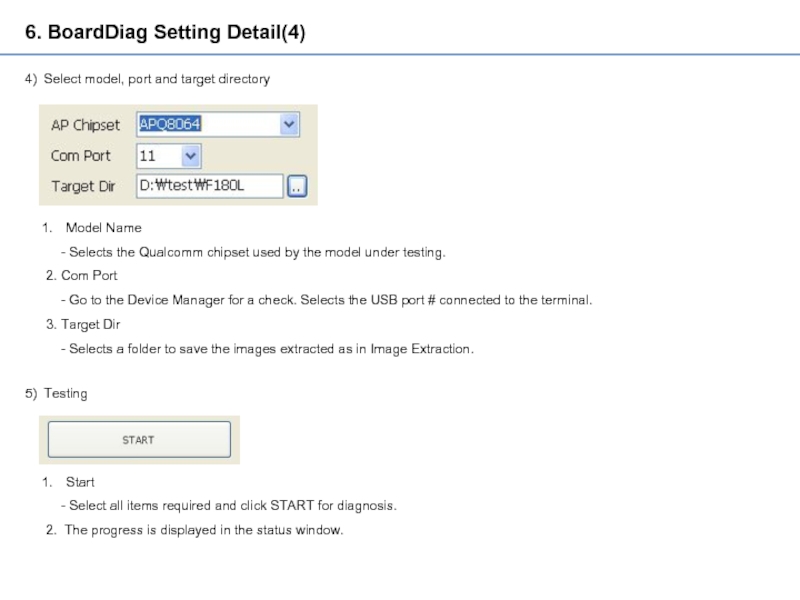
4) Select model, port and target directory
Model Name
2. Com Port
- Go to the Device Manager for a check. Selects the USB port # connected to the terminal.
3. Target Dir
- Selects a folder to save the images extracted as in Image Extraction.
5) Testing
Start
- Select all items required and click START for diagnosis.
2. The progress is displayed in the status window.
Слайд 126. BoardDiag Setting Detail(5)
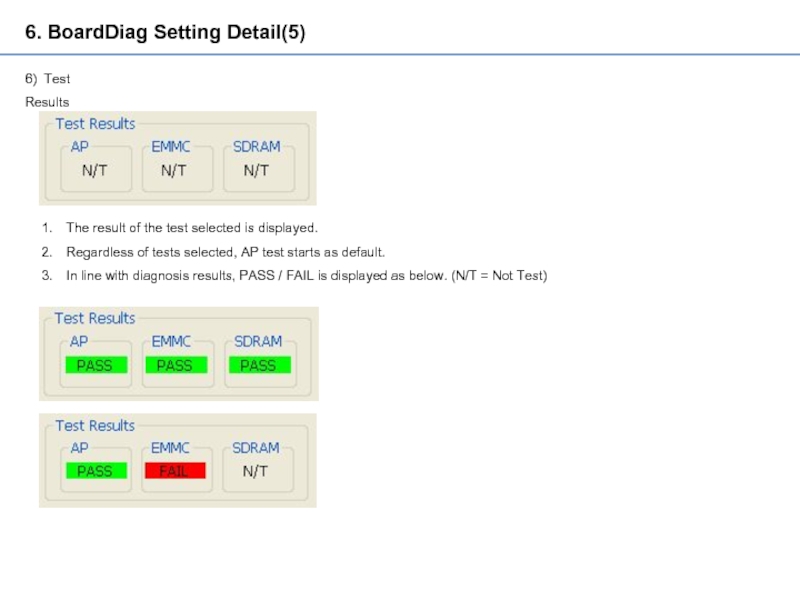
6) Test Results
The result of the test selected
Regardless of tests selected, AP test starts as default.
In line with diagnosis results, PASS / FAIL is displayed as below. (N/T = Not Test)
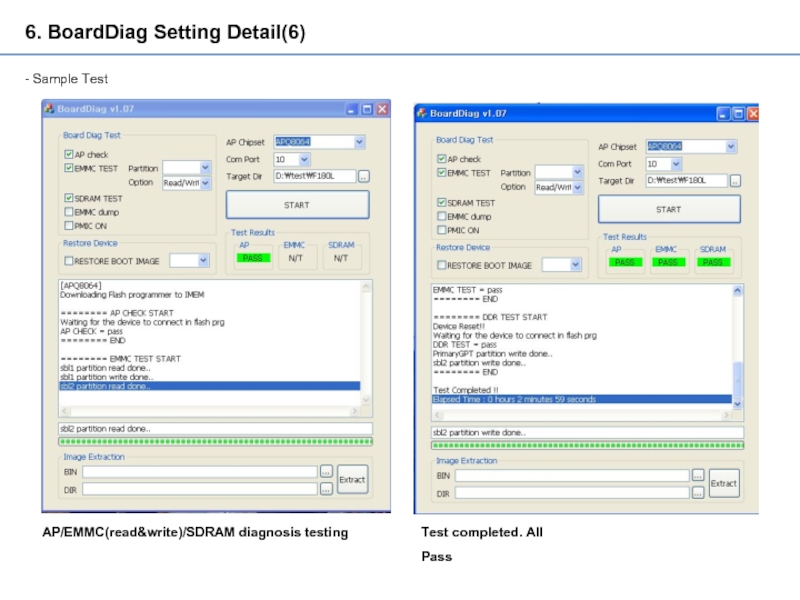
Слайд 136. BoardDiag Setting Detail(6)
- Sample Test
AP/EMMC(read&write)/SDRAM diagnosis testing
Test completed. All
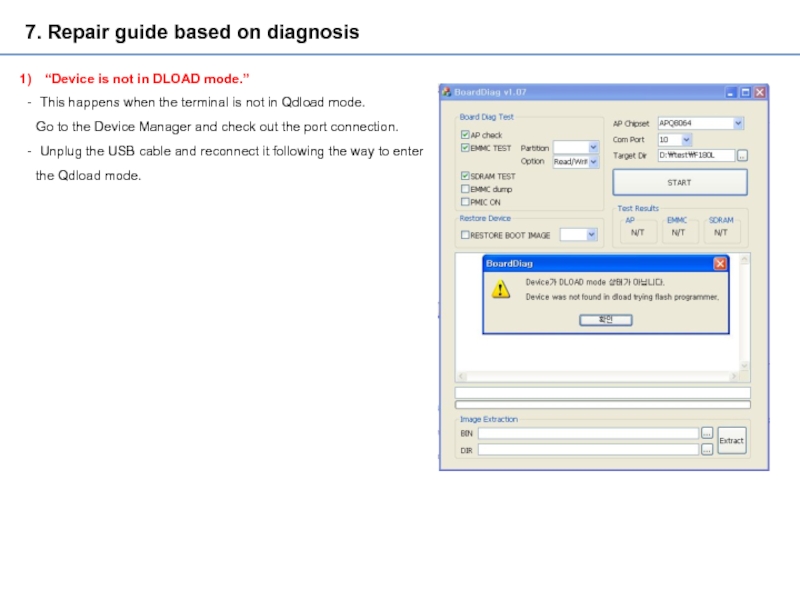
Слайд 147. Repair guide based on diagnosis
“Device is not in DLOAD mode.”
This
Go to the Device Manager and check out the port connection.
Unplug the USB cable and reconnect it following the way to enter
the Qdload mode.
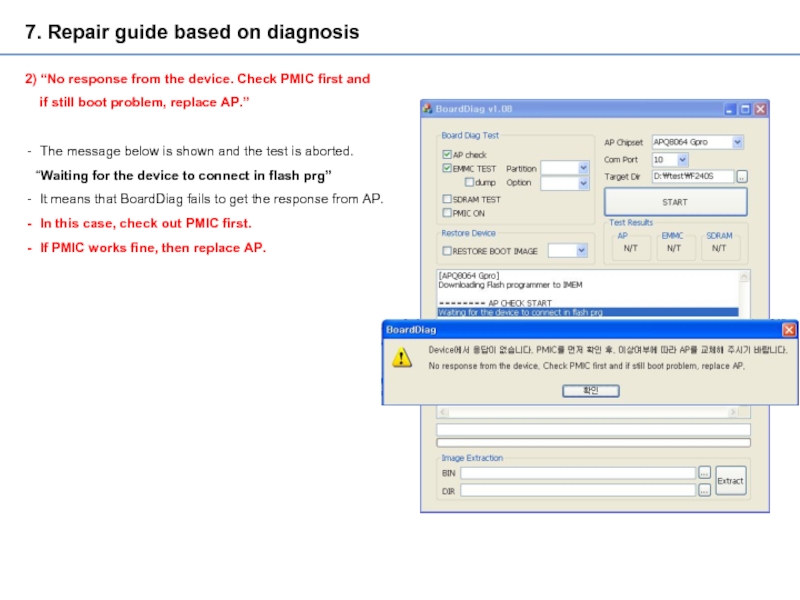
Слайд 157. Repair guide based on diagnosis
2) “No response from the device.
if still boot problem, replace AP.”
The message below is shown and the test is aborted.
“Waiting for the device to connect in flash prg”
It means that BoardDiag fails to get the response from AP.
In this case, check out PMIC first.
If PMIC works fine, then replace AP.
Слайд 167. Repair guide based on diagnosis
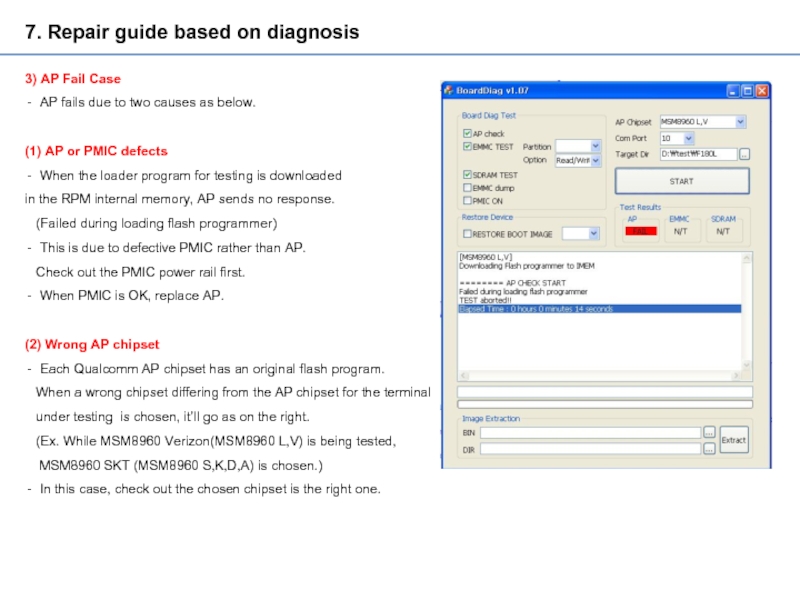
3) AP Fail Case
AP fails due
(1) AP or PMIC defects
When the loader program for testing is downloaded
in the RPM internal memory, AP sends no response.
(Failed during loading flash programmer)
This is due to defective PMIC rather than AP.
Check out the PMIC power rail first.
When PMIC is OK, replace AP.
(2) Wrong AP chipset
Each Qualcomm AP chipset has an original flash program.
When a wrong chipset differing from the AP chipset for the terminal
under testing is chosen, it’ll go as on the right.
(Ex. While MSM8960 Verizon(MSM8960 L,V) is being tested,
MSM8960 SKT (MSM8960 S,K,D,A) is chosen.)
In this case, check out the chosen chipset is the right one.
Слайд 177. Repair guide based on diagnosis
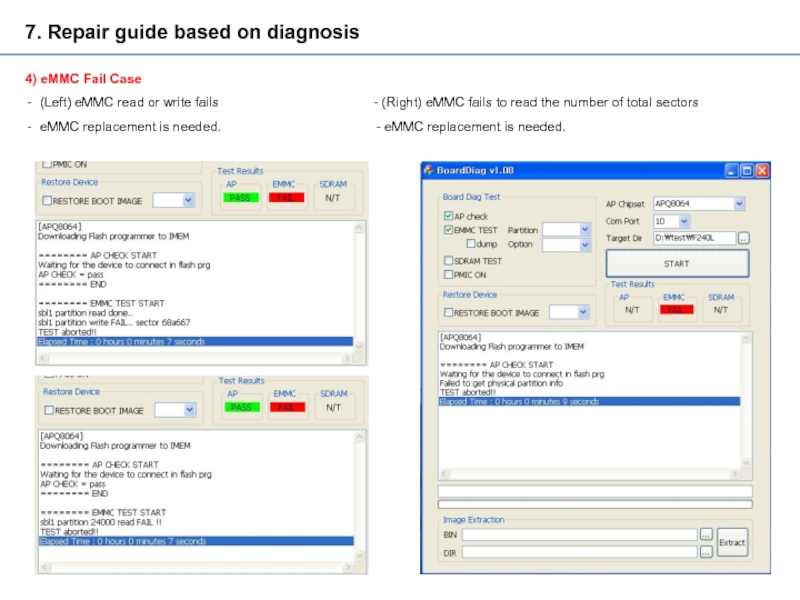
4) eMMC Fail Case
(Left) eMMC read
eMMC replacement is needed. - eMMC replacement is needed.
Слайд 187. Repair guide based on diagnosis
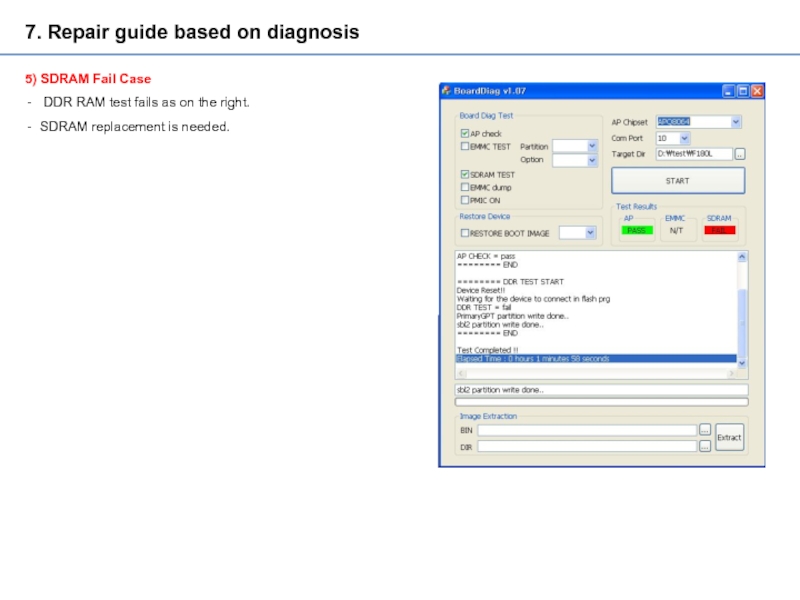
5) SDRAM Fail Case
DDR RAM
SDRAM replacement is needed.
Слайд 197. Repair guide based on diagnosis
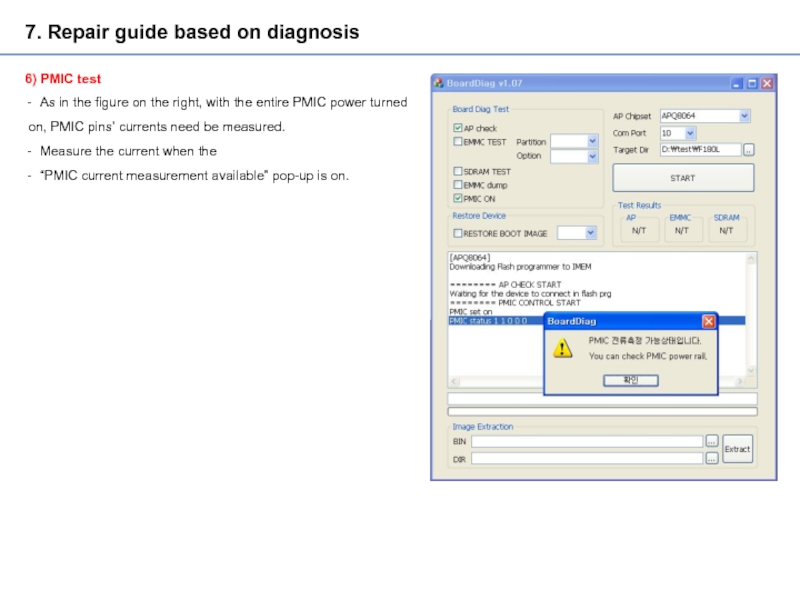
6) PMIC test
As in the
on, PMIC pins’ currents need be measured.
Measure the current when the
“PMIC current measurement available” pop-up is on.
Слайд 207. Repair guide based on diagnosis
7) Qdload port remains or
Case that only eMMC test is performed
If you perform the eMMC test only including write option except SDRAM test, Qdload mode remains after test.
It is because AA55 bit patterns are written in the eMMC boot area and original bootable codes are erased.
In order to come back to LG USB serial port mode, perform RESTORE BOOT IMAGE or SDRAM test.
(2) Case that no LG USB serial port is shown even if RESTORE BOOT IMAGE or SDRAM test is performed
Check out if the target directory matchs the test device model.
