at InMobi
- Главная
- Разное
- Дизайн
- Бизнес и предпринимательство
- Аналитика
- Образование
- Развлечения
- Красота и здоровье
- Финансы
- Государство
- Путешествия
- Спорт
- Недвижимость
- Армия
- Графика
- Культурология
- Еда и кулинария
- Лингвистика
- Английский язык
- Астрономия
- Алгебра
- Биология
- География
- Детские презентации
- Информатика
- История
- Литература
- Маркетинг
- Математика
- Медицина
- Менеджмент
- Музыка
- МХК
- Немецкий язык
- ОБЖ
- Обществознание
- Окружающий мир
- Педагогика
- Русский язык
- Технология
- Физика
- Философия
- Химия
- Шаблоны, картинки для презентаций
- Экология
- Экономика
- Юриспруденция
Getting Started with Developing for the Apple Watch Murtza Manzur, Developer Evangelist at InMobi презентация
Содержание
- 1. Getting Started with Developing for the Apple Watch Murtza Manzur, Developer Evangelist at InMobi
- 2. About InMobi Largest independent mobile ad network
- 3. MASSIVE REACH ACROSS TOP COMPANIES
- 4. Agenda Apple Watch architecture Hello World app
- 5. Architecture Apple Watch app requires an iOS
- 6. Architecture When Apple Watch app is launched,
- 7. Architecture
- 8. Hello World App for the Apple Watch Let’s build a Hello Word app
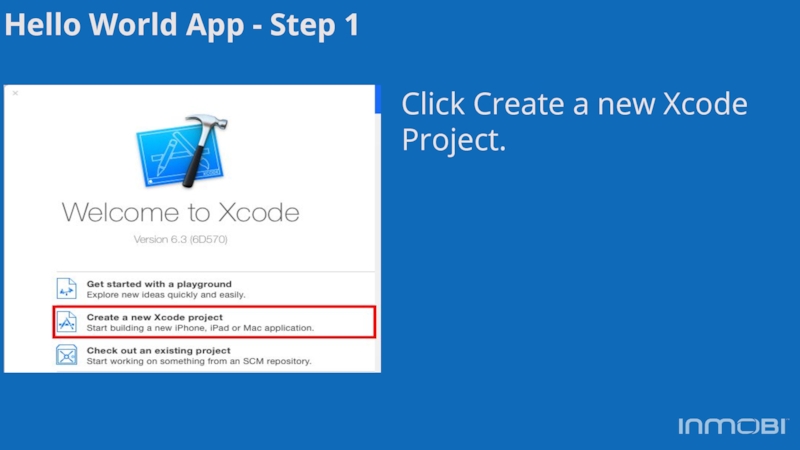
- 9. Hello World App - Step 1 Click Create a new Xcode Project.
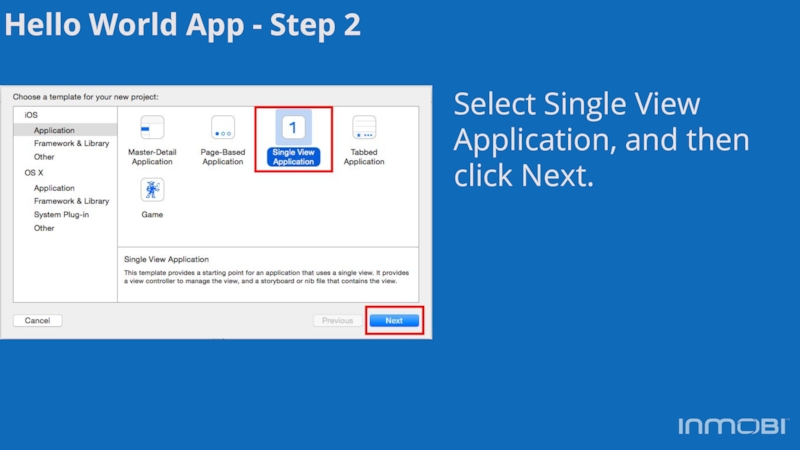
- 10. Hello World App - Step 2 Select Single View Application, and then click Next.
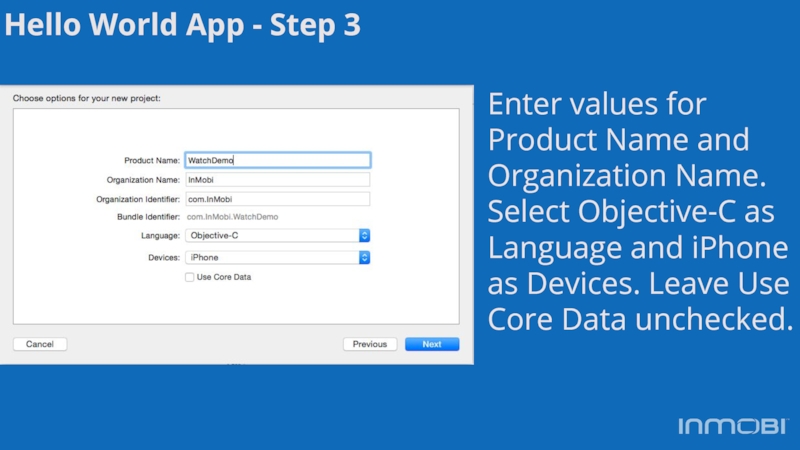
- 11. Hello World App - Step 3 Enter
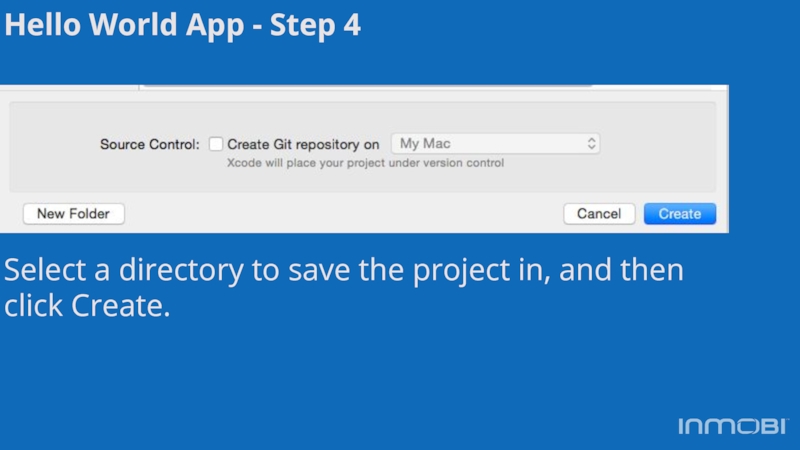
- 12. Hello World App - Step 4 Select
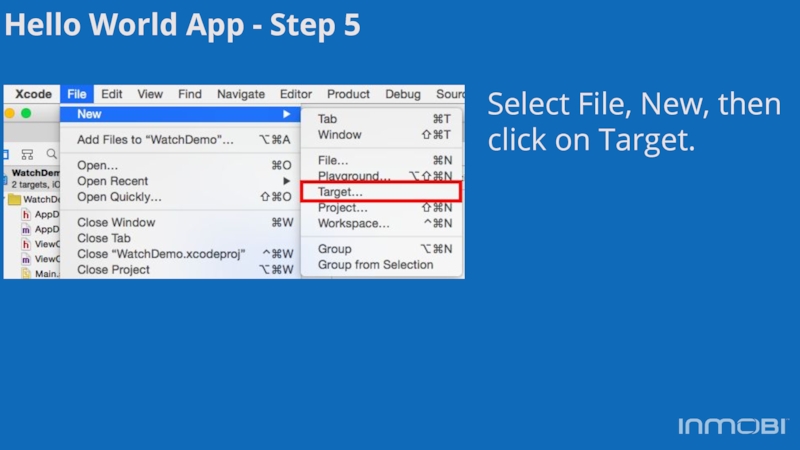
- 13. Hello World App - Step 5 Select File, New, then click on Target.
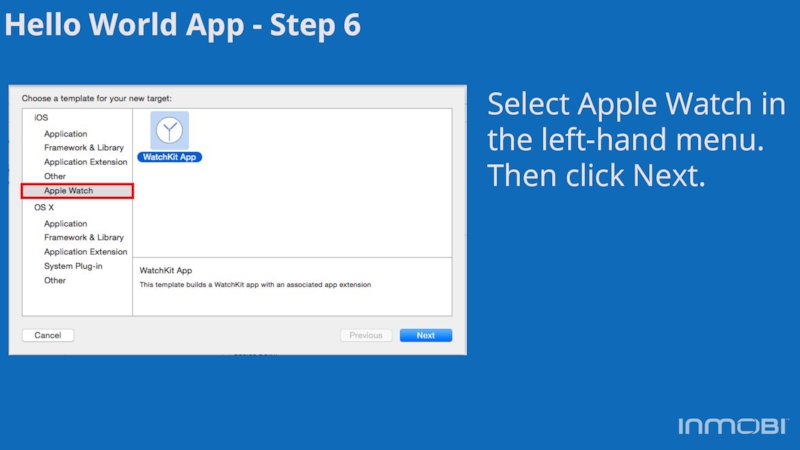
- 14. Hello World App - Step 6 Select
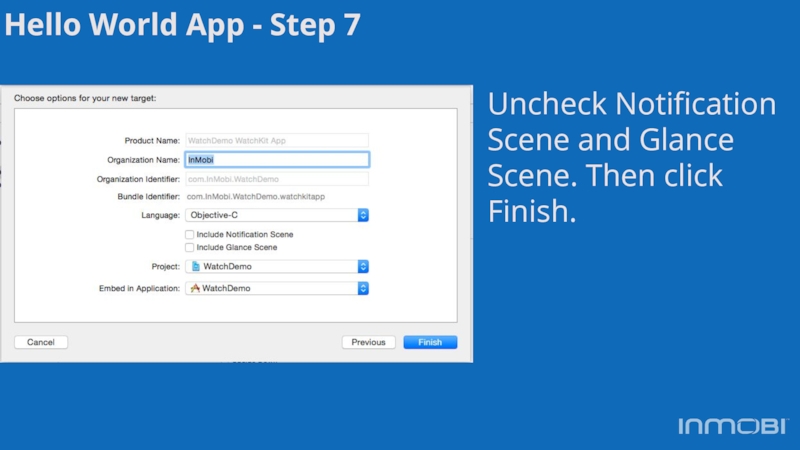
- 15. Hello World App - Step 7 Uncheck Notification Scene and Glance Scene. Then click Finish.
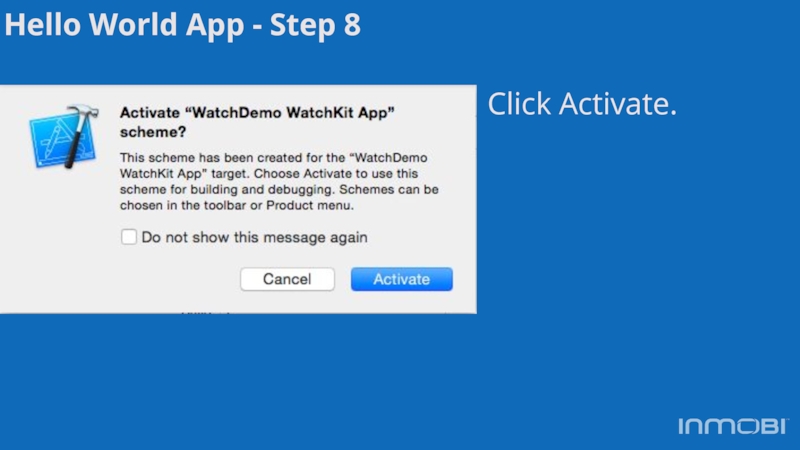
- 16. Hello World App - Step 8 Click Activate.
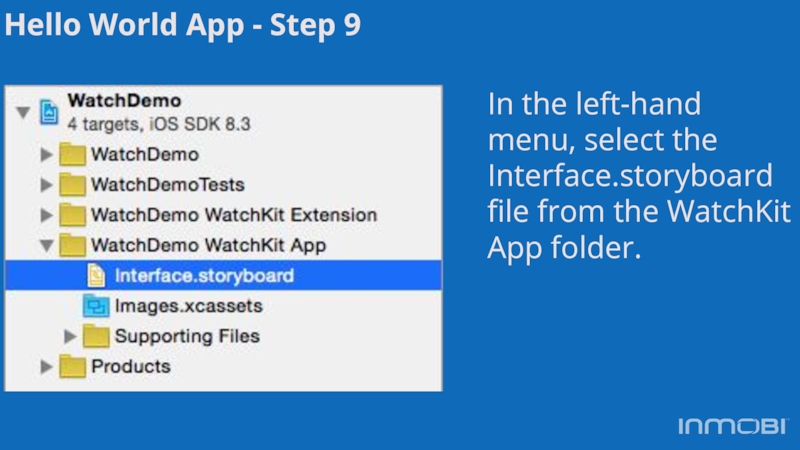
- 17. Hello World App - Step 9 In
- 18. Hello World App - Step 10 This
- 19. Interface Controller Like a View Controller in
- 20. Interface Controller awakeWithContext System calls this
- 21. Hello World App - Step 10
- 22. Interface Objects Arrange themselves Two unique view
- 23. Hello World App - Step 11 Double
- 24. Hello World App - Step 11 Click
- 25. Hello World App - Step 12
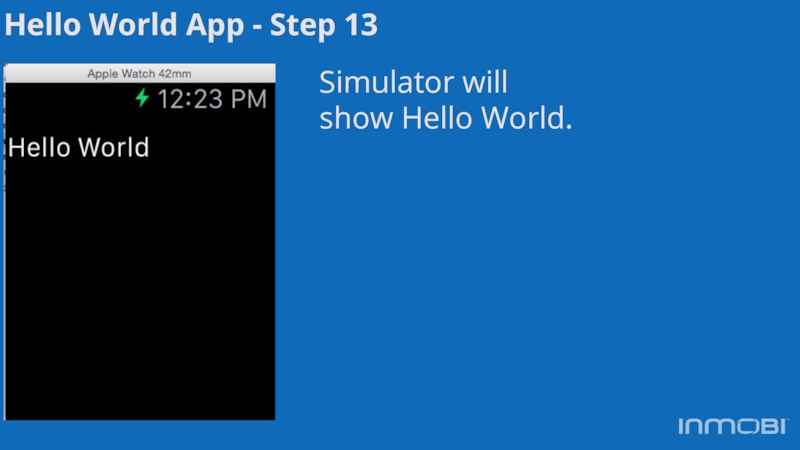
- 26. Hello World App - Step 13 Simulator will show Hello World.
- 27. Counter App for the Apple Watch Let’s
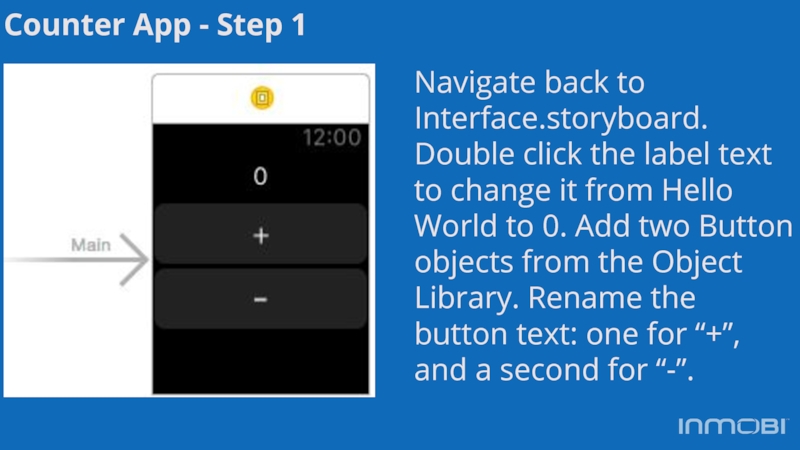
- 28. Counter App - Step 1 Navigate back
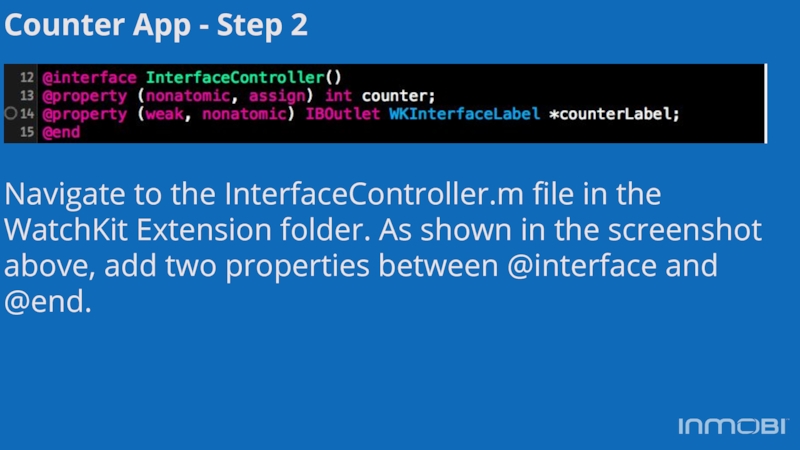
- 29. Counter App - Step 2 Navigate to
- 30. Counter App - Step 3 In @implementation,
- 31. Counter App - Step 4 In @implementation,
- 32. Counter App - Step 5 Connect the
- 33. Counter App - Step 6 Connect the
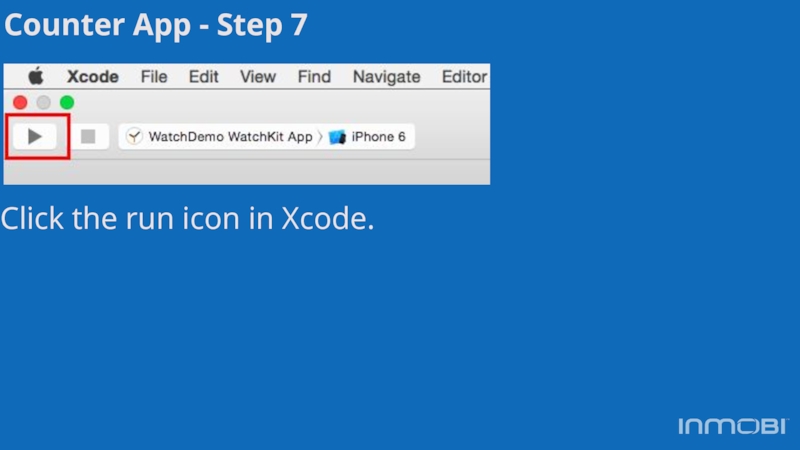
- 34. Counter App - Step 7 Click the run icon in Xcode.
- 35. Counter App - Step 8 The Watch
- 36. Communicating from Watch to iOS App Use
- 37. Resources WatchKit Development Tips https://developer.apple.com/watchkit/tips/ Developing for Apple Watch https://developer.apple.com/library/ios/documentation/General/Conceptual/WatchKitProgrammingGuide/index.html
- 38. Resources Tips for Submitting Apple Watch App
- 39. Murtza Manzur Developer Evangelist murtza.manzur@inmobi.com Questions?
Слайд 2About InMobi
Largest independent mobile ad network
1 billion unique devices
Products for Publishers:
Native Ads, Video Ads
Products for Advertisers: App-Install Platform
Products for Advertisers: App-Install Platform
Слайд 4Agenda
Apple Watch architecture
Hello World app for the Apple Watch
Counter app
for the Apple Watch
Communicating from the Apple Watch to the iOS App
Communicating from the Apple Watch to the iOS App
Слайд 5Architecture
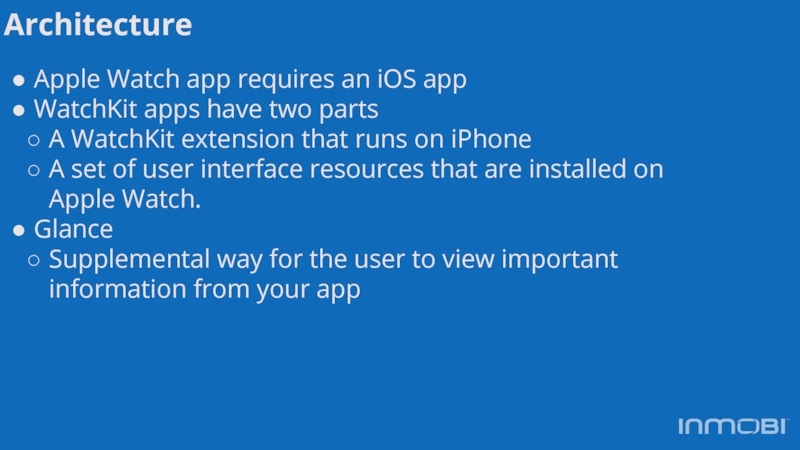
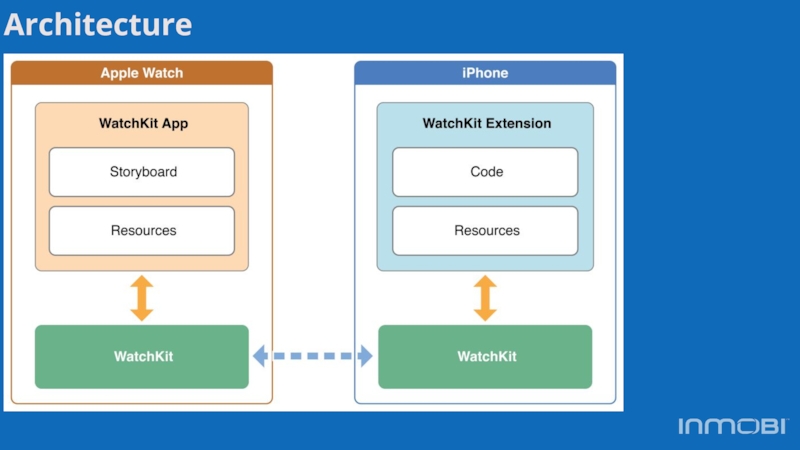
Apple Watch app requires an iOS app
WatchKit apps have two parts
A
WatchKit extension that runs on iPhone
A set of user interface resources that are installed on Apple Watch.
Glance
Supplemental way for the user to view important information from your app
A set of user interface resources that are installed on Apple Watch.
Glance
Supplemental way for the user to view important information from your app
Слайд 6Architecture
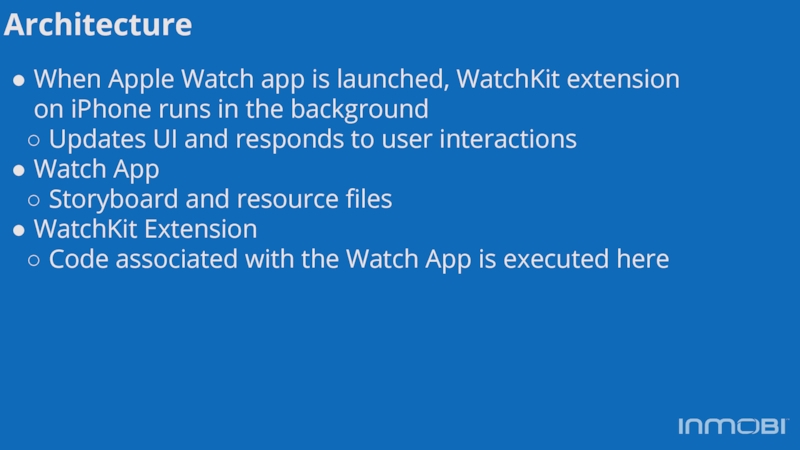
When Apple Watch app is launched, WatchKit extension on iPhone runs
in the background
Updates UI and responds to user interactions
Watch App
Storyboard and resource files
WatchKit Extension
Code associated with the Watch App is executed here
Updates UI and responds to user interactions
Watch App
Storyboard and resource files
WatchKit Extension
Code associated with the Watch App is executed here
Слайд 11Hello World App - Step 3
Enter values for Product Name and
Organization Name. Select Objective-C as Language and iPhone as Devices. Leave Use Core Data unchecked.
Слайд 17Hello World App - Step 9
In the left-hand menu, select the
Interface.storyboard file from the WatchKit App folder.
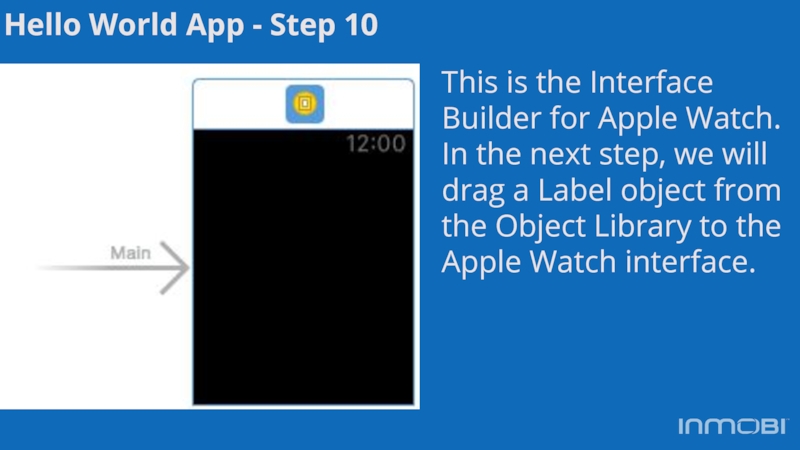
Слайд 18Hello World App - Step 10
This is the Interface Builder for
Apple Watch. In the next step, we will drag a Label object from the Object Library to the Apple Watch interface.
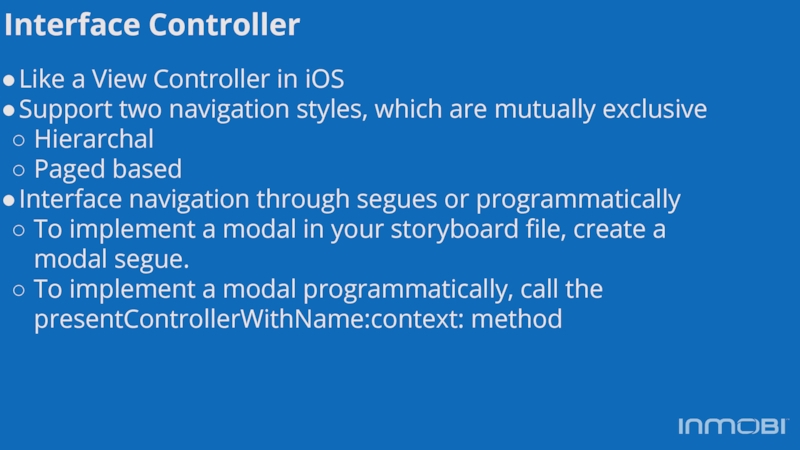
Слайд 19Interface Controller
Like a View Controller in iOS
Support two navigation styles, which
are mutually exclusive
Hierarchal
Paged based
Interface navigation through segues or programmatically
To implement a modal in your storyboard file, create a modal segue.
To implement a modal programmatically, call the presentControllerWithName:context: method
Hierarchal
Paged based
Interface navigation through segues or programmatically
To implement a modal in your storyboard file, create a modal segue.
To implement a modal programmatically, call the presentControllerWithName:context: method
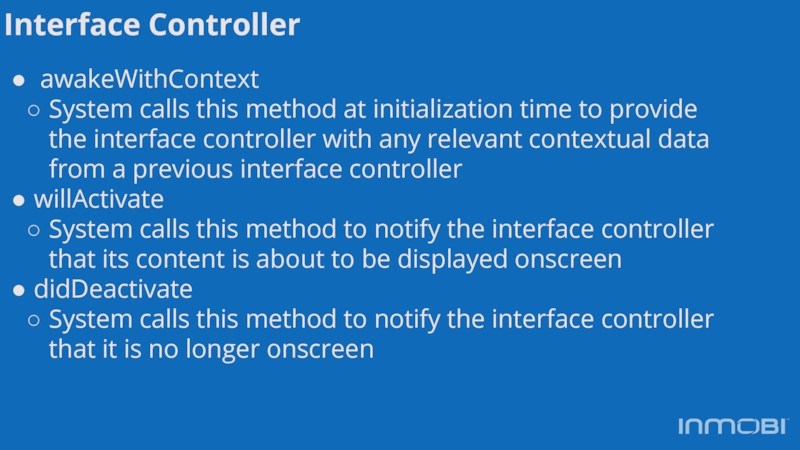
Слайд 20Interface Controller
awakeWithContext
System calls this method at initialization time to provide
the interface controller with any relevant contextual data from a previous interface controller
willActivate
System calls this method to notify the interface controller that its content is about to be displayed onscreen
didDeactivate
System calls this method to notify the interface controller that it is no longer onscreen
willActivate
System calls this method to notify the interface controller that its content is about to be displayed onscreen
didDeactivate
System calls this method to notify the interface controller that it is no longer onscreen
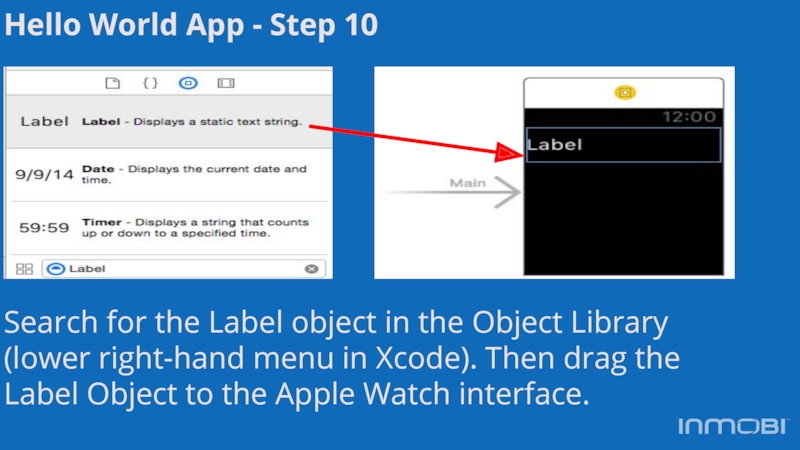
Слайд 21Hello World App - Step 10
Search for the Label object in
the Object Library (lower right-hand menu in Xcode). Then drag the Label Object to the Apple Watch interface.
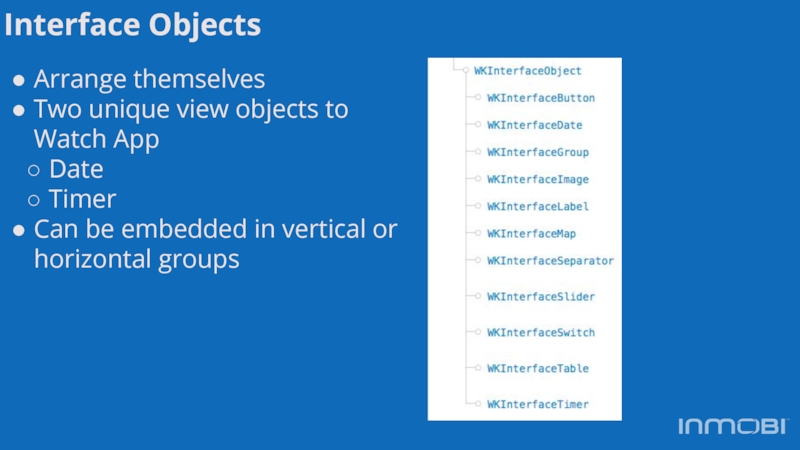
Слайд 22Interface Objects
Arrange themselves
Two unique view objects to Watch App
Date
Timer
Can be embedded
in vertical or horizontal groups
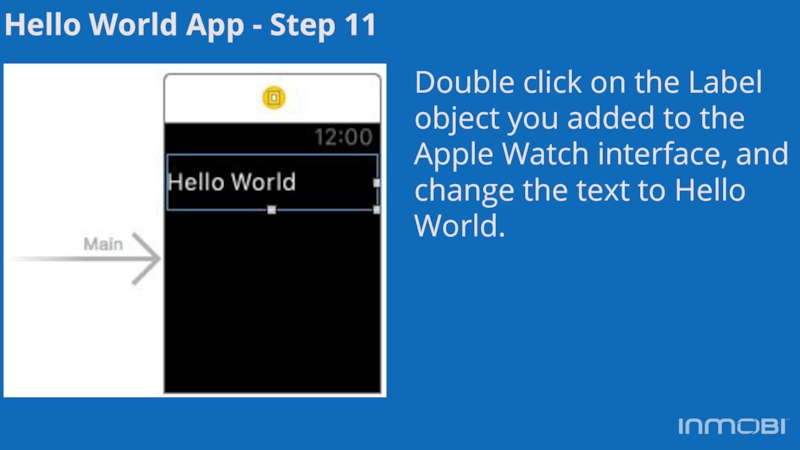
Слайд 23Hello World App - Step 11
Double click on the Label object
you added to the Apple Watch interface, and change the text to Hello World.
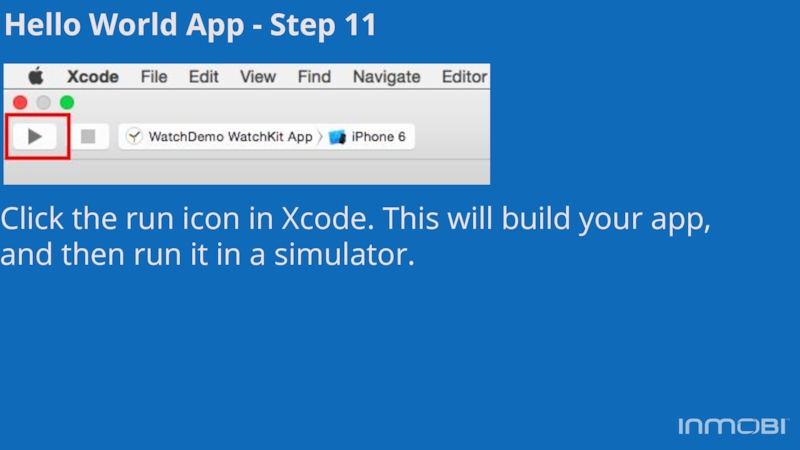
Слайд 24Hello World App - Step 11
Click the run icon in Xcode.
This will build your app, and then run it in a simulator.
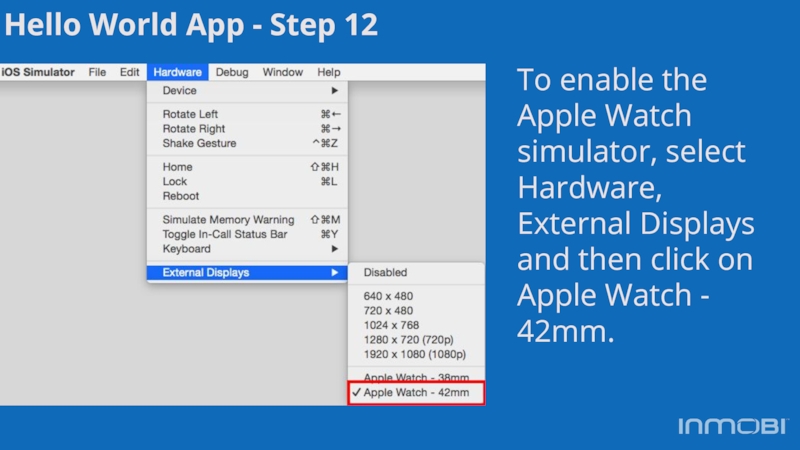
Слайд 25Hello World App - Step 12
To enable the Apple Watch simulator,
select Hardware, External Displays and then click on Apple Watch - 42mm.
Слайд 28Counter App - Step 1
Navigate back to Interface.storyboard. Double click the
label text to change it from Hello World to 0. Add two Button objects from the Object Library. Rename the button text: one for “+”, and a second for “-”.
Слайд 29Counter App - Step 2
Navigate to the InterfaceController.m file in the
WatchKit Extension folder. As shown in the screenshot above, add two properties between @interface and @end.
Слайд 30Counter App - Step 3
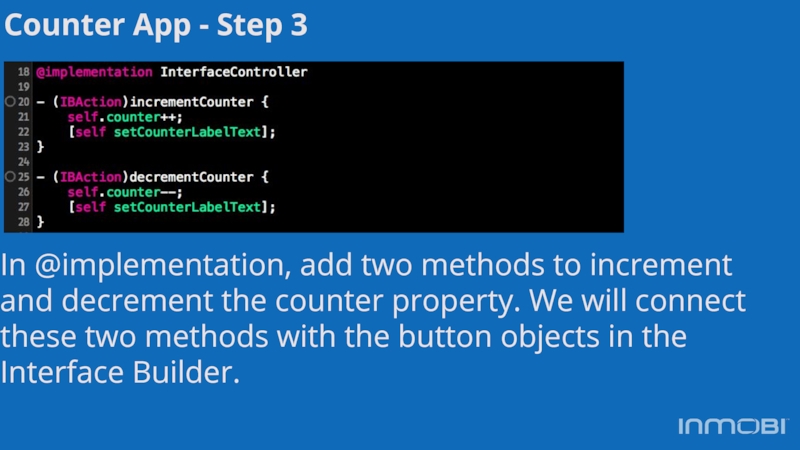
In @implementation, add two methods to increment
and decrement the counter property. We will connect these two methods with the button objects in the Interface Builder.
Слайд 31Counter App - Step 4
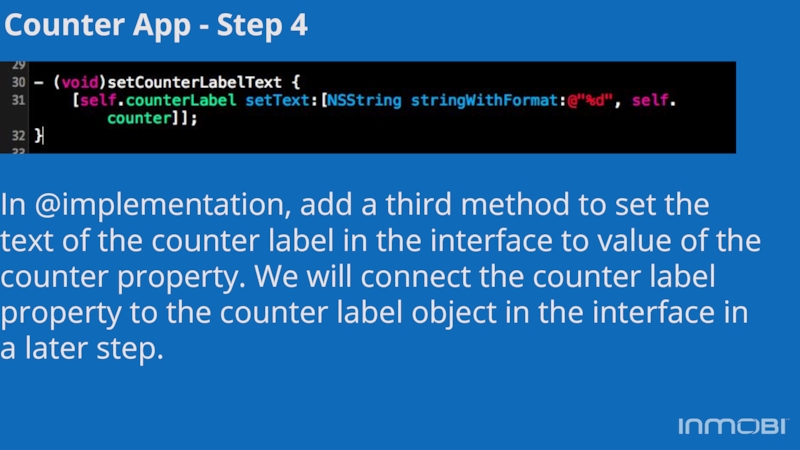
In @implementation, add a third method to
set the text of the counter label in the interface to value of the counter property. We will connect the counter label property to the counter label object in the interface in a later step.
Слайд 32Counter App - Step 5
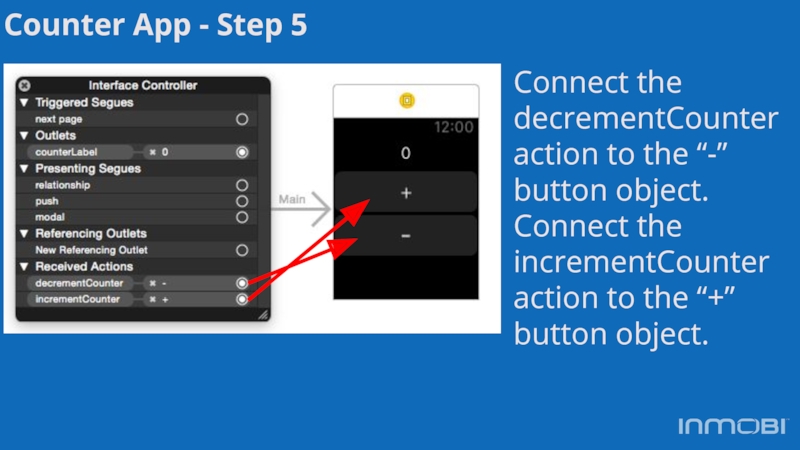
Connect the decrementCounter action to the “-”
button object. Connect the incrementCounter action to the “+” button object.
Слайд 33Counter App - Step 6
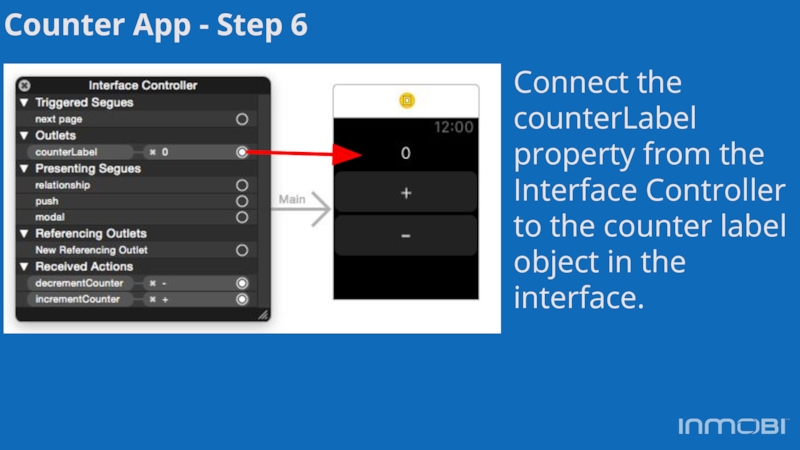
Connect the counterLabel property from the Interface
Controller to the counter label object in the interface.
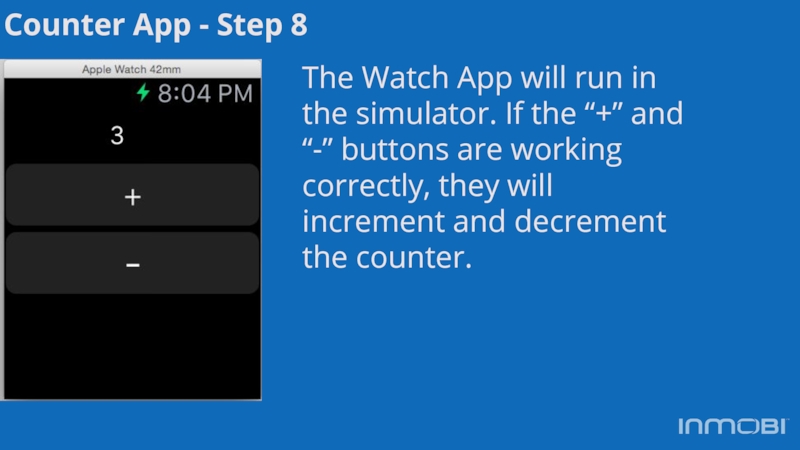
Слайд 35Counter App - Step 8
The Watch App will run in the
simulator. If the “+” and “-” buttons are working correctly, they will increment and decrement the counter.
Слайд 36Communicating from Watch to iOS App
Use openParentApplication method to send data
from WatchKit extension to iOS app
Passed as a dictionary object
handleWatchKitExtensionRequest method to receive data on iOS app
Reference
https://developer.apple.com/library/prerelease/ios/documentation/WatchKit/Reference/WKInterfaceController_class/index.html
Passed as a dictionary object
handleWatchKitExtensionRequest method to receive data on iOS app
Reference
https://developer.apple.com/library/prerelease/ios/documentation/WatchKit/Reference/WKInterfaceController_class/index.html
Слайд 37Resources
WatchKit Development Tips
https://developer.apple.com/watchkit/tips/
Developing for Apple Watch
https://developer.apple.com/library/ios/documentation/General/Conceptual/WatchKitProgrammingGuide/index.html
Слайд 38Resources
Tips for Submitting Apple Watch App
http://www.fiveminutewatchkit.com/blog/2015/4/2/submitting-your-watchkit-app
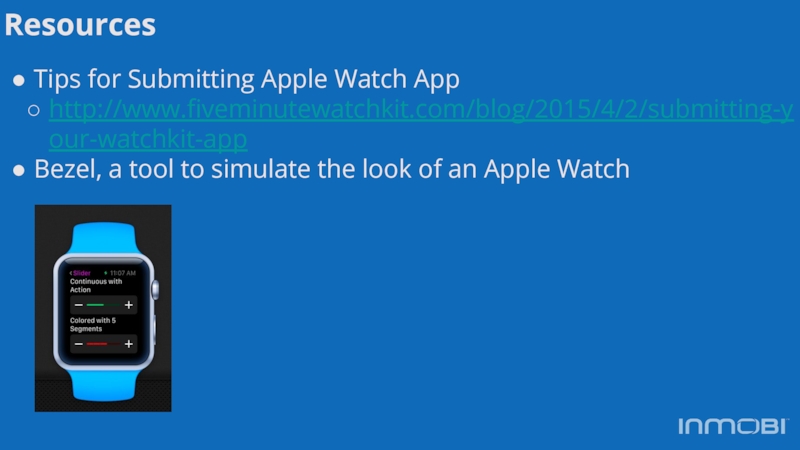
Bezel, a tool to simulate the
look of an Apple Watch
