- Главная
- Разное
- Дизайн
- Бизнес и предпринимательство
- Аналитика
- Образование
- Развлечения
- Красота и здоровье
- Финансы
- Государство
- Путешествия
- Спорт
- Недвижимость
- Армия
- Графика
- Культурология
- Еда и кулинария
- Лингвистика
- Английский язык
- Астрономия
- Алгебра
- Биология
- География
- Детские презентации
- Информатика
- История
- Литература
- Маркетинг
- Математика
- Медицина
- Менеджмент
- Музыка
- МХК
- Немецкий язык
- ОБЖ
- Обществознание
- Окружающий мир
- Педагогика
- Русский язык
- Технология
- Физика
- Философия
- Химия
- Шаблоны, картинки для презентаций
- Экология
- Экономика
- Юриспруденция
Simple Steps to Launching a Self-Hosted WordPress Blog презентация
Содержание
- 1. Simple Steps to Launching a Self-Hosted WordPress Blog
- 2. If you think setting up a blog
- 3. It’s easy to
- 4. Step by Step Instructions to Setting up Your Self-Hosted WordPress Blog www.shanebarker.com
- 5. The first thing you need to do
- 6. Make it memorable Tips for choosing
- 7. If you choose the wrong hosting
- 8. Designed with Newbies in mind –
- 9. www.shanebarker.com Disclosure: I am an affiliate for
- 10. Click here to go to the Bluehost
- 11. After clicking the “get started now” button
- 12. Click the “next” button. If you’re
- 13. As mentioned previously, Bluehost has an Anytime
- 14. After entering your payment information and
- 15. Once you create your password, you’ll be
- 16. Now you’re ready to install WordPress. The
- 17. You’ll be taking to a service called
- 18. You’ll be taken to your MOJO account
- 19. After clicking the Install button you’ll be
- 20. You don’t need to change the email
- 21. You’re almost ready to write your first
- 22. Enter your username and password. You’ll be
- 23. Next, enter a title for your post
- 24. You can now change the look of
- 25. At the top of the main screen
- 26. You’ll be presented with a screen on
- 27. What To Do If You’ve Already
- 28. However, if you have already registered your
- 29. Sometimes you’ll be able to load it
- 30. Click “next” and follow the rest Of
- 31. www.shanebarker.com Please contact us today to
Слайд 2If you think setting up a blog is difficult or time-consuming,
You no longer have to be a super geek to set up a hosting account and blog. Today, setting up a blog at a host is something that just about anybody can do.
www.shanebarker.com
Hosting companies want to gain and retain customers, so they have worked hard over the years to make the process of getting a presence online as simple as possible.
I’ll show you in a bit how simple it is to set up your hosting account and blog.
Слайд 3
It’s easy to use. If you can do basic
It’s included free with most of the best hosting companies, including the host I personally use and recommend.
Upgrades are free.
Many hosts offer a one click installation wizard for WordPress – very similar to how you install programs on a personal computer.
There are thousands of free WordPress themes available to make your site look visually appealing. Best of all you can change the look of your site with just one click.
www.shanebarker.com
I recommend you use the WordPress blogging platform for a variety of reasons:
WordPress is the blogging platform of choice for many professional bloggers and major publishing outlets.
Слайд 5The first thing you need to do is choose a domain
Step 1: Choose a Domain Name
If you’ve already registered your domain elsewhere, I’ve included a section at the end of the tutorial explaining what you need to do.
Most of you should choose a domain name ending with .com.
However, if you are a non-profit organization or an association, you may want to choose a domain name ending with .org instead.
This tutorial assumes you haven’t registered your domain name yet.
It’s better and cheaper for you to register the domain name with the hosting company I use in this tutorial.
www.shanebarker.com
Слайд 6
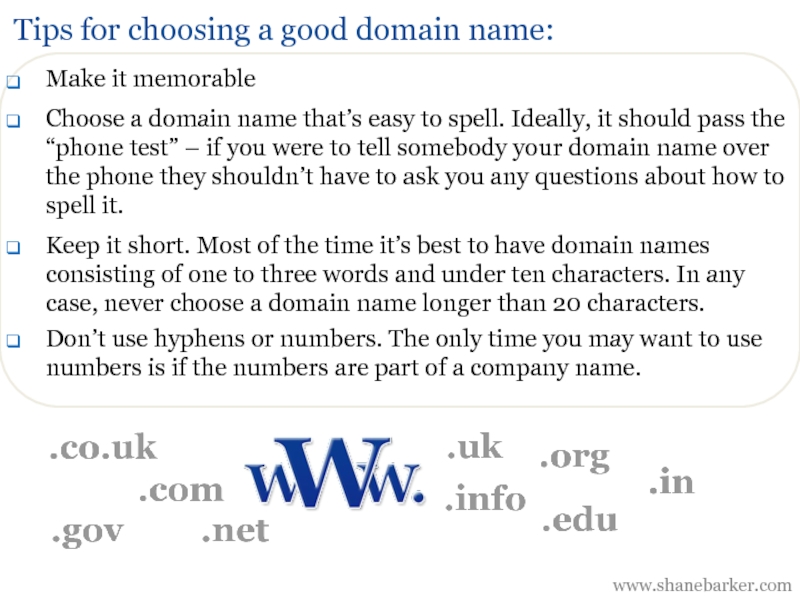
Make it memorable
Tips for choosing a good domain name:
Keep it short. Most of the time it’s best to have domain names consisting of one to three words and under ten characters. In any case, never choose a domain name longer than 20 characters.
Choose a domain name that’s easy to spell. Ideally, it should pass the “phone test” – if you were to tell somebody your domain name over the phone they shouldn’t have to ask you any questions about how to spell it.
Don’t use hyphens or numbers. The only time you may want to use numbers is if the numbers are part of a company name.
www.shanebarker.com
Слайд 7
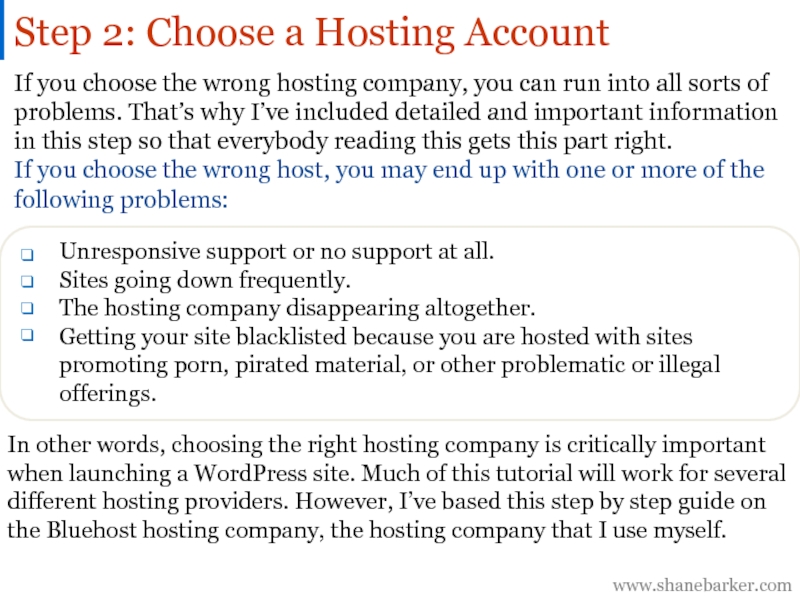
If you choose the wrong hosting company, you can run into
If you choose the wrong host, you may end up with one or more of the following problems:
Step 2: Choose a Hosting Account
Unresponsive support or no support at all.
Sites going down frequently.
The hosting company disappearing altogether.
Getting your site blacklisted because you are hosted with sites promoting porn, pirated material, or other problematic or illegal offerings.
www.shanebarker.com
In other words, choosing the right hosting company is critically important when launching a WordPress site. Much of this tutorial will work for several different hosting providers. However, I’ve based this step by step guide on the Bluehost hosting company, the hosting company that I use myself.
Слайд 8
Designed with Newbies in mind – You’ll see in my tutorial
Recommended by WordPress – Bluehost is one of the few hosting companies recommended by WordPress itself. You can’t get a better recommendation than that.
Value for Money – Bluehost is a great value for the money. Their shared hosting plan is priced from $3.95 to $5.95 depending on how many months of hosting you commit to up front.
Money back Guarantee – Bluehost has an “anytime money back guarantee.” You can cancel at any time and get a full pro-rated refund for anytime you paid for but didn’t use.
www.shanebarker.com
There are several reasons that I and many other people choose Bluehost over other hosting companies. Here are a few:
Слайд 9www.shanebarker.com
Disclosure: I am an affiliate for Bluehost. If you click through
Reliable – Bluehost is extremely reliable. Bluehost is committed to a 99.9% uptime and is one of the most reliable hosting companies in operation today.
Excellent 24/7 Support – Bluehost has trained in-house experts that provide superior support 24/7. At any time of day or night, you are only a toll-free phone call, email, or chat away from Bluehost’s courteous and helpful support. Whether you’re a complete beginner or an experienced web geek, you’ll quickly get the support you need.
Your Site Won’t Get Blacklisted – You’ll never have to worry that your site will be sharing space with the type of sites that could get your site blacklisted. Bluehost is strict about the type of content and sites they allow on their shared hosting plans.
Stay Small or Grow Big – Bluehost offers unlimited disk space, unlimited bandwidth, and unlimited email accounts. You can also host as many websites or blogs as you like on your account.
Слайд 10Click here to go to the Bluehost WordPress signup page.
Once
www.shanebarker.com
Step : Set Up Your Hosting Account
3
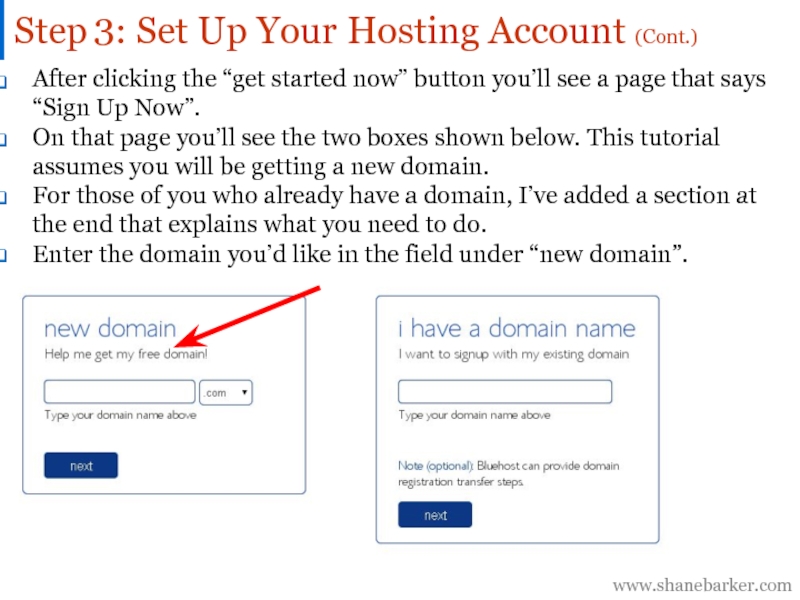
Слайд 11After clicking the “get started now” button you’ll see a page
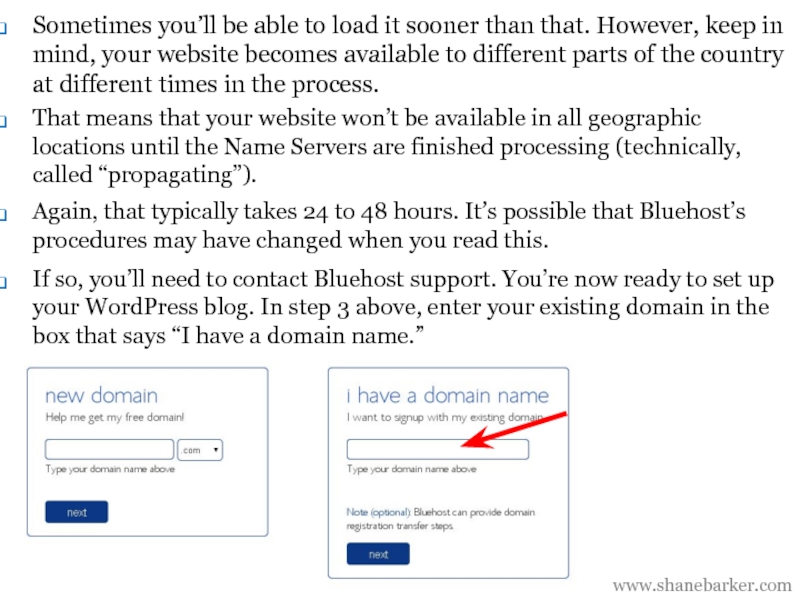
On that page you’ll see the two boxes shown below. This tutorial assumes you will be getting a new domain.
For those of you who already have a domain, I’ve added a section at the end that explains what you need to do.
Enter the domain you’d like in the field under “new domain”.
www.shanebarker.com
Step : Set Up Your Hosting Account (Cont.)
3
Слайд 12
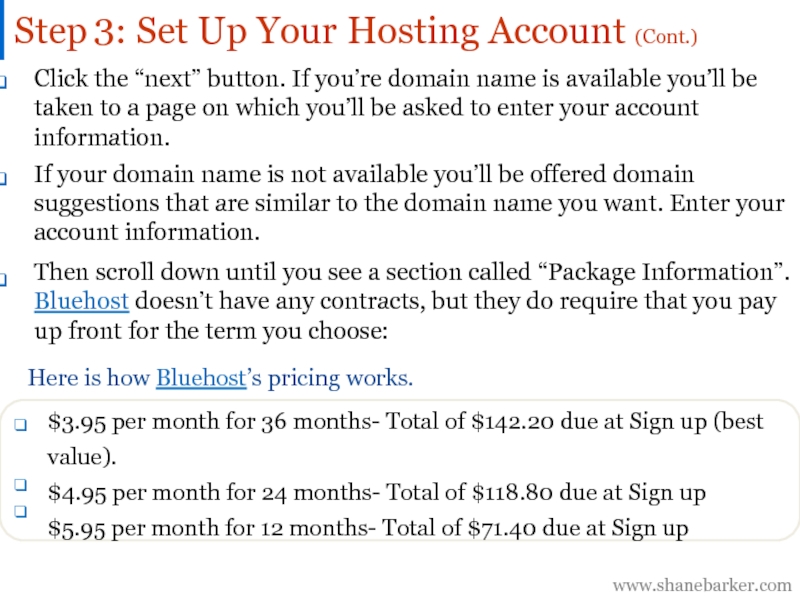
Click the “next” button. If you’re domain name is available you’ll
$3.95 per month for 36 months- Total of $142.20 due at Sign up (best value).
$4.95 per month for 24 months- Total of $118.80 due at Sign up
$5.95 per month for 12 months- Total of $71.40 due at Sign up
If your domain name is not available you’ll be offered domain suggestions that are similar to the domain name you want. Enter your account information.
Then scroll down until you see a section called “Package Information”. Bluehost doesn’t have any contracts, but they do require that you pay up front for the term you choose:
Here is how Bluehost’s pricing works.
www.shanebarker.com
Step : Set Up Your Hosting Account (Cont.)
3
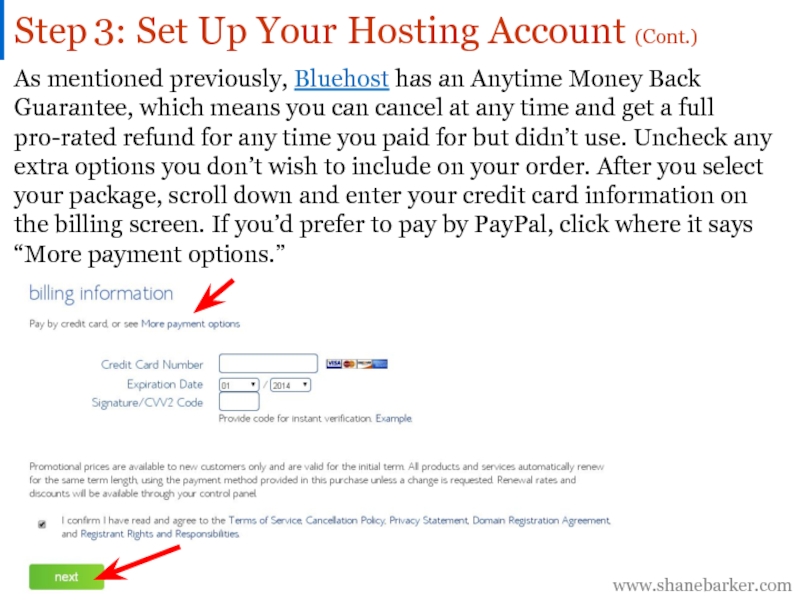
Слайд 13As mentioned previously, Bluehost has an Anytime Money Back Guarantee, which
pro-rated refund for any time you paid for but didn’t use. Uncheck any extra options you don’t wish to include on your order. After you select your package, scroll down and enter your credit card information on the billing screen. If you’d prefer to pay by PayPal, click where it says “More payment options.”
www.shanebarker.com
Step : Set Up Your Hosting Account (Cont.)
3
Слайд 14
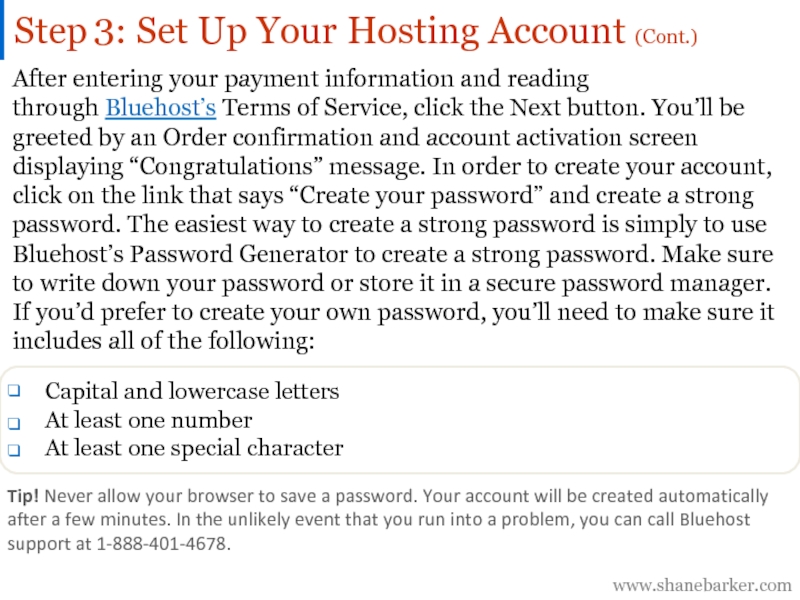
After entering your payment information and reading
through Bluehost’s Terms of Service, click
Capital and lowercase letters
At least one number
At least one special character
Tip! Never allow your browser to save a password. Your account will be created automatically after a few minutes. In the unlikely event that you run into a problem, you can call Bluehost support at 1-888-401-4678.
www.shanebarker.com
Step : Set Up Your Hosting Account (Cont.)
3
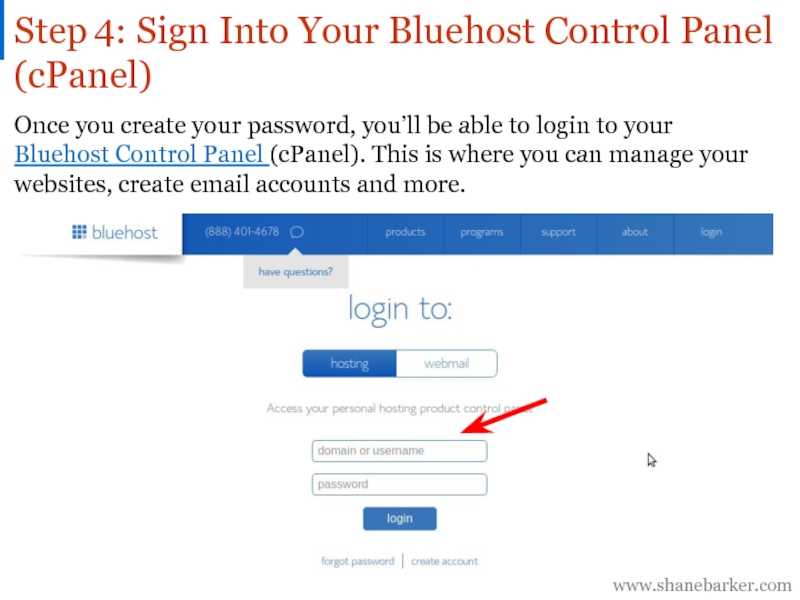
Слайд 15Once you create your password, you’ll be able to login to
Bluehost Control Panel (cPanel). This is where you can manage your websites, create email accounts and more.
Step : Sign Into Your Bluehost Control Panel (cPanel)
www.shanebarker.com
4
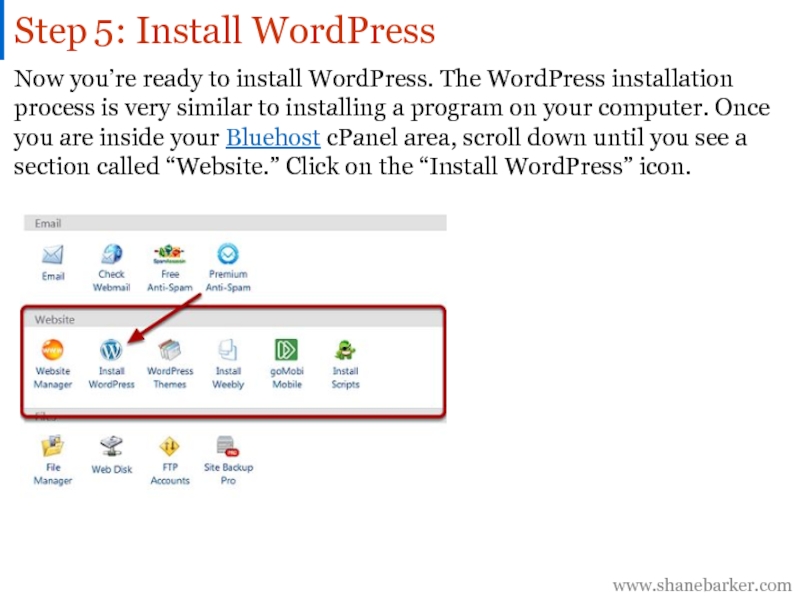
Слайд 16Now you’re ready to install WordPress. The WordPress installation process is
www.shanebarker.com
Step : Install WordPress
5
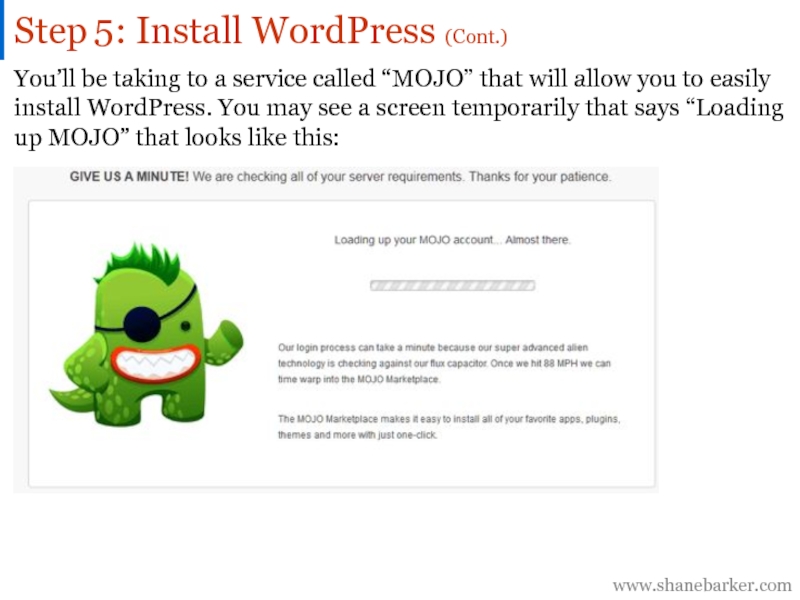
Слайд 17You’ll be taking to a service called “MOJO” that will allow
www.shanebarker.com
Step : Install WordPress (Cont.)
5
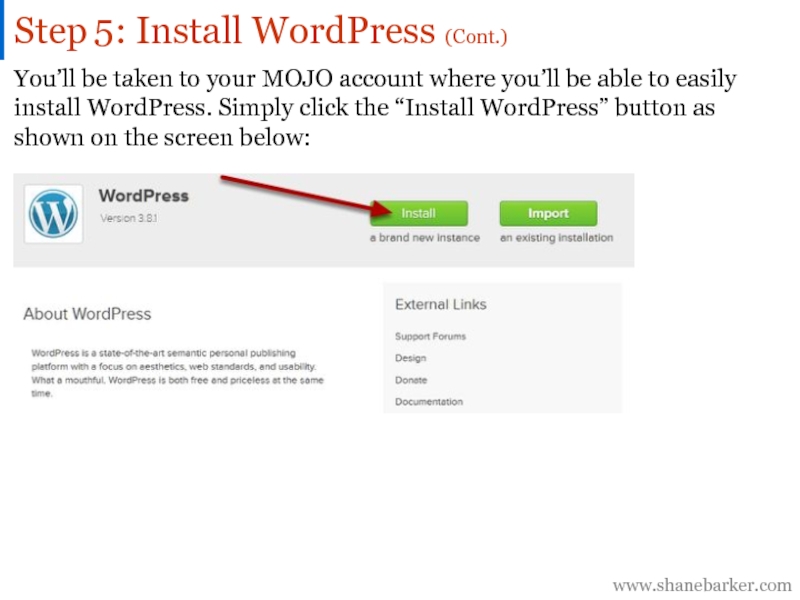
Слайд 18You’ll be taken to your MOJO account where you’ll be able
www.shanebarker.com
Step : Install WordPress (Cont.)
5
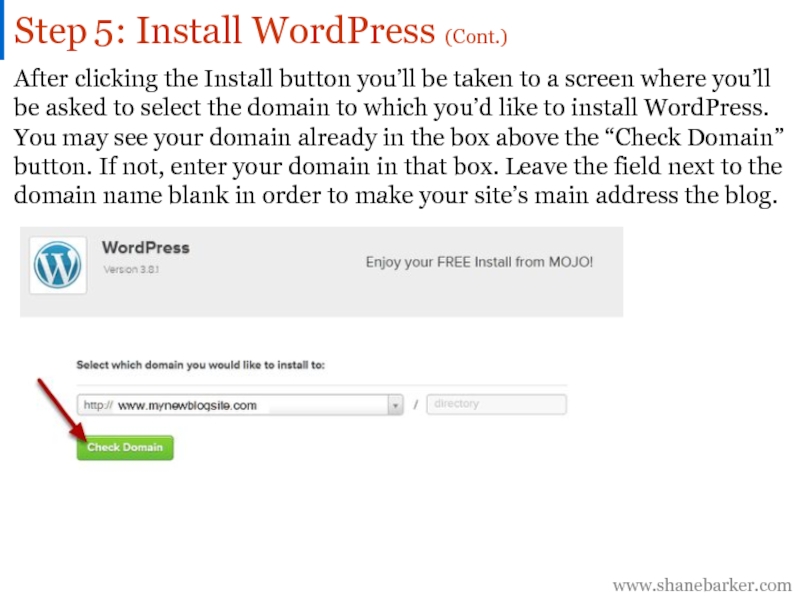
Слайд 19After clicking the Install button you’ll be taken to a screen
www.shanebarker.com
Step : Install WordPress (Cont.)
5
Слайд 20You don’t need to change the email address, username and password
Once you’re done, you’ll be presented with a screen containing your blog address, blog login URL, username, and password. The information will also be sent to your email.
After reading through the terms and conditions, check the box. Click the Install Now button.
It will take a couple minutes for the script to finish installing your WordPress blog.
www.shanebarker.com
Step : Install WordPress (Cont.)
5
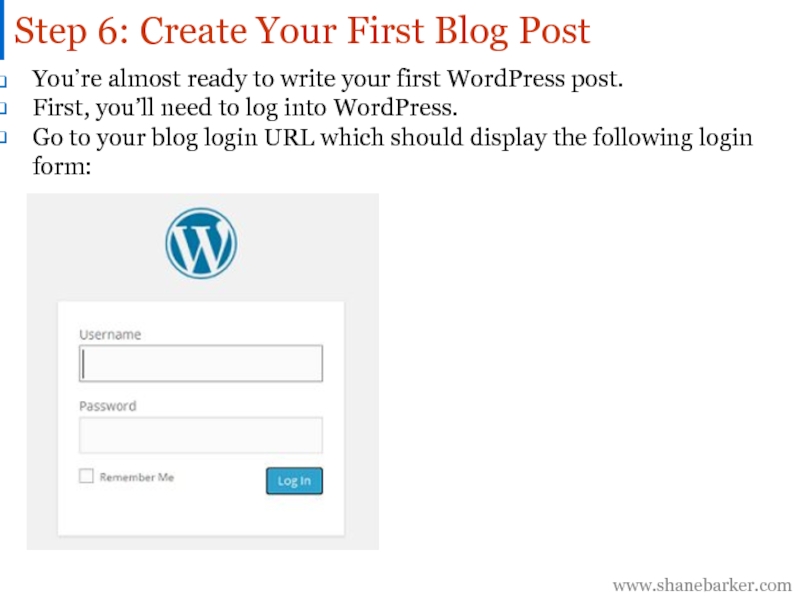
Слайд 21You’re almost ready to write your first WordPress post.
First, you’ll
Go to your blog login URL which should display the following login form:
Step 6: Create Your First Blog Post
www.shanebarker.com
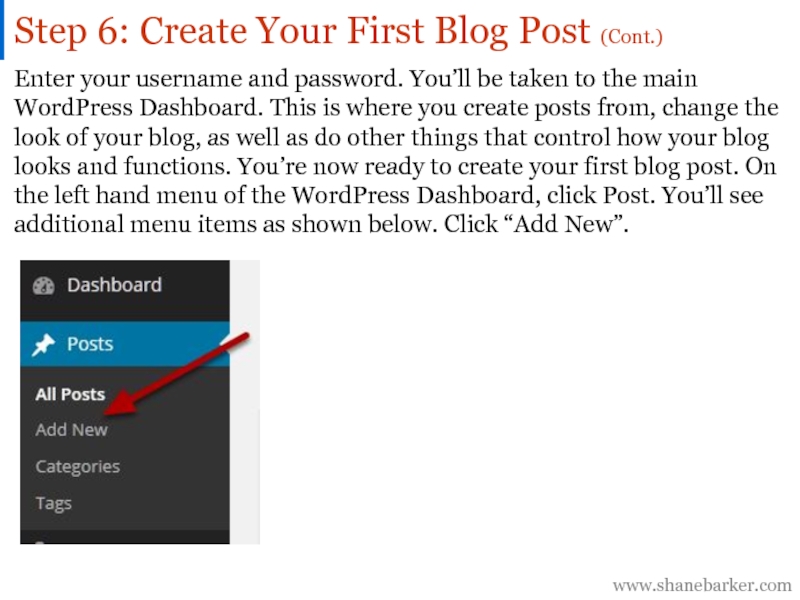
Слайд 22Enter your username and password. You’ll be taken to the main
Step 6: Create Your First Blog Post (Cont.)
www.shanebarker.com
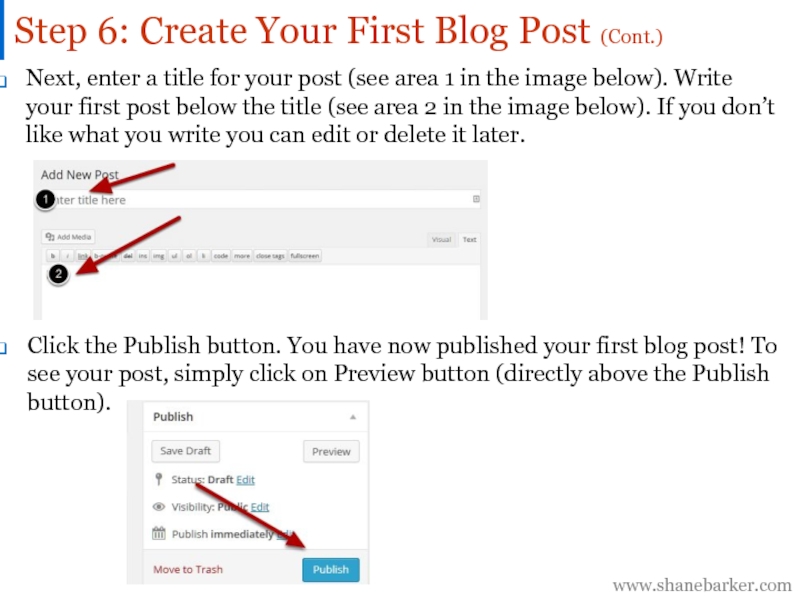
Слайд 23Next, enter a title for your post (see area 1 in
Click the Publish button. You have now published your first blog post! To see your post, simply click on Preview button (directly above the Publish button).
www.shanebarker.com
Step 6: Create Your First Blog Post (Cont.)
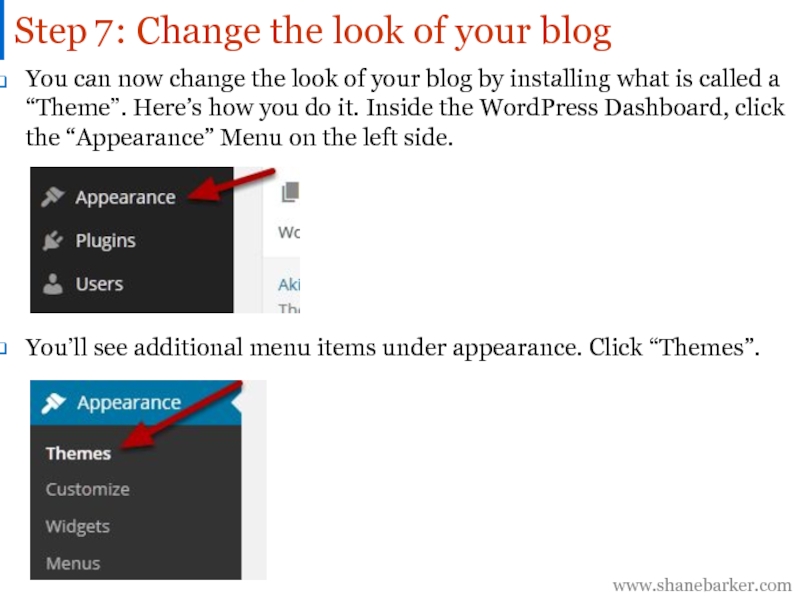
Слайд 24You can now change the look of your blog by installing
You’ll see additional menu items under appearance. Click “Themes”.
Step : Change the look of your blog
www.shanebarker.com
7
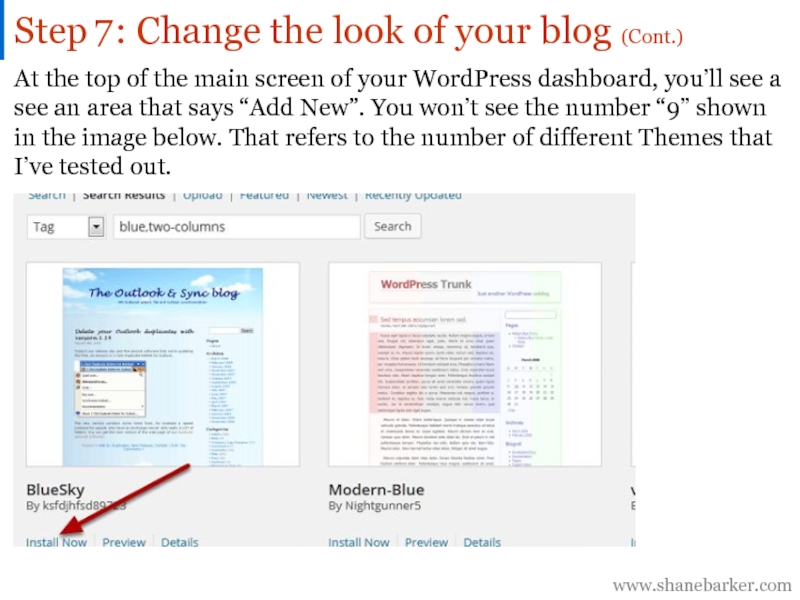
Слайд 25At the top of the main screen of your WordPress dashboard,
www.shanebarker.com
Step : Change the look of your blog (Cont.)
7
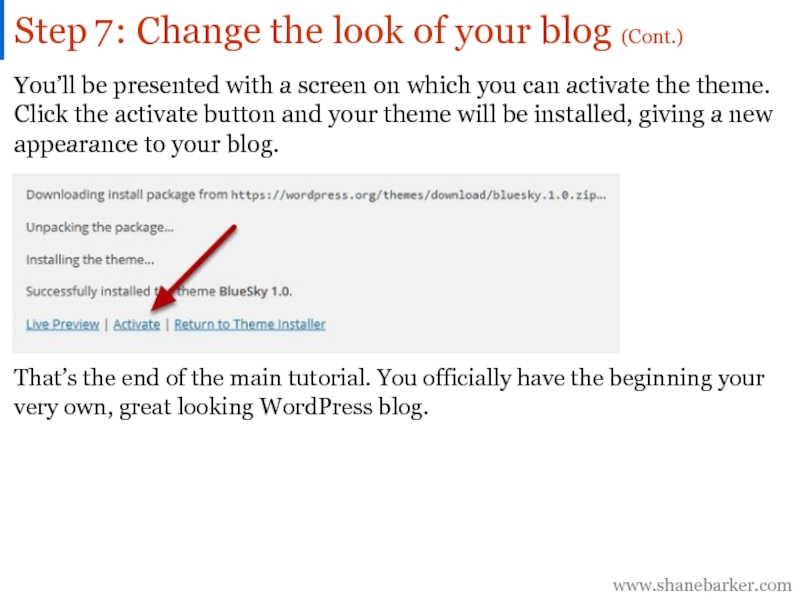
Слайд 26You’ll be presented with a screen on which you can activate
That’s the end of the main tutorial. You officially have the beginning your very own, great looking WordPress blog.
www.shanebarker.com
Step : Change the look of your blog (Cont.)
7
Слайд 27
What To Do If You’ve Already Registered Your Domain Elsewhere.
If you
www.shanebarker.com
Only continue if you have registered your domain elsewhere. When you purchase a domain through BlueHost everything is taken care of for you.
Слайд 28However, if you have already registered your domain elsewhere, you will
www.shanebarker.com
If you are unable to follow the instructions, contact your registrar and ask them to set your Name Servers to: ns1.bluehost.com ns2.bluehost.com After your Name Servers are set, you should be able to load your website within 24 to 48 hours.
To be able to host your website with Bluehost you will need to use their Name Servers.
If you do not set your Name Servers correctly, your website may not work properly, or possibly not even work at all.
Bluehost has instructions for how to set Name Servers correctly for most of the major domain registrars here.
Слайд 29Sometimes you’ll be able to load it sooner than that. However,
www.shanebarker.com
Again, that typically takes 24 to 48 hours. It’s possible that Bluehost’s procedures may have changed when you read this.
That means that your website won’t be available in all geographic locations until the Name Servers are finished processing (technically, called “propagating”).
If so, you’ll need to contact Bluehost support. You’re now ready to set up your WordPress blog. In step 3 above, enter your existing domain in the box that says “I have a domain name.”
Слайд 30Click “next” and follow the rest Of step 3 to the
www.shanebarker.com
Transfers can take 3-10 days to complete; during this time the name servers cannot be modified.
If you point the name servers to us before starting a transfer, your domain will be pointed to us during the duration of the transfer and your site will show what is on Bluehost’s servers.”
You can read more about transferring your domain registration to Bluehost here.

