- Главная
- Разное
- Дизайн
- Бизнес и предпринимательство
- Аналитика
- Образование
- Развлечения
- Красота и здоровье
- Финансы
- Государство
- Путешествия
- Спорт
- Недвижимость
- Армия
- Графика
- Культурология
- Еда и кулинария
- Лингвистика
- Английский язык
- Астрономия
- Алгебра
- Биология
- География
- Детские презентации
- Информатика
- История
- Литература
- Маркетинг
- Математика
- Медицина
- Менеджмент
- Музыка
- МХК
- Немецкий язык
- ОБЖ
- Обществознание
- Окружающий мир
- Педагогика
- Русский язык
- Технология
- Физика
- Философия
- Химия
- Шаблоны, картинки для презентаций
- Экология
- Экономика
- Юриспруденция
Win 7 Smart Tool For Intel SKL platform презентация
Содержание
- 1. Win 7 Smart Tool For Intel SKL platform
- 2. Overview 概述 Before Install Windows 7 in
- 3. Preparation (En) Notice Support OS platform: Win
- 4. 準備事項 (中) 注意事項: 此工具支援的平台: Win 7 (32/64bit),
- 5. Step 1 – Execute Win 7 Smart
- 6. 步驟 1 – 執行 Win 7 Smart
- 7. Step 2.1 – Create by ISO for
- 8. Step 2.2 – Create by ISO for
- 9. Step 3.1 – Create by USB for
- 10. Step 3.2 – Create by USB for
- 11. Thanks for your attention
Слайд 2Overview 概述
Before Install Windows 7 in SKL (Skylake) platform, we have
可擴展的主機控制接口 (以下簡稱XHCI) 的驅動程式是 Skylake 平台使用者安裝 Win 7 時需先預裝的軟體。然而安裝 XHCI的方法對一般使用者來說是相對複雜。 MSI 因此研發了一套軟體叫做 Win 7 Smart tool, 讓使用者更簡單的可以進行 XHCI 的安裝流程。 安裝與操作方法請參考本文件。
Слайд 3Preparation (En)
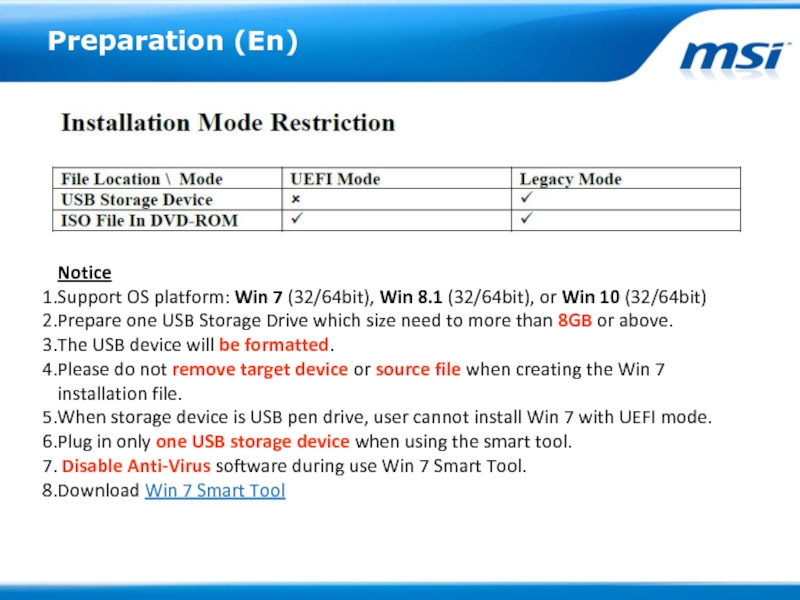
Notice
Support OS platform: Win 7 (32/64bit), Win 8.1 (32/64bit), or
Prepare one USB Storage Drive which size need to more than 8GB or above.
The USB device will be formatted.
Please do not remove target device or source file when creating the Win 7 installation file.
When storage device is USB pen drive, user cannot install Win 7 with UEFI mode.
Plug in only one USB storage device when using the smart tool.
Disable Anti-Virus software during use Win 7 Smart Tool.
Download Win 7 Smart Tool
Слайд 4準備事項 (中)
注意事項:
此工具支援的平台: Win 7 (32/64bit), Win 8.1 (32/64bit), or Win 10
準備一支容量8G 或以上大小的USB 儲存裝置。
請先格式化這一支USB儲存裝置。
當系統安裝 Win 7 時請勿將此USB儲存裝置移除。
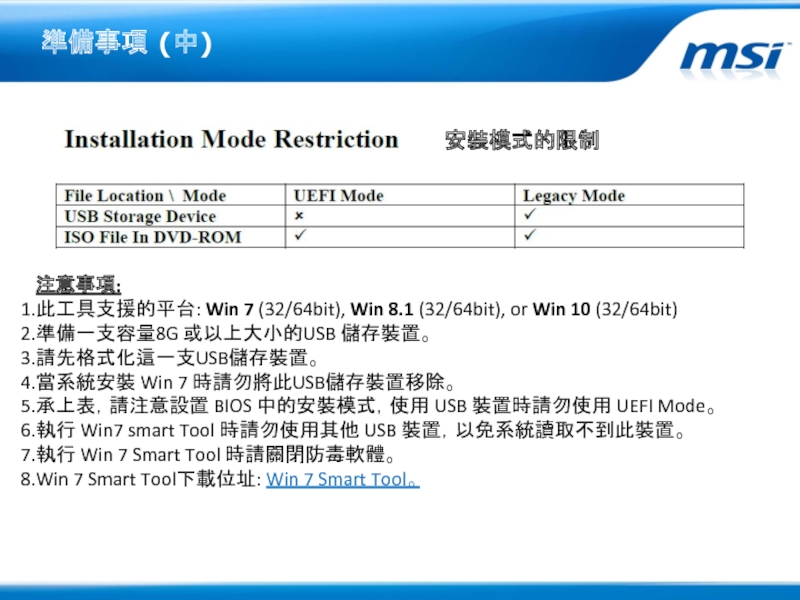
承上表,請注意設置 BIOS 中的安裝模式,使用 USB 裝置時請勿使用 UEFI Mode。
執行 Win7 smart Tool 時請勿使用其他 USB 裝置,以免系統讀取不到此裝置。
執行 Win 7 Smart Tool 時請關閉防毒軟體。
Win 7 Smart Tool下載位址: Win 7 Smart Tool。
安裝模式的限制
Слайд 5Step 1 – Execute Win 7 Smart Tool (En)
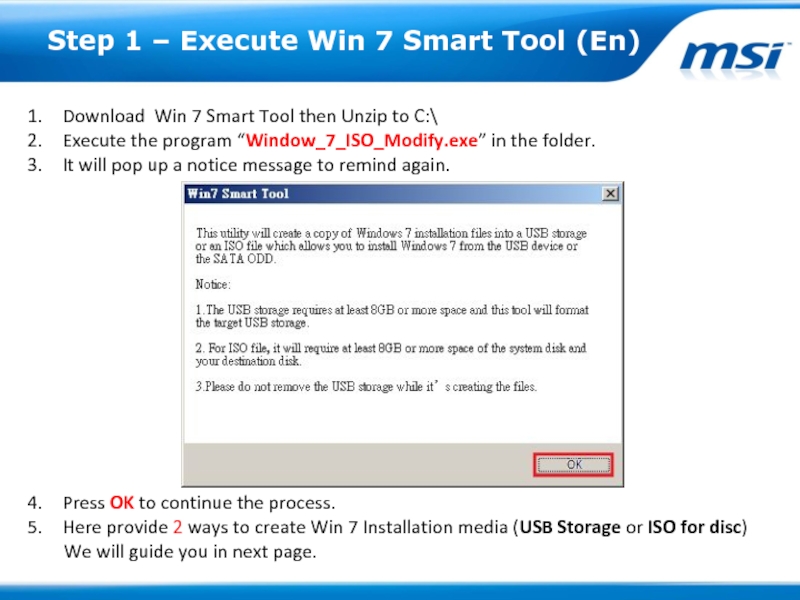
Download Win 7
Execute the program “Window_7_ISO_Modify.exe” in the folder.
It will pop up a notice message to remind again.
Press OK to continue the process.
Here provide 2 ways to create Win 7 Installation media (USB Storage or ISO for disc)
We will guide you in next page.
Слайд 6步驟 1 – 執行 Win 7 Smart Tool (中)
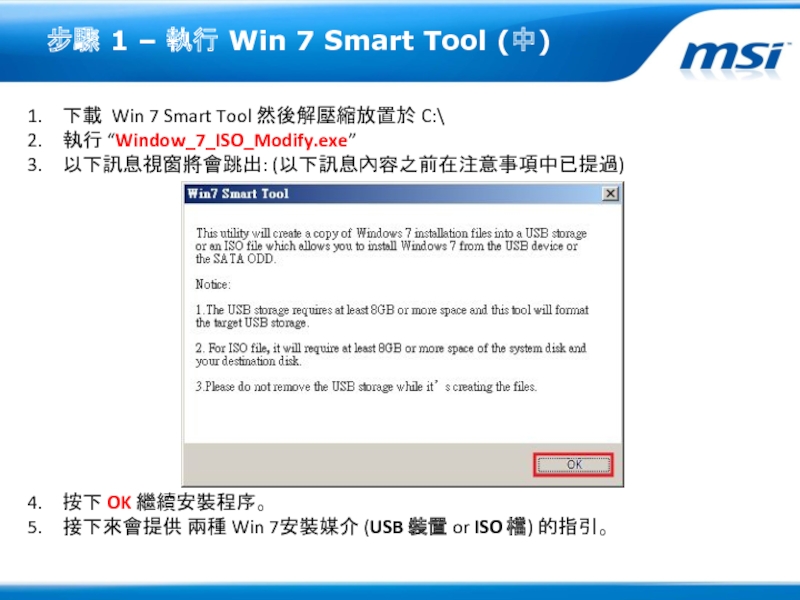
下載 Win 7
執行 “Window_7_ISO_Modify.exe”
以下訊息視窗將會跳出: (以下訊息內容之前在注意事項中已提過)
按下 OK 繼續安裝程序。
接下來會提供 兩種 Win 7安裝媒介 (USB 裝置 or ISO 檔) 的指引。
Слайд 7Step 2.1 – Create by ISO for disc recovery
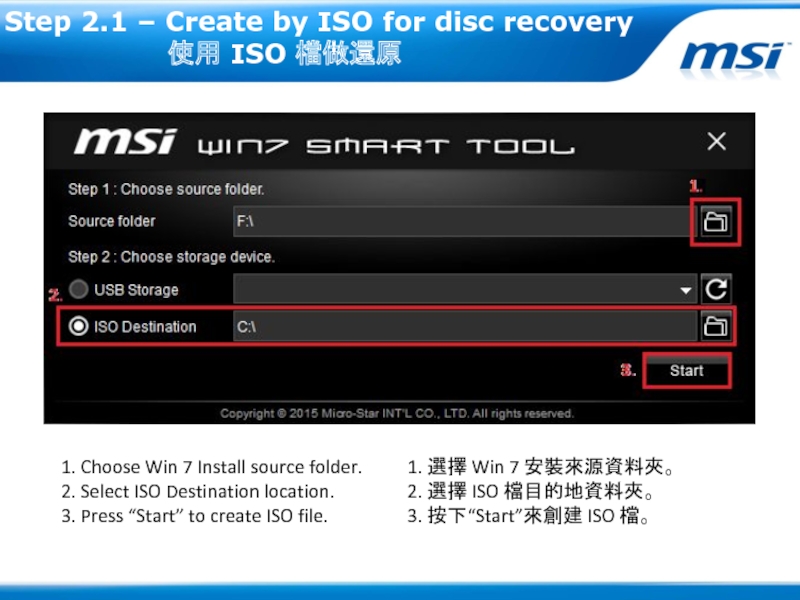
1. Choose Win 7 Install source folder.
2. Select ISO Destination location.
3. Press “Start” to create ISO file.
1. 選擇 Win 7 安裝來源資料夾。
2. 選擇 ISO 檔目的地資料夾。
3. 按下“Start”來創建 ISO 檔。
Слайд 8Step 2.2 – Create by ISO for disc recovery
4. Around 15~ 20 mins, the process finish will pop up a message to notice.
5. The ISO Image will located in the drive, please burn ISO to disc for Win 7 installation.
4. 大約 15至20分鐘, 當 ISO 檔轉換完成會彈出一視窗告知。
5. 此ISO 檔位於您之前指定的資料夾中, 請將此ISO 檔燒錄成 DVD 或其他可 模擬光碟的裝置。
Слайд 9Step 3.1 – Create by USB for recovery
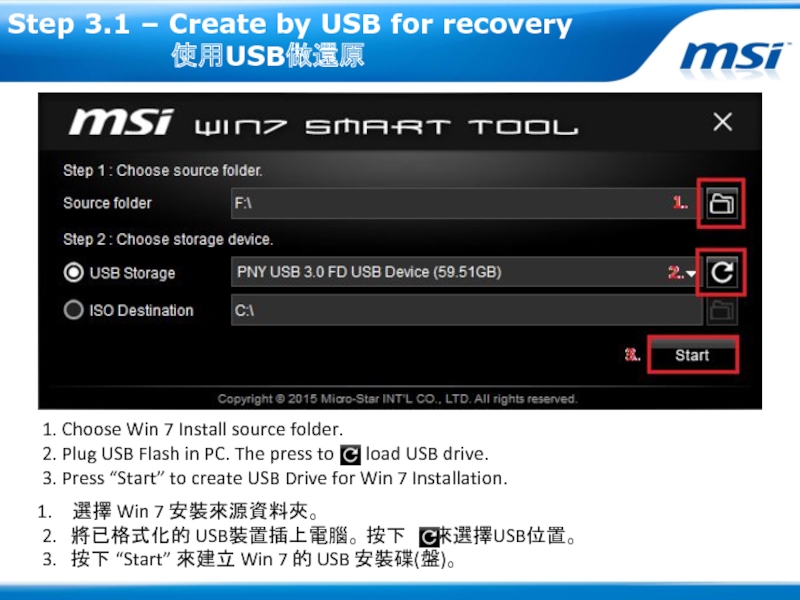
1. Choose Win 7 Install source folder.
2. Plug USB Flash in PC. The press to load USB drive.
3. Press “Start” to create USB Drive for Win 7 Installation.
選擇 Win 7 安裝來源資料夾。
2. 將已格式化的 USB裝置插上電腦。 按下 來選擇USB位置。
3. 按下 “Start” 來建立 Win 7 的 USB 安裝碟(盤)。
Слайд 10Step 3.2 – Create by USB for recovery
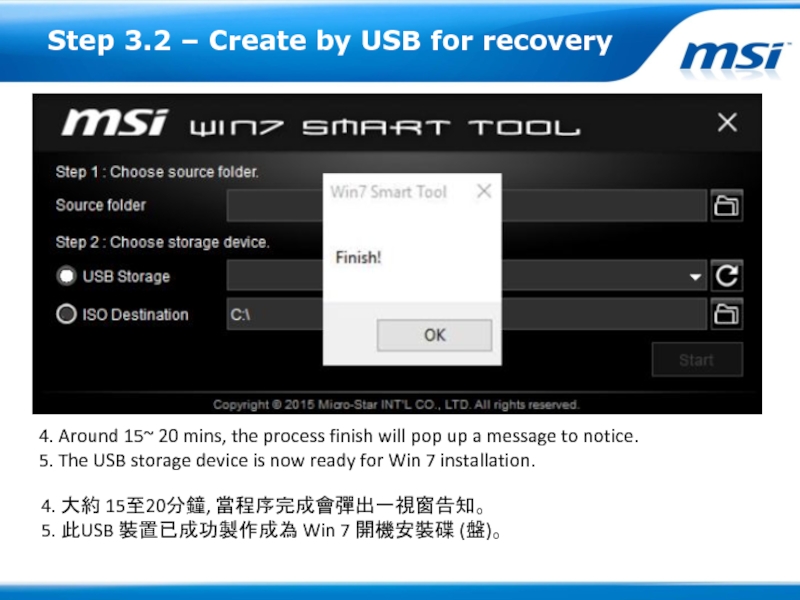
4. Around 15~ 20
5. The USB storage device is now ready for Win 7 installation.
4. 大約 15至20分鐘, 當程序完成會彈出一視窗告知。
5. 此USB 裝置已成功製作成為 Win 7 開機安裝碟 (盤)。
