- Главная
- Разное
- Дизайн
- Бизнес и предпринимательство
- Аналитика
- Образование
- Развлечения
- Красота и здоровье
- Финансы
- Государство
- Путешествия
- Спорт
- Недвижимость
- Армия
- Графика
- Культурология
- Еда и кулинария
- Лингвистика
- Английский язык
- Астрономия
- Алгебра
- Биология
- География
- Детские презентации
- Информатика
- История
- Литература
- Маркетинг
- Математика
- Медицина
- Менеджмент
- Музыка
- МХК
- Немецкий язык
- ОБЖ
- Обществознание
- Окружающий мир
- Педагогика
- Русский язык
- Технология
- Физика
- Философия
- Химия
- Шаблоны, картинки для презентаций
- Экология
- Экономика
- Юриспруденция
Veeam Replica презентация
Содержание
- 1. Veeam Replica
- 2. Outline Replication job and its workflow Replication
- 3. process of copying a VM from its
- 4. *on target site Direct SAN TM is
- 5. Changes the VMWare network on the replica
- 6. IP address, subnet mask, default gateway and
- 7. Have an existing VM on the target
- 8. Make a backup locally, on-site Transfer it
- 9. Have backup(s) of VM on the target
- 10. Native VMWare snapshots are used as restore
- 11. Detect best source and target proxies for
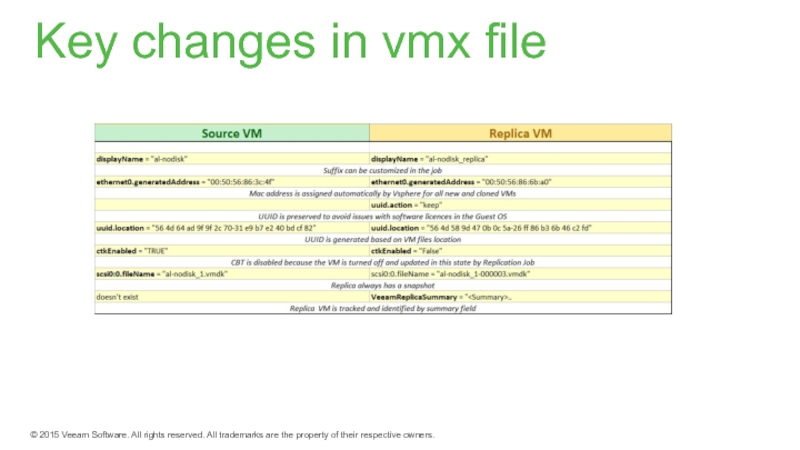
- 12. Key changes in vmx file
- 13. Replica failover Switches over from the original
- 14. 1) Revert to the selected restore point 2) Apply
- 15. Revert to the latest restore point Update
- 16. Check replica and source vm configurations Detect
- 17. Revert replica to the pre-failback state Update
- 18. Failover Plan Offers a possibility to failover
- 19. Planned Failover Can be used if you’re
- 20. Thank you!
Слайд 2Outline
Replication job and its workflow
Replication architecture
Network Mapping and Re-IP
Mapping/Seeding/Replica from Backup
Key
Fаilover and Failback
Слайд 3process of copying a VM from its primary location to a
creates an almost identical, functional copy of a VM in a ready-to-start-state (thus providing minimal Recovery time objective)
allows to have restore points
onsite and offsite implementations
provides ability to customize replicated VM settings (name, networking, ip configuration, disks locations)
allow to use WAN accelerators to minimize network traffic
controlled failover/failback from Veeam console
What is replication?
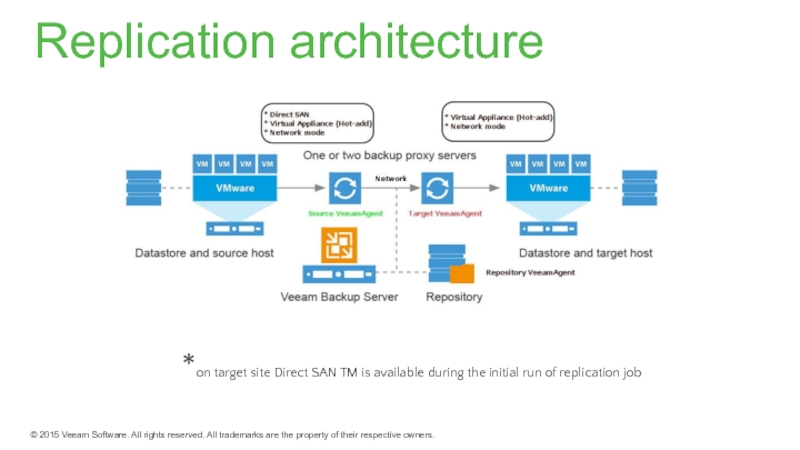
Слайд 4*on target site Direct SAN TM is available during the initial
Replication architecture
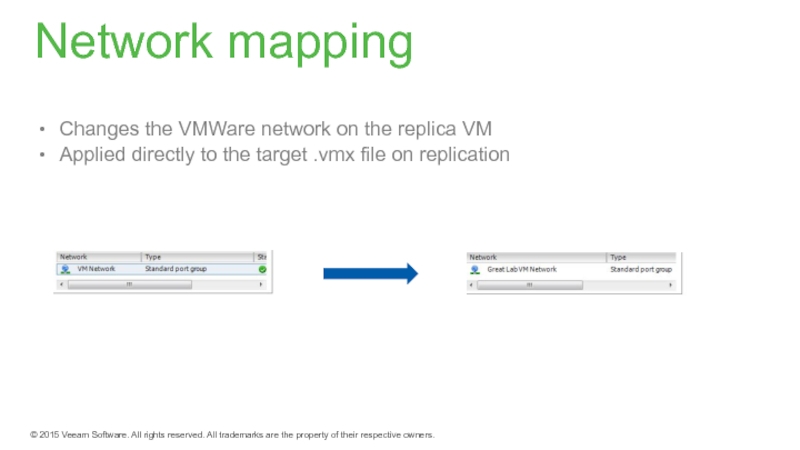
Слайд 5Changes the VMWare network on the replica VM
Applied directly to the
Network mapping
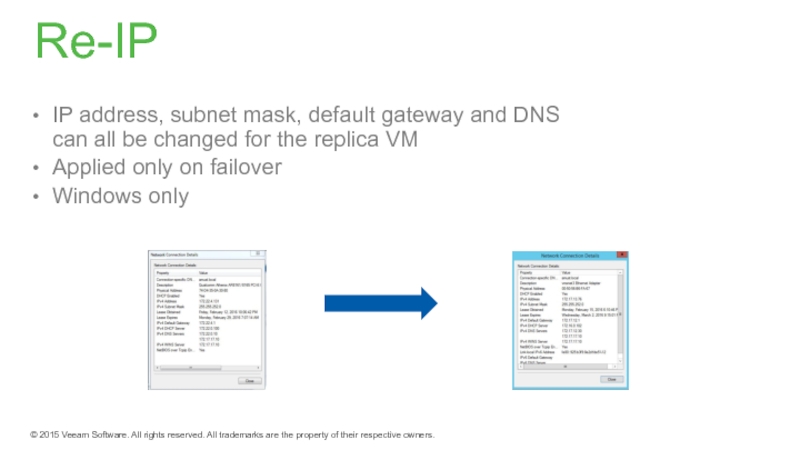
Слайд 6IP address, subnet mask, default gateway and DNS can all be
Applied only on failover
Windows only
Re-IP
Слайд 7Have an existing VM on the target host that is similar
either made from the same template or left from a previous replication job
Point to that VM in the replication job
Veeam will calculate the digests and transfer the different blocks
all existing snapshots on the target VM will be removed first
Replica Mapping
Слайд 8Make a backup locally, on-site
Transfer it to the off-site (e.g. on
Rescan the repository so that Veeam registers the backup files
The backup will appear under Backups > Imported
Use this backup as a seed in the replication job
Once the job starts:
Veeam will restore the VM to the target host from that backup
Veeam will scan and determine the data blocks that are different between production VM and the restored VM (“calculating digests”)
Only the changes are transferred over
Replica seeding
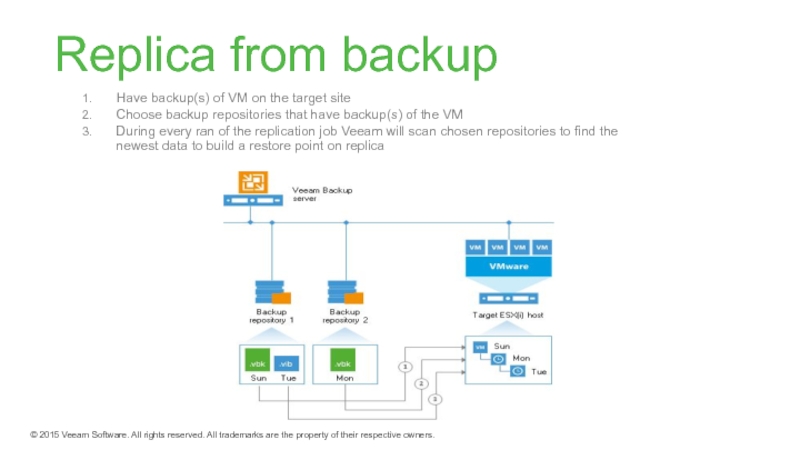
Слайд 9Have backup(s) of VM on the target site
Choose backup repositories that
During every ran of the replication job Veeam will scan chosen repositories to find the newest data to build a restore point on replica
Replica from backup
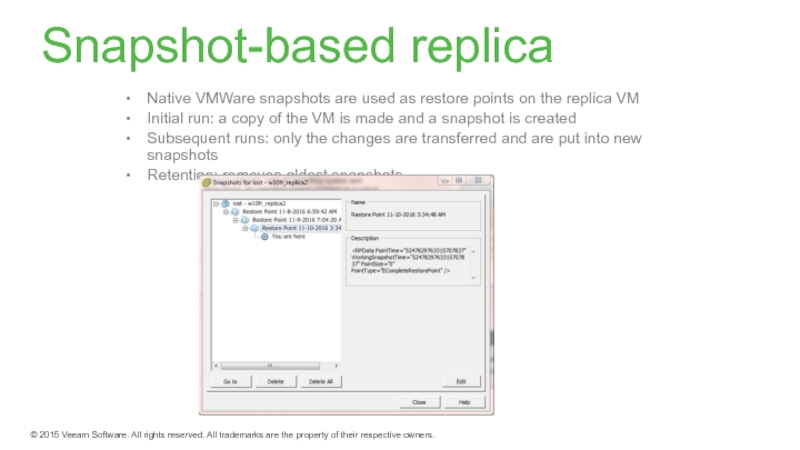
Слайд 10Native VMWare snapshots are used as restore points on the replica
Initial run: a copy of the VM is made and a snapshot is created
Subsequent runs: only the changes are transferred and are put into new snapshots
Retention: removes oldest snapshots
Snapshot-based replica
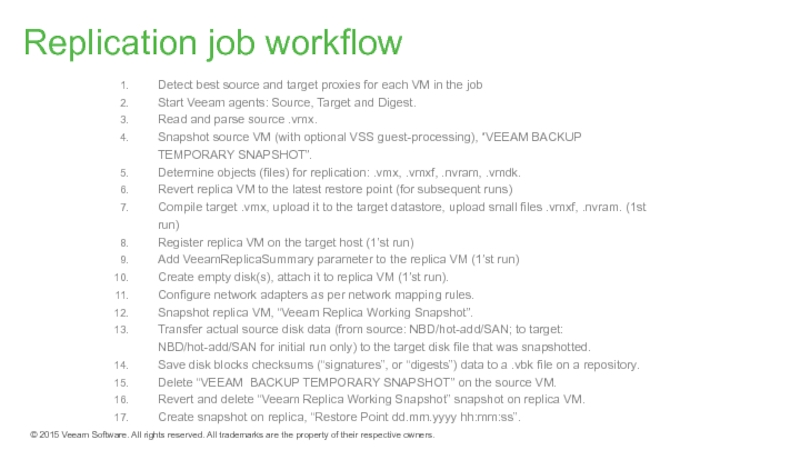
Слайд 11Detect best source and target proxies for each VM in the
Start Veeam agents: Source, Target and Digest.
Read and parse source .vmx.
Snapshot source VM (with optional VSS guest-processing), “VEEAM BACKUP TEMPORARY SNAPSHOT”.
Determine objects (files) for replication: .vmx, .vmxf, .nvram, .vmdk.
Revert replica VM to the latest restore point (for subsequent runs)
Compile target .vmx, upload it to the target datastore, upload small files .vmxf, .nvram. (1st run)
Register replica VM on the target host (1’st run)
Add VeeamReplicaSummary parameter to the replica VM (1’st run)
Create empty disk(s), attach it to replica VM (1’st run).
Configure network adapters as per network mapping rules.
Snapshot replica VM, “Veeam Replica Working Snapshot”.
Transfer actual source disk data (from source: NBD/hot-add/SAN; to target: NBD/hot-add/SAN for initial run only) to the target disk file that was snapshotted.
Save disk blocks checksums (“signatures”, or “digests”) data to a .vbk file on a repository.
Delete “VEEAM BACKUP TEMPORARY SNAPSHOT” on the source VM.
Revert and delete “Veeam Replica Working Snapshot” snapshot on replica VM.
Create snapshot on replica, “Restore Point dd.mm.yyyy hh:mm:ss”.
Replication job workflow
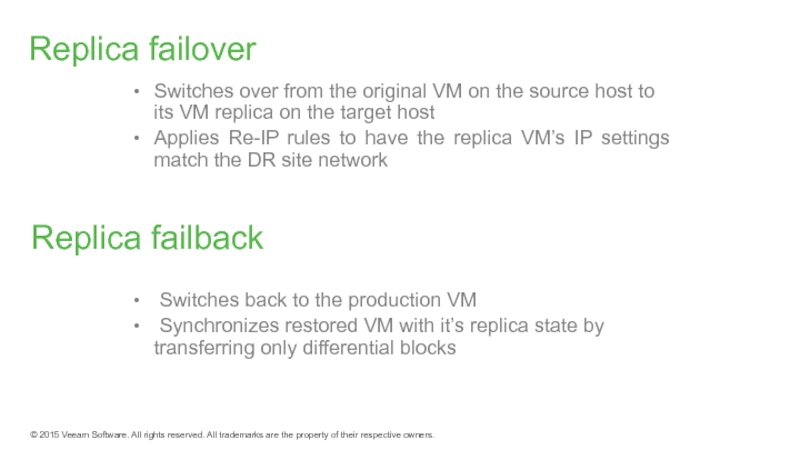
Слайд 13Replica failover
Switches over from the original VM on the source host
Applies Re-IP rules to have the replica VM’s IP settings match the DR site network
Replica failback
Switches back to the production VM
Synchronizes restored VM with it’s replica state by transferring only differential blocks
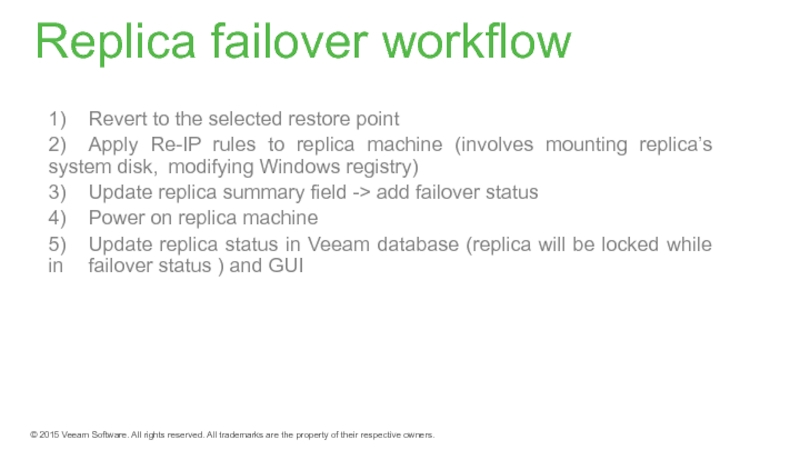
Слайд 141) Revert to the selected restore point
2) Apply Re-IP rules to replica machine
3) Update replica summary field -> add failover status
4) Power on replica machine
5) Update replica status in Veeam database (replica will be locked while in failover status ) and GUI
Replica failover workflow
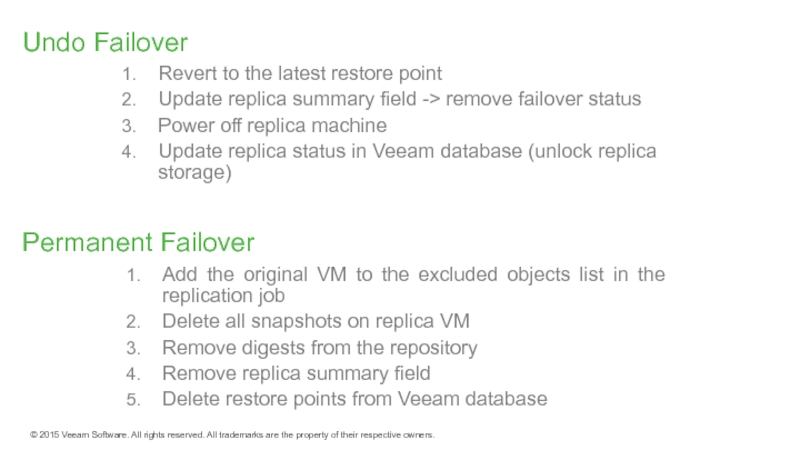
Слайд 15Revert to the latest restore point
Update replica summary field -> remove
Power off replica machine
Update replica status in Veeam database (unlock replica storage)
Undo Failover
Add the original VM to the excluded objects list in the replication job
Delete all snapshots on replica VM
Remove digests from the repository
Remove replica summary field
Delete restore points from Veeam database
Permanent Failover
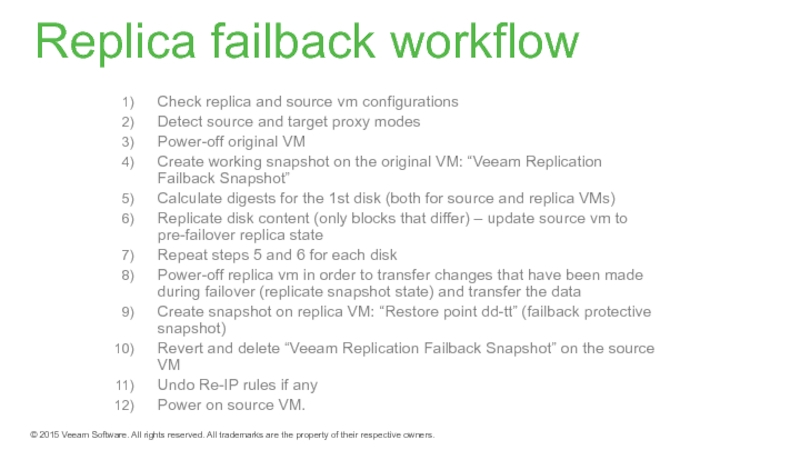
Слайд 16Check replica and source vm configurations
Detect source and target proxy modes
Power-off
Create working snapshot on the original VM: “Veeam Replication Failback Snapshot”
Calculate digests for the 1st disk (both for source and replica VMs)
Replicate disk content (only blocks that differ) – update source vm to pre-failover replica state
Repeat steps 5 and 6 for each disk
Power-off replica vm in order to transfer changes that have been made during failover (replicate snapshot state) and transfer the data
Create snapshot on replica VM: “Restore point dd-tt” (failback protective snapshot)
Revert and delete “Veeam Replication Failback Snapshot” on the source VM
Undo Re-IP rules if any
Power on source VM.
Replica failback workflow
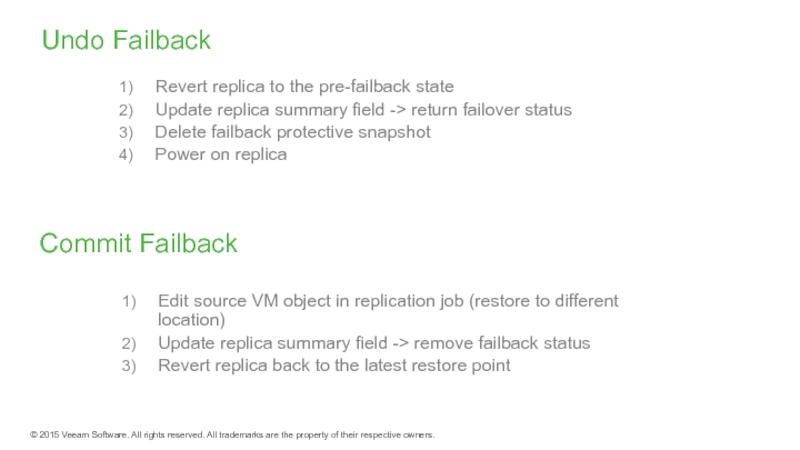
Слайд 17Revert replica to the pre-failback state
Update replica summary field -> return
Delete failback protective snapshot
Power on replica
Undo Failback
Edit source VM object in replication job (restore to different location)
Update replica summary field -> remove failback status
Revert replica back to the latest restore point
Commit Failback
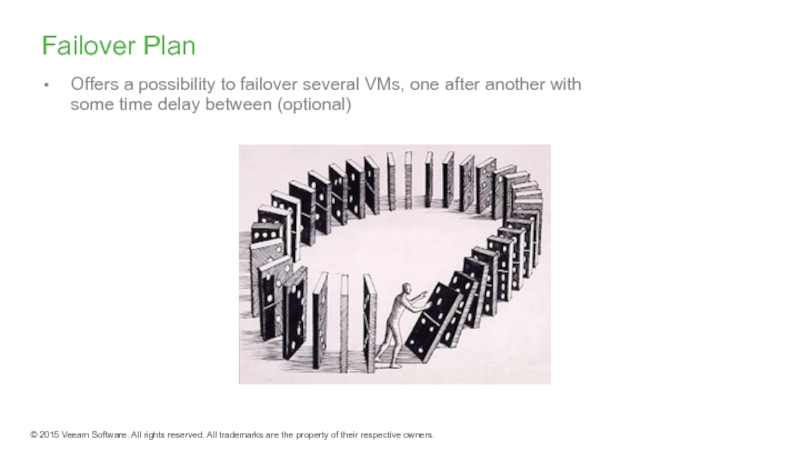
Слайд 18Failover Plan
Offers a possibility to failover several VMs, one after another
Слайд 19Planned Failover
Can be used if you’re planning to turn off your
Planned Failover workflow
Planned failover triggers incremental run of the replication job for the selected VM
The source VM is powered off
Failover from original VM to it’s replica
Replica VM is turned on

