- Главная
- Разное
- Дизайн
- Бизнес и предпринимательство
- Аналитика
- Образование
- Развлечения
- Красота и здоровье
- Финансы
- Государство
- Путешествия
- Спорт
- Недвижимость
- Армия
- Графика
- Культурология
- Еда и кулинария
- Лингвистика
- Английский язык
- Астрономия
- Алгебра
- Биология
- География
- Детские презентации
- Информатика
- История
- Литература
- Маркетинг
- Математика
- Медицина
- Менеджмент
- Музыка
- МХК
- Немецкий язык
- ОБЖ
- Обществознание
- Окружающий мир
- Педагогика
- Русский язык
- Технология
- Физика
- Философия
- Химия
- Шаблоны, картинки для презентаций
- Экология
- Экономика
- Юриспруденция
Crystal Defects and Noncrystalline Structure–Imperfection презентация
Содержание
- 1. Crystal Defects and Noncrystalline Structure–Imperfection
- 2. In our pervious Lecture when discussing Crystals
- 3. Forming a liquid solution of water and
- 4. • Vacancies: -vacant atomic sites in a
- 5. POINT DEFECTS The simplest of the
- 6. Two outcomes if impurity (B) added to
- 7. Solid solution of nickel in copper shown
- 8. Imperfections in Solids Conditions for substitutional solid
- 9. Imperfections in Solids Application of Hume–Rothery rules
- 10. Imperfections in Solids Specification of composition
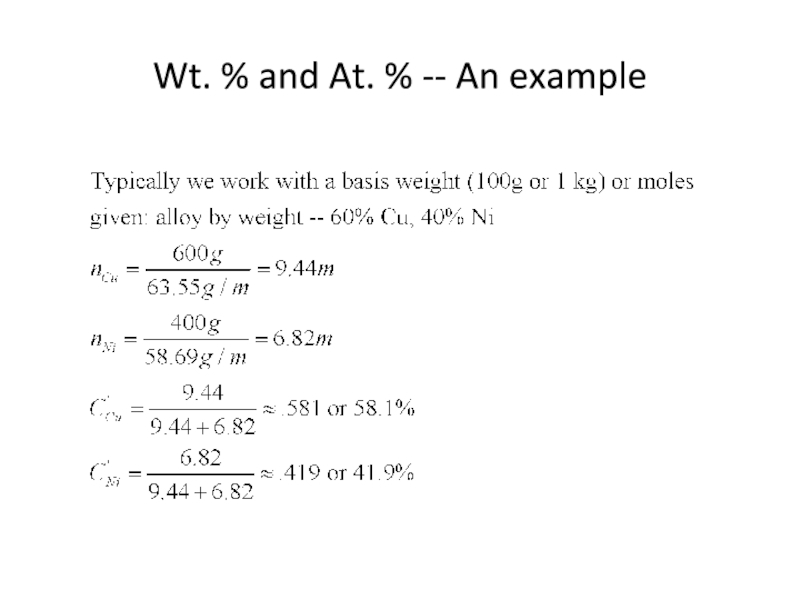
- 11. Wt. % and At. % -- An example
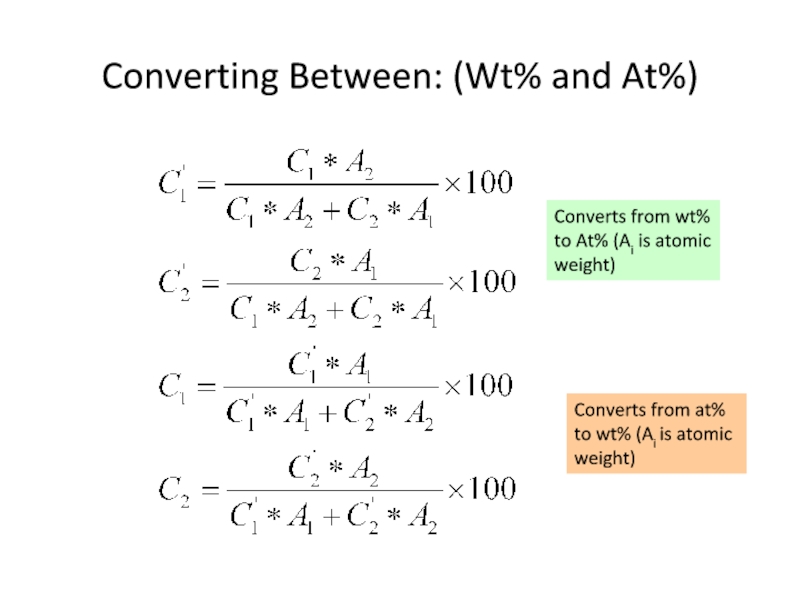
- 12. Converting Between: (Wt% and At%) Converts from
- 13. Interstitial solid solution applies to carbon in
- 14. Random, substitution solid solution can occur in
- 15. A substitution solid solution of Al2O3 in
- 16. Iron oxide, Fe1−xO with x ≈ 0.05,
- 17. • Frenkel Defect --a cation
- 18. And: • slip between crystal planes result
- 19. Linear Defects (Dislocations) Are one-dimensional defects around
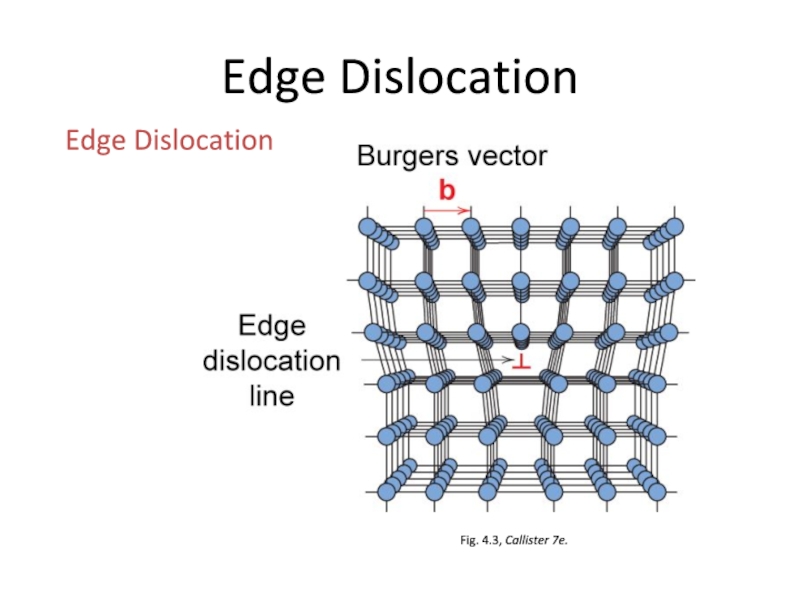
- 20. Edge Dislocation Fig. 4.3, Callister 7e. Edge Dislocation
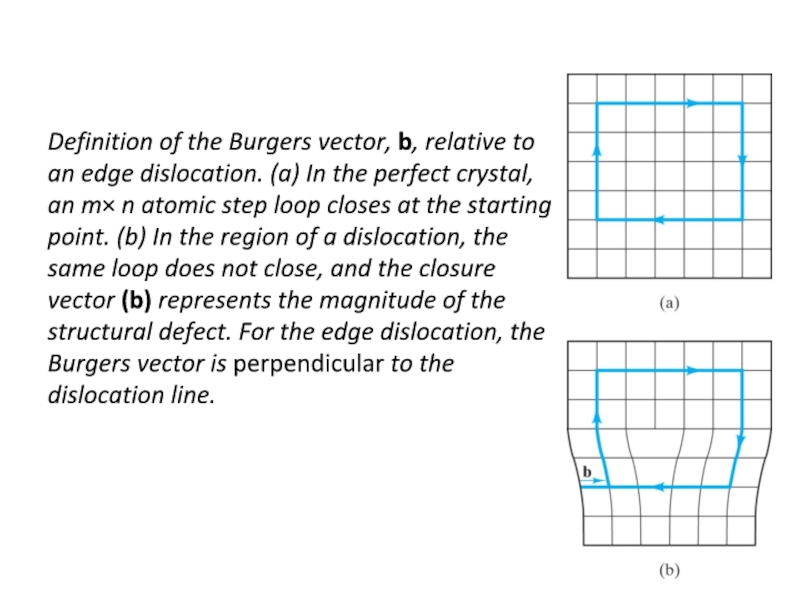
- 21. Definition of the Burgers vector, b, relative
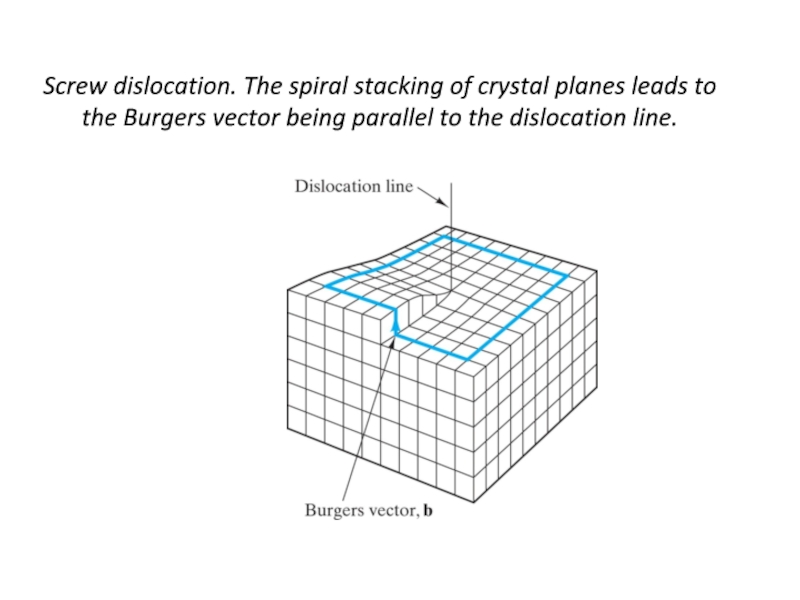
- 22. Screw dislocation. The spiral stacking of crystal
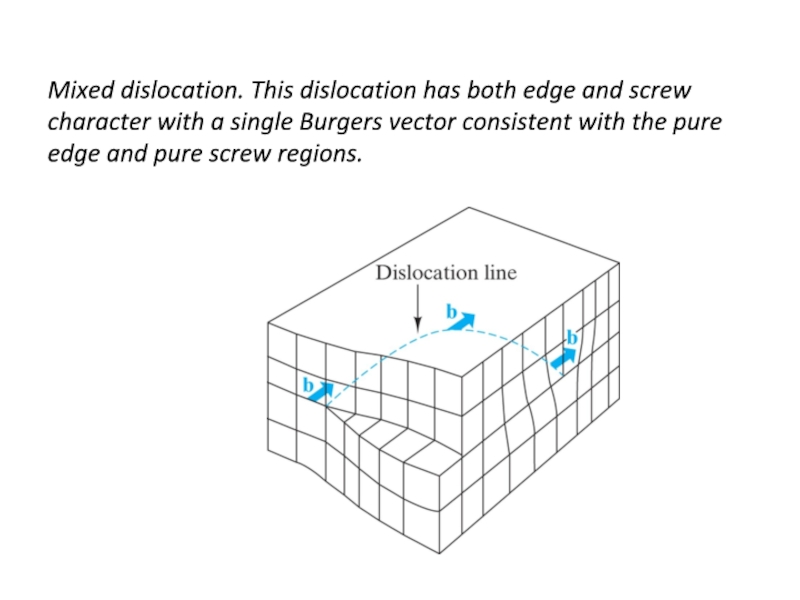
- 23. Mixed dislocation. This dislocation has both edge
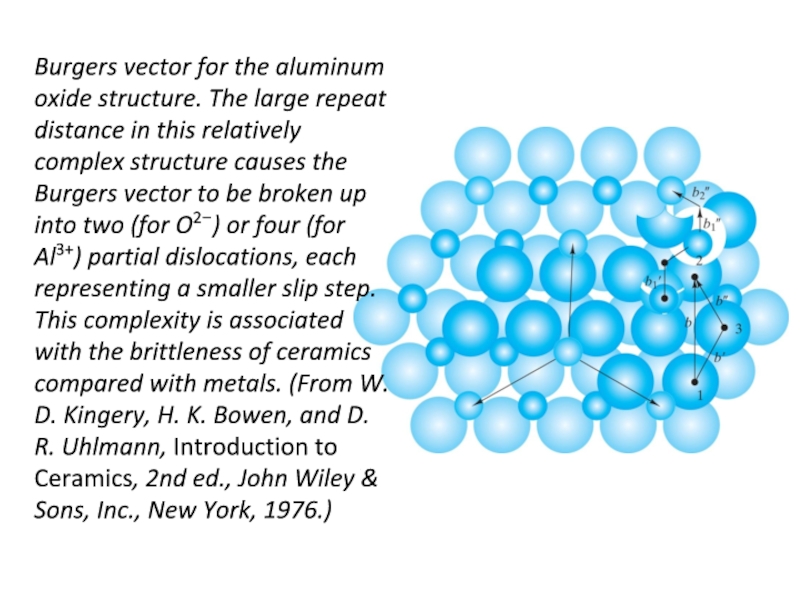
- 24. Burgers vector for the aluminum oxide structure.
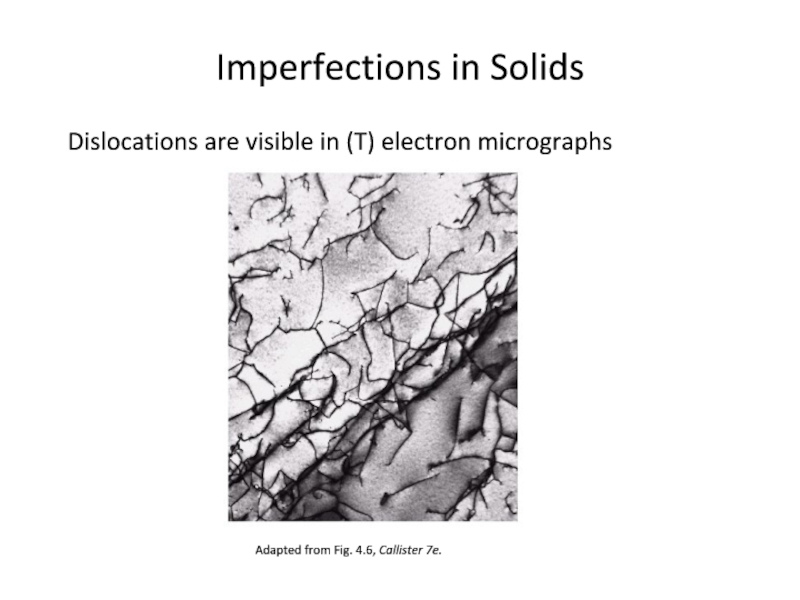
- 25. Imperfections in Solids Dislocations are visible in
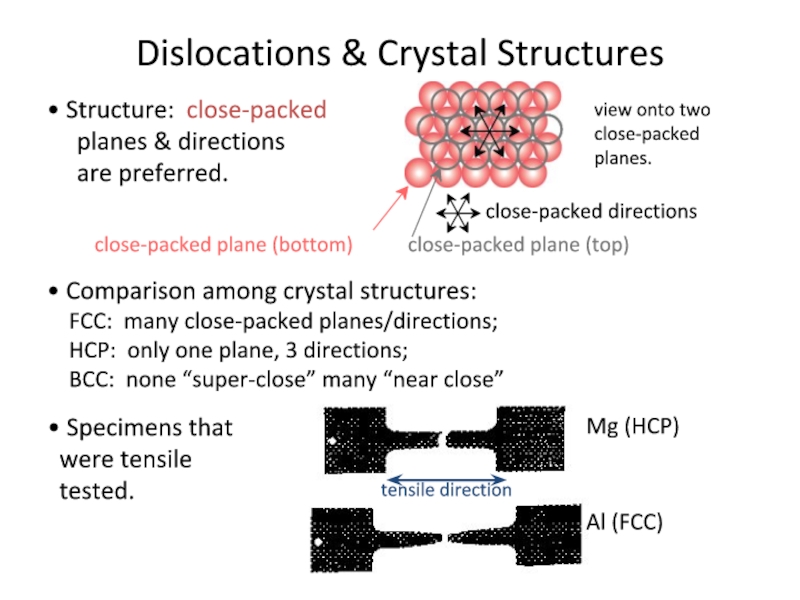
- 26. Dislocations & Crystal Structures • Structure: close-packed
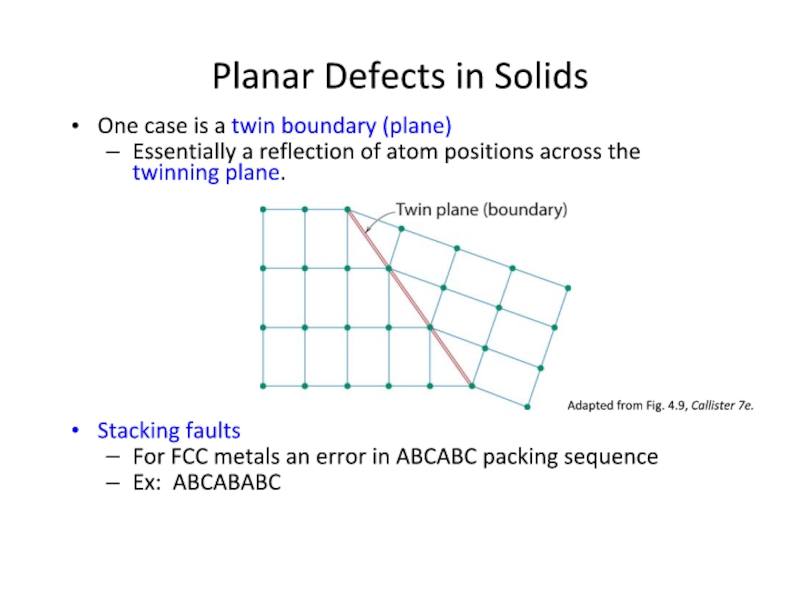
- 27. One case is a twin boundary (plane)
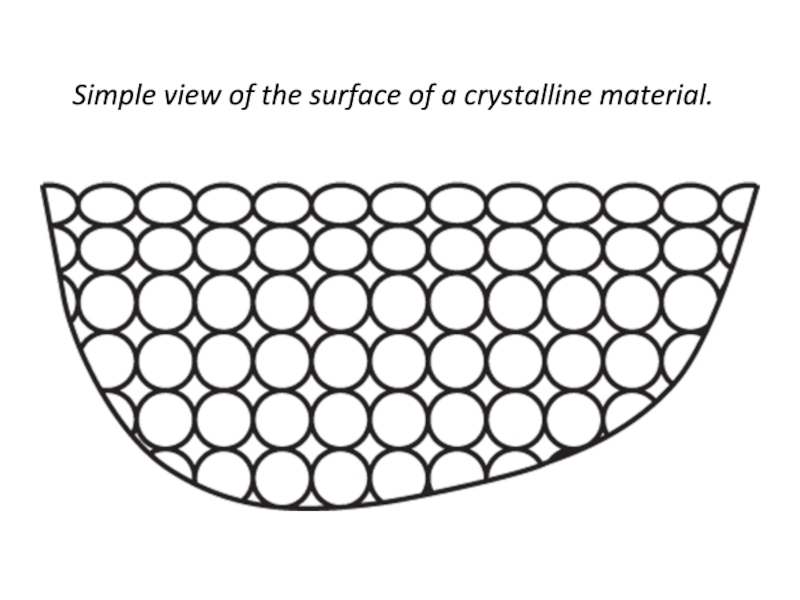
- 28. Simple view of the surface of a crystalline material.
- 29. A more detailed model of the elaborate
- 30. Typical optical micrograph of a grain structure,
- 31. Simple grain-boundary structure. This is termed a
- 32. The ledge Growth leads to structures with
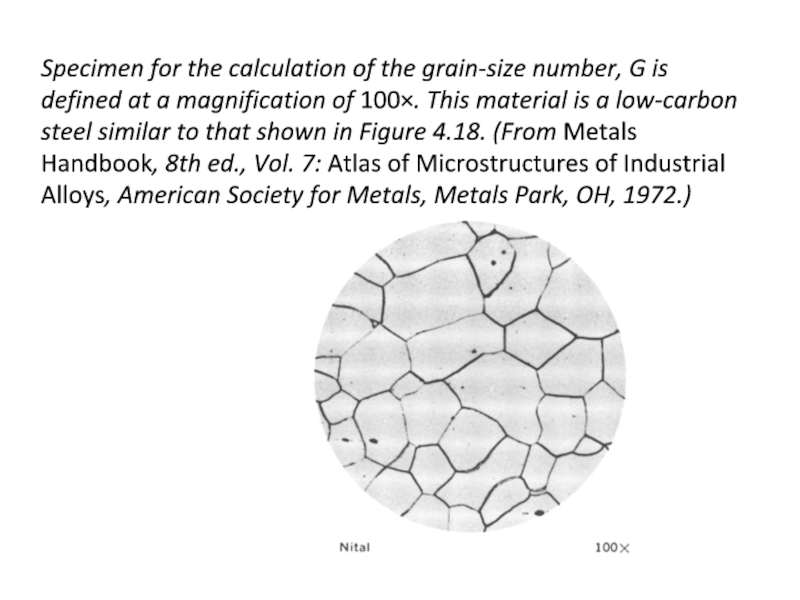
- 33. Specimen for the calculation of the grain-size
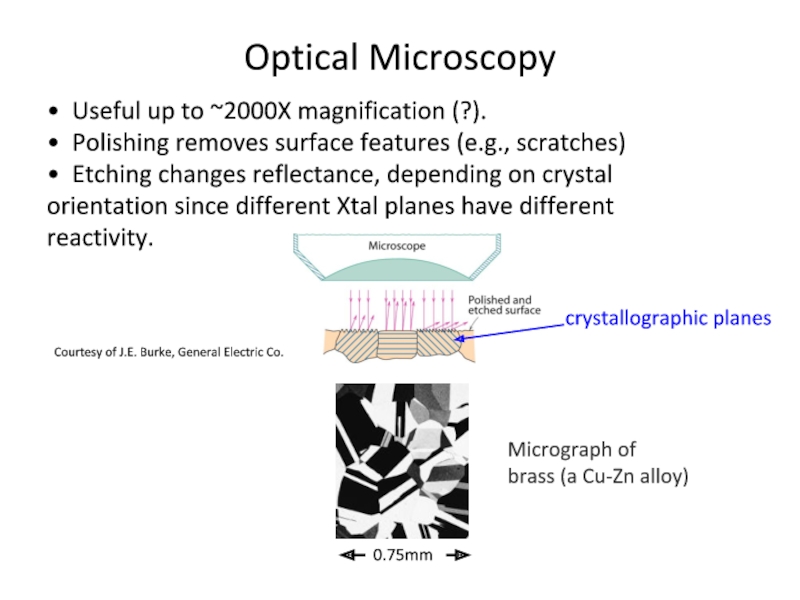
- 34. • Useful up to ~2000X magnification (?).
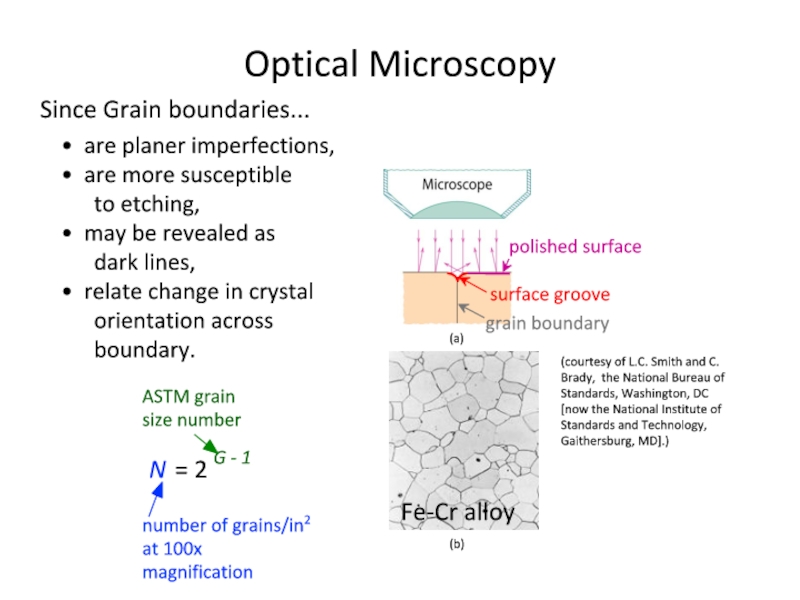
- 35. Since Grain boundaries... • are planer imperfections,
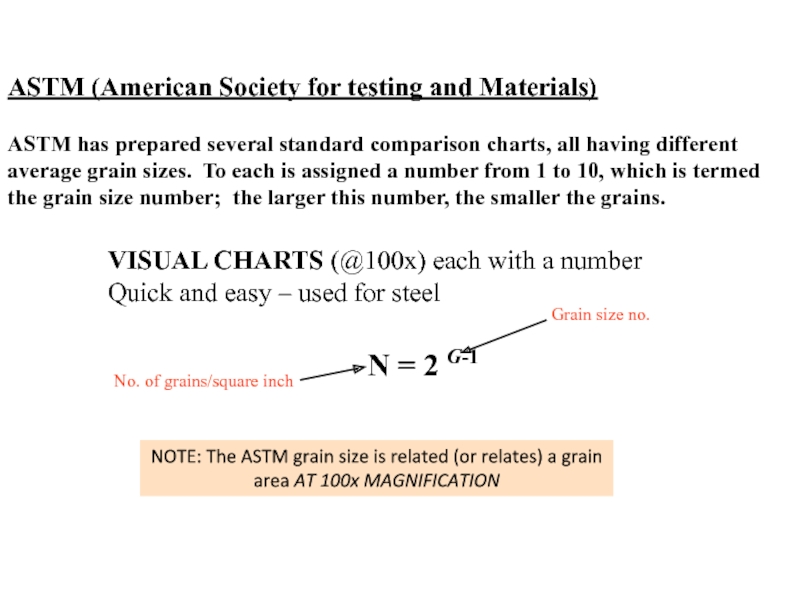
- 36. ASTM (American Society for testing and Materials)
- 37. Determining Grain Size, using a micrograph taken
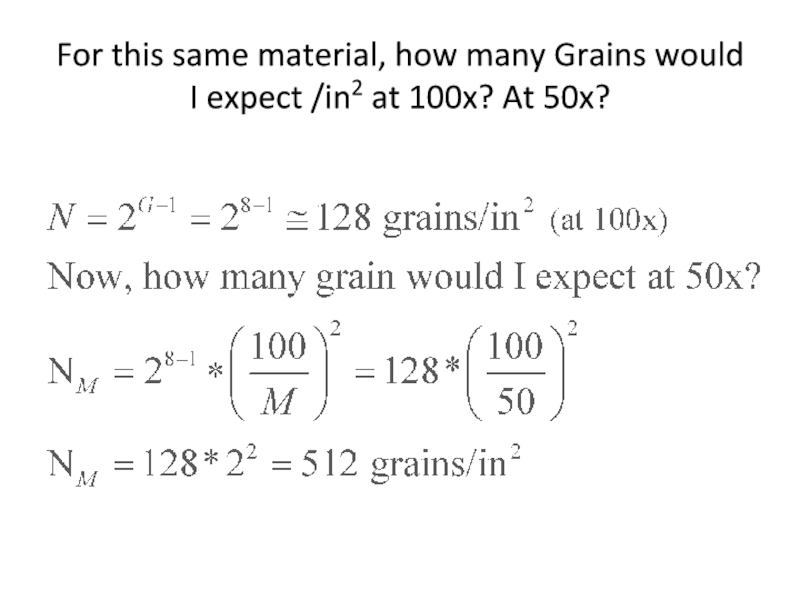
- 38. For this same material, how many Grains would I expect /in2 at 100x? At 50x?
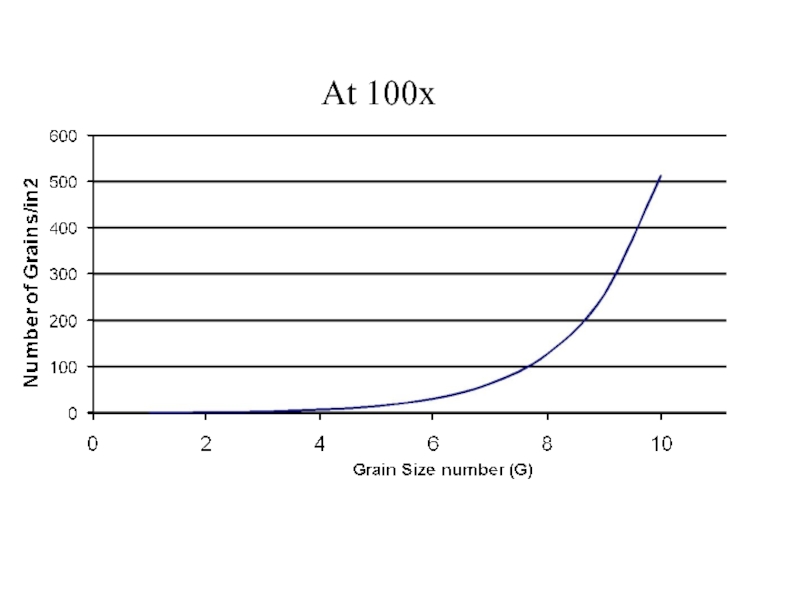
- 39. At 100x
- 40. Two-dimensional schematics give a comparison of (a)
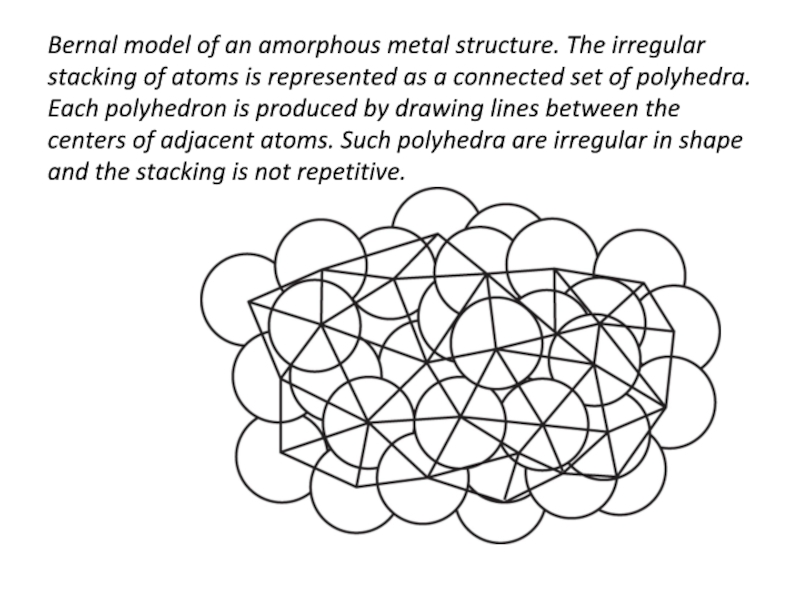
- 41. Bernal model of an amorphous metal structure.
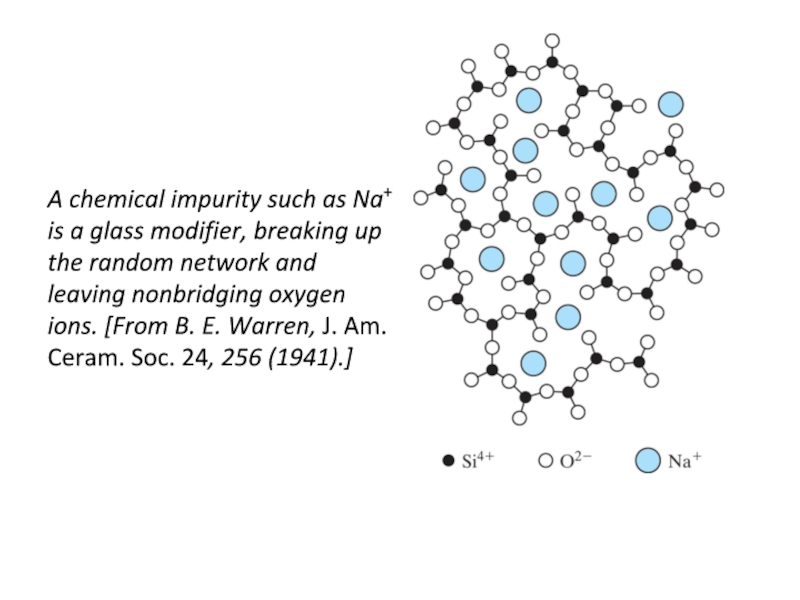
- 42. A chemical impurity such as Na+ is
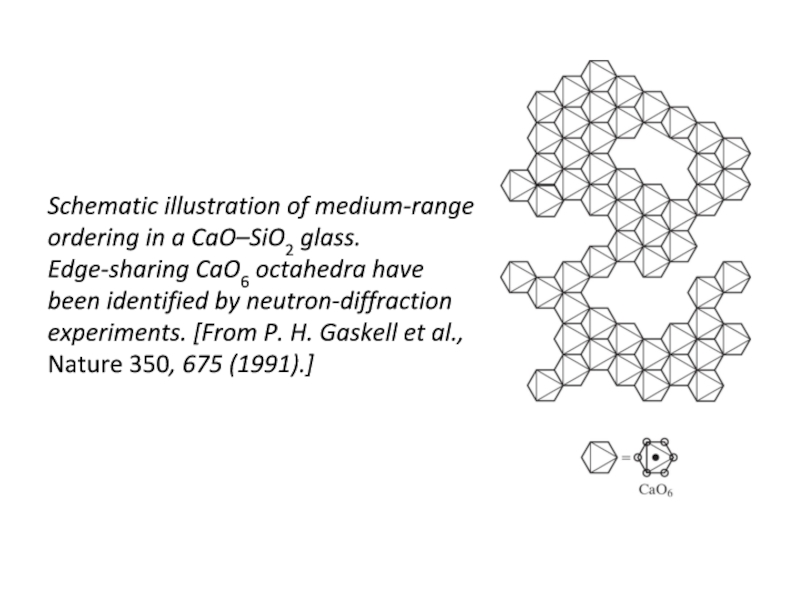
- 43. Schematic illustration of medium-range ordering in a
- 44. Summary Point, Line, Surface and Volumetric defects
Слайд 2In our pervious Lecture when discussing Crystals we
ASSUMED PERFECT ORDER
In
Crystalline Defects or lattice irregularity
Most real materials have one or more “errors in perfection”
with dimensions on the order of an atomic diameter to many lattice sites
Defects can be classification:
1. according to geometry
(point, line or plane)
2. dimensions of the defect
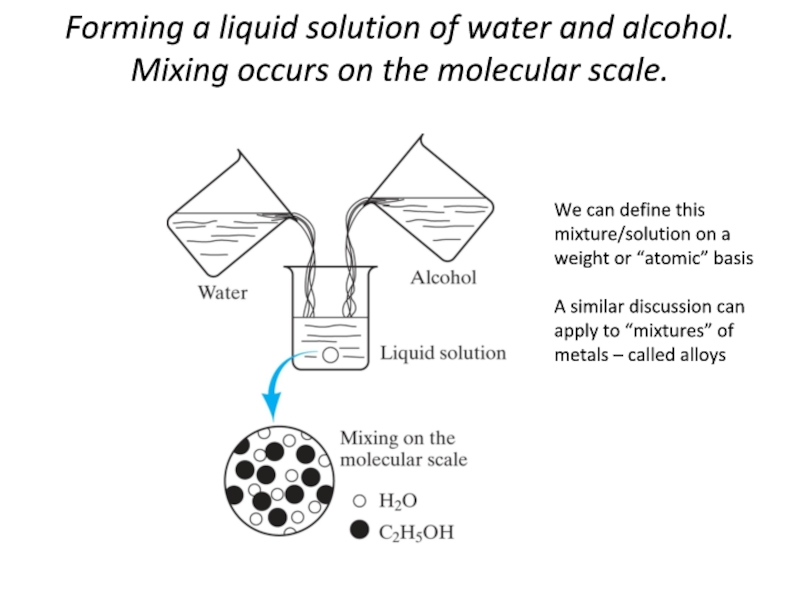
Слайд 3Forming a liquid solution of water and alcohol. Mixing occurs on
We can define this mixture/solution on a weight or “atomic” basis
A similar discussion can apply to “mixtures” of metals – called alloys
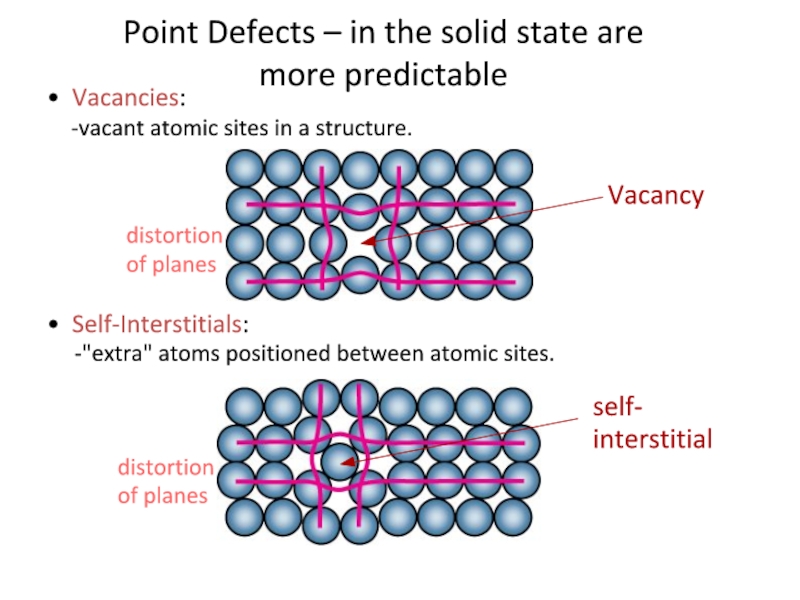
Слайд 4• Vacancies:
-vacant atomic sites in a structure.
• Self-Interstitials:
-"extra" atoms positioned between
Point Defects – in the solid state are more predictable
Слайд 5POINT DEFECTS
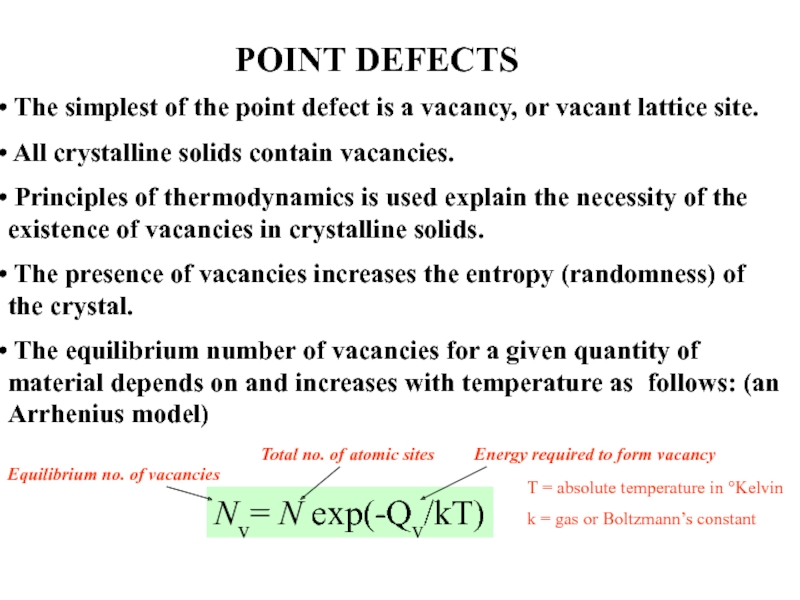
The simplest of the point defect is a vacancy,
All crystalline solids contain vacancies.
Principles of thermodynamics is used explain the necessity of the existence of vacancies in crystalline solids.
The presence of vacancies increases the entropy (randomness) of the crystal.
The equilibrium number of vacancies for a given quantity of material depends on and increases with temperature as follows: (an Arrhenius model)
Nv= N exp(-Qv/kT)
Equilibrium no. of vacancies
Total no. of atomic sites
Energy required to form vacancy
T = absolute temperature in °Kelvin
k = gas or Boltzmann’s constant
Слайд 6Two outcomes if impurity (B) added to host (A):
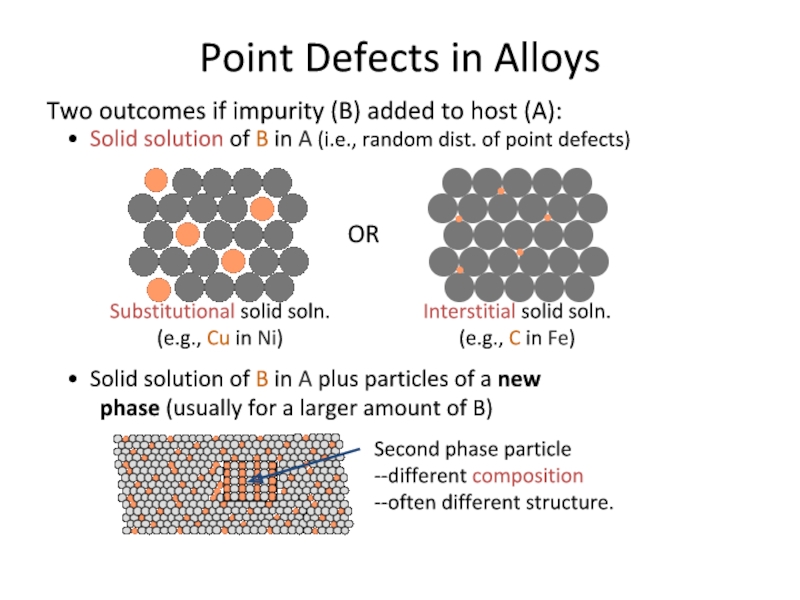
• Solid solution
• Solid solution of B in A plus particles of a new
phase (usually for a larger amount of B)
OR
Substitutional solid soln.
(e.g., Cu in Ni)
Interstitial solid soln.
(e.g., C in Fe)
Second phase particle
--different composition
--often different structure.
Point Defects in Alloys
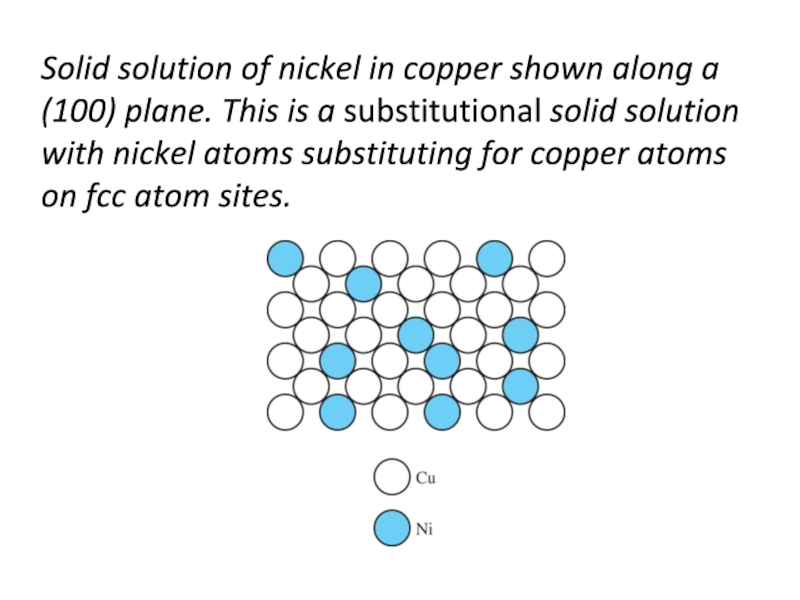
Слайд 7Solid solution of nickel in copper shown along a (100) plane.
Слайд 8Imperfections in Solids
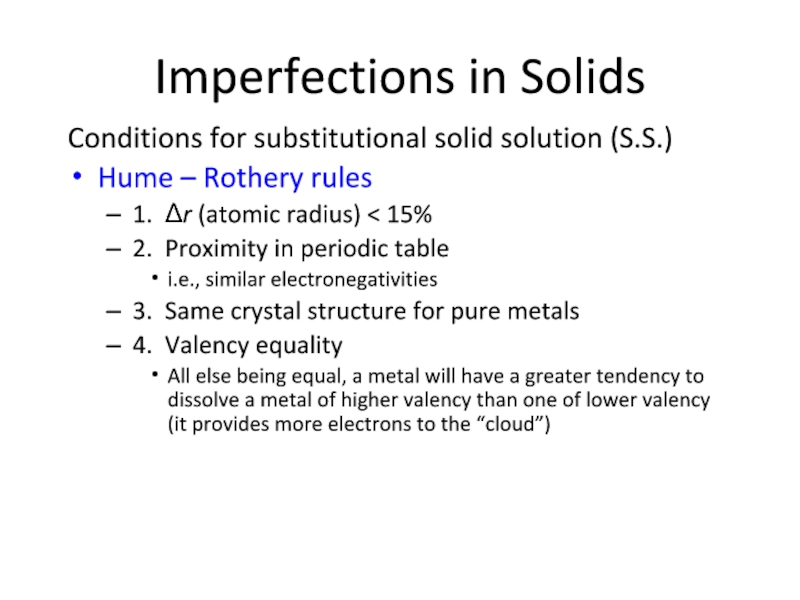
Conditions for substitutional solid solution (S.S.)
Hume – Rothery rules
1.
2. Proximity in periodic table
i.e., similar electronegativities
3. Same crystal structure for pure metals
4. Valency equality
All else being equal, a metal will have a greater tendency to dissolve a metal of higher valency than one of lower valency (it provides more electrons to the “cloud”)
Слайд 9Imperfections in Solids
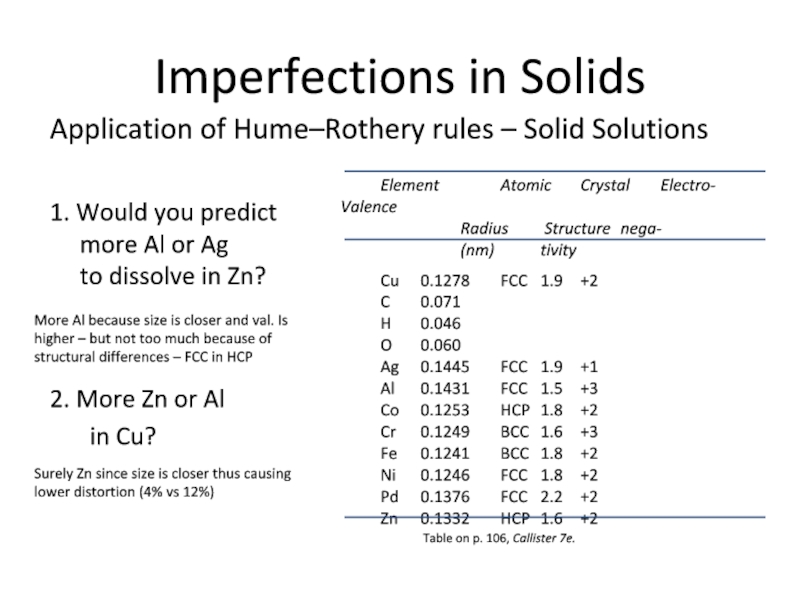
Application of Hume–Rothery rules – Solid Solutions
1. Would you
2. More Zn or Al
in Cu?
Table on p. 106, Callister 7e.
More Al because size is closer and val. Is higher – but not too much because of structural differences – FCC in HCP
Surely Zn since size is closer thus causing lower distortion (4% vs 12%)
Слайд 10Imperfections in Solids
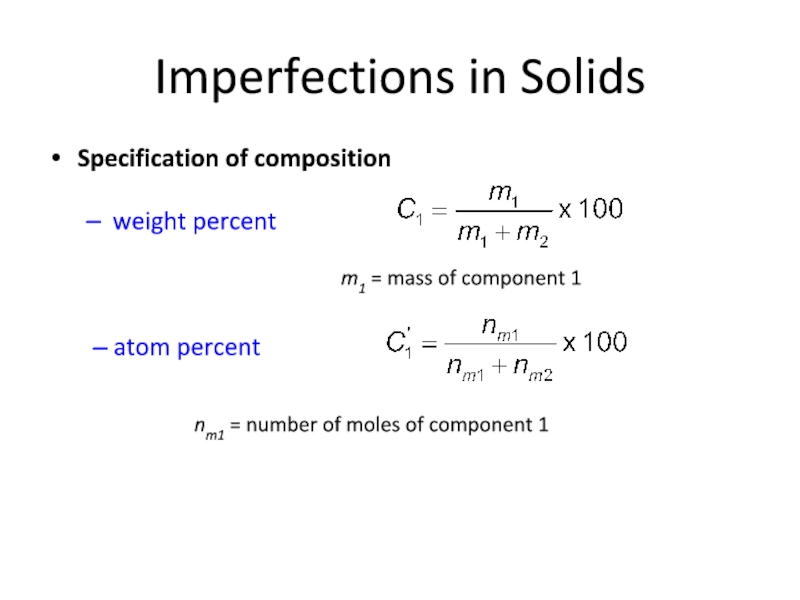
Specification of composition
weight percent
m1 = mass of component 1
nm1
atom percent
Слайд 12Converting Between: (Wt% and At%)
Converts from wt% to At% (Ai is
Converts from at% to wt% (Ai is atomic weight)
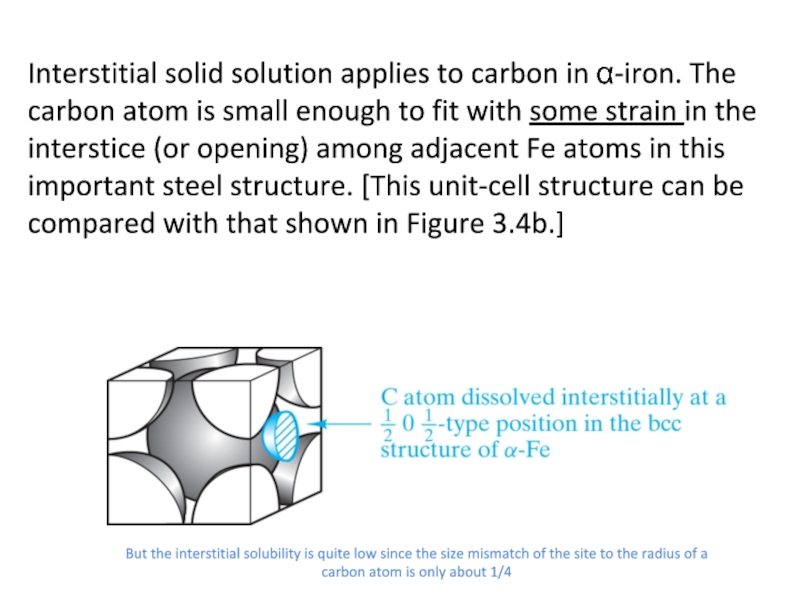
Слайд 13Interstitial solid solution applies to carbon in α-iron. The carbon atom
But the interstitial solubility is quite low since the size mismatch of the site to the radius of a carbon atom is only about 1/4
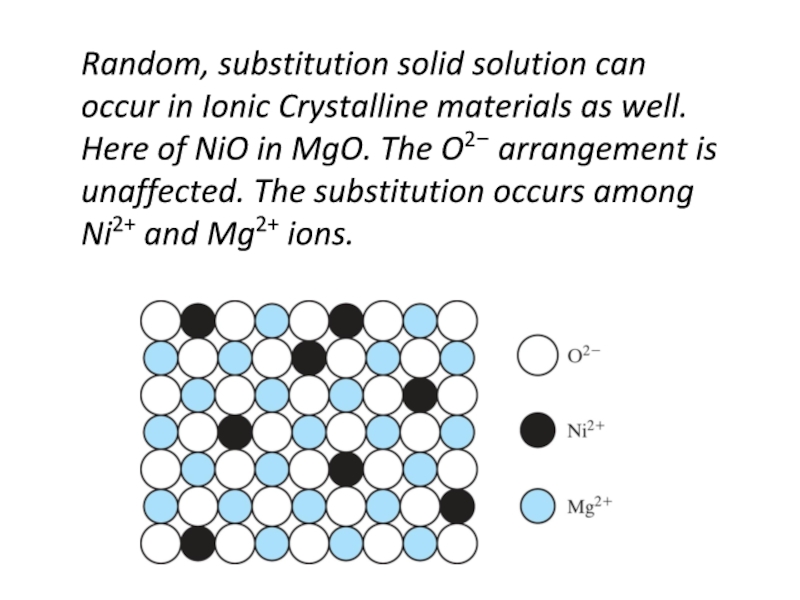
Слайд 14Random, substitution solid solution can occur in Ionic Crystalline materials as
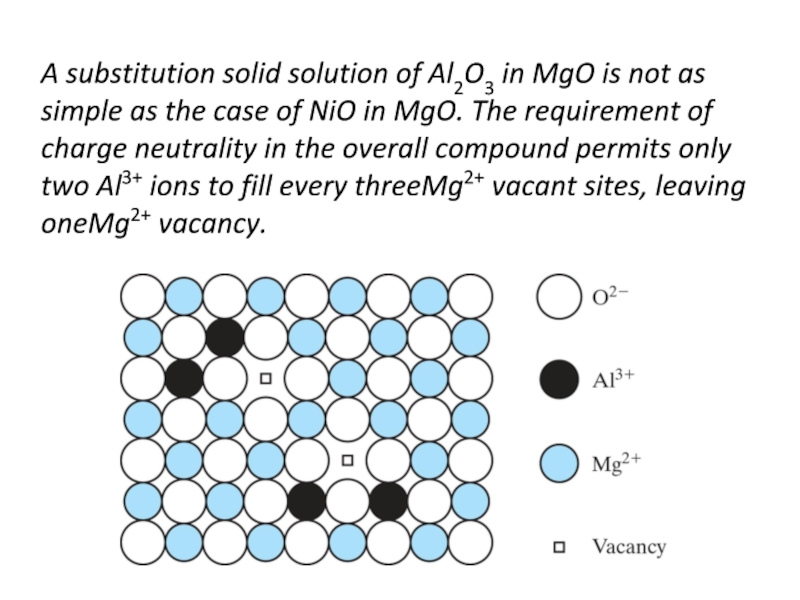
Слайд 15A substitution solid solution of Al2O3 in MgO is not as
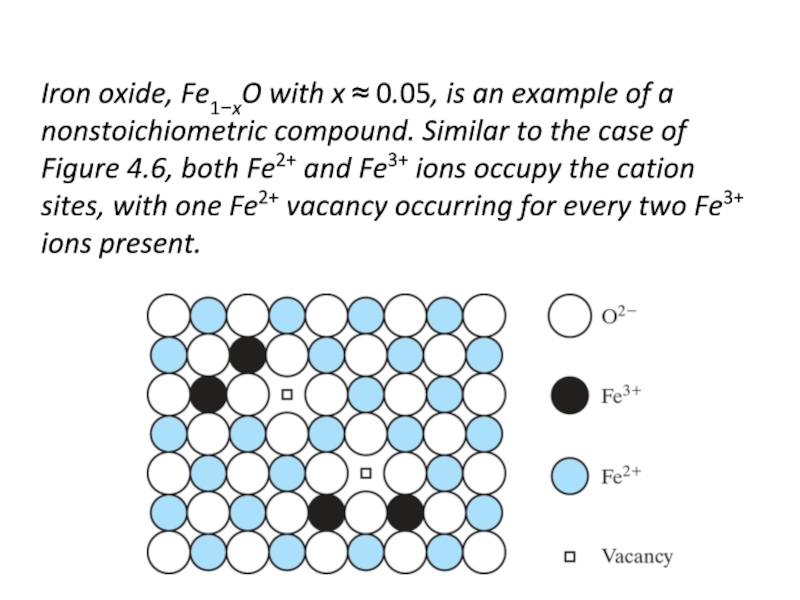
Слайд 16Iron oxide, Fe1−xO with x ≈ 0.05, is an example of
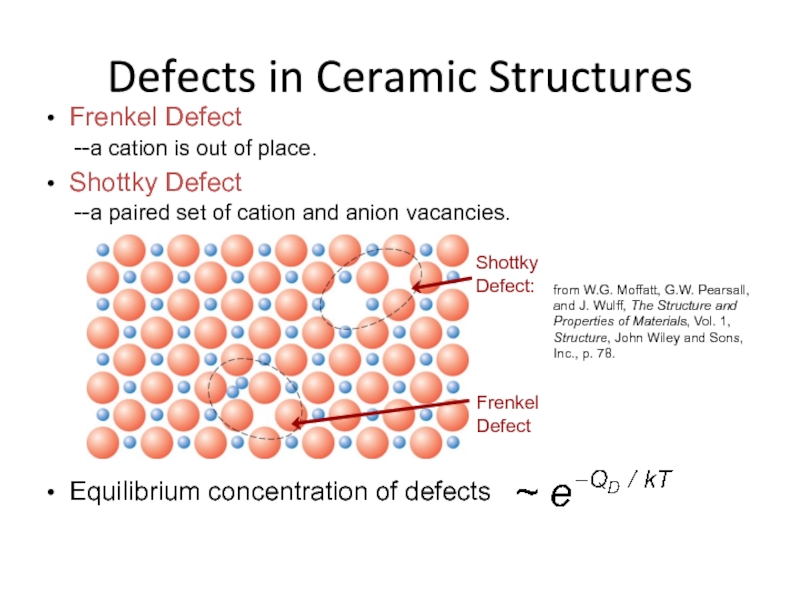
Слайд 17• Frenkel Defect
--a cation is out of place.
• Shottky
--a paired set of cation and anion vacancies.
• Equilibrium concentration of defects
from W.G. Moffatt, G.W. Pearsall, and J. Wulff, The Structure and Properties of Materials, Vol. 1, Structure, John Wiley and Sons, Inc., p. 78.
Defects in Ceramic Structures
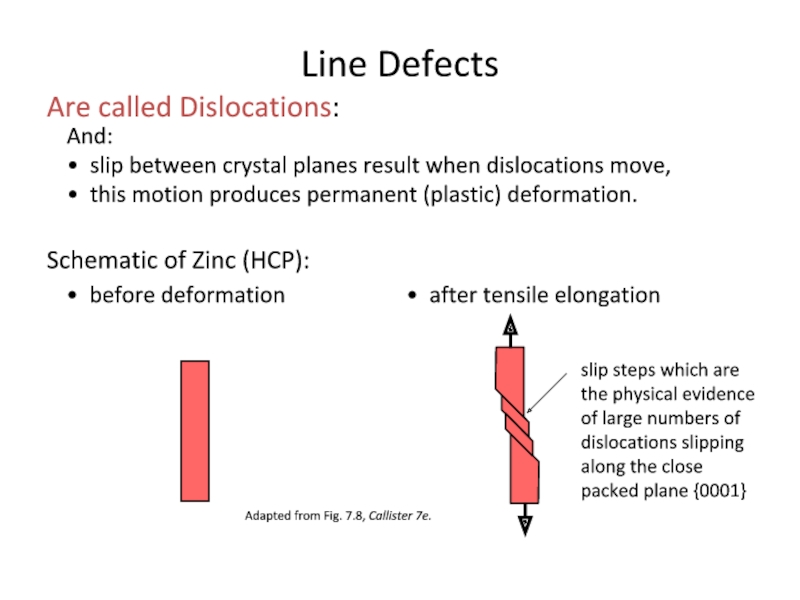
Слайд 18And:
• slip between crystal planes result when dislocations move,
• this motion
Are called Dislocations:
Schematic of Zinc (HCP):
• before deformation
• after tensile elongation
slip steps which are the physical evidence of large numbers of dislocations slipping along the close packed plane {0001}
Line Defects
Adapted from Fig. 7.8, Callister 7e.
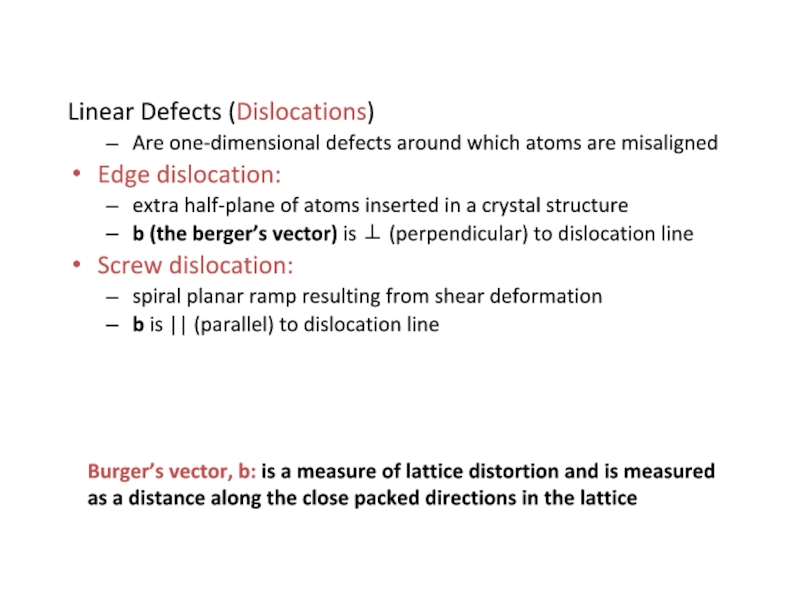
Слайд 19Linear Defects (Dislocations)
Are one-dimensional defects around which atoms are misaligned
Edge dislocation:
extra
b (the berger’s vector) is ⊥ (perpendicular) to dislocation line
Screw dislocation:
spiral planar ramp resulting from shear deformation
b is || (parallel) to dislocation line
Burger’s vector, b: is a measure of lattice distortion and is measured as a distance along the close packed directions in the lattice
Слайд 21Definition of the Burgers vector, b, relative to an edge dislocation.
Слайд 22Screw dislocation. The spiral stacking of crystal planes leads to the
Слайд 23Mixed dislocation. This dislocation has both edge and screw character with
Слайд 24Burgers vector for the aluminum oxide structure. The large repeat distance
Слайд 25Imperfections in Solids
Dislocations are visible in (T) electron micrographs
Adapted from Fig.
Слайд 26Dislocations & Crystal Structures
• Structure: close-packed
planes & directions
view onto two
close-packed
planes.
close-packed plane (bottom)
close-packed plane (top)
close-packed directions
• Comparison among crystal structures:
FCC: many close-packed planes/directions;
HCP: only one plane, 3 directions;
BCC: none “super-close” many “near close”
• Specimens that
were tensile
tested.
Mg (HCP)
Al (FCC)
tensile direction
Слайд 27One case is a twin boundary (plane)
Essentially a reflection of
Stacking faults
For FCC metals an error in ABCABC packing sequence
Ex: ABCABABC
Planar Defects in Solids
Adapted from Fig. 4.9, Callister 7e.
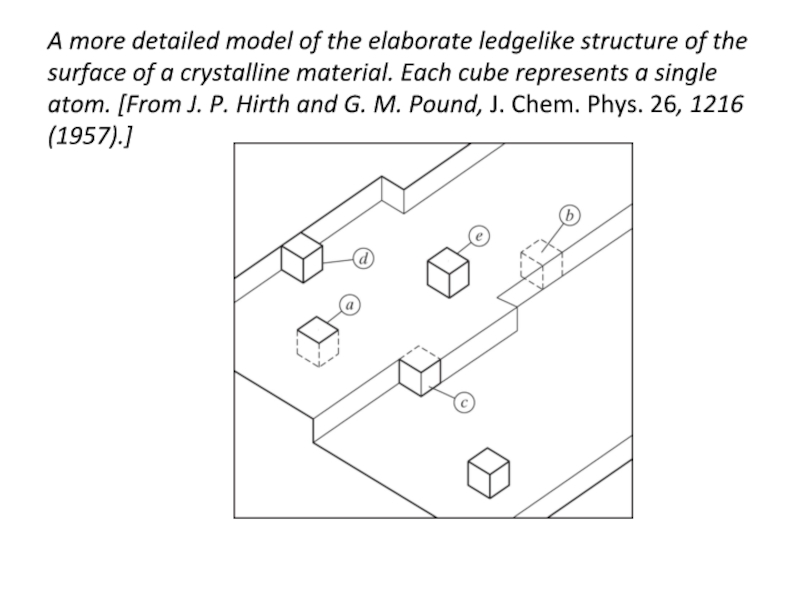
Слайд 29A more detailed model of the elaborate ledgelike structure of the
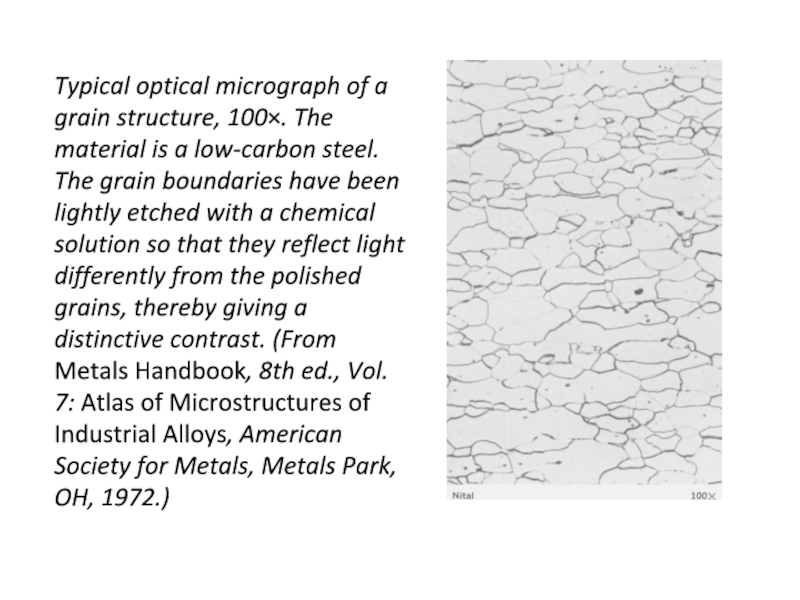
Слайд 30Typical optical micrograph of a grain structure, 100×. The material is
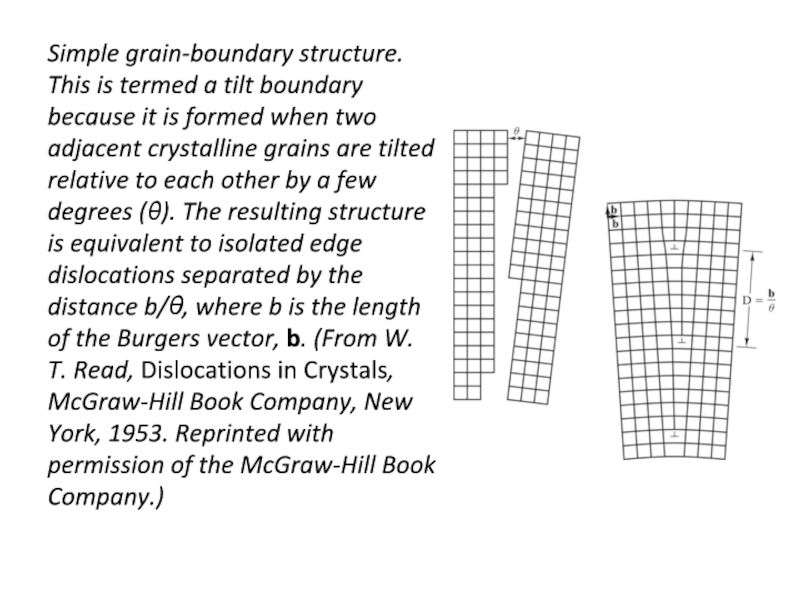
Слайд 31Simple grain-boundary structure. This is termed a tilt boundary because it
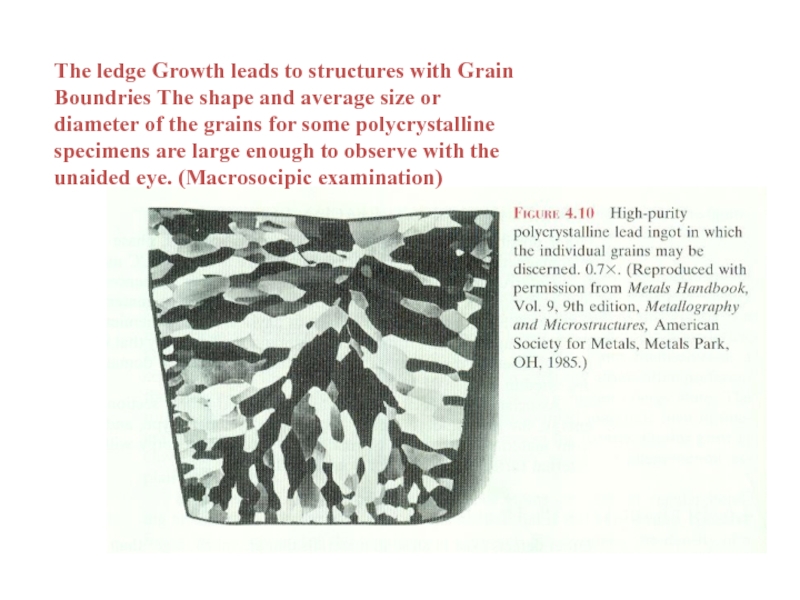
Слайд 32The ledge Growth leads to structures with Grain Boundries The shape
diameter of the grains for some polycrystalline specimens are large enough to observe with the unaided eye. (Macrosocipic examination)
Слайд 33Specimen for the calculation of the grain-size number, G is defined
Слайд 34• Useful up to ~2000X magnification (?).
• Polishing removes surface features
• Etching changes reflectance, depending on crystal orientation since different Xtal planes have different reactivity.
Micrograph of
brass (a Cu-Zn alloy)
Optical Microscopy
Courtesy of J.E. Burke, General Electric Co.
crystallographic planes
Слайд 35Since Grain boundaries...
• are planer imperfections,
• are more susceptible
• may be revealed as
dark lines,
• relate change in crystal
orientation across
boundary.
(courtesy of L.C. Smith and C. Brady, the National Bureau of Standards, Washington, DC [now the National Institute of Standards and Technology, Gaithersburg, MD].)
Optical Microscopy
ASTM grain
size number
N
= 2
G - 1
number of grains/in2
at 100x
magnification
Слайд 36ASTM (American Society for testing and Materials)
VISUAL CHARTS (@100x) each with
Quick and easy – used for steel
ASTM has prepared several standard comparison charts, all having different average grain sizes. To each is assigned a number from 1 to 10, which is termed the grain size number; the larger this number, the smaller the grains.
NOTE: The ASTM grain size is related (or relates) a grain area AT 100x MAGNIFICATION
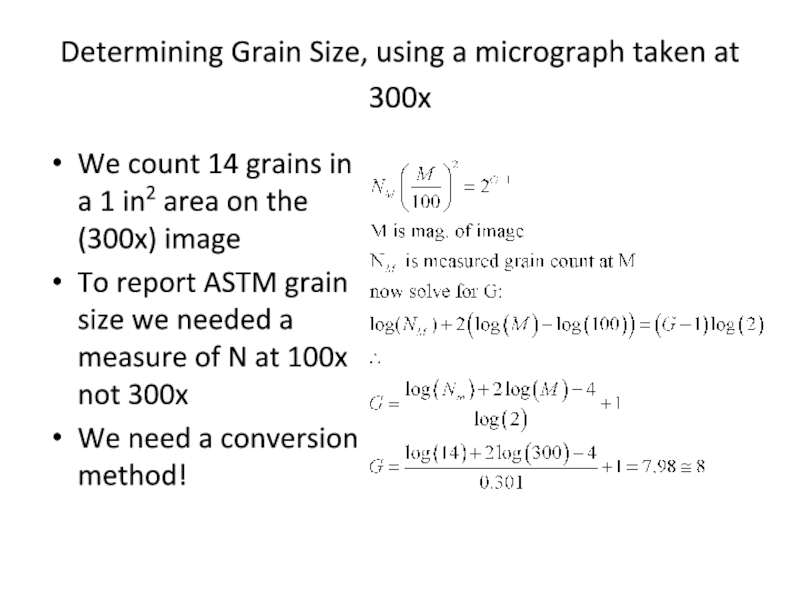
Слайд 37Determining Grain Size, using a micrograph taken at 300x
We count
To report ASTM grain size we needed a measure of N at 100x not 300x
We need a conversion method!
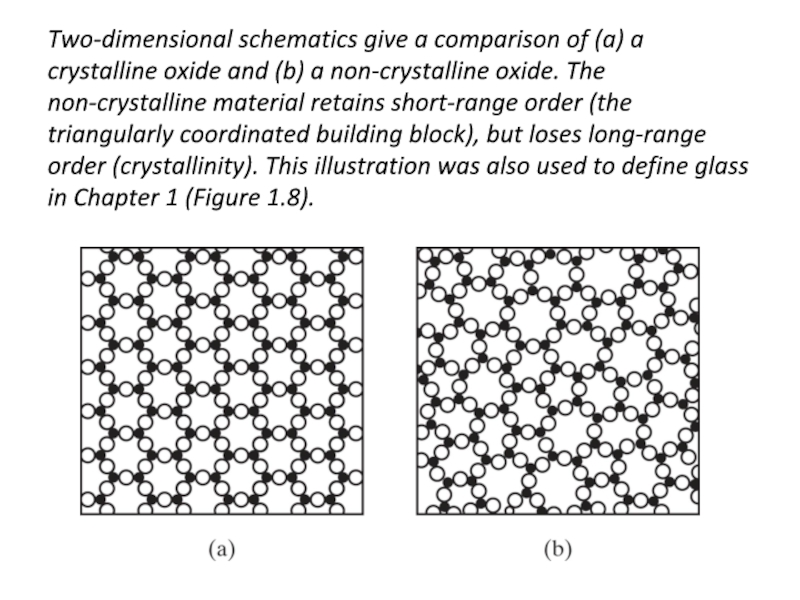
Слайд 40Two-dimensional schematics give a comparison of (a) a crystalline oxide and
Слайд 41Bernal model of an amorphous metal structure. The irregular stacking of
Слайд 42A chemical impurity such as Na+ is a glass modifier, breaking
Слайд 43Schematic illustration of medium-range ordering in a CaO–SiO2 glass. Edge-sharing CaO6
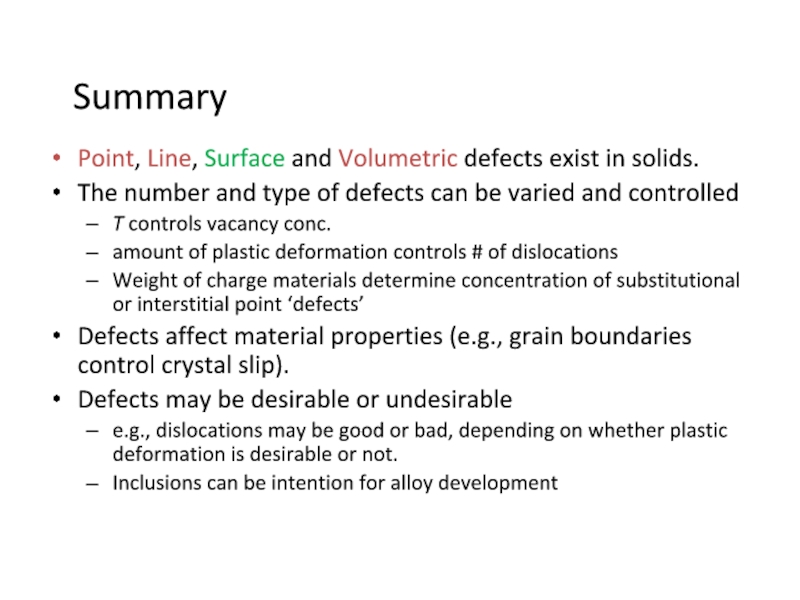
Слайд 44Summary
Point, Line, Surface and Volumetric defects exist in solids.
The number and
T controls vacancy conc.
amount of plastic deformation controls # of dislocations
Weight of charge materials determine concentration of substitutional or interstitial point ‘defects’
Defects affect material properties (e.g., grain boundaries control crystal slip).
Defects may be desirable or undesirable
e.g., dislocations may be good or bad, depending on whether plastic deformation is desirable or not.
Inclusions can be intention for alloy development
